Safely Publish PDF
A Markdown transcript based on the original PDF by the NSA, "How to Safely Publish Word to PDF".
There are a number of pitfalls for the person attempting to sanitize a Word document for release. This paper describes the issue, and gives a step-by-step description of how to do it with confidence that inappropriate material will not be released.
Both the Microsoft Word document format (MS Word) and Adobe Portable Document (PDF) are complex, sophisticated computer data formats. They can contain many kinds of information such as text, graphics, tables, images, meta-data, and more all mixed together. The complexity makes them potential vehicles for exposing information unintentionally, especially when downgrading or sanitizing classified materials. Although the focus is on MS Word, the general guidance applies to other word processors and office tools, such as WordPerfect, PowerPoint, Excel, Star Office, etc.
This document does not address all the issues that can arise when distributing or downgrading original document formats such as MS Word or MS PowerPoint. Using original source formats, such as MS Word, for downgrading can entail exceptional risks; the lengthy and complicated procedures for mitigating such risks are outside the scope of this note.
MS Word is used throughout the DoD and the Intelligence Community (IC) for preparing documents, reports, notes, and other formal and informal materials. Commonly used versions of MS Word include Word 2000, Word XP, and Word 2003. Adobe PDF is used very extensively by all parts of the U.S. Government and military services for disseminating and distributing documents of all kinds. PDF provides excellent fidelity and portability, and allows easy distribution of documents over computer networks and the Internet. PDF files are usually produced using commercial conversion software (so-called “distillers”) that accept source formats such as Postscript or MS Word, and output PDF. PDF is often used as the format for downgraded or sanitized documents.
As numerous people have learned to their chagrin, merely converting an MS Word document to PDF does not remove all metadata automatically. In addition, Adobe Distiller and the PDFMaker Add-in to MS Word (the most common way to convert) convert much of the layering complexity from one format to the next. For example, images placed on top of text in MS Word will be copied verbatim to PDF with the same layout.
When attempting to sanitize a document, analysts commit three common mistakes with MS Word and PDF that lead to most cases of unintentional exposure.
- Redaction of Text and Diagrams - Covering text, charts, tables, or diagrams with black rectangles, or highlighting text in black, is a common and effective means of redaction for hardcopy printed materials. It is not effective, in general, for computer documents distributed across computer networks (i.e. in “softcopy” format). The most common mistake is covering text with black.
- Redaction of Images - Covering up parts of an image with separate graphics such as black rectangles, or making images ‘unreadable’ by reducing their size, has also been used for redaction of hardcopy printed materials. It is generally not effective for computer documents distributed in softcopy form.
- Meta-data and Document Properties - In addition to the visible content of a document, most office tools, such as MS Word, contain substantial hidden information about the document. This information is often as sensitive as the original document, and its presence in downgraded or sanitized documents has historically led to compromise.
Note that many of these mistakes can also occur inadvertently in document composition. For example, sensitive information in an embedded image can be overlaid with another image during format. Such hidden data can be difficult to be spot during manual review of the softcopy.
Microsoft Word XP/2003: Microsoft has attempted to remedy certain issues with Metadata in Office XP and up by including a menu option to remove personal information (metadata). There is also a tool available for free from MS, Remove Hidden Data 1.0 (for XP) and 1.1 (for Office 2003), hereafter referred to as RHD, that allows batch removal information from Word documents. None of these will remove sensitive information from the main document; neither will they remove all metadata of possible concern. And RHD 1.0 suffered from stability issues. Reliance of these tools may give a false sense of security.

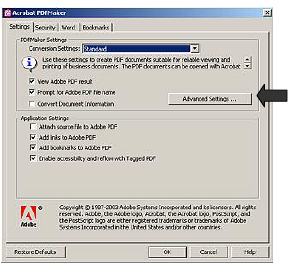
Adobe Acrobat 5.0/6.0: The use of PDF conversion tools on a Word document does guarantee the removal of a great deal of data, such as version information and change tracking. These tools also convert embedded objects such as Excel spreadsheets into images so that only the viewable face of the object remains. Adobe’s conversion tool for within Word, PDFMaker, is an add-in that works in connection with Adobe Distiller. Distiller is a robust PostScript to PDF application whose operation can be modified by Conversion Settings selectable within Distiller or PDFMaker (Select Adobe PDF->Change Conversion Settings->Advanced Settings). Most of these tweak the size and resolution of the resulting PDF. PDFMaker itself has a number of Word-specific settings as shown in Figure A, two of which are relevant to the sanitizer. The checkbox “Convert Document Information” controls the conversion of MS Word metadata to PDF and is checked by default. “Attach source file to Adobe PDF” does just what it suggest: it inserts a copy of the original Word document inside the output file, almost certainly not what was intended by the analyst. It is unchecked by default. Unselecting “Convert Document Information” removes one avenue of metadata leakage, but will not stop the other sources of leakage.
The key concept for understanding the issues that lead to the inadvertent exposure is that information hidden or covered in a computer document can almost always be recovered. The way to avoid exposure is to ensure that sensitive information is not just visually hidden or made illegible, but is actually removed from the original document. Thus any sensitive information must be removed from the document through deletion. The procedures detailed below discuss some of the ways to maintain formatting during the process.
The following steps were tested with MS Word 2000 and Acrobat 5.0 and 6.0. Other recent versions should work similarly. While time-consuming, these steps give the highest confidence that sensitive information is not hidden in the released document. Copying the text and images into a blank document is a good way to manually review a sensitive document, since sections can be copied over one at a time as they are reviewed.
Pictorial Outline of Procedure--

- Open the document and select
File->SaveAsfrom the top menu bar; give the file a new name. Make sure the new name is not itself sensitive. Do all redacting work with the new copy, preserving the original as a backup.
- The Track Changes feature is a toggle. Selecting Tools->Track Changes from the top menu bar toggles the feature on or off. The quickest way to determine if Track Changes is on or off is by looking at the bottom status bar. The letters TRK are dimmed if Track Changes is off and bold if Track Changes is on. Review and
- Select each chart, diagram, image or segment of text to be redacted and delete that item. Delete all comments.
Resizing an image, covering a section with a black box, or changing the color of a font to make it invisible will not work. The item must be deleted. If deleting an item changes the format or structure of the document in an unacceptable way, replace the item with meaningless content of a size that keeps the formatting correct. If the redacted item is text, replace the text with copies of a single character such as all As or all Xs. If the redacted item is an image or a chart, replace the item with a gray rectangle of the same size.
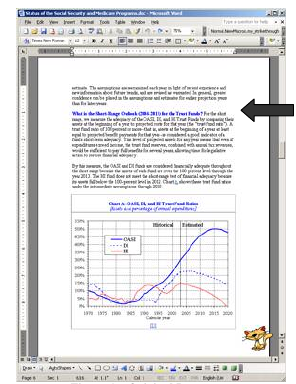
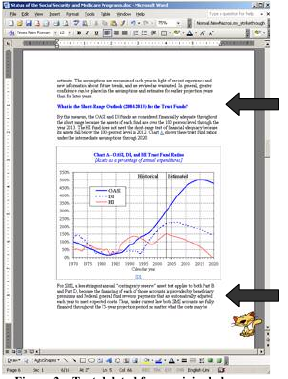
Example: Redacting text. Figure 1 on the right shows a page of a document before redaction. Figure 2 shows the same page after deleting some text (the area marked by the large black arrows at the top of the figures).
Notice that the chart and a paragraph from the next page move up in the document because deleting the text has shifted the subsequent text (the area marked by the large black arrow at the bottom of figure 2).
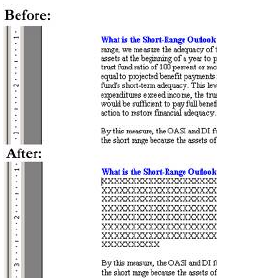
Because of this shift, subsequent pages may need to be reformatted to ensure figures stay with certain text, or that page breaks are in the correct place, or that other such formatting issues do not adversely alter the appearance of the document. This could be time consuming for a large document. If formatting changes are a concern, replace the text with meaningless content of the same size rather than delete it. Figure 3 shows a before and after close-up of the replaced text. Notice that the paragraph following the replaced text did not shift position thus preserving the formatting of the rest of the document.
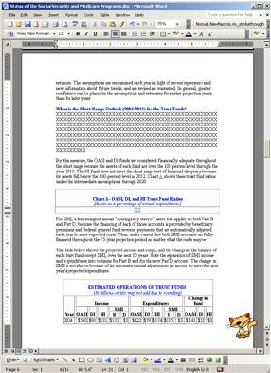
Example: Redacting a chart, image, or other object. Figure 4 shows the page from Figure 1 after redacting some textand deleting the chart. In this case, the chart is an image. Notice that some text and part of a table have shifted onto the page. To preserve the formatting, insert a gray rectangle the same size as the chart (or image) into the vacant space as detailed in the following steps:
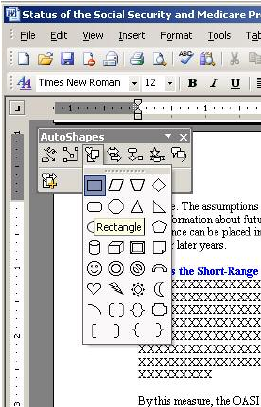
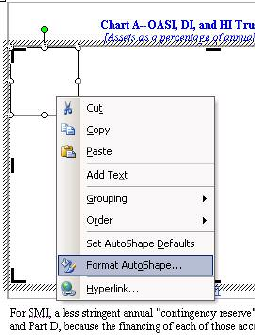
a. Before deleting the image, determine its size: select the image, select Format->Picture from the top menu bar, and then select the Size tab in the Format Picture dialog box. Make a note of the height and width of the image. b. Select the image and delete it. c. Insert a rectangle in the same space: select Insert->Picture->Autoshapes from the top menu bar (this opens the AutoShapes toolbar). Select the rectangle from the Autoshapes toolbar as in Figure 5. Left click the rectangle which creates a drawing canvas. Move the cursor somewhere on the drawing canvas, left click again to drop a rectangle on the canvas. d. resize the rectangle: select rectangle, move it to the upcorner of the drawing canvclick, select Format AutoSfrom the menu as in Figureopens the Format AutoShapbox), select the Size tab, endesired height and width ofrectangle and hit OK.
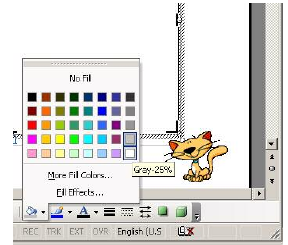
e. Fill the rectangle with gray: selecthe paint bucket on the bottom toolbar which brings up the Fill toolbar shown in Figure 7. Left con one of the gray colors.
f. Figure 8 shows the page after redacting the text and the chart; Notice that the format and page layout of the subsequent text in the document is preserved.

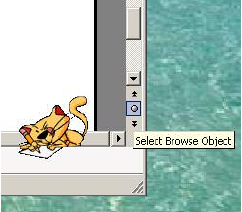
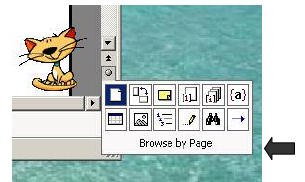
- Carefully read over the document to ensure that all material to be redacted has been deleted and if necessary replaced with innocuous filler. Check all headers, footers, captions, section titles, footnotes, endnotes, labels, etc. Verify that all comments have been deleted. To easily flip through the document, use Word’s “Browse By” feature for some of the different objects. By default, the arrows at the bottom of the right scroll bar browse through the document by page when clicked. To change this, hit the dot at the bottom of the scroll bar that is shown in figure 9. This brings up a toolbar with the “Browse By” options, including Browse By Comment, Browse By Footnote, Browse By Graphic, etc. as shown in figure 10. Select one of the options. Now use the double arrows on top and bottom of the dot to flip through the document to each instance of that type of object. This is a quick way to make sure all comments are deleted, all images have been redacted correctly, all footnotes have been checked, etc.
- Select the entire contents of the document using Edit->Select All from the top menu bar. Copy the selected contents using Edit->Copy from the top menu bar. This will copy the contents, the formatting, the headers and footers and all necessary information into Word’s buffer. Open a new Word document using File->New from the top menu bar. Paste the redacted document contents into this new document using Edit->Paste from the top menu bar. Save the document with a new name using File->SaveAs from the top menu bar. Ensure Adobe PDF settings are correct.

- One reason to convert a Word document to PDF is that the conversion redacts some information or hidden data from the document that is intrinsic to the Word format. However, some PDF software has the ability to automatically copy document meta-data and properties from Word to PDF. This feature, among others, must be disabled when downgrading or sanitizing documents. This section of the paper will describe the most common way to disable the features and convert a document, but other methods are suitable as long as the PDF software is configured to prevent converting anything but the visible contents of the file.
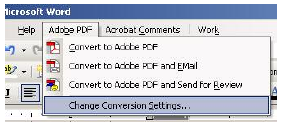
The most common configuration for PDFMaker in Acrobat 6.0 is to run from the menu bar of Word as in Figure 11 (if Adobe PDF is not on the menu bar, see the system administrator). There is also a configuration tool that allows the user to change numerous settings for PDF conversions. This step describes which options must be set for converting redacted Word documents, and these options must be verified for each document conversion.
Select Adobe PDF->Change Conversion Settings from the menu bar as in Figure 12. This opens the Acrobat PDFMaker dialog shown in Figure 13. There are four tabs labeled Settings, Security, Word, and Bookmarks. On the Settings tab, ensure that Convert Document Information and Attach Source File to Adobe PDF are both unchecked as shown in Figure 13. On the Word Tab, shown in the close-up in Figure 14, uncheck Convert Comments to Notes and hit OK.

-
Convert the document to PDF by selecting Adobe PDF ->Convert to Adobe PDF from the menu bar.
-
Lastly, review the output PDF for formatting issues and omissions.
- How to minimize metadata in Office documents – Microsoft, January 28, 2005, available at support.microsoft.com.
- Avoiding Information Compromise When Using Microsoft Word and Adobe Acrobat PDF – NSIRC- Advisory
- Metadata – Are you Protected? – Donna Payne, Payne Consulting Group, Law Technology News, August 2004. Discussion of PDF issues.