Secure Archive UI and RESTful Services using Keycloak
Follow Database configuration. Configure basic LDAP needed for archive. This page guides with new installation of secured version of archive which explains configuration related to Wildfly/Keycloak and additional configuration needed for LDAP. Install Keycloak as authentication server in Standalone Server mode.
Content
NOTE : Below configurations for Wildfly can be done only with archive versions 5.16.1 onwards. QueryDSL JBoss module is no longer supported.
-
Get the latest Java 11, Wildfly-26.0.1.Final, version 16.1.1 of Keycloak Standalone Server and Client Adapter for Wildfly
-
Note the following have been used in the below Configuration steps :
-
$KEYCLOAK_HOME: replace by your unzipped Keycloak Standalone Server location -
$KEYCLOAK_WILDFLY_ADAPTER: replace by your unzipped Keycloak Client Adapter for Wildfly location -
$DCM4CHEE_ARC: replace by your unzipped DCM4CHEE Archive release location. -
$WILDFLY_HOME: replace by your unzipped Wildfly 26.1.1.Final location -
$KEYCLOAK: replace by keycloak and keystores folders -
<ldap-host>: replace with hostname where LDAP shall be started -
389: replace with port where LDAP shall be started (if default port of LDAP389is not used) -
Users DN: replace with value configured during LDAP Installation, if defaultou=users,dc=dcm4che,dc=orgis not used -
Bind DN: replace with value configured during LDAP Installation, if defaultcn=admin,dc=dcm4che,dc=orgis not used -
Bind Credential: replace with value configured during LDAP Installation -
<keycloak-host>: replace with hostname where Keycloak shall be started -
<archive-host>: replace with hostname where archive shall be started -
5.x.x: replace with archive version
-
-
Note, if archive and Keycloak shall be started on the same host, change the values of standard Wildfly ports in Keycloak in
$KEYCLOAK_HOME/standalone/configuration/standalone.xmland$KEYCLOAK_HOME/bin/jboss-cli.xml. -
The following have been used in the below Configuration steps, assuming archive and Keycloak are started on the same host :
-
8843: replace with ports where Keycloak shall be started -
8080,8443,9990,9993: replace with ports where archive shall be started
-
-
Unzip the Keycloak Standalone Server.
-
Unzip the
modules/system/add-onsfrom Keycloak Client Adapter for Wildfly zip into$KEYCLOAK_HOME/modules/system. Unzip also the DCM4CHE libraries as JBoss modules in$KEYCLOAK_HOME/moduleslocation:> cd $KEYCLOAK_HOME > unzip $DCM4CHEE_ARC/jboss-modules/dcm4che-jboss-modules-5.x.x.zip > cp -R $KEYCLOAK_WILDFLY_ADAPTER/modules/system/add-ons $KEYCLOAK_HOME/modules/system -
Copy
ldap.propertiesfrom your release package into Keycloak and keystores into the Keycloak installation in location$KEYCLOAK_HOME/standalone/configuration> cd $KEYCLOAK_HOME/standalone/configuration > mkdir keycloak > cp $DCM4CHEE_ARC/configuration/dcm4chee-arc/ldap.properties keycloak/-
Ensure that one's LDAP specific values
are present in the file
keycloak/ldap.properties.. Replacelocalhostand389inside this properties file with hostname and port where your LDAP is started.
-
Ensure that one's LDAP specific values
are present in the file
-
Copy keystore and truststore files from your release package into Keycloak
> cd $KEYCLOAK_HOME/standalone/configuration > cp -R $DCM4CHEE_ARC/configuration/keystores . -
Start your Keycloak Standalone Server.
> $KEYCLOAK_HOME/bin/standalone.sh [UNIX] > %KEYCLOAK_HOME%\bin\standalone.bat [Windows] -
Start JBoss CLI.
> $KEYCLOAK_HOME/bin/jboss.sh -c [UNIX] > %KEYCLOAK_HOME%\bin\jboss.bat -c [Windows] -
Add following system properties.
[standalone@localhost:9980 /] /system-property=super-user-role:add(value=admin) [standalone@localhost:9980 /] /system-property=org.dcm4che.audit-keycloak.AppName:add(value=keycloak) [standalone@localhost:9980 /] /system-property=keycloak.DeviceName:add(value=keycloak) -
To be able to connect to LDAP over TLS, add following system property in Keycloak configuration
[standalone@localhost:9980 /] /system-property=com.sun.jndi.ldap.object.disableEndpointIdentification:add(value=true) -
If your application setup requires that a user's authentication events shall be logged, configure audit logging by adding Events Listener and corresponding events. The audit logging module in dcm4che library currently supports following audit messages : This is needed since the user's login/logout events are audited as per
-
User Authentication Audit : For user logins / logouts
-
Security Alert Audit : For user's password updates or for super user logins / logouts role makes any changes in Keycloak's admin console.
[standalone@localhost:9980 /] /subsystem=keycloak-server/:list-add(name=providers,index=1,value=module:org.dcm4che.audit-keycloak)
[standalone@localhost:9980 /] /subsystem=keycloak-server/spi=eventsListener:add()
[standalone@localhost:9980 /] /subsystem=keycloak-server/spi=eventsListener/provider=dcm4che-audit:add(enabled=true)
-
-
Add CA certificate present in Keycloak configuration at
$KEYCLOAK_HOME/standalone/configuration/keystores/cacerts.p12to JDK truststoresudo -i keytool -importkeystore -srckeystore /home/vrinda/work/secure/latest/keycloak-16.1.1/standalone/configuration/keystores/cacerts.p12 -srcstorepass secret -destkeystore /usr/lib/jvm/java-13-oracle/lib/security/cacerts -deststorepass changeit exit -
For logins to work with https as well, add the following
[standalone@localhost:9980 /] /subsystem=elytron/key-store=httpsKS:add(credential-reference={clear-text=secret},type=PKCS12,path=/home/vrinda/work/secure/latest/keycloak-16.1.1/standalone/configuration/keystores/key.p12) [standalone@localhost:9980 /] /subsystem=elytron/key-manager=httpsKM:add(algorithm=SunX509,key-store=httpsKS,credential-reference={clear-text=secret}) [standalone@localhost:9980 /] /subsystem=elytron/server-ssl-context=httpsSSC:add(protocols=[TLSv1.2],key-manager=httpsKM) [standalone@localhost:9980 /] /subsystem=undertow/server=default-server/https-listener=https:remove() [standalone@localhost:9980 /] /subsystem=undertow/server=default-server/https-listener=https:add(socket-binding=https,ssl-context=httpsSSC,enable-http2=true) [standalone@localhost:9980 /] /subsystem=keycloak-server/spi=truststore:add() [standalone@localhost:9980 /] /subsystem=keycloak-server/spi=truststore/provider=file:add(enabled=true) [standalone@localhost:9980 /] /subsystem=keycloak-server/spi=truststore/provider=file:map-put(name=properties,key=file,value=/usr/lib/jvm/java-13-oracle/lib/security/cacerts) [standalone@localhost:9980 /] /subsystem=keycloak-server/spi=truststore/provider=file:map-put(name=properties,key=password,value=changeit) [standalone@localhost:9980 /] /subsystem=keycloak-server/spi=truststore/provider=file:map-put(name=properties,key=hostname-verification-policy,value=ANY) [standalone@localhost:9980 /] /subsystem=keycloak-server/spi=truststore/provider=file:map-put(name=properties,key=disabled,value=false) [standalone@localhost:9980 /] /core-service=management/security-realm=ManagementRealm/authentication=ldap:add(connection=ldap,base-dn="ou=users,dc=dcm4che,dc=org",advanced-filter="(&(uid={0})(uid=admin))") [standalone@localhost:9980 /] /core-service=management/management-interface=http-interface:write-attribute(name=ssl-context,value=httpsSSC) [standalone@localhost:9980 /] /core-service=management/management-interface=http-interface:write-attribute(name=secure-socket-binding,value=management-https) [standalone@localhost:9980 /] /core-service=management/ldap-connection=ldap:add(url=ldap://<ldap-host>:389,search-dn="cn=admin,dc=dcm4che,dc=org",search-credential=secret)- Replace the paths for
keystoreandtruststorewith your keystore (in Keycloak configuration) and truststore (of JDK) locations respectively.
- Replace the paths for
-
Login to Keycloak admin console at and create a Keycloak admin user eg.
admin\adminhttps://<keycloak-host>:8843/auth/ -
Go to the
Administration consoleand login with the user you created above. -
Add a new realm and name it as
dcm4che. -
Next create an OIDC client with below values and
Save.Client ID : dcm4chee-arc-ui Root URL : https://<archive-host>:8443/dcm4chee-arc/ui2 -
On the page that follows,
Valid Redirect URIs,Admin URLandWeb Originsare pre-populated. To the existing configuredValid Redirect URIsandWeb Origins, add additional http specific URLs using the+ (Add)andSaveWeb Origins : http://<archive-host>:8080 Valid Redirect URI : http://<archive-host>:8080/dcm4chee-arc/ui2/* -
If audit looging module and events listener was configured in Keycloak as specified in one of the above points, then go to
Events -> Config, adddcm4che-auditin addition to existingjboss-loggingforEvent Listenersfield.- In
Login Events Settings, turnONthe fieldSave Events. In the list ofSaved Types, ensure following six events are saved.- LOGIN
- LOGIN_ERROR
- LOGOUT
- LOGOUT_ERROR
- UPDATE_PASSWORD
- UPDATE_PASSWORD_ERROR
- In
Admin Events Settings, turnONthe fieldSave Events.
- In
-
Next you may choose to manually add roles and users and the map the roles to the users as explained in the following points or use LDAP Configuration add Keycloak User Federation to maintain your users/roles etc and sync the LDAP user changes to Keycloak. The advantage of the latter is that you have the freedom with respect to your users, their passwords and role mappings independent of Keycloak upgrade changes.
-
Below points shall be followed only if you want to manually add roles, users and their respective role mappings.
- Go to
Rolesfrom the left-hand menu and add new roles asadmin,auditlog,ADMINISTRATOR,rootanduser. - Next go to
Usersfrom the left-hand menu and create new users asadmin,rootanduser. You may choose to set Password for these new users by going toCredentialstab. You also have an option to keep this as temporary password or not by selecting the required setting for the fieldTemporary. - Next to assign roles to the users, their
Role Mappingstab. By defaultoffline_accessanduma_authorizationare shown asAssigned Roles. Select both andRemove Selected. This should be done for all users i.e.admin,rootanduser. - For the
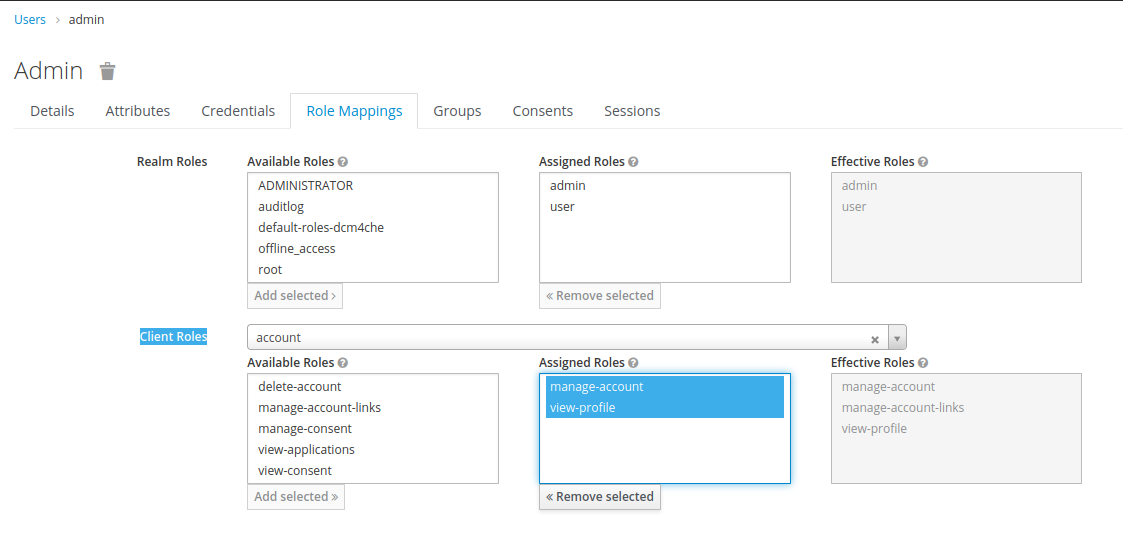
adminuser, selectadminanduserinRealm RolesandAdd Selected. If you want that thisadminuser shall also be considered as a Keycloak Admin User which can perform various actions in the Keycloak Admin console, then selectrealm-managementinClient Rolesdropdown. Select all roles mentioned inAvailable RolesandAdd Selected. - For the
rootuser, selectroot,auditlog,ADMINISTRATORanduserinRealm RolesandAdd Selected. Additionallyrootuser shall also have possibility to perform Keycloak administration functions, therefore selectrealm-managementinClient Rolesdropdown and select all roles mentioned inAvailable RolesandAdd Selected. - For the
useruser, selectuserinRealm RolesandAdd Selected.
- Go to
- Ensure the required ldif files have been imported into the LDAP during the LDAP setup, as specified here
(Note : Replacelocal-adminwithadminindefault-ui-config.ldiffile due to an open unsolved issue) - Stop your Keycloak Standalone Server.
- Import
$DCM4CHEE_ARC/ldap/default-users.ldiffile into LDAP. This file consists of default roles, users names and passwords. It also consists of various realm-management roles assigned to one of the default users admin. - Start your Keycloak Standalone Server.
- Login to Keycloak Administration Console and
Add ProviderasldapinUser Federation. Following fields shall have values as shown below, rest shall be kept unchanged. By default, theConsole Display Nameis shown asldap, which can be changed if required.Edit Mode : WRITABLE Sync Registrations : ON Vendor : Other Connection URL : ldap://<ldap-host>:389 Users DN : ou=users,dc=dcm4che,dc=org Bind DN : cn=admin,dc=dcm4che,dc=org Bind Credential : <rootpw> Validate Password Policy : ON- Use
Test ConnectionandTest Authenticationto test if the connections to LDAP and its authentication are working correctly. -
Savethe settings and useSync LDAP Roles to Keycloak. - To enable assignment of roles, create a
role-ldap-mapperusing theMapperstabandName : role Mapper Type : role-ldap-mapper LDAP Roles DN : ou=users,dc=dcm4che,dc=orgSave. UseSync LDAP Roles to Keycloak. Note : If you configured different valueUsers DNduring LDAP installation, change the above value accordingly. - To enable assignment of
realm-managementroles, create arole-ldap-mapperusing theMapperstabandName : realm-management Mapper Type : role-ldap-mapper Client ID : realm-management LDAP Roles DN : ou=realm-management,dc=dcm4che,dc=org Use Realm Roles Mapping : OFFSave. UseSync LDAP Roles to Keycloak.
- Use
- Verify import of users
admin,user, androotin left-hand menuUserspage. - Verify import of roles
admin,auditlog,ADMINISTRATOR,rootanduserin left-hand menuRolespage. - To verify roles assigned to a particular user, for each of the users in
Userspage go to itsRole Mappingstab and
view the list of roles assigned inRealm Rolesuser. Additionally, selectrealm-managementinClient Rolesto view if any keycloak administration realm management roles are assigned to a particular user.
Note : Due to a known issue in Keycloak starting with version 14.0.0 onwards Keycloak does not automatically assign manage-account and view-profile roles which are part of the account client. You have to manually assign these to the created users. For super user root you may choose to assign additional roles of this client
Note that default-roles-dcm4che Realm role is not required!


For logins with an Identity Provider refer Forward Authorization Requests
One may also protect access to the Wildfly Adminstration Console with Keycloak.
-
Create another OIDC client with
wildfly-consoleasClient ID. Enter values for following fields as shown below, rest shall be kept unchanged.Valid Redirect URIandWeb Originsshall have 2 values which can be added using the+ (Add)option.Root URL : https://<archive-host>:9993/console Admin URL : https://<archive-host>:9993/console Web Origins : http://<archive-host>:9990 : https://<archive-host>:9993 Valid Redirect URI : http://<archive-host>:9990/console https://<archive-host>:9993/console -
Create a role
ADMINISTRATORand a new user and map this role to the new created user. Alternatively, one may reuse the above createdadminuser and map thisADMINISTRATORrole to it. -
After completing archive's Wildfly configuration as described in the next section, secure Wildfly Management Console
-
Unzip the Wildfly and then inside of your wildfly location unzip the Keycloak Client Adapter for Wildfly.
-
Copy configuration files into the WildFly installation:
> cp -r $DCM4CHEE_ARC/configuration $WILDFLY_HOME/standalone [UNIX] > xcopy %DCM4CHEE_ARC%\configuration %WILDFLY_HOME%\standalone\configuration [Windows] (Select D = directory)Note: Beside LDAP Connection configuration
dcm4chee-arc/ldap.properties, the private keykeystores/key.p12and the trusted CA certificatekeystores/cacerts.p12used in TLS connections are not stored in LDAP.Ensure that one's LDAP specific values are present in the file
dcm4chee-arc/ldap.properties. -
The Java EE 8 Full Profile configuration can be used as base configuration. To preserve the original WildFly configuration one may copy the original configuration file for JavaEE 8 Full Profile:
> cd $WILDFLY_HOME/standalone/configuration/ > cp standalone-full.xml dcm4chee-arc.xml -
Install JBoss module containing DCM4CHE libraries, Keycloak admin client and Apache commons.
> cd $WILDFLY_HOME > unzip $DCM4CHEE_ARC/jboss-modules/dcm4che-jboss-modules-5.x.x.zip -
Install JAI Image IO 1.2 libraries as JBoss module (needed for compression/decompression, does not work on Windows 64 bit and Mac OS X caused by missing native components for these platforms):
> cd $WILDFLY_HOME > unzip $DCM4CHEE_ARC/jboss-modules/jai_imageio-jboss-modules-1.2-pre-dr-b04.zip -
Install jclouds 2.2.1 libraries as JBoss modules:
> cd $WILDFLY_HOME > unzip $DCM4CHEE_ARC/jboss-modules/jclouds-jboss-modules-2.2.1-noguava.zip -
Install ecs-object-client 3.0.0 libraries as JBoss modules:
> cd $WILDFLY_HOME > unzip $DCM4CHEE_ARC/jboss-modules/ecs-object-client-jboss-modules-3.0.0.zip -
Except for H2, one has to install the JDBC Driver for the database. DCM4CHEE Archive light 5.x binary distributions do not include a JDBC driver for the database for license issues. One may download it from:
- MySQL
- PostgreSQL
- Firebird
- DB2, also included in DB2 Express-C
- Oracle, also included in Oracle 11g XE)
- Microsoft SQL Server
The JDBC driver can be installed either as a deployment or as a core module. See
Installation as deployment is limited to JDBC 4-compliant driver consisting of one JAR.
For installation as a core module,
$DCM4CHEE_ARC/jboss-modules/jdbc-jboss-modules-1.0.0-<database>.zipalready provides a module definition filemodule.xml. Just extract the ZIP file into $WILDFLY_HOME and copy the JDBC Driver file(s) into the sub-directory, e.g.:> cd $WILDFLY_HOME > unzip $DCM4CHEE_ARC/jboss-modules/jdbc-jboss-modules-1.0.0-db2.zip > cd $DB2_HOME/java > cp db2jcc4.jar db2jcc_license_cu.jar $WILDFLY_HOME/modules/com/ibm/db2/main/Verify, that the actual JDBC Driver file(s) name matches the path(s) in the provided
module.xml, e.g.:<?xml version="1.0" encoding="UTF-8"?> <module xmlns="urn:jboss:module:1.1" name="com.ibm.db2"> <resources> <resource-root path="db2jcc4.jar"/> <resource-root path="db2jcc_license_cu.jar"/> </resources> <dependencies> <module name="javax.api"/> <module name="javax.transaction.api"/> </dependencies> </module> -
Start WildFly in standalone mode with the correct configuration file:
> $WILDFLY_HOME/bin/standalone.sh -c dcm4chee-arc.xml [UNIX]
> %WILDFLY_HOME%\bin\standalone.bat -c dcm4chee-arc.xml [Windows]
Verify, that JBoss started successfully, e.g.:
  =========================================================================

  JBoss Bootstrap Environment

  JBOSS_HOME: /home/vrinda/work/secure/latest/wildfly-26.1.1.Final

  JAVA: /usr/lib/jvm/java-13-oracle/bin/java

  JAVA_OPTS:  -server -Xms64m -Xmx512m -XX:MetaspaceSize=96M -XX:MaxMetaspaceSize=256m -Djava.net.preferIPv4Stack=true -Djboss.modules.system.pkgs=org.jboss.byteman -Djava.awt.headless=true  --add-exports=java.desktop/sun.awt=ALL-UNNAMED --add-exports=java.naming/com.sun.jndi.ldap=ALL-UNNAMED --add-opens=java.base/java.lang=ALL-UNNAMED --add-opens=java.base/java.lang.invoke=ALL-UNNAMED --add-opens=java.base/java.lang.reflect=ALL-UNNAMED --add-opens=java.base/java.io=ALL-UNNAMED --add-opens=java.base/java.security=ALL-UNNAMED --add-opens=java.base/java.util=ALL-UNNAMED --add-opens=java.base/java.util.concurrent=ALL-UNNAMED --add-opens=java.management/javax.management=ALL-UNNAMED --add-opens=java.naming/javax.naming=ALL-UNNAMED -Djava.security.manager=allow

  =========================================================================

  11:06:04,437 INFO  [org.jboss.modules] (main) JBoss Modules version 2.0.2.Final
  11:06:04,815 INFO  [org.jboss.msc] (main) JBoss MSC version 1.4.13.Final
  11:06:04,820 INFO  [org.jboss.threads] (main) JBoss Threads version 2.4.0.Final
  11:06:04,905 INFO  [org.jboss.as] (MSC service thread 1-2) WFLYSRV0049: WildFly Full 26.1.1.Final (WildFly Core 18.1.1.Final) starting
  11:06:05,475 INFO  [org.wildfly.security] (ServerService Thread Pool -- 21) ELY00001: WildFly Elytron version 1.19.0.Final
  :
  11:06:07,269 INFO  [org.jboss.as] (Controller Boot Thread) WFLYSRV0025: WildFly Full 26.1.1.Final (WildFly Core 18.1.1.Final) started in 3094ms - Started 382 of 622 services (348 services are lazy, passive or on-demand) - Server configuration file in use: dcm4chee-arc.xml
Running JBoss in domain mode should work, but was not yet tested.
-
Install the Keycloak Wildfly Adapter
> $WILDFLY_HOME/bin/jboss-cli.sh -c --file=adapter-elytron-install.cli [UNIX] > %WILDFLY_HOME%\bin\jboss-cli.bat -c --file=adapter-elytron-install.cli [Windows] -
Add JDBC Driver into the server configuration using JBoss CLI in a new console window:
> $WILDFLY_HOME/bin/jboss-cli.sh -c [UNIX]
> %WILDFLY_HOME%\bin\jboss-cli.bat -c [Windows]
[standalone@localhost:9990 /] /subsystem=datasources/jdbc-driver=<driver-name>:add(driver-name=<driver-name>,driver-module-name=<module-name>)
One may choose any
<driver-name>for the JDBC Driver,<module-name>must match the name defined in the module definition filemodule.xmlof the JDBC driver, e.g.:[standalone@localhost:9990 /] /subsystem=datasources/jdbc-driver=db2:add(driver-name=db2,driver-module-name=com.ibm.db2) -
Create and enable a new Data Source bound to JNDI name
java:/PacsDSusing JBoss CLI:[standalone@localhost:9990 /] data-source add --name=PacsDS \ > --driver-name=<driver-name> \ > --connection-url=<jdbc-url> \ > --jndi-name=java:/PacsDS \ > --user-name=<user-name> \ > --password=<user-password> [standalone@localhost:9990 /] data-source enable --name=PacsDSThe format of
<jdbc-url>is JDBC Driver specific, e.g.:- H2:
jdbc:h2:<directory-path>/<database-name> - MySQL:
jdbc:mysql://<host>:3306/<database-name>?serverTimezone=<timezone> - PostgreSQL:
jdbc:postgresql://<host>:5432/<database-name> - Firebird:
jdbc:firebirdsql:<host>/3050:<database-name> - DB2:
jdbc:db2://<host>:50000/<database-name> - Oracle:
jdbc:oracle:thin:@<host>:1521:<database-name> - Microsoft SQL Server:
jdbc:sqlserver://<host>:1433;databaseName=<database-name>
There is also a CLI script
$DCM4CHEE_ARC/cli/add-data-source-<db>.cliprovided, which just applies the two commands to add the JDBC driver and creating the Data Source. Replace<host>,<database-name>,<timezone>(one may get this value from the system's timezone file),<user-name>and<user-password>by their actual values before executing it:> $WILDFLY_HOME/bin/jboss-cli.sh -c --file=$DCM4CHEE_ARC/cli/add-data-source-<db>.cli - H2:
-
If one is using H2 as database, create tables and indexes using the H2 Console:
- Download the H2 Console WAR file from https://github.com/sgilda/wildfly-quickstart/tree/master/h2-console
- Deploy it using JBoss CLI, e.g.:
[standalone@localhost:9990 /] deploy ~/Downloads/h2-console.war - Access the console at
http://<archive-host>:8080/h2consoleand login withJDBC URL,User nameundPasswordmatching the values passed to abovedata-source add --name=PacsDS. - Create tables and indexes:
RUNSCRIPT FROM '$DCM4CHEE_ARC/sql/create-h2.sql'
-
Only upto archive version 5.23.3, create JMS Queues using JBoss CLI:
[standalone@localhost:9990 /] jms-queue add --queue-address=StgCmtSCP --entries=java:/jms/queue/StgCmtSCP
[standalone@localhost:9990 /] jms-queue add --queue-address=StgCmtSCU --entries=java:/jms/queue/StgCmtSCU
[standalone@localhost:9990 /] jms-queue add --queue-address=MPPSSCU --entries=java:/jms/queue/MPPSSCU
[standalone@localhost:9990 /] jms-queue add --queue-address=IANSCU --entries=java:/jms/queue/IANSCU
[standalone@localhost:9990 /] jms-queue add --queue-address=Export1 --entries=java:/jms/queue/Export1
[standalone@localhost:9990 /] jms-queue add --queue-address=Export2 --entries=java:/jms/queue/Export2
[standalone@localhost:9990 /] jms-queue add --queue-address=Export3 --entries=java:/jms/queue/Export3
[standalone@localhost:9990 /] jms-queue add --queue-address=HL7Send --entries=java:/jms/queue/HL7Send
[standalone@localhost:9990 /] jms-queue add --queue-address=RSClient --entries=java:/jms/queue/RSClient
[standalone@localhost:9990 /] jms-queue add --queue-address=DiffTasks --entries=java:/jms/queue/DiffTasks
[standalone@localhost:9990 /] jms-queue add --queue-address=Export4 --entries=java:/jms/queue/Export4
[standalone@localhost:9990 /] jms-queue add --queue-address=Export5 --entries=java:/jms/queue/Export5
[standalone@localhost:9990 /] jms-queue add --queue-address=StgVerTasks --entries=java:/jms/queue/StgVerTasks
[standalone@localhost:9990 /] jms-queue add --queue-address=Export6 --entries=java:/jms/queue/Export6
[standalone@localhost:9990 /] jms-queue add --queue-address=Export7 --entries=java:/jms/queue/Export7
[standalone@localhost:9990 /] jms-queue add --queue-address=Export8 --entries=java:/jms/queue/Export8
[standalone@localhost:9990 /] jms-queue add --queue-address=Export9 --entries=java:/jms/queue/Export9
[standalone@localhost:9990 /] jms-queue add --queue-address=Export10 --entries=java:/jms/queue/Export10
[standalone@localhost:9990 /] jms-queue add --queue-address=Retrieve1 --entries=java:/jms/queue/Retrieve1
[standalone@localhost:9990 /] jms-queue add --queue-address=Retrieve2 --entries=java:/jms/queue/Retrieve2
[standalone@localhost:9990 /] jms-queue add --queue-address=Retrieve3 --entries=java:/jms/queue/Retrieve3
[standalone@localhost:9990 /] jms-queue add --queue-address=Retrieve4 --entries=java:/jms/queue/Retrieve4
[standalone@localhost:9990 /] jms-queue add --queue-address=Retrieve5 --entries=java:/jms/queue/Retrieve5
[standalone@localhost:9990 /] jms-queue add --queue-address=Retrieve6 --entries=java:/jms/queue/Retrieve6
[standalone@localhost:9990 /] jms-queue add --queue-address=Retrieve7 --entries=java:/jms/queue/Retrieve7
[standalone@localhost:9990 /] jms-queue add --queue-address=Retrieve8 --entries=java:/jms/queue/Retrieve8
[standalone@localhost:9990 /] jms-queue add --queue-address=Retrieve9 --entries=java:/jms/queue/Retrieve9
[standalone@localhost:9990 /] jms-queue add --queue-address=Retrieve10 --entries=java:/jms/queue/Retrieve10
[standalone@localhost:9990 /] jms-queue add --queue-address=Retrieve11 --entries=java:/jms/queue/Retrieve11
[standalone@localhost:9990 /] jms-queue add --queue-address=Retrieve12 --entries=java:/jms/queue/Retrieve12
[standalone@localhost:9990 /] jms-queue add --queue-address=Retrieve13 --entries=java:/jms/queue/Retrieve13
There is also a CLI script
$DCM4CHEE_ARC/cli/add-jms-queues.cliprovided, containing these commands, which one may just execute:> $WILDFLY_HOME/bin/jboss-cli.sh -c --file=$DCM4CHEE_ARC/cli/add-jms-queues.cliNote : Archive version 5.24.0 onwards, addition of JMS queues is not required.
-
Enable property replacement in deployment descriptors by setting attribute
spec-descriptor-property-replacementof theeesubsystem totrue, and adjust themanaged-executor-servicesand themanaged-scheduled-executor-serviceconfiguration of theeesubsystem to avoid thread-pool related issues on long running tasks or heavy load using JBoss CLI - you may configure a larger maximal number of threads than 100 according your needs:[standalone@localhost:9990 /] /subsystem=ee:write-attribute(name=spec-descriptor-property-replacement,value=true) [standalone@localhost:9990 /] /subsystem=ee/managed-executor-service=default:undefine-attribute(name=hung-task-threshold) [standalone@localhost:9990 /] /subsystem=ee/managed-executor-service=default:write-attribute(name=long-running-tasks,value=true) [standalone@localhost:9990 /] /subsystem=ee/managed-executor-service=default:write-attribute(name=core-threads,value=2) [standalone@localhost:9990 /] /subsystem=ee/managed-executor-service=default:write-attribute(name=max-threads,value=100) [standalone@localhost:9990 /] /subsystem=ee/managed-executor-service=default:write-attribute(name=queue-length,value=0) [standalone@localhost:9990 /] /subsystem=ee/managed-scheduled-executor-service=default:undefine-attribute(name=hung-task-threshold) [standalone@localhost:9990 /] /subsystem=ee/managed-scheduled-executor-service=default:write-attribute(name=long-running-tasks,value=true) [standalone@localhost:9990 /] /subsystem=ee/managed-scheduled-executor-service=default:write-attribute(name=core-threads,value=2) -
At default, DCM4CHEE Archive 5.x will assume
dcm4chee-arcas its Device Name, used to find its configuration in the LDAP Server. One may specify a different Device Name by system propertydcm4chee-arc.DeviceNameusing JBoss CLI:[standalone@localhost:9990 /] /system-property=dcm4chee-arc.DeviceName:add(value=<device-name>) -
Add following system properties
[standalone@localhost:9990 /] /system-property=super-user-role:add(value=admin) [standalone@localhost:9990 /] /system-property=realm-name:add(value=dcm4che) [standalone@localhost:9990 /] /system-property=auth-server-url:add(value=https://<keycloak-host>:8843/auth)- To enable archive UI login with
httpsas well, configure the following :[standalone@localhost:9990 /] /subsystem=elytron/key-store=httpsKS:add(credential-reference={clear-text=secret},type=PKCS12,path=/home/vrinda/work/secure/latest/wildfly-26.1.1.Final/standalone/configuration/keystores/key.p12) [standalone@localhost:9990 /] /subsystem=elytron/key-manager=httpsKM:add(algorithm=SunX509,key-store=httpsKS,credential-reference={clear-text=secret}) [standalone@localhost:9990 /] /subsystem=elytron/server-ssl-context=httpsSSC:add(protocols=[TLSv1.2],key-manager=httpsKM) [standalone@localhost:9990 /] /core-service=management/management-interface=http-interface:write-attribute(name=ssl-context,value=httpsSSC) [standalone@localhost:9990 /] /core-service=management/management-interface=http-interface:write-attribute(name=secure-socket-binding,value=management-https) [standalone@localhost:9990 /] /subsystem=undertow/server=default-server/https-listener=https:remove() [standalone@localhost:9990 /] /subsystem=undertow/server=default-server/https-listener=https:add(socket-binding=https,ssl-context=httpsSSC,enable-http2=true)- Note : Replace
pathpointing to your keystore location.
- Note : Replace
- To enable archive UI login with
-
At default, the Wildfly supports maximum size of POST requests only as 10MB, one may change this to a higher value as shown below
  [standalone@localhost:9990 /] /subsystem=undertow/server=default-server/http-listener=default:write-attribute(name=max-post-size,value=10000000000)
  [standalone@localhost:9990 /] /subsystem=undertow/server=default-server/https-listener=https:write-attribute(name=max-post-size,value=10000000000)
You have to reload the configuration - or restart Wildfly - to make the changes effective:
[standalone@localhost:9990 /] :reload -
You may now choose to either use Secured UI and Unsecured RESTful services or Secured UI and Secured RESTful services
-
Secure Wildfly's Management Console if you registered an OIDC client for Wildfly Management console in Keycloak
-
Login to DCM4CHEE Archive UI at
http://<archive-host>:8080/dcm4chee-arc/ui2
- Add Keycloak Standalone Server specific settings to your DCM4CHEE Archive's Wildfly as shown below
/subsystem=keycloak/secure-deployment=dcm4chee-arc-ui2-5.x.x-secure.war/:add(realm=dcm4che,resource=dcm4chee-arc-ui,auth-server-url=https://<keycloak-host>:8843/auth,ssl-required=external,public-client=true,truststore=/home/vrinda/work/secure/latest/wildfly-26.1.1.Final/standalone/configuration/keystores/cacerts.p12,truststore-password=secret,allow-any-hostname=true)- Replace
truststorepath pointing to your truststore location in archive's wildfly.
- Replace
- Restart your archive and deploy
- Upto version 5.23.2 : secure-ui ear (only archive UI secured) using JBoss CLI
> $WILDFLY_HOME/bin/jboss-cli.sh -c [UNIX] > %WILDFLY_HOME%\bin\jboss-cli.bat -c [Windows] [standalone@localhost:9999 /] deploy $DCM4CHEE_ARC/deploy/dcm4chee-arc-ear-5.x.x-psql-secure-ui.ear - Version 5.23.3 onwards (Archive Backend and UI are separated) : secured archive UI and unsecured archive backend using JBoss CLI
> $WILDFLY_HOME/bin/jboss-cli.sh -c [UNIX]
> %WILDFLY_HOME%\bin\jboss-cli.bat -c [Windows]
[standalone@localhost:9999 /] deploy $DCM4CHEE_ARC/deploy/dcm4chee-arc-ear-5.x.x-psql.ear
[standalone@localhost:9999 /] deploy $DCM4CHEE_ARC/deploy/dcm4chee-arc-ui2-5.x.x-secure-ui.war
- Upto version 5.23.2 : secure-ui ear (only archive UI secured) using JBoss CLI
- Add Keycloak Standalone Server specific settings to your DCM4CHEE Archive's Wildfly as shown below
/subsystem=keycloak/secure-deployment=dcm4chee-arc-ui2-5.x.x-secure.war/:add(realm=dcm4che,resource=dcm4chee-arc-ui,auth-server-url=https://<keycloak-host>:8843/auth,ssl-required=external,public-client=true,truststore=/home/vrinda/work/secure/latest/wildfly-26.1.1.Final/standalone/configuration/keystores/cacerts.p12,truststore-password=secret,allow-any-hostname=true) /subsystem=keycloak/secure-deployment=dcm4chee-arc-war-5.x.x-secure.war/:add(realm=dcm4che,resource=dcm4chee-arc-rs,auth-server-url=https://<keycloak-host>:8843/auth,ssl-required=external,bearer-only=true,truststore=/home/vrinda/work/secure/latest/wildfly-26.1.1.Final/standalone/configuration/keystores/cacerts.p12,truststore-password=secret,allow-any-hostname=true)- Replace
truststorepath pointing to your truststore location in archive's wildfly.
- Replace
- Also note in the above step, for
dcm4chee-arc-rswe havebearer-onlyastrue. This means that if any application, other than the DCM4CHEE Archive UI (for eg. Viewers), are using the secured RESTful services, then these applications shall sendAuthorizationRequest Header with theBearer <token>. Refer Get OIDC Access Token using curl. The Archive UI (as a Client) handles this case already. - Restart your archive and deploy
- Upto version 5.23.2 : secure ear using JBoss CLI
> $WILDFLY_HOME/bin/jboss-cli.sh -c [UNIX] > %WILDFLY_HOME%\bin\jboss-cli.bat -c [Windows] [standalone@localhost:9999 /] deploy $DCM4CHEE_ARC/deploy/dcm4chee-arc-ear-5.x.x-psql-secure.ear - Version 5.23.3 onwards (Archive Backend and UI are separated) : secure archive backend and UI using JBoss CLI
> $WILDFLY_HOME/bin/jboss-cli.sh -c [UNIX]
> %WILDFLY_HOME%\bin\jboss-cli.bat -c [Windows]
[standalone@localhost:9999 /] deploy $DCM4CHEE_ARC/deploy/dcm4chee-arc-ear-5.x.x-psql-secure.ear
[standalone@localhost:9999 /] deploy $DCM4CHEE_ARC/deploy/dcm4chee-arc-ui2-5.x.x-psql-secure.war
- Upto version 5.23.2 : secure ear using JBoss CLI
- Add
wildfly-consoleandwildfly-managementto Keycloak Standalone Server subsystem in your DCM4CHEE Archive's Wildfly as shown below/subsystem=keycloak/secure-deployment=wildfly-console/:add(realm=dcm4che,resource=wildfly-console,auth-server-url=https://<keycloak-host>:8843/auth,ssl-required=external,public-client=true,truststore=/home/vrinda/work/secure/latest/wildfly-26.1.1.Final/standalone/configuration/keystores/cacerts.p12,truststore-password=secret,allow-any-hostname=true) /subsystem=keycloak/secure-deployment=wildfly-management/:add(realm=dcm4che,resource=wildfly-management,auth-server-url=https://<keycloak-host>:8843/auth,ssl-required=external,bearer-only=true,truststore=/home/vrinda/work/secure/latest/wildfly-26.1.1.Final/standalone/configuration/keystores/cacerts.p12,truststore-password=secret,allow-any-hostname=true)- Replace
truststorepath pointing to your truststore location in archive's wildfly. Sign out, before verifying that accessing the WildFly Administration Console athttp://<archive-host>:9990orhttps://<archive-host>:9993will redirect you to the login page of Keycloak. Sign in with the newly created User/Password oradmin/admin.
- Replace