Distribute secured archive services and Elastic Stack over several hosts without Docker Swarm
Secured archive services using Keycloak as Authentication Server and storing System and Audit Logs to Elastic Stack distributed over 3 nodes
(Optional) Create system groups and users with particular group and user IDs used by the archive services
$ sudo -i
# groupadd -r dcm4chee-arc --gid=1023 && useradd -r -g dcm4chee-arc --uid=1023 dcm4chee-arc
# groupadd -r keycloak-dcm4chee --gid=1029 && useradd -r -g keycloak-dcm4chee --uid=1029 keycloak-dcm4chee
# exit
$ sudo -i
# groupadd -r slapd-dcm4chee --gid=1021 && useradd -r -g slapd-dcm4chee --uid=1021 slapd-dcm4chee
# groupadd -r postgres-dcm4chee --gid=999 && useradd -r -g postgres-dcm4chee --uid=999 postgres-dcm4chee
# exit
System Configuration for Elasticsearch on the Elastic Stack Node
$ sudo -i
# sysctl -w vm.swappiness=1
# echo 'vm.swappiness=1' >> /etc/sysctl.conf (to persist reboots)
# exit
$ sudo -i
# sysctl -w vm.max_map_count=262144
# echo 'vm.max_map_count=262144' >> /etc/sysctl.conf (to persist reboots)
# exit
If you are bind-mounting a local directory or file, it must be readable by the elasticsearch user. In addition, this user must have write access to the config, data and log dirs (Elasticsearch needs write access to the config directory so that it can generate a keystore). A good strategy is to grant group access to gid 0 for the local directory.
For example, to prepare a local directory for storing data through a bind-mount:
$ sudo mkdir -p /var/local/dcm4chee-arc/esdatadir
$ sudo chmod g+rwx /var/local/dcm4chee-arc/esdatadir
$ sudo chgrp 0 /var/local/dcm4chee-arc/esdatadir
Ensure that Logstash has write access to the file used to persist the fingerprint of the last audit message
You have to mount the file or parent directory specified by environment variable HASH_FILE to a volume or host directory to avoid to start a new hash tree on every re-creation of the container. The file (or parent directory) must be writable by the logstash user of the container (uid=1000). E.g., for mapping the file:
$ sudo mkdir -p /var/local/dcm4chee-arc/logstash
$ sudo touch /var/local/dcm4chee-arc/logstash/filter-hashtree
$ sudo chown 1000:1000 /var/local/dcm4chee-arc/logstash/filter-hashtree
or for mapping the parent directory
$ sudo mkdir -p /var/local/dcm4chee-arc/logstash
$ sudo chown 1000:1000 /var/local/dcm4chee-arc/logstash
Continue using Docker Command Line or Docker Compose alternatively:
-
$ docker network create dcm4chee_default -
Start Elasticsearch as described in Run secured archive services and Elastic Stack on a single host
-
Start Kibana as described in Run secured archive services and Elastic Stack on a single host
-
Start Logstash as described in Run secured archive services and Elastic Stack on a single host
-
$ docker network create dcm4chee_default -
Launch a container providing the LDAP server into the created network, e.g:
$ docker run --network=dcm4chee_default --name ldap \
           --log-driver gelf \
           --log-opt gelf-address=udp://<elk-node>:12201 \
           --log-opt tag=slapd
           -p 389:389 \
           -e ARCHIVE_HOST=<arc-host> \
           -e SYSLOG_HOST=<elk-node> \
           -e SYSLOG_PORT=8514 \
           -e SYSLOG_PROTOCOL=TLS \
           -v /var/local/dcm4chee-arc/ldap:/var/lib/openldap/openldap-data \
           -v /var/local/dcm4chee-arc/slapd.d:/etc/openldap/slapd.d \
           -d dcm4che/slapd-dcm4chee:2.6.5-32.0
which differs from Run secured archive services and Elastic Stack on a single host by
--log-opt gelf-address=udp://<elk-node>:12201and-e SYSLOG_HOST=<elk-node>- you have to replace _<arc-node> _and <elk-node> by the hostnames of the Archive and the Elastic Stack Node. -
Launch a container providing the database server into the created network, e.g:
$ docker run --network=dcm4chee_default --name db \
           --log-driver gelf \
           --log-opt gelf-address=udp://<elk-node>:12201 \
           --log-opt tag=postgres
           -p 5432:5432 \
           -e POSTGRES_DB=pacsdb \
           -e POSTGRES_USER=pacs \
           -e POSTGRES_PASSWORD=pacs \
           -v /etc/localtime:/etc/localtime:ro \
           -v /etc/timezone:/etc/timezone:ro \
           -v /var/local/dcm4chee-arc/db:/var/lib/postgresql/data \
           -d dcm4che/postgres-dcm4chee:16.2-32
which differs from Run secured archive services and Elastic Stack on a single host by
--log-opt gelf-address=udp://<elk-node>:12201- you have to replace <elk-node> by the hostname of the Elastic Stack Node. -
Launch a container providing Maria DB server into the created network, e.g:
$ docker run --network=dcm4chee_network --name mariadb \
           --log-driver gelf \
           --log-opt gelf-address=udp://<elk-host>:12201 \
           --log-opt tag=mariadb \
           -p 3306:3306 \
           -e MYSQL_ROOT_PASSWORD=secret \
           -e MYSQL_DATABASE=keycloak \
           -e MYSQL_USER=keycloak \
           -e MYSQL_PASSWORD=keycloak \
           -v /etc/localtime:/etc/localtime:ro \
           -v /etc/timezone:/etc/timezone:ro \
           -v /var/local/dcm4chee-arc/mysql:/var/lib/mysql \
           -d mariadb:10.11.4
which differs from Run secured archive services and Elastic Stack on a single host by
--log-opt gelf-address=udp://<elk-node>:12201- you have to replace <elk-node> by the hostname of the Elastic Stack Node.
-
$ docker network create dcm4chee_default -
Launch a container providing preconfigured Keycloak Authentication Server into the created network, e.g:
$ docker run --network=dcm4chee_default --name keycloak \
           --log-driver gelf \
           --log-opt gelf-address=udp://<elk-node>:12201 \
           --log-opt tag=keycloak \
           -p 8843:8843 \
           -e KC_HTTPS_PORT=8843 \
           -e KC_HOSTNAME=<arc-node> \
           -e KEYCLOAK_ADMIN=admin \
           -e KEYCLOAK_ADMIN_PASSWORD=changeit \
           -e KC_DB=mariadb \
           -e KC_DB_URL_DATABASE=keycloak \
           -e KC_DB_URL_HOST=<db-node> \
           -e KC_DB_USERNAME=keycloak \
           -e KC_DB_PASSWORD=keycloak \
           -e KC_LOG=file,gelf \
           -e KC_LOG_GELF_HOST=<elk-node> \
           -e ARCHIVE_HOST=<arc-node> \
           -e KIBANA_CLIENT_ID=kibana \
           -e KIBANA_CLIENT_SECRET=<kibana-client-secret> \
           -e KIBANA_REDIRECT_URL=https://<arc-node>:8643/oauth2/callback/* \
           -e KEYCLOAK_WAIT_FOR=<db-node>:389 <db-node>:3306 <elk-node>:8514 \
           -v /etc/localtime:/etc/localtime:ro \
           -v /etc/timezone:/etc/timezone:ro \
           -v /var/local/dcm4chee-arc/keycloak:/opt/keycloak/data \
           -d dcm4che/keycloak:24.0.3
which differs from Run secured archive services and Elastic Stack on a single host by
--log-opt gelf-address=udp://<elk-node>:12201-e KC_HOSTNAME=<arc-node>-e KC_DB_URL_HOST=<db-node>-e KC_LOG=file,gelf-e KC_LOG_GELF_HOST=<elk-node>-e ARCHIVE_HOST=<arc-node>-e LOGSTASH_HOST=<elk-node>-e KIBANA_REDIRECT_URL=https://<arc-node>:8643/oauth2/callback/*-
-e KEYCLOAK_WAIT_FOR='<db-node>:389 <db-node>:3306 <elk-node>:8514'(you have to replace <arc-node>, <db-node> and <elk-node> by the hostnames of the Archive, Database and Elastic Stack node).
-
Launch a container providing Wildfly with deployed dcm4che Archive 5 application into the created network, e.g:
$ docker run --network=dcm4chee_default --name arc \
           --log-driver gelf \
           --log-opt gelf-address=udp://<elk-node>:12201 \
           --log-opt tag=dcm4chee-arc \
           -p 8080:8080 \
           -p 8443:8443 \
           -p 9990:9990 \
           -p 9993:9993 \
           -p 2762:2762 \
           -p 2575:2575 \
           -p 12575:12575 \
           -p 11112:11112 \
           -e LOGSTASH_HOST=<elk-node> \
           -e POSTGRES_DB=pacsdb \
           -e POSTGRES_USER=pacs \
           -e POSTGRES_PASSWORD=pacs \
           -e AUTH_SERVER_URL=https://<arc-node>:8843 \
           -e UI_AUTH_SERVER_URL=https://<arc-node>:8843 \
           -e WILDFLY_WAIT_FOR="<db-node>:389 <db-node>:5432 <arc-node>:8843 <elk-node>:8514" \
           -v /etc/localtime:/etc/localtime:ro \
           -v /etc/timezone:/etc/timezone:ro \
           -v /var/local/dcm4chee-arc/wildfly:/opt/wildfly/standalone \
           -d dcm4che/dcm4chee-arc-psql:5.32.0-secure
which differs from Run secured archive services and Elastic Stack on a single host by
--log-opt gelf-address=udp://<elk-node>:12201-e LOGSTASH_HOST=<elk-node>-e AUTH_SERVER_URL=https://<arc-node>:8843-e UI_AUTH_SERVER_URL=https://<arc-node>:8843-
-e WILDFLY_WAIT_FOR="<db-node>:389 <db-node>:5432 <arc-node>:8843 <elk-node>:8514"(you have to replace <arc-node>, <db-node> and <elk-node> by the hostnames of the Archive, Database and Elastic Stack node).
-
Sign in with User/Password
root/changeitat the Realm Admin Console of Keycloak athttps://<arc-node>:8843/admin/dcm4che/console- you have to replace <arc-node> by the hostname of the Archive Node. If you changed the default realm name:dcm4cheby environment variableREALM_NAMEfor the Keycloak and the Archive Container, you also have to replacedcm4cheby the that value in the URL.Keycloak docker image
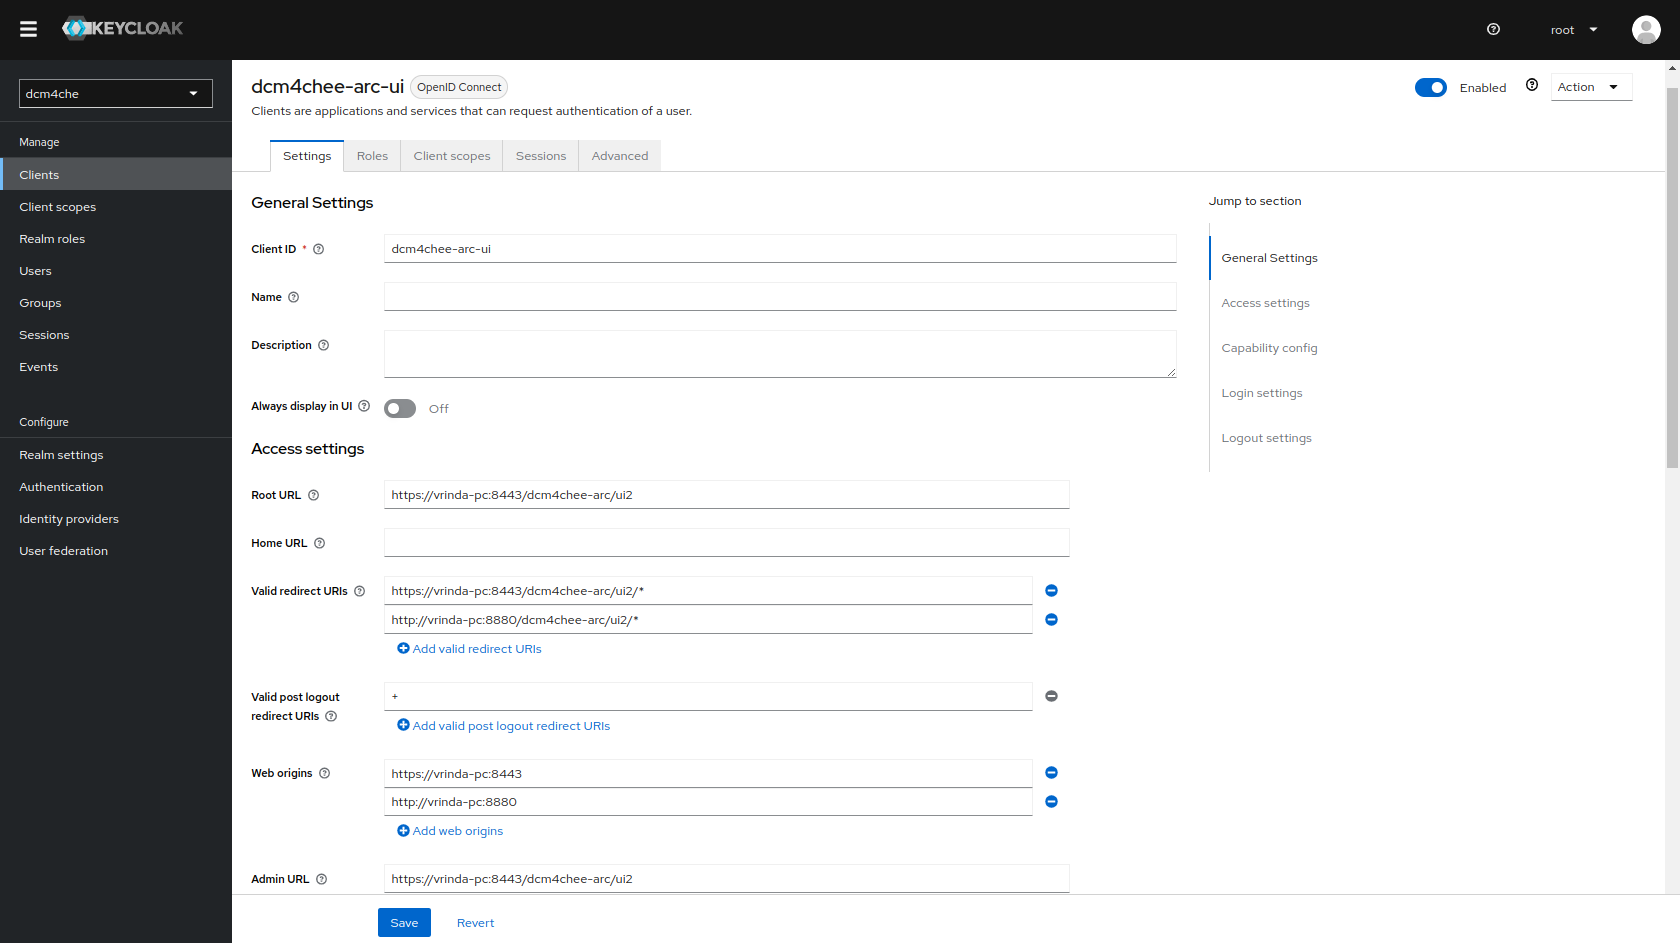
dcm4che/keycloak:19.0.1and newer creates an OIDC client for the Archive UI on first startup, customizable by environment variablesUI_CLIENT_ID,ARCHIVE_HOST,ARCHIVE_HTTP_PORTandARCHIVE_HTTPS_PORT:
-
Access to the Wildfly Administration Console is also protected with Keycloak.
Keycloak docker image
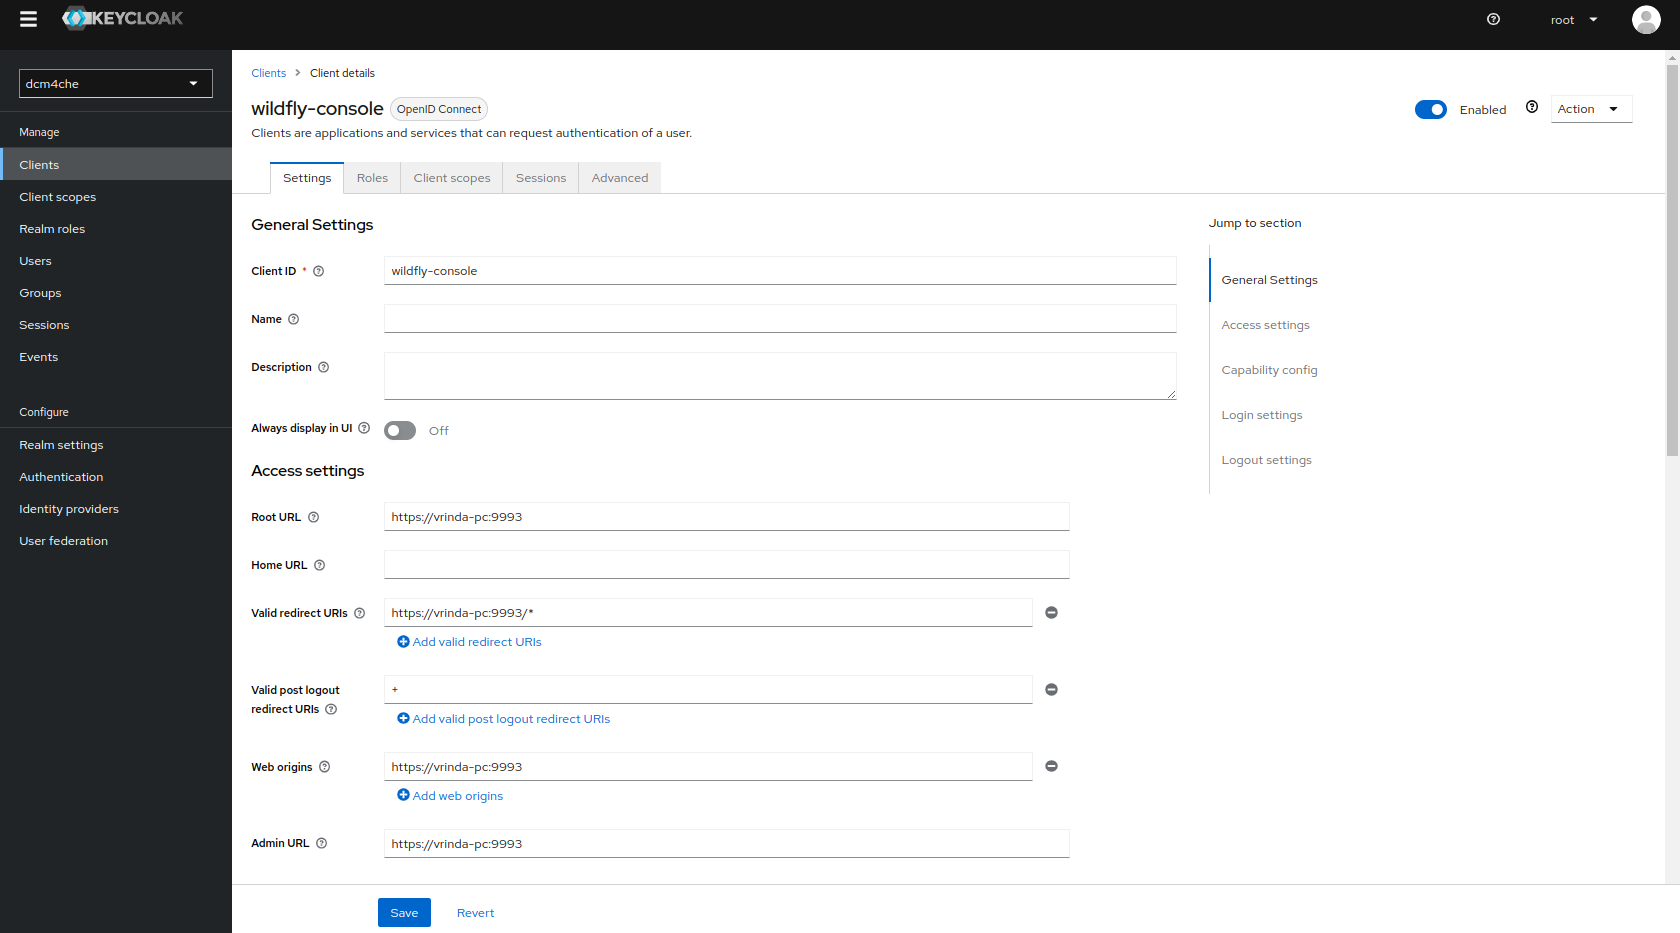
dcm4che/keycloak:19.0.1and newer creates also another OIDC client for the Wildfly Administration Console on first startup, customizable by environment variablesWILDFLY_CONSOLE,ARCHIVE_HOSTandARCHIVE_MANAGEMENT_HTTPS_PORT:
Only users with role
ADMINISTRATORare permitted to access the WildFly Administration Console.Sign out, before verifying that accessing the WildFly Administration Console at
http://<arc-node>:9990orhttps://<arc-node>:9993will redirect you to the Login page of Keycloak. You may sign in with User/Passwordroot/changeit. -
Sign in with User/Password
root/changeitat the Realm Admin Console of Keycloak athttps://<docker-host>:8843/admin/dcm4che/console- you have to replace <docker-host> by the hostname of the docker host. If you changed the default realm name:dcm4cheby environment variableREALM_NAMEfor the Keycloak, the Keycloak Proxy and the Archive Container, you also have to replacedcm4cheby the that value in the URL.Keycloak docker image
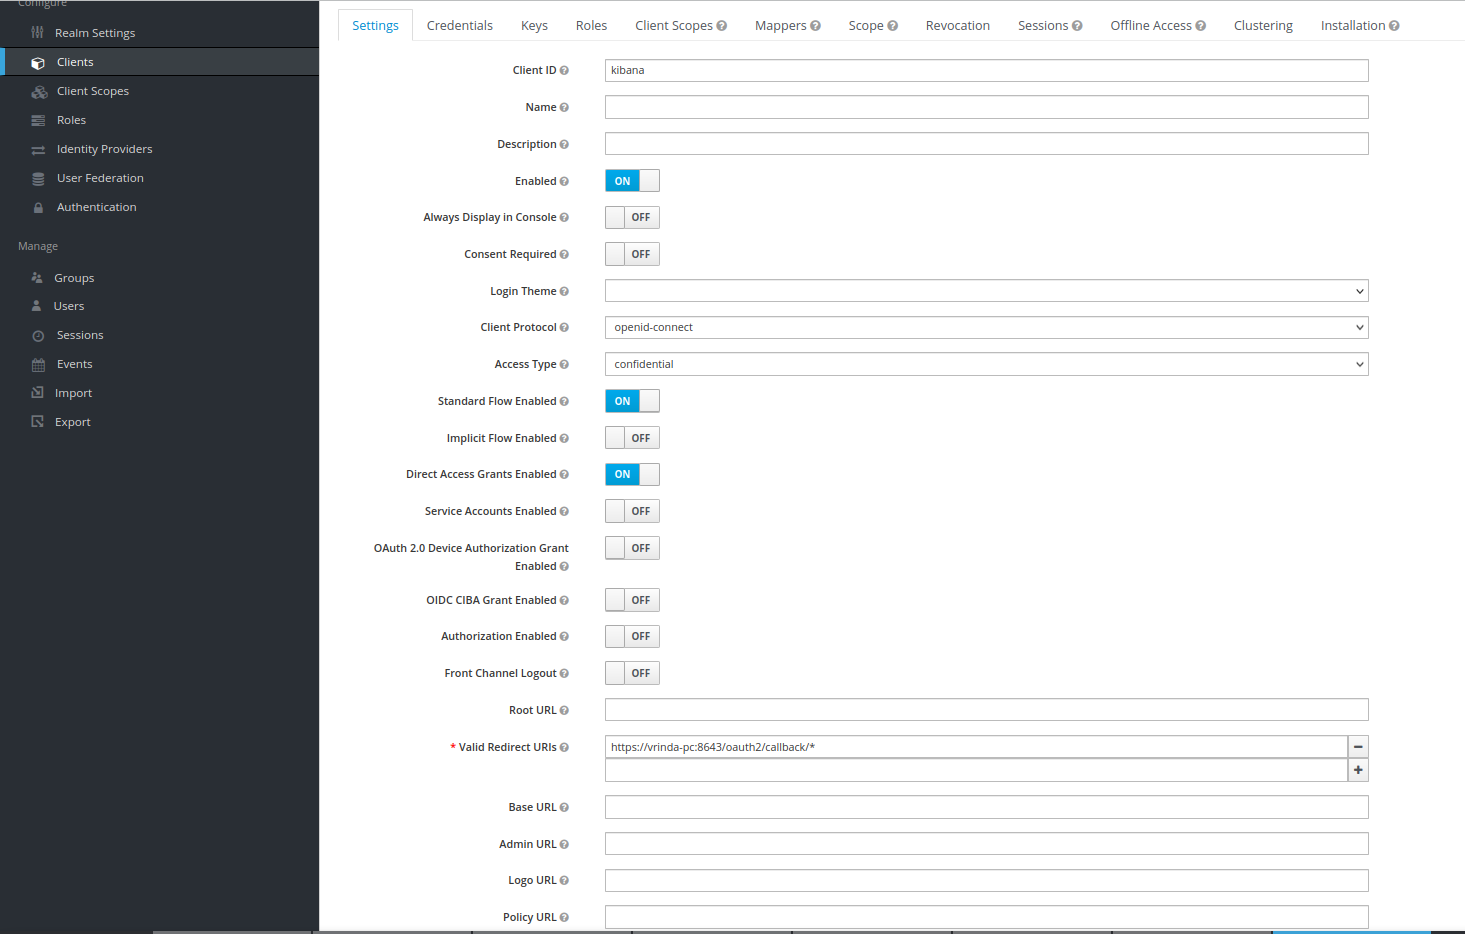
dcm4che/keycloak:19.0.1and newer creates an OIDC client for OAuth2-Proxy for securing Kibana on first startup, customizable by environment variablesKIBANA_CLIENT_ID,KIBANA_CLIENT_SECRETandKIBANA_REDIRECT_URL:
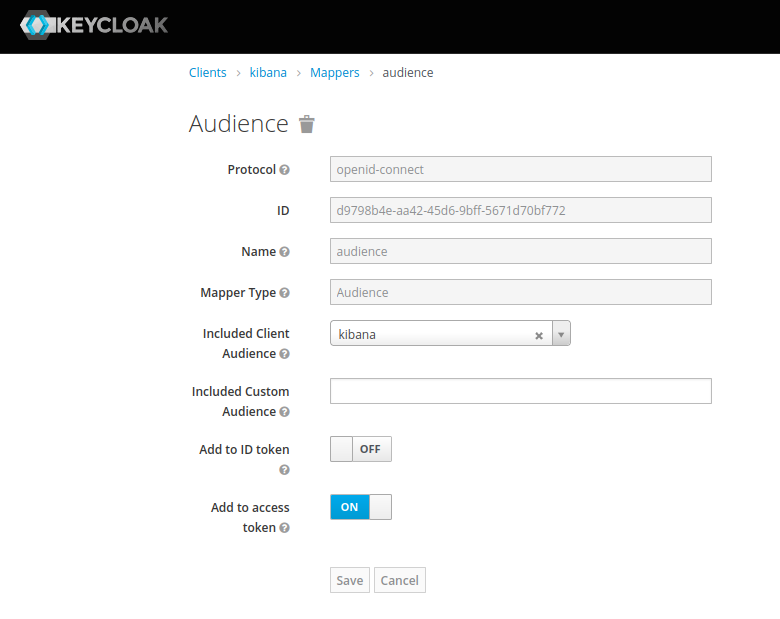
with Audience Token Mapper
audience:
and Client Credential
changeit:
which you can/should
Regenerate Secretand copy the new value for passing it as environment variableOAUTH2_PROXY_CLIENT_SECRETto OAuth2 Proxy container in the next step. -
Launch a container providing OAuth2 Proxy securing Kibana into the created network, e.g:
$ docker run --network=dcm4chee_default --name oauth2-proxy \
           -p 8643:8643 \
           -e OAUTH2_PROXY_HTTPS_ADDRESS=0.0.0.0:8643 \
           -e OAUTH2_PROXY_PROVIDER=keycloak-oidc \
           -e OAUTH2_PROXY_SKIP_PROVIDER_BUTTON="true" \
           -e OAUTH2_PROXY_UPSTREAMS=http://<elk-node>:5601 \
           -e OAUTH2_PROXY_OIDC_ISSUER_URL=https://<arc-node>:8843/realms/dcm4che \
           -e OAUTH2_PROXY_REDIRECT_URL=https://<arc-node>:8643/oauth2/callback \
           -e OAUTH2_PROXY_ALLOWED_ROLES=auditlog \
           -e OAUTH2_PROXY_CLIENT_ID=kibana \
           -e OAUTH2_PROXY_CLIENT_SECRET=<kibana-client-secret> \
           -e OAUTH2_PROXY_EMAIL_DOMAINS="*" \
           -e OAUTH2_PROXY_OIDC_EMAIL_CLAIM="preferred_username" \
           -e OAUTH2_PROXY_INSECURE_OIDC_ALLOW_UNVERIFIED_EMAIL="true" \
           -e OAUTH2_PROXY_COOKIE_SECRET=T0F1dGhLaWJhbmFUZXN0cw== \
           -e OAUTH2_PROXY_SSL_INSECURE_SKIP_VERIFY="true" \
           -e OAUTH2_PROXY_TLS_CERT_FILE=/etc/certs/cert.pem \
           -e OAUTH2_PROXY_TLS_KEY_FILE=/etc/certs/key.pem \
           -e OAUTH2_PROXY_CUSTOM_TEMPLATES_DIR=/templates \
           -d dcm4che/oauth2-proxy:7.5.1 \
which differs from Run secured archive services and Elastic Stack on a single host by
-e OAUTH2_PROXY_UPSTREAMS=http://<elk-node>:5601-e OAUTH2_PROXY_OIDC_ISSUER_URL=https://<arc-node>:8843/realms/dcm4che-e OAUTH2_PROXY_REDIRECT_URL=https://<arc-node>:8643/oauth2/callback
Note :
-
OAUTH2_PROXY_OIDC_ISSUER_URL: "https://<docker-host>:8843/realms/dcm4che"applies only for Keycloak v18.0+ and if default KC_HTTP_RELATIVE_PATH is used. -
If lower versions of Keycloak are used or if KC_HTTP_RELATIVE_PATH is set to
/authfor Keycloak v18.0+, thenOAUTH2_PROXY_OIDC_ISSUER_URL: "https://<docker-host>:8843/auth/realms/dcm4che"-
-p 8643:8643- publishes the https (8643) port of the OAuth2-Proxy from the container to the host to enable connections from external https clients to the OAuth2-Proxy, which have to match with -
-e OAUTH2_PROXY_HTTPS_ADDRESS=0.0.0.0:8643- the port to be listening, and with the port of -
-e OAUTH2_PROXY_PROVIDER=kibana-oidc- specifies the OAuth provider. -
-e OAUTH2_PROXY_SKIP_PROVIDER_BUTTONis optional. If set totrue, it will skip sign-in-page specifyingSign-on with Keycloakand directly show the Keycloak login page. -
-e OAUTH2_PROXY_UPSTREAMS=http://<elk-node>:5601- specifies Kibana https URL as upstream endpoint -
-e OAUTH2_PROXY_OIDC_ISSUER_URL=https://<arc-node>:8843/realms/dcm4che- specifies OpenID Connect issuer URL, wherein (8843) port refersKC_HTTPS_PORTused on Keycloak container startup -
-e OAUTH2_PROXY_REDIRECT_URL=https://<arc-node>:8643/oauth2/callback- the redirection URL for the Keycloak Authentication Server callback URL - you have to replace <arc-node> by the hostname of the Archive Node, which must be resolvable by your DNS server. -
-e OAUTH2_PROXY_ALLOWED_ROLES=auditlog- (keycloak-oidc) restrict logins to members of these roles (may be given multiple times) -
-e OAUTH2_PROXY_CLIENT_ID=kibana- specifies the Client ID used to authenticate to the Keycloak Server, -
-e OAUTH2_PROXY_CLIENT_SECRET=<kibana-client-secret>- specifies the Client Secret used to authenticate to the Keycloak Authentication Server for Confidential type kibana client. The value should match with that used during keycloak container startup. -
-e OAUTH2_PROXY_EMAIL_DOMAINS="*"as*specifies to authenticate any email. -
-e OAUTH2_PROXY_OIDC_EMAIL_CLAIM="preferred_username"which OIDC claim contains the user's email (default "email") -
-e OAUTH2_PROXY_INSECURE_OIDC_ALLOW_UNVERIFIED_EMAIL="true"specifies to not fail if an email address in an id_token is not verified -
-e OAUTH2_PROXY_COOKIE_SECRET=T0F1dGhLaWJhbmFUZXN0cw==- specifies the seed string for secure cookies (optionally base64 encoded) -
-e OAUTH2_PROXY_SSL_INSECURE_SKIP_VERIFY=trueastrueskips validation of certificates presented when using HTTPS -
-e OAUTH2_PROXY_CUSTOM_TEMPLATES_DIRspecifies the custom templates' directory location which contains the customized forbidden error page shown to unauthorized users on authentication. Note : OAuth2 proxy does not yet have a mechanism to only customize one of the templates (i.e. sign_in or error). Hence, if one wants to customize only one, both templates need to be still provided. -
-e OAUTH2_PROXY_TLS_CERT_FILEandOAUTH2_PROXY_TLS_KEY_FILEspecifies path to TLS certificate and private key in Privacy-Enhanced Mail (PEM) format to use for TLS support. To avoid the security warning of Web Browsers connecting to Kibana via OAuth2 Proxy, replace the certificate provided in/etc/certs/cert.pemof the docker image:
by a certificate whose Common Name and/or Subject Alt Name matches the host name and which is signed by a trusted issuer; bind mount the PEM files with the certificate and corresponding private key and adjust
OAUTH2_PROXY_TLS_CERT_FILEandOAUTH2_PROXY_TLS_KEY_FILEto refer their paths inside of the container.
$ docker run --rm dcm4che/oauth2-proxy:7.5.1 helpwill show all available environment variables and command options. See also OAuth2 Proxy as well as Keycloak OIDC Auth Provider of Keycloak for more information about configuration options of OAuth2 Proxy.
-
Use Docker Compose
Alternatively to Docker Command Line one may use Docker Compose to take care for starting all 8 containers:
-
version: "3"
services:
  elasticsearch:
    image: docker.elastic.co/elasticsearch/elasticsearch:8.13.0
    environment:
      ES_JAVA_OPTS: -Xms1024m -Xmx1024m
      discovery.type: single-node
      xpack.security.enabled: "false"
    logging:
      driver: json-file
      options:
        max-size: "10m"
    ports:
      - "9200:9200"
      - "9300:9300"
    volumes:
      - /etc/localtime:/etc/localtime:ro
      - /etc/timezone:/etc/timezone:ro
      - /var/local/dcm4chee-arc/esdatadir:/usr/share/elasticsearch/data
  kibana:
    image: docker.elastic.co/kibana/kibana:8.13.0
    logging:
      driver: json-file
      options:
        max-size: "10m"
    depends_on:
      - elasticsearch
    volumes:
      - /etc/localtime:/etc/localtime:ro
      - /etc/timezone:/etc/timezone:ro
  logstash:
    image: dcm4che/logstash-dcm4chee:8.13.0-16
    logging:
      driver: json-file
      options:
        max-size: "10m"
    ports:
      - "12201:12201/udp"
      - "8514:8514/udp"
      - "8514:8514"
    depends_on:
      - elasticsearch
    volumes:
      - /etc/localtime:/etc/localtime:ro
      - /etc/timezone:/etc/timezone:ro
      - /var/local/dcm4chee-arc/logstash/filter-hashtree:/usr/share/logstash/data/filter-hashtree
-
$ docker-compose -p dcm4chee up -d
Creating network "dcm4chee_default" with the default driver
Creating dcm4chee_elasticsearch_1 ... done
Creating dcm4chee_logstash_1 ... done
Creating dcm4chee_kibana_1 ... done
in the directory containing
docker-compose.yml.
-
version: "3"
services:
  ldap:
    image: dcm4che/slapd-dcm4chee:2.6.5-32.0
    logging:
      driver: gelf
      options:
        gelf-address: "udp://<elk-node>:12201"
        tag: slapd
    ports:
      - "389:389"
    environment:
      SYSLOG_HOST: <elk-node>
      SYSLOG_PORT: 8514
      SYSLOG_PROTOCOL: TLS
      STORAGE_DIR: /storage/fs1
    volumes:
      - /var/local/dcm4chee-arc/ldap:/var/lib/openldap/openldap-data
      - /var/local/dcm4chee-arc/slapd.d:/etc/openldap/slapd.d
  db:
    image: dcm4che/postgres-dcm4chee:16.2-32
    logging:
      driver: gelf
      options:
        gelf-address: "udp://<elk-node>:12201"
        tag: postgres
    ports:
      - "5432:5432"
    environment:
      POSTGRES_DB: pacsdb
      POSTGRES_USER: pacs
      POSTGRES_PASSWORD: pacs
    volumes:
      - /etc/localtime:/etc/localtime:ro
      - /etc/timezone:/etc/timezone:ro
      - /var/local/dcm4chee-arc/db:/var/lib/postgresql/data
  mariadb:
    image: mariadb:10.11.4
    logging:
      driver: gelf
      options:
        gelf-address: "udp://<elk-node>:12201"
        tag: mariadb
    ports:
      - "3306:3306"
    environment:
      MYSQL_ROOT_PASSWORD: secret
      MYSQL_DATABASE: keycloak
      MYSQL_USER: keycloak
      MYSQL_PASSWORD: keycloak
    volumes:
      - /etc/localtime:/etc/localtime:ro
      - /etc/timezone:/etc/timezone:ro
      - /var/local/dcm4chee-arc/mysql:/var/lib/mysql
You have to replace <elk-node> by the hostname of theElastic Stack node.
-
$ docker-compose -p dcm4chee up -d
Creating dcm4chee_ldap_1          ... done
Creating dcm4chee_db_1            ... done
Creating dcm4chee_mariadb_1       ... done
in the directory containing
docker-compose.yml.
-
You have to replace <arc-node>, <db-node> and <elk-node> by the hostnames of the Archive, Database and Elastic Stack node.
version: "3"
services:
  keycloak:
    image: dcm4che/keycloak:24.0.3
    logging:
      driver: gelf
      options:
        gelf-address: "udp://<elk-node>:12201"
        tag: keycloak
    ports:
      - "8843:8843"
    environment:
      KC_HTTPS_PORT: 8843
      KC_HOSTNAME: <arc-node>
      KEYCLOAK_ADMIN: admin
      KEYCLOAK_ADMIN_PASSWORD: changeit
      KC_DB: mariadb
      KC_DB_URL_DATABASE: keycloak
      KC_DB_URL_HOST: <db-node>
      KC_DB_USERNAME: keycloak
      KC_DB_PASSWORD: keycloak
      KC_LOG: file,gelf
      KC_LOG_GELF_HOST: logstash
      ARCHIVE_HOST: <arc-node>
      KIBANA_CLIENT_ID: kibana
      KIBANA_CLIENT_SECRET: <kibana-client-secret>
      KIBANA_REDIRECT_URL: https://<arc-node>:8643/oauth2/callback/*
      KEYCLOAK_WAIT_FOR: <db-node>:389 <db-node>:3306 <elk-node>:8514
    volumes:
      - /etc/localtime:/etc/localtime:ro
      - /etc/timezone:/etc/timezone:ro
      - /var/local/dcm4chee-arc/keycloak:/opt/keycloak/data
  oauth2-proxy:
    image: dcm4che/oauth2-proxy:7.5.1
    ports:
      - "8643:8643"
    environment:
      OAUTH2_PROXY_HTTPS_ADDRESS: 0.0.0.0:8643
      OAUTH2_PROXY_PROVIDER: keycloak-oidc
      OAUTH2_PROXY_SKIP_PROVIDER_BUTTON: "true"
      OAUTH2_PROXY_UPSTREAMS: "http://<elk-node>:5601"
      OAUTH2_PROXY_OIDC_ISSUER_URL: "https://<arc-node>:8843/realms/dcm4che"
      OAUTH2_PROXY_REDIRECT_URL: "https://<arc-node>:8643/oauth2/callback"
      OAUTH2_PROXY_ALLOWED_ROLES: auditlog
      OAUTH2_PROXY_CLIENT_ID: kibana
      OAUTH2_PROXY_CLIENT_SECRET: changeit
      OAUTH2_PROXY_EMAIL_DOMAINS: "*"
      OAUTH2_PROXY_OIDC_EMAIL_CLAIM: "sub"
      OAUTH2_PROXY_INSECURE_OIDC_ALLOW_UNVERIFIED_EMAIL: "true"
      OAUTH2_PROXY_COOKIE_SECRET: T0F1dGhLaWJhbmFUZXN0cw==
      OAUTH2_PROXY_SSL_INSECURE_SKIP_VERIFY: "true"
      OAUTH2_PROXY_TLS_CERT_FILE: /etc/certs/cert.pem
      OAUTH2_PROXY_TLS_KEY_FILE: /etc/certs/key.pem
      OAUTH2_PROXY_CUSTOM_TEMPLATES_DIR: /templates
  arc:
    image: dcm4che/dcm4chee-arc-psql:5.32.0-secure
    logging:
      driver: gelf
      options:
        gelf-address: "udp://<elk-node>:12201"
        tag: dcm4chee-arc
    ports:
      - "8080:8080"
      - "8443:8443"
      - "9990:9990"
      - "9993:9993"
      - "11112:11112"
      - "2762:2762"
      - "2575:2575"
      - "12575:12575"
    environment:
      LOGSTASH_HOST: logstash
      POSTGRES_DB: pacsdb
      POSTGRES_USER: pacs
      POSTGRES_PASSWORD: pacs
      AUTH_SERVER_URL: https://keycloak:8843
      UI_AUTH_SERVER_URL: https://<arc-host>:8843
      WILDFLY_CHOWN: /storage
      WILDFLY_WAIT_FOR: <db-node>:389 <db-node>:5432 <elk-node>:8514
    depends_on:
      - keycloak
    volumes:
      - /etc/localtime:/etc/localtime:ro
      - /etc/timezone:/etc/timezone:ro
      - /var/local/dcm4chee-arc/wildfly:/opt/wildfly/standalone
      - /var/local/dcm4chee-arc/storage:/storage
Note :
-
OAUTH2_PROXY_OIDC_ISSUER_URL: "https://<docker-host>:8843/realms/dcm4che"applies only for Keycloak v18.0+ and if default KC_HTTP_RELATIVE_PATH is used. - If lower versions of Keycloak are used or if KC_HTTP_RELATIVE_PATH
is set to
/authfor Keycloak v18.0+, thenOAUTH2_PROXY_OIDC_ISSUER_URL: "https://<docker-host>:8843/auth/realms/dcm4che"
-
$ docker-compose -p dcm4chee up -d
Creating network "dcm4chee_default" with the default driver
Creating dcm4chee_keycloak_1 ... done
Creating dcm4chee_arc_1 ... done
Creating dcm4chee_oauth2-proxy_1 ... done
in the directory containing
docker-compose.yml. -
Verify OIDC client for Archive UI in Keycloak as described above.
-
Verify OIDC client for Wildfly Administration Console in Keycloak as described above.
-
Verify OIDC client for OAuth2 Proxy in Keycloak as described above.
-
If you configured the OIDC client for OAuth2 Proxy with
Access Type: confidential, you have to adjust the value for the environment variableOAUTH2_PROXY_CLIENT_SECRETof theoauth2-proxyservice indocker-compose.ymlto match with the actual value from theCredentialstab for the OIDC client in the Realm Admin Console of Keycloak and recreate and restart the OAuth2 Proxy container by invoking$ docker-compose -p dcm4chee up -d dcm4chee_keycloak_1 is up-to-date dcm4chee_arc_1 is up-to-date Recreating dcm4chee_oauth2-proxy_1 ... Recreating dcm4chee_oauth2-proxy_1 ... done
in the directory containing
docker-compose.yml.
DCM4CHEE 5 Documentation