Distribute secured archive services and Elastic Stack over several hosts using Docker Swarm
s.o. Setup Docker Swarm test environment using Multipass
Secured archive services using Keycloak as Authentication Server and storing System and Audit Logs to Elastic Stack distributed over 3 nodes:

(Optional) Create system groups and users with particular group and user IDs used by the archive services
$ sudo -i
# groupadd -r dcm4chee-arc --gid=1023 && useradd -r -g dcm4chee-arc --uid=1023 dcm4chee-arc
# groupadd -r keycloak-dcm4chee --gid=1029 && useradd -r -g keycloak-dcm4chee --uid=1029 keycloak-dcm4chee
# exit
$ sudo -i
# groupadd -r slapd-dcm4chee --gid=1021 && useradd -r -g slapd-dcm4chee --uid=1021 slapd-dcm4chee
# groupadd -r postgres-dcm4chee --gid=999 && useradd -r -g postgres-dcm4chee --uid=999 postgres-dcm4chee
# exit
System Configuration for Elasticsearch on the Elastic Stack Node
$ sudo -i
# sysctl -w vm.swappiness=1
# echo 'vm.swappiness=1' >> /etc/sysctl.conf (to persist reboots)
# exit
$ sudo -i
# sysctl -w vm.max_map_count=262144
# echo 'vm.max_map_count=262144' >> /etc/sysctl.conf (to persist reboots)
# exit
$ sudo mkdir -p /var/local/dcm4chee-arc/keycloak
$ sudo mkdir -p /var/local/dcm4chee-arc/wildfly
$ sudo mkdir -p /var/local/dcm4chee-arc/storage
$ sudo mkdir -p /var/local/dcm4chee-arc/ldap
$ sudo mkdir -p /var/local/dcm4chee-arc/slapd.d
$ sudo mkdir -p /var/local/dcm4chee-arc/db
$ sudo mkdir -p /var/local/dcm4chee-arc/mysql
$ sudo mkdir -p /var/local/dcm4chee-arc/esdatadir
$ sudo chmod g+rwx /var/local/dcm4chee-arc/esdatadir
$ sudo chgrp 0 /var/local/dcm4chee-arc/esdatadir
Ensure that Elasticsearch has write access to bind-mounted config, data and log dirs by granting group access to gid 0 for the local directory.
$ sudo mkdir -p /var/local/dcm4chee-arc/esdatadir
$ sudo mkdir -p /var/local/dcm4chee-arc/logstash
$ sudo touch /var/local/dcm4chee-arc/logstash/filter-hashtree
Ensure that Logstash (uid=1000) has write access to the mapped out file used to persist the fingerprint of the last audit message - configurable by environment variable HASH_FILE:
$ sudo chown 1000:1000 /var/local/dcm4chee-arc/logstash/filter-hashtree
Run the following command to create a new swarm on any of the nodes:
$ docker swarm init --advertise-addr <NODE-IP>
E.g.:
$ docker swarm init --advertise-addr 192.168.99.100
Swarm initialized: current node (dxn1zf6l61qsb1josjja83ngz) is now a manager.

To add a worker to this swarm, run the following command:

    docker swarm join \
    --token SWMTKN-1-49nj1cmql0jkz5s954yi3oex3nedyz0fb0xx14ie39trti4wxv-8vxv8rssmk743ojnwacrr2e7c \
    192.168.99.100:2377

To add a manager to this swarm, run 'docker swarm join-token manager' and follow the instructions.
On each of the other 2 nodes run the command produced by the $ docker swarm init output to
create a worker node joined to the swarm, e.g.:
$ docker swarm join \
--token  SWMTKN-1-49nj1cmql0jkz5s954yi3oex3nedyz0fb0xx14ie39trti4wxv-8vxv8rssmk743ojnwacrr2e7c \
192.168.99.100:2377

This node joined a swarm as a worker.
To view a list of nodes in the swarm run $ docker node ls from the manager node
(= where you created the swarm), e.g.:
$ docker node ls
ID                            HOSTNAME            STATUS              AVAILABILITY        MANAGER STATUS
jill34qzqqz9x5zlo5vg69sq4     elk-node            Ready               Active
o5xraaz2lhxe8bhmjt22mzzka *   arc-node            Ready               Active              Leader
rw89dvm047372gswfmzp0v0vh     db-node             Ready               Active
Continue using Docker Service or Docker Stack alternatively:
-
Create an overlay network on the manager node:
$ docker network create --driver overlay dcm4chee_default -
Create a Swarm Service running Elasticsearch on the Elastic Stack node, e.g:
$ docker service create \
           --network dcm4chee_default \
           --name elasticsearch \
           --constraint 'node.hostname == <elk-node>' \
           -e ES_JAVA_OPTS="-Xms1024m -Xmx1024m" \
           -e discovery.type=single-node \
           -e xpack.security.enabled=false \
           -p published=9200,target=9200,mode=host \
           -p published=9300,target=9300,mode=host \
           --endpoint-mode dnsrr \
           --mount type=bind,src=/etc/localtime,dst=/etc/localtime,readonly \
           --mount type=bind,src=/etc/timezone,dst=/etc/timezone,readonly \
           --mount type=bind,src=/var/local/dcm4chee-arc/esdatadir,dst=/usr/share/elasticsearch/data \
           -d docker.elastic.co/elasticsearch/elasticsearch:8.13.0
You have to replace
<elk-node>by the hostname of the Elastic Stack node.-e ES_JAVA_OPTS="-Xms1024m -Xmx1024m"- sets the JVM heap size used by Elasticsearch.-e discovery.type=single-node- sets the discovery type tosingle-node; otherwise Elasticsearch will not start caused by failed Bootstrap Checks upon startup.-e xpack.security.enabled=false- disable security features, otherwise Logstash will not be able to connect to Elasticsearch via plain http.-p published=9200,target=9200,mode=host \ -p published=9300,target=9300,mode=host \ --endpoint-mode dnsrr \publishes the REST (
9200) and the node communication (9300) port of Elasticsearch directly at the<elk-node>, bypassing the routing mesh, to enable access by clients outside the swarm. It is not required for running the Archive, because the Logstash and the Kibana container connects to Elasticsearch over the created overlay network.Bind mount
--mount type=bind,src=/etc/localtime,dst=/etc/localtime,readonlyand--mount type=bind,src=/etc/timezone,dst=/etc/timezone,readonlyduplicates your host timezone inside the container. Otherwise the container timezone is UTC. Attention: If there is no/etc/timezoneon the Elastic Stack node, you have to create one (e.g.:$ echo "Europe/Vienna" > /etc/timezone) before launching the container, otherwise the container will not start.Bind mount
--mount type=bind,src=/var/local/dcm4chee-arc/esdatadir,/usr/share/elasticsearch/datatakes care to store the data in the specified host directory. It is initialized on first container start-up if it is not already present in the specified host directory. That ensures that the data does not get lost on deletion and re-creation of the Elasticsearch container. -
Create a Swarm Service running Kibana on the Elastic Stack node, e.g:
$ docker service create \
           --network dcm4chee_default \
           --name kibana \
           --constraint 'node.hostname == <elk-node>' \
           --mount type=bind,src=/etc/localtime,dst=/etc/localtime,readonly \
           --mount type=bind,src=/etc/timezone,dst=/etc/timezone,readonly \
           -d docker.elastic.co/kibana/kibana:8.13.0
You have to replace
<elk-node>by the hostname of the Elastic Stack node.You may enable accessing Kibana from any web browser without user authentication publishing the http port of Kibana to clients outside the swarm.
Otherwise web browsers have to access Kibana via the Keycloak Proxy which provides the User Authentication against Keycloak and which forwards HTTP requests from authorized users to Kibana over the created overlay network.
Bind mount
--mount type=bind,src=/etc/localtime,dst=/etc/localtime,readonlyand--mount type=bind,src=/etc/timezone,dst=/etc/timezone,readonlyduplicates your host timezone inside the container. Otherwise the container timezone is UTC. Attention: If there is no/etc/timezoneon the Elastic Stack node, you have to create one (e.g.:$ echo "Europe/Vienna" > /etc/timezone) before launching the container, otherwise the container will not start. -
Create a Swarm Service running Logstash on the Elastic Stack node, e.g:
$ docker service create \
           --network dcm4chee_default \
           --name logstash \
           --constraint 'node.hostname == <elk-node>' \
           -p published=12201,target=12201,protocol=udp,mode=host \
           -p published=8514,target=8514,protocol=udp,mode=host \
           -p published=8514,target=8514,mode=host \
           --endpoint-mode dnsrr \
           --mount type=bind,src=/etc/localtime,dst=/etc/localtime,readonly \
           --mount type=bind,src=/etc/timezone,dst=/etc/timezone,readonly \
           --mount type=bind,src=/var/local/dcm4chee-arc/logstash/filter-hashtree,dst=/usr/share/logstash/data/filter-hashtree \
           -d dcm4che/logstash-dcm4chee:8.13.0-16
You have to replace
<elk-node>by the hostname of the Elastic Stack node.-p published=12201,target=12201,protocol=udp,mode=host \ -p published=8514,target=8514,protocol=udp,mode=host \ -p published=8514,target=8514,mode=host \ --endpoint-mode dnsrr \publishes the configured GELF Logger (
12201) and Syslog (8514) port of Logstash directly at the<elk-node>, bypassing the routing mesh, to enable access by clients outside the swarm. Publishing the GELF Logger port is also required if other services have configured the GELF Logging Driver to log to Logstash. Keycloak and the Archive application connects to Logstash over the created overlay network, so they do not rely on that the ports are published.Bind mount
--mount type=bind,src=/etc/localtime,dst=/etc/localtime,readonlyand--mount type=bind,src=/etc/timezone,dst=/etc/timezone,readonlyduplicates your host timezone inside the container. Otherwise the container timezone is UTC. Attention: If there is no/etc/timezoneon the Elastic Stack node, you have to create one (e.g.:$ echo "Europe/Vienna" > /etc/timezone) before creating the service, otherwise the container will not start.Bind mount
--mount type=bind,src=/var/local/dcm4chee-arc/logstash/filter-hashtree,dst=/usr/share/logstash/data/filter-hashtreetakes care to store the file with the fingerprint of the last audit message - configurable by environment variable HASH_FILE with default/usr/share/logstash/data/filter-hashtree- outside of the container to avoid to start a new hash tree on every re-creation of the container. Attention: The file must already exist and must be writable by the logstash user of the container (uid=1000). -
Create a Swarm Service running the LDAP server on the Database node, e.g:
$ docker service create \
           --network dcm4chee_default \
           --name ldap \
           --constraint 'node.hostname == <db-node>' \
           --log-driver gelf \
           --log-opt gelf-address=udp://<elk-node>:12201 \
           --log-opt tag=slapd \
           -p published=389,target=389,mode=host \
           --endpoint-mode dnsrr \
           -e STORAGE_DIR=/storage/fs1 \
           -e ARCHIVE_HOST=<arc-node> \
           -e SYSLOG_HOST=<elk-node> \
           -e SYSLOG_PORT=8514 \
           -e SYSLOG_PROTOCOL=TLS \
           --mount type=bind,src=/var/local/dcm4chee-arc/ldap,dst=/var/lib/openldap/openldap-data \
           --mount type=bind,src=/var/local/dcm4chee-arc/slapd.d,dst=/etc/openldap/slapd.d \
           -d dcm4che/slapd-dcm4chee:2.6.5-32.0
You have to replace
<arc-node>,<db-node>and<elk-node>by the hostnames of the Archive, the Database and the Elastic Stack node.--log-driver gelf \ --log-opt gelf-address=udp://logstash:12201 \ --log-opt tag=slapd \configures the GELF Logging Driver for the service.
-p published=389,target=389,mode=host \
--endpoint-mode dnsrr \
publishes ldap port
389directly at the<db-node>, bypassing the routing mesh, to enable access by LDAP clients outside the swarm. It is not required for running the Archive, because the Archive container connects the LDAP port of the LDAP server container over the created overlay network.-e STORAGE_DIR=/storage/fs1specifies/storage/fs1(default:/opt/wildfly/standalone/data/fs1) as path of the directory - inside of the Archive container - where the Archive stores received DICOM objects.-e SYSLOG_HOST=logstash -e SYSLOG_PORT=8514 -e SYSLOG_PROTOCOL=TLSspecifies to emit audit logs to the Logstash container, using TLS (default: UDP).
Bind mount
--mount type=bind,src=/var/local/dcm4chee-arc/ldap,dst=/var/lib/openldapand--mount type=bind,src=/var/local/dcm4chee-arc/slapd.d,dst=/etc/openldap/slapd.dtakes care to store the LDAP database and the OpenLDAP server configuration in the specified host directories. They are initialized on first container start-up if they are not already present in the specified host directories. That ensures that changes on the Archive configuration does not get lost on deletion and re-creation of the OpenLDAP Server container. -
Create a Swarm Service running the LDAP server on the Database node, e.g:
$ docker service create \
           --network dcm4chee_default \
           --name mariadb \
           --constraint 'node.hostname == <db-node>' \
           --log-driver gelf \
           --log-opt gelf-address=udp://<elk-node>:12201 \
           --log-opt tag=mariadb \
           -p published=3306,target=3306,mode=host \
           --endpoint-mode dnsrr \
           -e MYSQL_ROOT_PASSWORD=secret \
           -e MYSQL_DATABASE=keycloak \
           -e MYSQL_USER=keycloak \
           -e MYSQL_PASSWORD=keycloak \
           --mount type=bind,src=/etc/localtime,dst=/etc/localtime,readonly \
           --mount type=bind,src=/etc/timezone,dst=/etc/timezone,readonly \
           --mount type=bind,src=/var/local/dcm4chee-arc/mysql,dst=/var/lib/omysql \
           -d mariadb:10.11.4
You have to replace
<db-node>and<elk-node>by the hostnames of the Database and the Elastic Stack node.--log-driver gelf \ --log-opt gelf-address=udp://<elk-node>:12201 \ --log-opt tag=mariadb \configures the GELF Logging Driver for the service.
-p published=3306,target=3306,mode=host \
--endpoint-mode dnsrr \
publishes the MariaDB Server port
3306directly at the<db-node>, bypassing the routing mesh, to enable access the MariaDB Server also by MariaDB/MySQL clients outside the swarm. It is not required for running Keycloak, because the Keycloak container connects the Server port of the MariaDB Server container over the created overlay network.-e MYSQL_ROOT_PASSWORD=secret -e MYSQL_DATABASE=keycloak \ -e MYSQL_USER=keycloak \ -e MYSQL_PASSWORD=keycloak \set the password of the MariaDB
rootsuperuser account, the name of the database, a user and its password.See further available environment variables of the MariaDB container.
Bind mount
--mount type=bind,src=/etc/localtime,dst=/etc/localtime,readonlyand--mount type=bind,src=/etc/timezone,dst=/etc/timezone,readonlyduplicates your host timezone inside the container. Otherwise the container timezone is UTC. Attention: If there is no/etc/timezoneon the Archive node, you have to create one (e.g.:$ echo "Europe/Vienna" > /etc/timezone) before creating the service, otherwise the container will not start.Bind mount
--mount type=bind,src=/var/local/dcm4chee-arc/mysql,dst=/var/lib/mysqltakes care to store the database in the specified host directory. It is initialized on first container start-up if it is not already present in the specified host directory. That ensures that the data does not get lost on deletion and re-creation of the MariaDB Server container. -
Create a Swarm Service running preconfigured Keycloak Authentication Server on the Archive node, e.g:
$ docker service create \
           --network dcm4chee_default \
           --name keycloak \
           --constraint 'node.hostname == <arc-node>' \
           --log-driver gelf \
           --log-opt gelf-address=udp://<elk-node>:12201 \
           --log-opt tag=keycloak \
           -p published=8843,target=8843,mode=host \
           --endpoint-mode dnsrr \
           -e KC_HTTPS_PORT=8843 \
           -e KC_HOSTNAME=<arc-node> \
           -e KEYCLOAK_ADMIN=admin \
           -e KEYCLOAK_ADMIN_PASSWORD=changeit \
           -e KC_DB=mariadb \
           -e KC_DB_URL_DATABASE=keycloak \
           -e KC_DB_URL_HOST=mariadb \
           -e KC_DB_USERNAME=keycloak \
           -e KC_DB_PASSWORD=keycloak \
           -e KC_LOG=file,gelf \
           -e KC_LOG_GELF_HOST=<elk-node> \
           -e ARCHIVE_HOST=<arc-node> \
           -e LOGSTASH_HOST=logstash \
           -e KIBANA_CLIENT_ID=kibana \
           -e KIBANA_CLIENT_SECRET=changeit \
           -e KIBANA_REDIRECT_URL=https://<arc-node>:8643/oauth2/callback/* \
           -e KEYCLOAK_WAIT_FOR="ldap:389 mariadb:8514 logstash:8514" \
           --mount type=bind,src=/etc/localtime,dst=/etc/localtime,readonly \
           --mount type=bind,src=/etc/timezone,dst=/etc/timezone,readonly \
           --mount type=bind,src=/var/local/dcm4chee-arc/keycloak,dst=/opt/keycloak/data \
           -d dcm4che/keycloak:24.0.3
You have to replace
<arc-node>and<elk-node>by the hostnames of the Archive and the Elastic Stack node.--log-driver gelf \ --log-opt gelf-address=udp://<elk-node>:12201 \ --log-opt tag=keycloak \configures the GELF Logging Driver for the service.
-p published=8843,target=8843,mode=host \
--endpoint-mode dnsrr \
publishes the https (
8843) port of Keycloak directly at the<arc-node>, bypassing the routing mesh, to enable access by http(s) clients outside the swarm.The https port number is set by
-e HTTPS_PORT=8843 \to avoid collisions with the https port used by Wildfly with the deployed dcm4che Archive 5 application by default.
If you set the environment variables
LDAP_BASE_DN,LDAP_ROOTPASSfor the LDAP service, you have to set that environment variables also for the Keycloak service. Otherwise Keycloak will fail to connect to the LDAP Server.-e KEYCLOAK_WAIT_FOR="ldap:389 mariadb:8514 logstash:8514"delays the start of Keycloak until OpenLDAP, MariaDB and Logstash are listening on the specified port.Bind mount
--mount type=bind,src=/etc/localtime,dst=/etc/localtime,readonlyand--mount type=bind,src=/etc/timezone,dst=/etc/timezone,readonlyduplicates your host timezone inside the container. Otherwise the container timezone is UTC. Attention: If there is no/etc/timezoneon the Archive node, you have to create one (e.g.:$ echo "Europe/Vienna" > /etc/timezone) before creating the service, otherwise the container will not start.Bind mount
--mount type=bind,src=/var/local/dcm4chee-arc/keycloak,dst=/opt/keycloak/datatakes care to store the Keycloak server configuration in the specified host directory. It is initialized on first container start-up if it is not already present in the specified host directory. That ensures that the data does not get lost on deletion and re-creation of the Keycloak Server container.For further available environment variables of the Keycloak container see https://github.com/dcm4che-dockerfiles/keycloak#environment-variables.
-
Create a Swarm Service running PostgreSQL on the Database node, e.g:
$ docker service create \
           --network dcm4chee_default \
           --name db \
           --constraint 'node.hostname == <db-node>' \
           --log-driver gelf \
           --log-opt gelf-address=udp://logstash:12201 \
           --log-opt tag=postgres \
           -p published=5432,target=5432,mode=host \
           --endpoint-mode dnsrr \
           -e POSTGRES_DB=pacsdb \
           -e POSTGRES_USER=pacs \
           -e POSTGRES_PASSWORD=pacs \
           --mount type=bind,src=/etc/localtime,dst=/etc/localtime,readonly \
           --mount type=bind,src=/etc/timezone,dst=/etc/timezone,readonly \
           --mount type=bind,src=/var/local/dcm4chee-arc/db,dst=/var/lib/postgresql/data \
           -d dcm4che/postgres-dcm4chee:16.2-32
You have to replace
<db-node>and<elk-node>by the hostnames of the Database and the Elastic Stack node.--log-driver gelf \ --log-opt gelf-address=udp://<elk-node>:12201 \ --log-opt tag=postgres \configures the GELF Logging Driver for the service.
-p published=5432,target=5432,mode=host \
--endpoint-mode dnsrr \
publishes the PostgreSQL Server port
5432directly at the , bypassing the routing mesh, to enable access by PostgreSQL clients outside the swarm. It is not required for running the Archive, because the Archive container connects the Server port of the PostgreSQL Server container over the created overlay network.-e POSTGRES_DB=pacsdb \ -e POSTGRES_USER=pacs \ -e POSTGRES_PASSWORD=pacs \set the name of the database, a user and its password.
For further available environment variables of the PostgreSQL container see https://github.com/dcm4che-dockerfiles/postgres-dcm4chee#environment-variables.
Bind mount
--mount type=bind,src=/etc/localtime,dst=/etc/localtime,readonlyand--mount type=bind,src=/etc/timezone,dst=/etc/timezone,readonlyduplicates your host timezone inside the container. Otherwise the container timezone is UTC. Attention: If there is no/etc/timezoneon the Database node, you have to create one (e.g.:$ echo "Europe/Vienna" > /etc/timezone) before creating the service, otherwise the container will not start.Bind mount
--mount type=bind,src=/var/local/dcm4chee-arc/db,dst=/var/lib/postgresql/datatakes care to store the database in the specified host directory. It is initialized on first container start-up if it is not already present in the specified host directory. That ensures that the data does not get lost on deletion and re-creation of the PostgreSQL Server container. -
Create a Swarm Service running Wildfly with deployed dcm4che Archive 5 application on the Archive node, e.g:
$ docker service create \ --network dcm4chee_default \ --name arc \ --constraint 'node.hostname == <arc-node>' \ --log-driver gelf \ --log-opt gelf-address=udp://logstash:12201 \ --log-opt tag=dcm4chee-arc \ -p published=8080,target=8080,mode=host \ -p published=8443,target=8443,mode=host \ -p published=9990,target=9990,mode=host \ -p published=9993,target=9993,mode=host \ -p published=11112,target=11112,mode=host \ -p published=2762,target=2762,mode=host \ -p published=2575,target=2575,mode=host \ -p published=12575,target=12575,mode=host \ --endpoint-mode dnsrr \ -e POSTGRES_DB=pacsdb \ -e POSTGRES_USER=pacs \ -e POSTGRES_PASSWORD=pacs \ -e LOGSTASH_HOST=logstash \ -e WILDFLY_WAIT_FOR='ldap:389 db:5432 logstash:8514' \ -e WILDFLY_CHOWN='/opt/wildfly/standalone /storage' \ -e AUTH_SERVER_URL=https://<arc-node>:8843 \ --mount type=bind,src=/etc/localtime,dst=/etc/localtime,readonly \ --mount type=bind,src=/etc/timezone,dst=/etc/timezone,readonly \ --mount type=bind,src=/var/local/dcm4chee-arc/wildfly,dst=/opt/wildfly/standalone \ --mount type=bind,src=/var/local/dcm4chee-arc/storage,dst=/storage \ -d dcm4che/dcm4chee-arc-psql:5.32.0-secureYou have to replace
<arc-node>and<elk-node>by the hostnames of the Archive and the Elastic Stack node.--log-driver gelf \ --log-opt gelf-address=udp://<elk-node>:12201 \ --log-opt tag=dcm4chee-arc \configures the GELF Logging Driver for the service.
-p published=8080,target=8080,mode=host \ -p published=8443,target=8443,mode=host \ -p published=9990,target=9990,mode=host \ -p published=9993,target=9993,mode=host \ -p published=11112,target=11112,mode=host \ -p published=2762,target=2762,mode=host \ -p published=2575,target=2575,mode=host \ -p published=12575,target=12575,mode=host \ --endpoint-mode dnsrr \publishes the http (
8080) and https (8443) port of the web server and the http (9990) and the https (9993) port of the WildFly Administration Console, and the DICOM (11112), DICOM TLS (2762), HL7 (2575) and HL7 TLS (12575) port of the Archive application directly at the<arc-node>, bypassing the routing mesh, to enable access by http(s) clients, DICOM applications and HL7 senders outside the swarm.The environment variables:
-e POSTGRES_DB=pacsdb \
-e POSTGRES_USER=pacs \
-e POSTGRES_PASSWORD=pacs \
set database name, user and its password to connect to the PostgreSQL server, which have to match with the values specified for the PostgreSQL Server container. Otherwise the Archive application will fail to connect to the PostgreSQL server.
If you set the environment variables
LDAP_BASE_DN,LDAP_ROOTPASSorARCHIVE_DEVICE_NAMEfor the LDAP server container, you have to set that environment variables also for the Archive container. Otherwise the Archive application will fail to connect to the LDAP Server or will not find its configuration in the LDAP directory.-e WILDFLY_WAIT_FOR='ldap:389 db:5432 logstash:8514'delays the start of WildFly until OpenLDAP slapd, PostgreSQL are and Logstash are listening on the specified ports.-e WILDFLY_CHOWN="/opt/wildfly/standalone /storage"takes care that the system user running WilfFly in the Archive container has write access to the Wildfly configuration and the Archive Storage directory - as specified by-e STORAGE_DIR=/storage/fs1of the LDAP container.-e AUTH_SERVER_URL=https://<arc-node>:8843- you have to replace<arc-node>by the hostname of the Archive Node, which must be resolvable by your DNS server - specifies Keycloak to redirect requests from not logged in users to Keycloak's Login Page.If you set the environment variables
REALM_NAMEorSSL_REQUIREDfor the Keycloak server container, you have to set that environment variables also for the Archive container. Otherwise the background out of band REST invocation to Keycloak for user authorization will fail.If you want to run more than one Archive container, you have to specify different values for environment variable
UI_CLIENT_ID(default:dcm4chee-arc-ui), and register each of the Archive UIs in Keycloak.For further available environment variables of the Archive container see https://github.com/dcm4che-dockerfiles/dcm4chee-arc-psql#environment-variables.
Bind mount
--mount type=bind,src=/etc/localtime,dst=/etc/localtime,readonlyand--mount type=bind,src=/etc/timezone,dst=/etc/timezone,readonlyduplicates your host timezone inside the container. Otherwise the container timezone is UTC. Attention: If there is no/etc/timezoneon the Archive node, you have to create one (e.g.:$ echo "Europe/Vienna" > /etc/timezone) before creating the service, otherwise the container will not start.Bind mount
--mount type=bind,src=/var/local/dcm4chee-arc/wildfly,dst=/opt/wildfly/standalonetakes care to store the Wildfly server configuration in the specified host directory. It is initialized on first container start-up if it is not already present in the specified host directory. That ensures that the data does not get lost on deletion and re-creation of the Archive Server container.Bind mount
--mount type=bind,src=/var/local/dcm4chee-arc/storage,dst=/storagetakes care that received DICOM objects stored to/storage/fs1- as specified by-e STORAGE_DIR=/storage/fs1of the LDAP container - are actually stored in the specified host directory to ensure that the stored DICOM objects does not get lost on deletion and re-creation of the Archive Server container. -
Sign in with User/Password
root/changeitat the Realm Admin Console of Keycloak athttps://<arc-node>:8843/admin/dcm4che/console- you have to replace <arc-node> by the hostname of the Archive Node. If you changed the default realm name:dcm4cheby environment variableREALM_NAMEfor the Keycloak and the Archive Container, you also have to replacedcm4cheby the that value in the URL.Keycloak docker image
dcm4che/keycloak:19.0.1and newer creates an OIDC client for the Archive UI on first startup, customizable by environment variablesUI_CLIENT_ID,ARCHIVE_HOST,ARCHIVE_HTTP_PORTandARCHIVE_HTTPS_PORT: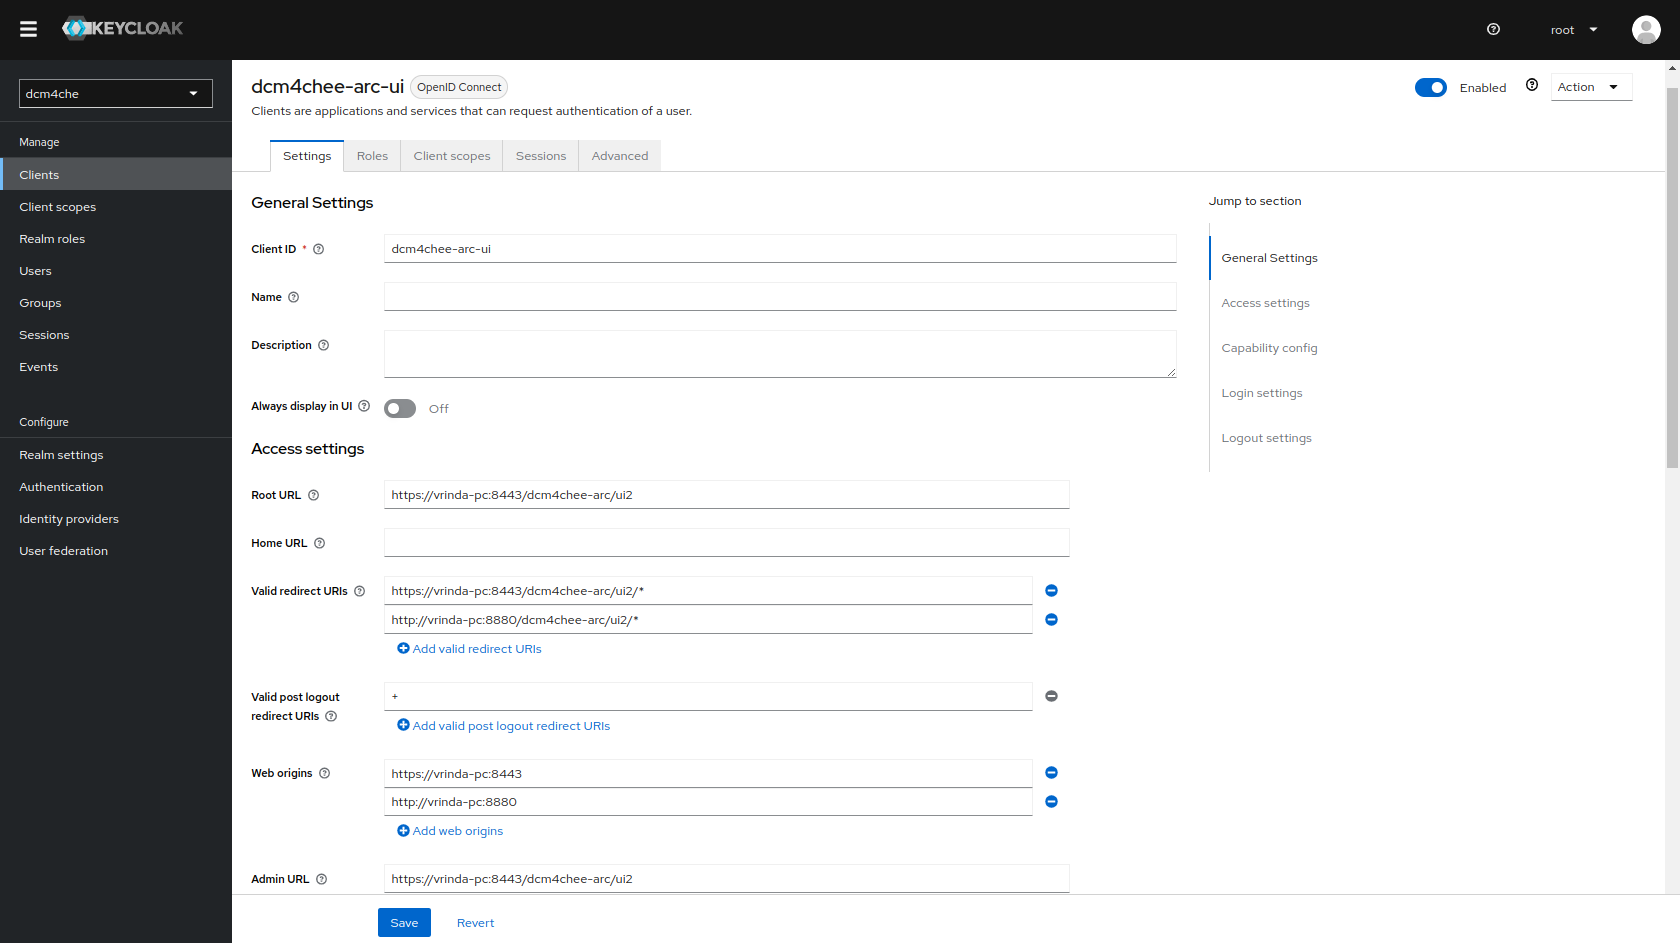
-
Access to the Wildfly Administration Console is also protected with Keycloak.
Keycloak docker image
dcm4che/keycloak:19.0.1and newer creates also another OIDC client for the Wildfly Administration Console on first startup, customizable by environment variablesWILDFLY_CONSOLE,ARCHIVE_HOSTandARCHIVE_MANAGEMENT_HTTPS_PORT: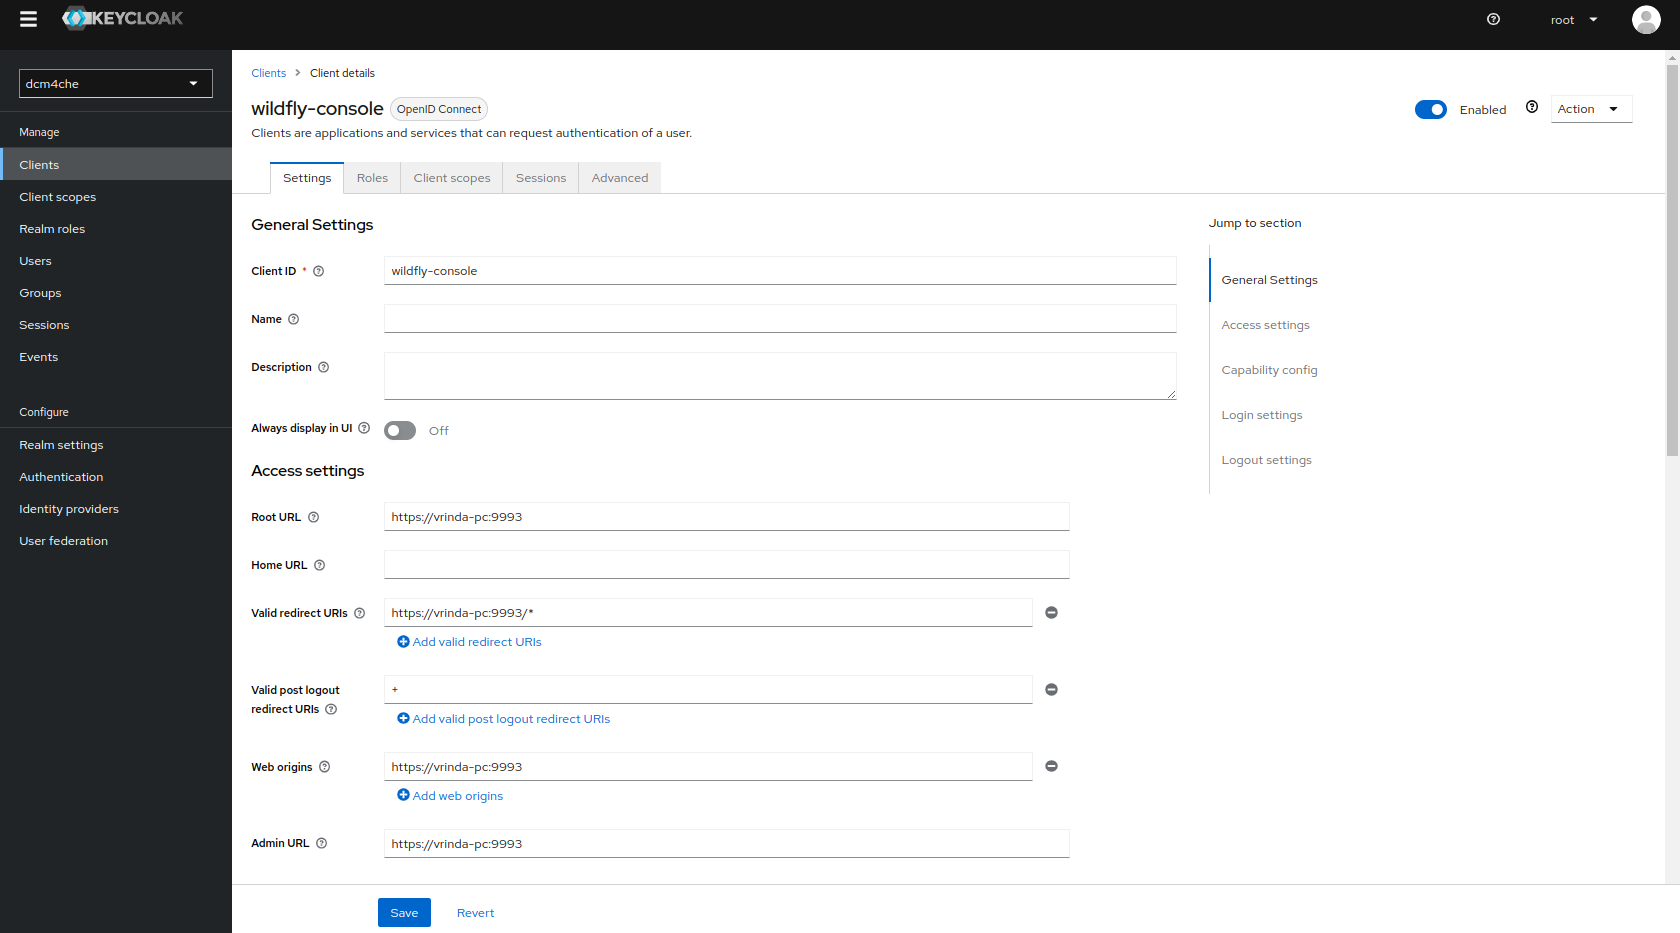
Only users with role
ADMINISTRATORare permitted to access the WildFly Administration Console.Sign out, before verifying that accessing the WildFly Administration Console at
http://<arc-node>:9990orhttps://<arc-node>:9993will redirect you to the Login page of Keycloak. You may sign in with User/Passwordroot/changeit. -
Sign in with User/Password
root/changeitat the Realm Admin Console of Keycloak athttps://<arc-node>:8843/admin/dcm4che/console- you have to replace <arc-node> by the hostname of the archive node. If you changed the default realm name:dcm4cheby environment variableREALM_NAMEfor the Keycloak, the Keycloak Proxy and the Archive Container, you also have to replacedcm4cheby the that value in the URL.Keycloak docker image
dcm4che/keycloak:19.0.1and newer creates an OIDC client for OAuth2-Proxy for securing Kibana on first startup, customizable by environment variablesKIBANA_CLIENT_ID,KIBANA_CLIENT_SECRETandKIBANA_REDIRECT_URL:
with Audience Token Mapper
audience: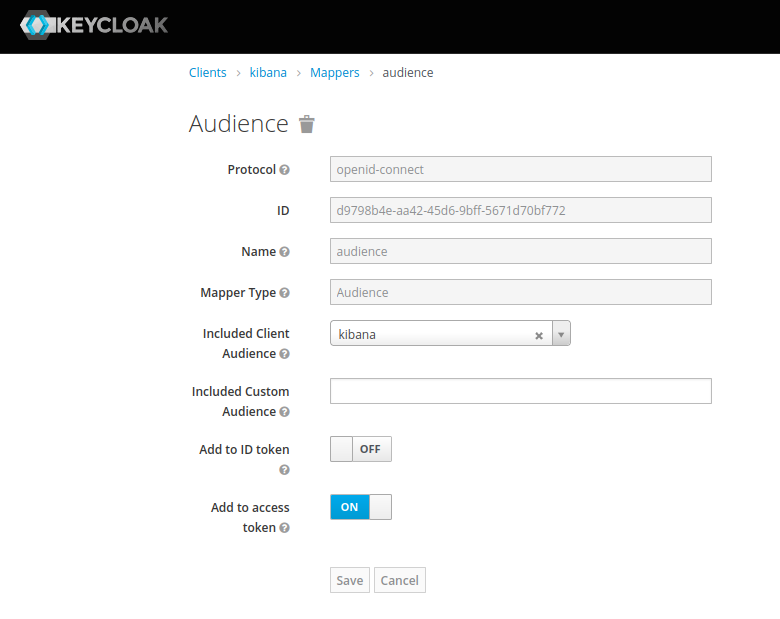
and Client Credential
changeit: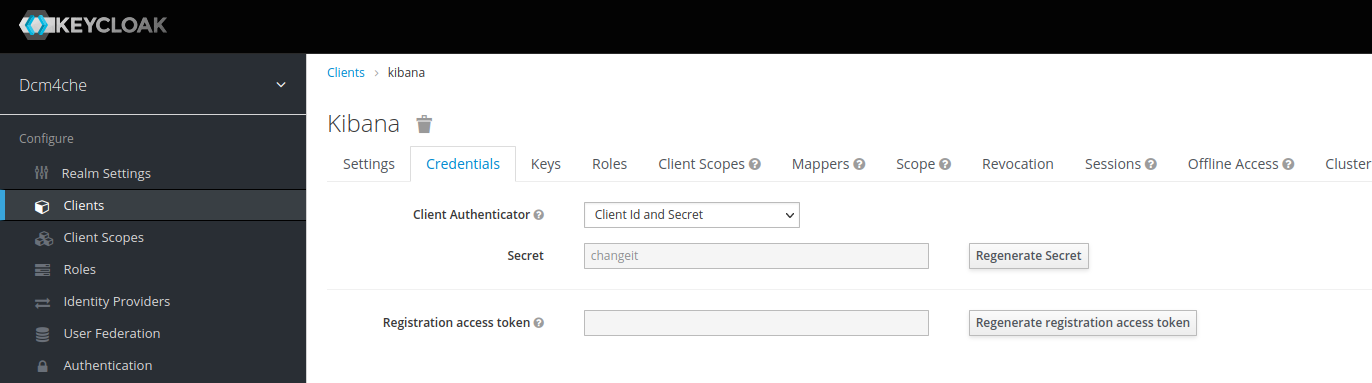
which you can/should
Regenerate Secretand copy the new value for passing it as environment variableOAUTH2_PROXY_CLIENT_SECRETto OAuth2 Proxy container in the next step.Create a Swarm Service running OAuth2 Proxy on the Archive node, e.g:, e.g:
$ docker service create \
    --network dcm4chee_default \
    --name oauth2-proxy \
    --constraint 'node.hostname == <arc-node>' \
    --log-driver gelf \
    --log-opt gelf-address=udp://elk-node:12201 \
    --log-opt tag=oauth2-proxy \
    -p published=8643,target=8643,mode=host \
    --endpoint-mode dnsrr \
    -e OAUTH2_PROXY_HTTPS_ADDRESS=0.0.0.0:8643 \
    -e OAUTH2_PROXY_PROVIDER=keycloak-oidc \
    -e OAUTH2_PROXY_SKIP_PROVIDER_BUTTON=true \
    -e OAUTH2_PROXY_UPSTREAMS=http://kibana:5601 \
    -e OAUTH2_PROXY_OIDC_ISSUER_URL=https://arc-node:8843/realms/dcm4che \
    -e OAUTH2_PROXY_REDIRECT_URL=https://arc-node:8643/oauth2/callback \
    -e OAUTH2_PROXY_ALLOWED_ROLES=auditlog \
    -e OAUTH2_PROXY_CLIENT_ID=kibana \
    -e OAUTH2_PROXY_CLIENT_SECRET=changeit \
    -e OAUTH2_PROXY_EMAIL_DOMAINS=* \
    -e OAUTH2_PROXY_OIDC_EMAIL_CLAIM=sub \
    -e OAUTH2_PROXY_INSECURE_OIDC_ALLOW_UNVERIFIED_EMAIL=true \
    -e OAUTH2_PROXY_COOKIE_SECRET=T0F1dGhLaWJhbmFUZXN0cw== \
    -e OAUTH2_PROXY_SSL_INSECURE_SKIP_VERIFY=true \
    -e OAUTH2_PROXY_TLS_CERT_FILE=/etc/certs/cert.pem \
    -e OAUTH2_PROXY_TLS_KEY_FILE=/etc/certs/key.pem \
    -e OAUTH2_PROXY_CUSTOM_TEMPLATES_DIR=/templates \
    -d dcm4che/oauth2-proxy:7.5.1
Note :
-
OAUTH2_PROXY_OIDC_ISSUER_URL: "https://<arc-node>:8843/realms/dcm4che"applies only for Keycloak v18.0+ and if default KC_HTTP_RELATIVE_PATH is used. -
If lower versions of Keycloak are used or if KC_HTTP_RELATIVE_PATH is set to
/authfor Keycloak v18.0+, thenOAUTH2_PROXY_OIDC_ISSUER_URL: "https://<arc-node>:8843/auth/realms/dcm4che"-
-p 8643:8643- publishes the https (8643) port of the OAuth2-Proxy from the container to the host to enable connections from external https clients to the OAuth2-Proxy, which have to match with -
-e OAUTH2_PROXY_HTTPS_ADDRESS=0.0.0.0:8643- the port to be listening, and with the port of -
-e OAUTH2_PROXY_PROVIDER=kibana-oidc- specifies the OAuth provider. -
-e OAUTH2_PROXY_SKIP_PROVIDER_BUTTONis optional. If set totrue, it will skip sign-in-page specifyingSign-on with Keycloakand directly show the Keycloak login page. -
-e OAUTH2_PROXY_UPSTREAMS=http://kibana:5601- specifies Kibana https URL as upstream endpoint -
-e OAUTH2_PROXY_OIDC_ISSUER_URL=https://<arc-node>:8843/realms/dcm4che- specifies OpenID Connect issuer URL, wherein (8843) port refersKC_HTTPS_PORTused on Keycloak container startup -
-e OAUTH2_PROXY_REDIRECT_URL=https://<arc-node>:8643/oauth2/callback- the redirection URL for the Keycloak Authentication Server callback URL - you have to replace <arc-node> by the hostname of the archive node, which must be resolvable by your DNS server. -
-e OAUTH2_PROXY_ALLOWED_ROLES=auditlog- (keycloak-oidc) restrict logins to members of these roles (may be given multiple times) -
-e OAUTH2_PROXY_CLIENT_ID=kibana- specifies the Client ID used to authenticate to the Keycloak Server, -
-e OAUTH2_PROXY_CLIENT_SECRET=<kibana-client-secret>- specifies the Client Secret used to authenticate to the Keycloak Authentication Server for Confidential type kibana client. The value should match with that used during keycloak container startup. -
-e OAUTH2_PROXY_EMAIL_DOMAINS="*"as*specifies to authenticate any email. -
-e OAUTH2_PROXY_OIDC_EMAIL_CLAIM="preferred_username"which OIDC claim contains the user's email (default "email") -
-e OAUTH2_PROXY_INSECURE_OIDC_ALLOW_UNVERIFIED_EMAIL="true"specifies to not fail if an email address in an id_token is not verified -
-e OAUTH2_PROXY_COOKIE_SECRET=T0F1dGhLaWJhbmFUZXN0cw==- specifies the seed string for secure cookies (optionally base64 encoded) -
-e OAUTH2_PROXY_SSL_INSECURE_SKIP_VERIFY=trueastrueskips validation of certificates presented when using HTTPS -
-e OAUTH2_PROXY_CUSTOM_TEMPLATES_DIRspecifies the custom templates' directory location which contains the customized forbidden error page shown to unauthorized users on authentication. Note : OAuth2 proxy does not yet have a mechanism to only customize one of the templates (i.e. sign_in or error). Hence, if one wants to customize only one, both templates need to be still provided. -
-e OAUTH2_PROXY_TLS_CERT_FILEandOAUTH2_PROXY_TLS_KEY_FILEspecifies path to TLS certificate and private key in Privacy-Enhanced Mail (PEM) format to use for TLS support. To avoid the security warning of Web Browsers connecting to Kibana via OAuth2 Proxy, replace the certificate provided in/etc/certs/cert.pemof the docker image: by a certificate whose Common Name and/or Subject Alt Name matches the host name and which is signed by a
trusted issuer; bind mount the PEM files with the certificate and corresponding private key and adjust
by a certificate whose Common Name and/or Subject Alt Name matches the host name and which is signed by a
trusted issuer; bind mount the PEM files with the certificate and corresponding private key and adjust
OAUTH2_PROXY_TLS_CERT_FILEandOAUTH2_PROXY_TLS_KEY_FILEto refer their paths inside of the container.$ docker run --rm dcm4che/oauth2-proxy:7.5.1 help
will show all available environment variables and command options. See also OAuth2 Proxy as well as Keycloak OIDC Auth Provider of Keycloak for more information about configuration options of OAuth2 Proxy.
-
$ docker service ls
ID                  NAME                     MODE                REPLICAS            IMAGE                                                 PORTS
26xg4sn0vb0q        arc                      replicated          1/1                 dcm4che/dcm4chee-arc-psql:5.32.0-secure               *:8080->8080/tcp,*:8443->8443/tcp,*:9990->9990/tcp,*:11112->11112/tcp,*:2575->2575/tcp
dtksw5sv18xt        keycloak                 replicated          1/1                 dcm4che/keycloak:24.0.3                               *:8843->8843/tcp
jt50ort8c7qw        ldap                     replicated          1/1                 dcm4che/slapd-dcm4chee:2.6.5-32.0                     *:389->389/tcp
ku6wx87ap9y9        oauth2-proxy             replicated          1/1                 dcm4che/oauth2-proxy:7.5.1                            *:8643->8643/tcp
pkkqh4zvvop0        logstash                 replicated          1/1                 dcm4che/logstash-dcm4chee:8.13.0-16                   *:12201->12201/udp,*:8514->8514/udp,*:8514->8514/tcp
rn7n79g36u30        db                       replicated          1/1                 dcm4che/postgres-dcm4chee:16.2-32                     *:5432->5432/tcp
v991z4viy2cn        elasticsearch            replicated          1/1                 docker.elastic.co/elasticsearch/elasticsearch:8.13.0  *:9200->9200/tcp,*:9300->9300/tcp
xubeh4sbhm8n        kibana                   replicated          1/1                 docker.elastic.co/kibana/kibana:8.13.0                *:5601->5601/tcp
$ docker service ps elasticsearch kibana logstash ldap mariadb keycloak oauth2-proxy db arc
ID NAME IMAGE NODE DESIRED STATE CURRENT STATE ERROR PORTS
76janjrnoca8 elasticsearch.1 docker.elastic.co/elasticsearch/elasticsearch:8.13.0 elk-node Running Running 4 minutes ago
nqfj2jw1zosw arc.1 dcm4che/dcm4chee-arc-psql:5.32.0-secure arc-node Running Running 4 minutes ago
9w2osm5k7dqy db.1 dcm4che/postgres-dcm4chee:16.2-32 db-node Running Running about a minute ago
829g3b2jtm5m oauth2-proxy.1 dcm4che/oauth2-proxy:7.5.1 arc-node Running Running about a minute ago
117jw1w92pjr keycloak.1 dcm4che/keycloak:24.0.3 arc-node Running Running 4 minutes ago
x0f08a5i4x4q ldap.1 dcm4che/slapd-dcm4chee:2.6.5-32.0 db-node Running Running about a minute ago
mxbin0wv2h7s logstash.1 dcm4che/logstash-dcm4chee:8.13.0-16 elk-node Running Running about a minute ago
qfj2x7ny6p0d kibana.1 docker.elastic.co/kibana/kibana:8.13.0 elk-node Running Running about a minute ago -
$ docker service scale elasticsearch=0 kibana=0 logstash=0 ldap=0 mariadb=0 keycloak=0 oauth2-proxy=0 db=0 arc=0and re-start services by
$ docker service scale elasticsearch=1 kibana=1 logstash=1 ldap=1 mariadb=1 keycloak=1 oauth2-proxy=1 db=1 arc=1 -
$ docker service rm elasticsearch kibana logstash ldap mariadb keycloak oauth2-proxy db arcYou may delete the created overlay network by
$ docker network rm dcm4chee_default -
Run on each of the 2 worker nodes;
$ docker swarm leave
Node left the swarm.
Run on the manager node:
$ docker swarm leave -f
Node left the swarm.
Use Docker Stack
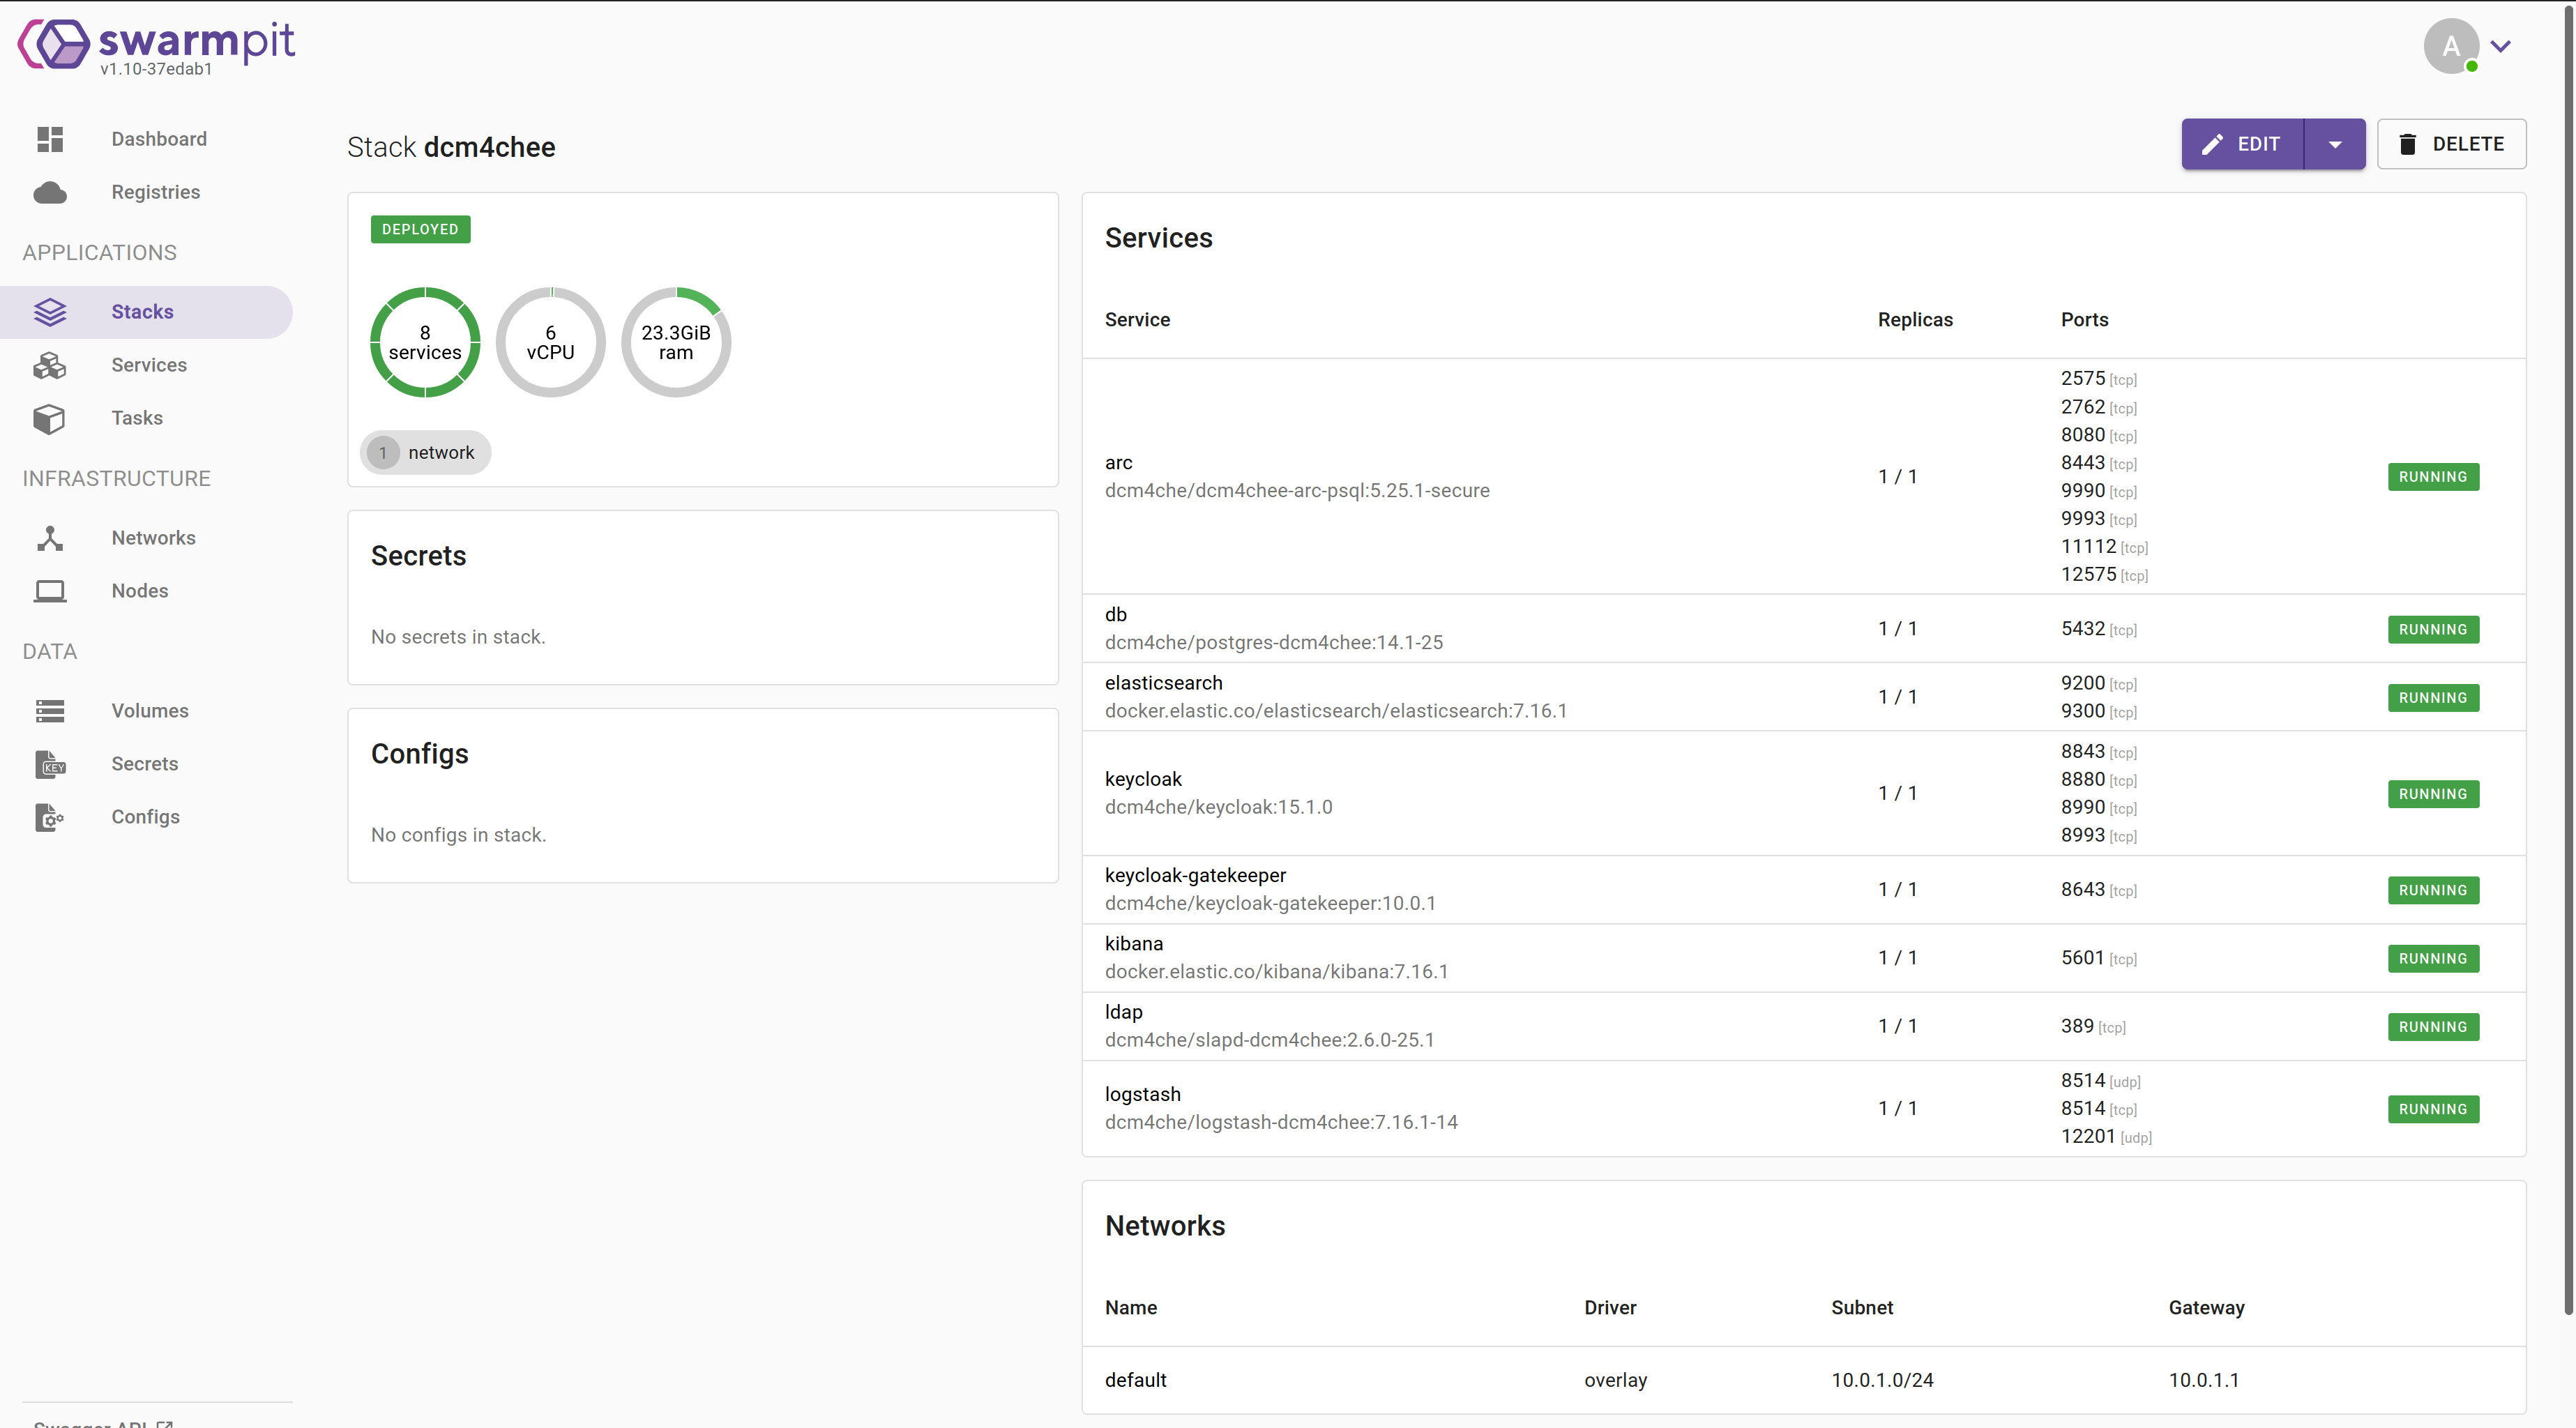
Alternatively to Docker Service one may use Docker Stack to deploy all 8 services:
-
Specify the services in a configuration file
docker-compose.yml(e.g.):version: "3.5" services: elasticsearch: image: docker.elastic.co/elasticsearch/elasticsearch:8.13.0 environment: ES_JAVA_OPTS: -Xms1024m -Xmx1024m discovery.type: single-node xpack.security.enabled: "false" logging: driver: json-file options: max-size: "10m" ports: - target: 9200 published: 9200 protocol: tcp mode: host - target: 9300 published: 9300 protocol: tcp mode: host volumes: - /etc/localtime:/etc/localtime:ro - /etc/timezone:/etc/timezone:ro - /var/local/dcm4chee-arc/esdatadir:/usr/share/elasticsearch/data deploy: endpoint_mode: dnsrr placement: constraints: [node.hostname == <elk-node>] kibana: image: docker.elastic.co/kibana/kibana:8.13.0 logging: driver: json-file options: max-size: "10m" ports: - target: 5601 published: 5601 protocol: tcp mode: host volumes: - /etc/localtime:/etc/localtime:ro - /etc/timezone:/etc/timezone:ro deploy: endpoint_mode: dnsrr placement: constraints: [node.hostname == <elk-node>] logstash: image: dcm4che/logstash-dcm4chee:8.13.0-16 logging: driver: json-file options: max-size: "10m" ports: - target: 12201 published: 12201 protocol: udp mode: host - target: 8514 published: 8514 protocol: udp mode: host - target: 8514 published: 8514 protocol: tcp mode: host volumes: - /etc/localtime:/etc/localtime:ro - /etc/timezone:/etc/timezone:ro - /var/local/dcm4chee-arc/logstash/filter-hashtree:/usr/share/logstash/data/filter-hashtree deploy: endpoint_mode: dnsrr placement: constraints: [node.hostname == <elk-node>] ldap: image: dcm4che/slapd-dcm4chee:2.6.5-32.0 logging: driver: gelf options: gelf-address: "udp://<elk-node>:12201" tag: ldap ports: - target: 389 published: 389 protocol: tcp mode: host environment: SYSLOG_HOST: logstash SYSLOG_PORT: 8514 SYSLOG_PROTOCOL: TLS STORAGE_DIR: /storage/fs1 volumes: - /var/local/dcm4chee-arc/ldap:/var/lib/openldap/openldap-data - /var/local/dcm4chee-arc/slapd.d:/etc/openldap/slapd.d deploy: endpoint_mode: dnsrr placement: constraints: [node.hostname == <db-node>] mariadb: image: mariadb:10.11.4 logging: driver: gelf options: gelf-address: "udp://<elk-node>:12201" tag: mariadb ports: - "3306:3306" environment: MYSQL_ROOT_PASSWORD: secret MYSQL_DATABASE: keycloak MYSQL_USER: keycloak MYSQL_PASSWORD: keycloak volumes: - /etc/localtime:/etc/localtime:ro - /etc/timezone:/etc/timezone:ro - /var/local/dcm4chee-arc/mysql:/var/lib/mysql deploy: endpoint_mode: dnsrr placement: constraints: [node.hostname == <db-node>] keycloak: image: dcm4che/keycloak:24.0.3 logging: driver: gelf options: gelf-address: "udp://<elk-node>:12201" tag: keycloak ports: - target: 8843 published: 8843 protocol: tcp mode: host environment: KC_HTTPS_PORT: 8843 KC_HOSTNAME: <arc-node> KEYCLOAK_ADMIN: admin KEYCLOAK_ADMIN_PASSWORD: changeit KC_DB: mariadb KC_DB_URL_DATABASE: keycloak KC_DB_URL_HOST: mariadb KC_DB_USERNAME: keycloak KC_DB_PASSWORD: keycloak KC_LOG: file,gelf KC_LOG_GELF_HOST: logstash ARCHIVE_HOST: <arc-node> KIBANA_CLIENT_ID: kibana KIBANA_CLIENT_SECRET: <kibana-client-secret> KIBANA_REDIRECT_URL: https://<arc-node>:8643/oauth2/callback/* KEYCLOAK_WAIT_FOR: ldap:389 mariadb:3306 logstash:8514 volumes: - /etc/localtime:/etc/localtime:ro - /etc/timezone:/etc/timezone:ro - /var/local/dcm4chee-arc/keycloak:/opt/keycloak/data deploy: endpoint_mode: dnsrr placement: constraints: [node.hostname == <arc-node>] oauth2-proxy: image: dcm4che/oauth2-proxy:7.5.1 ports: - target: 8643 published: 8643 protocol: tcp mode: host environment: OAUTH2_PROXY_HTTPS_ADDRESS: 0.0.0.0:8643 OAUTH2_PROXY_PROVIDER: keycloak-oidc OAUTH2_PROXY_SKIP_PROVIDER_BUTTON: "true" OAUTH2_PROXY_UPSTREAMS: "http://kibana:5601" OAUTH2_PROXY_OIDC_ISSUER_URL: "https://<arc-node>:8843/realms/dcm4che" OAUTH2_PROXY_REDIRECT_URL: "https://<arc-node>:8643/oauth2/callback" OAUTH2_PROXY_ALLOWED_ROLES: auditlog OAUTH2_PROXY_CLIENT_ID: kibana OAUTH2_PROXY_CLIENT_SECRET: changeit OAUTH2_PROXY_EMAIL_DOMAINS: "*" OAUTH2_PROXY_OIDC_EMAIL_CLAIM: "sub" OAUTH2_PROXY_INSECURE_OIDC_ALLOW_UNVERIFIED_EMAIL: "true" OAUTH2_PROXY_COOKIE_SECRET: T0F1dGhLaWJhbmFUZXN0cw== OAUTH2_PROXY_SSL_INSECURE_SKIP_VERIFY: "true" OAUTH2_PROXY_TLS_CERT_FILE: /etc/certs/cert.pem OAUTH2_PROXY_TLS_KEY_FILE: /etc/certs/key.pem OAUTH2_PROXY_CUSTOM_TEMPLATES_DIR: /templates deploy: endpoint_mode: dnsrr placement: constraints: [node.hostname == <arc-node>] db: image: dcm4che/postgres-dcm4chee:16.2-32 logging: driver: gelf options: gelf-address: "udp://<elk-node>:12201" tag: postgres ports: - target: 5432 published: 5432 protocol: tcp mode: host environment: POSTGRES_DB: pacsdb POSTGRES_USER: pacs POSTGRES_PASSWORD: pacs volumes: - /etc/localtime:/etc/localtime:ro - /etc/timezone:/etc/timezone:ro - /var/local/dcm4chee-arc/db:/var/lib/postgresql/data deploy: endpoint_mode: dnsrr placement: constraints: [node.hostname == <db-node>] arc: image: dcm4che/dcm4chee-arc-psql:5.32.0-secure logging: driver: gelf options: gelf-address: "udp://<elk-node>:12201" tag: dcm4chee-arc ports: - target: 8080 published: 8080 protocol: tcp mode: host - target: 8443 published: 8443 protocol: tcp mode: host - target: 9990 published: 9990 protocol: tcp mode: host - target: 9993 published: 9993 protocol: tcp mode: host - target: 11112 published: 11112 protocol: tcp mode: host - target: 2762 published: 2762 protocol: tcp mode: host - target: 2575 published: 2575 protocol: tcp mode: host - target: 12575 published: 12575 protocol: tcp mode: host environment: LOGSTASH_HOST: logstash POSTGRES_DB: pacsdb POSTGRES_USER: pacs POSTGRES_PASSWORD: pacs AUTH_SERVER_URL: https://keycloak:8843 UI_AUTH_SERVER_URL: https://<arc-host>:8843 WILDFLY_CHOWN: /storage WILDFLY_WAIT_FOR: ldap:389 mariadb:5432 logstash:8514 volumes: - /etc/localtime:/etc/localtime:ro - /etc/timezone:/etc/timezone:ro - /var/local/dcm4chee-arc/wildfly:/opt/wildfly/standalone - /var/local/dcm4chee-arc/storage:/storage deploy: endpoint_mode: dnsrr placement: constraints: [node.hostname == <arc-node>]
You have to replace
<arc-node>,<db-node>and<elk-node>by the hostnames of the Archive, Database and Elastic Stack node.
Note :
-
OAUTH2_PROXY_OIDC_ISSUER_URL: "https://<arc-node>:8843/realms/dcm4che"applies only for Keycloak v18.0+ and if default KC_HTTP_RELATIVE_PATH is used. - If lower versions of Keycloak are used or if KC_HTTP_RELATIVE_PATH
is set to
/authfor Keycloak v18.0+, thenOAUTH2_PROXY_OIDC_ISSUER_URL: "https://<arc-node>:8843/auth/realms/dcm4che"
-
$ docker stack deploy -c docker-compose.yml dcm4chee
Creating network dcm4chee_default
Creating service dcm4chee_elasticsearch
Creating service dcm4chee_kibana
Creating service dcm4chee_logstash
Creating service dcm4chee_ldap
Creating service dcm4chee_mariadb
Creating service dcm4chee_keycloak
Creating service dcm4chee_oauth2-proxy
Creating service dcm4chee_db
Creating service dcm4chee_arc
in the directory containing
docker-compose.yml. -
$ docker stack services dcm4chee
ID                  NAME                           MODE                REPLICAS            IMAGE                                                    PORTS
0nlodmc3exg4        dcm4chee_oauth2-proxy          replicated          1/1                 dcm4che/oauth2-proxy:7.5.1                               *:8643->8643/tcp
7jr7svjz7vur        dcm4chee_elasticsearch         replicated          1/1                 docker.elastic.co/elasticsearch/elasticsearch:8.13.0     *:9200->9200/tcp,*:9300->9300/tcp
7xqwpuddf36m        dcm4chee_keycloak              replicated          1/1                 dcm4che/keycloak:24.0.3                                  *:8843->8843/tcp
a308pzkzyeut        dcm4chee_arc                   replicated          1/1                 dcm4che/dcm4chee-arc-psql:5.32.0-secure                  *:2575->2575/tcp,*:8080->8080/tcp,*:8443->8443/tcp,*:9990->9990/tcp,*:9993->9993/tcp,*:11112->11112/tcp
d59jgiu9ummi        dcm4chee_ldap                  replicated          1/1                 dcm4che/slapd-dcm4chee:2.6.5-32.0                        *:389->389/tcp
3dgkrowsdekr        dcm4chee_mariadb               replicated          1/1                 dcm4che/mariadb:10.11.4                                  *:3306->3306/tcp
lxh9h2oaoe9a        dcm4chee_logstash              replicated          1/1                 dcm4che/logstash-dcm4chee:8.13.0-16                      *:8514->8514/udp,*:8514->8514/tcp,*:12201->12201/udp
o5m1k5jn5od9        dcm4chee_kibana                replicated          1/1                 docker.elastic.co/kibana/kibana:8.13.0                   *:5601->5601/tcp
vu5ufiv4cixx        dcm4chee_db                    replicated          1/1                 dcm4che/postgres-dcm4chee:16.2-32                        *:5432->5432/tcp
$ docker stack ps dcm4chee
ID                  NAME                             IMAGE                                                 NODE                DESIRED STATE       CURRENT STATE           ERROR               PORTS
lq3sahd5akg0        dcm4chee_oauth2-proxy.1          dcm4che/oauth2-proxy:7.5.1                            arc-node            Running             Running 6 minutes ago
6w9sacdo2ik7        dcm4chee_keycloak.1              dcm4che/keycloak:24.0.3                               arc-node            Running             Running 3 minutes ago
wzuwieytbjjt        dcm4chee_ldap.1                  dcm4che/slapd-dcm4chee:2.6.5-32.0                     db-node             Running             Running 3 minutes ago
szeuvfjruttl        dcm4chee_mariadb.1               dcm4che/mariadb:10.11.4                               db-node             Running             Running 3 minutes ago
odxv7xanq173        dcm4chee_logstash.1              dcm4che/logstash-dcm4chee:8.13.0-16                   elk-node            Running             Running 6 minutes ago
x6mphxjcp6fd        dcm4chee_kibana.1                docker.elastic.co/kibana/kibana:8.13.0                elk-node            Running             Running 6 minutes ago
bx5wr396bvhh        dcm4chee_elasticsearch.1         docker.elastic.co/elasticsearch/elasticsearch:8.13.0  elk-node            Running             Running 6 minutes ago
589p3yv4vlus        dcm4chee_arc.1                   dcm4che/dcm4chee-arc-psql:5.32.0-secure               arc-node            Running             Running 4 minutes ago
xeh6u4zg205u        dcm4chee_db.1                    dcm4che/postgres-dcm4chee:16.2-32                     db-node             Running             Running 4 minutes ago
-
Register the Archive UI as OIDC client in Keycloak as described in above.
-
Register the Keycloak Proxy as OIDC client in Keycloak as described above.
-
If you configured the OCID client for Keycloak Gatekeeper with
Access Type: confidential, you have to adjust the value for the environment variablePROXY_CLIENT_SECRETof theoauth2-proxyservice indocker-compose.ymlto match with the actual value from theCredentialstab for the OIDC client in the Realm Admin Console of Keycloak and update the Keycloak Gatekeeper service by invoking$ docker stack deploy -c docker-compose.yml dcm4chee Updating service dcm4chee_archive (id: nuudyr5klhsnddgelzswi8v9n) Updating service dcm4chee_elasticsearch (id: pzia3mwd7j0yw6ege0rsqztnp) Updating service dcm4chee_kibana (id: sa2ora66tyzvpzzfzucc0kwwg) Updating service dcm4chee_logstash (id: v90zk4kouotqnxt2o2bpl5hma) Updating service dcm4chee_ldap (id: t5e2fe622zvbizfdjy6so3j90) Updating service dcm4chee_mariadb (id: 2zvbizfdjy6st5e2fe62o3j90) Updating service dcm4chee_keycloak (id: s9729xyqozqjrru6qz2izbbfi) Updating service dcm4chee_oauth2-proxy (id: 21mgvpigzi51l4w8wwv215yqj) Updating service dcm4chee_db (id: 06ug78g6se1mpqpkr28vggtqs)
in the directory containing
docker-compose.ymlagain. -
You may stop services as described above.
-
$ docker stack rm dcm4chee
Removing service dcm4chee_arc
Removing service dcm4chee_db
Removing service dcm4chee_kibana
Removing service dcm4chee_elasticsearch
Removing service dcm4chee_logstash
Removing service dcm4chee_keycloak
Removing service dcm4chee_mariadb
Removing service dcm4chee_ldap
Removing service dcm4chee_oauth2-proxy
Removing network dcm4chee_default
-
You may delete the swarm as described above.
Installation:
$ curl -o swarmpit.yaml https://raw.githubusercontent.com/swarmpit/swarmpit/master/docker-compose.yml
$ docker stack deploy -c swarmpit.yaml swarmpit
swarmpit runs on port 888, so open your browser http://<IP>:888: