Users Guide Using uClinux
The uClinux running on the leanXcam provides many tools and configuration facilities. This section describes some of the installed programs and important paths and files. It is not a tutorial for Linux, since there are many such things on the web.
- vi: The standard Unix text editor. There are many tutorials on the web.
- cat/more/less: If you only desire to look at the file, it can be printed to the console with one of these commands.
Files can be transferred to and from the leanXcam with SCP, which stands for secure copy. On a Linux environment, like the leanXcam SDK, scp is already installed. On Windows, WinSCP or putty can be used. On Linux, the syntax is very similar to the copy command (cp):
 scp <file-name> root@<Camera-IP>:/mnt/app     , respectively
 scp root@<Camera-IP>:/mnt/app/<file-name> .
SCP uses SSH to transfer the files. See Documentation/SSH introduction for an introduction on how to set up your SSH so you do not have to enter the password every time as well as many other tips and trick.
In the standard configuration an FTP-Server is installed on the leanXcam and running on the standard port. Username: root Password: oscar
TFTP is a very basic communication protocol for file transfer over UDP. Due to its potential unreliability this is generally not recommended and only needed for some advanced techniques like Making the camera boot over the network.
This section describes the setup of a TFTP server on your host operating system. The TFTP server will grant your camera access to all files stored in the TFTP root directory (usually called 'tftp-root').
Depending on the host OS you are using, you have to follow the instuctions for your host OS:
- Mac OS X
- Install the package tftp-hpa-0.48.
- Run the following command to start the tftp daemon:
sudo launchctl load -w /System/Library/LaunchDaemons/tftp.plist
- Windows
- Running a Windows host you install a free tftp server such as the Solar-Winds TFTP Server obtainable from here. The tftp-root folder which you probably created during the configuration of VirtualBox will be the folder which is accessed through the tftp server.
- Configuring Solar-Winds tftp server
- Select File ? Configure
- Select TFTP Server Root Directory using the Browse Button, for example: D:\tftp-root
- Click OK
- Start the server by right-clicking on the tftp server icon from the notification section in the taskbar.
Short shell script to copy files from the tftproot folder on the host machine. The script extracts the Host-IP from the U-Boot variable serverip. You can copy a file with:
$root:/mnt/app> tftp-get <File-Name>
Do not forget to start your TFTP server on the host first. For details on how to use TFTP, see VirtualBox Installation Guide.html on the installation DVD or this section.
NFS is very useful to write debug output (like images) or read large data sets over the network. Since the access to the remote machine is transparently integrated into the file system, no special actions apart from mounting the remote file system are necessary and the mounted directory can be seen as a virtual storage extension of the limited data storage capacities on the camera itself.
First, one needs to install and set up an NFS server on the remote machine. On Linux, this is fairly straightforward. Assuming the shared directory is called nfs-share, the following command can be executed on the camera to mount it:
 mkdir /mnt/nfs
 mount -o nfsvers=3,tcp,rsize=1024,wsize=1024,nolock 192.168.1.50:/home/oscar/nfs-share /mnt/nfs/
The directory of the remote machine will then be accessible on /mnt/nfs.
Attention: NFS is not installed on the leanXcam by default. See this link for instructions how to enable it.
The root file system on the leanXcam is stored compressed in the boot flash and replaced after reboot. If one would like to store a file persistently, it needs to be placed in the application flash. In the Linux root file system, the application flash is mapped to /mnt/app, everything stored in there will survive a reboot. The disadvantage of this folder is that accesses (especially write accesses) tend to be very slow and the space is limited (4 MB).
The default setup of the leanXcam already has one example application installed. It is called web-view and is what is behind the web page you see when you first plug in your leanXcam and open the corresponding IP address in a browser. On the leanXcam, every application has its own folder on the application flash in order not to conflict with other applications. The contained files will be very similar for most applications, for web-view.app they are:
This is the shell script that has to be executed after bootup (see Execution on startup) in order for web-view to be started.
Please beware that version v1.0-p1 of the uClinux operating system has a bug occurring when starting the application in foreground. This results in all the daemons like the http or ssh server not being started until the run-script script exits.
If you are using a version of uClinux prior to v1.0-p2, we advise you update the operating system to a newer version with updates from the Download page. If you cannot update the operating system you must not forget to put an ampersand after the line calling your application in the run.sh script to have it executed in a separate process, like this:
 # run.sh
 ./myapp_target &
The executable of the web-view application. Automatically started in run.sh.
This contains the default web interface of the camera (the web-live-view application). In run.sh it is extracted and copied to the web server root directory, see Execution on startup.
When the leanXcam's uClinux boots, it checks a few things before the user application is started. This includes a so called fallback mode which enables a user reset the network configuration temporarily to a known state.
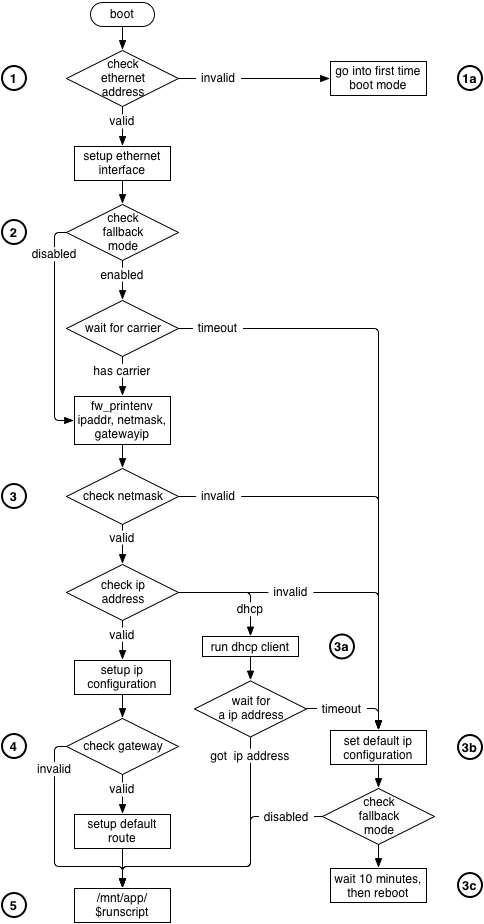
The graphic on the right shows the boot procedure graphically. Refer to the numbered steps for more information.
- Before the network interface is brought up, it is checked whether the U-Boot environment has a valid MAC address set in the variables ethaddr.
- 1a: If this is not the case the device boots into first time boot mode which is only used during manufacturing.
- Then the network interface is brought up and it is checked whether the fallback mode is completely deactivated. Deactivating the fallback mode is done by setting the fallback_disabled U-Boot environment variable. If this is not the case, the device waits for a carrier signal for fallback_timeout seconds (or 15 if that variable is not set).
- When a valid IP address and netmask is configured in the U-Boot environment with the variables ipaddr and netmask, then these configurations are applied.
- 3a: If the U-Boot environment variable ipaddr is dhcp, then a DHCP client dameon is startet which then tries to request an IP address from a DHCP server.
- 3b: If the IP configuration is invalid on no DHCP server responded to the request, then a default network configuration is applied.
- 3c: If a default IP configuration has been applied and the fallback mode isn't disabled, then, instead of running the user application, the server daemons are started and the device waits 10 minutes before rebooting itself. This prevents a device which accidentally booted into fallback mode and which cannot be restarted arbitrarily from staying in that mode indefinitely.
- If a valid IP address for the default gateway server has been configured in the gateway U-Boot environment variable, it is used to setup the default route.
- If the device did not boot into fallback mode or it has been disabled, then the user application or script, configured using the runscript U-Boot environment variable, is started.
The U-Boot variable runscript determines what application or script should be launched upon startup. In Fallback mode this feature is disabled and no application is launched on startup. See Users Guide Using uClinux#wiki-UBoot_environment_variables for details on how to read out and set U-Boot environment variables. To disable the feature for automatic startup of an application after boot, simply set the variable to an empty string and it will disappear:
fw_setenv runscript
Usually the runscript variable is set to the run.sh script of the application one would like to have executed on startup. For example:
fw_setenv runscript web-view.app/run.sh
Alternatively, the variable can be set to an arbitrary executable by specifying the full path.
The bootloader is controlled with a set of persistent environment variables. Also the network properties of Linux are configured on boot time based on some U-Boot variables (ipaddr, serverip, gatewayip). The variables can be visualized and modified from Linux, e.g.:
 $ fw_printenv
 $ fw_setenv bootdelay <Seconds to wait for user interaction before booting Linux>
 $ fw_setenv runscript app-template/run.sh
 $ fw_setenv serverip <Host-IP: This should be set to the IP of the machine one uses to interact with the leanXcam>
 $ fw_setenv gatewayip <Gateway-IP>
 $ fw_setenv ipaddr 192.168.1.10
 $ fw_setenv ipaddr dhcp
 $ fw_setenv ntpserver <IP of NTP-Server>
Until uClinux v2.1, the kernel log messages as well as everything logged by the framework logging module (log) were written to the system log in /var/log/log. This was a double-buffered file with a size limit and not persistent.
Since uClinux v2.1, you can set the location of the logfile using the environment variable "syslog_file". If you wish, you can now have the logfile on persistent storage. Set it for example with:
$ fw_setenv syslog_file /root/logfile
Also sinces v2.1, it is possible to have all syslog messages logged over the network, using the syslog protocol and UDP. With the environment variable "syslog_ipaddr", you can specify the ip address:
$ fw_setenv syslog_ipaddr 192.168.1.28
or both ip address and port:
$ fw_setenv syslog_ipaddr 192.168.1.28:588
if you don't want to use the default port '514'.
The leanXcam does not have an RTC (Real-Time Clock) installed and thus does not keep time when powered off. If the internet is reachable from your leanXcam, or you installed an NTP (Network Time Protocol) service in your local network, the camera can be configured to retrieve the current time from a time server every time it boots up. This feature is supported in uClinux versions v1.2-p2 and later only. For this, you need to specify the IP address (not the DNS name) of a time server in the U-Boot environment variable ntpserver.
fw_setenv ntpserver <IP of NTP-Server>
There are many public NTP servers available. An easy way to find an NTP server near you is to ping one of the NTP Pool servers from your host machine, which will assign you a random NTP server in your vicinity. You can then configure the pinged IP address in your leanXcam.
 oscar@oscar:~$ ping 0.pool.ntp.org
 PING 0.pool.ntp.org (195.141.190.190) 56(84) bytes of data.
 64 bytes from time.sunrise.net (195.141.190.190): icmp_seq=1 ttl=61 time=19.0 ms
you can show the currently installed uClinux version with this command:
 > uname -r
 2.6.28.10-ADI-2009R1.1-Git_<b>v2.0-p1</b>-gbee3ff1
To simplify updating the system to a newer version, the imgupd tool is provided. It checks the header of an image file for either uClinux (uImage) or U-Boot (u-boot.ldr) and writes it to the correct section on the boot flash. For the rest of this paragraph we will refer to either uImage (for uClinux) or u-boot.ldr (for U-Boot) simply as the 'image file'. Therefore, the recommended way to update is as follows:
- Make sure there is enough free space on the file system of the camera. This might not be the case if you're updating Linux and already have an application with a large web interface deployed. First stop the web application on the leanXcam to prevent large image files to be generated. Then open a command prompt on the camera (with telnet, ssh or serial port) and delete the web folder:
rm -rf /home/httpd/*
- Download the image file to the temporary folder in the file system on the camera. The simplest option in a Linux environment is to use scp.
oscar@oscar:~/$ scp <image-file> root@<Camera-IP>:/tmp
Alternatively, for example when working from a Windows environment, an FTP client can be used to transfer the image file to the /tmp folder on the camera.
- Open a shell on the camera via telnet, ssh or over the serial port. Write the downloaded image file to the correct section in the boot-flash with the imgupd tool:
$root:/> imgupd /tmp/<image-file>
Be very patient with the update process. Because of the slow write speed of the flash it can take several minutes to complete. Do NOT disconnect power or otherwise shutdown the camera during the update process, as the boot-flash will become corrupted. Also do NOT update your camera while in Fallback mode as it will reboot automatically after 10 minutes which might be exactly at the time you are writing the update to flash.
If you are making a lot of changes to the uCLinux boot image, or would like to try out a version of uCLinux with an easy way to fall back, you can make the camera boot over the network instead of the on-board boot-flash. This works over TFTP and therefore requires you to install a TFTP server on your host first.
- Place the uImage you would like to try out (the compressed image of the uCLinux kernel and root file system) in your TFTP root directory (the one served by the TFTP-Server, most likely 'tftp-root')
- On the camera, switch to TFTP-Boot (do not forget the ""):
root:> fw_setenv bootcmd "run tstlinux"
- After the next reboot, the boot loader on the camera will fetch the file uImage in the TFTP root directory, extract it and try to boot it. You can always switch back to a working version by replacing uImage with a downloaded uImage from this site.
- If you would like to switch back to booting from flash, execute the following command on the camera:
root:> fw_setenv bootcmd "run boot"
If ever the Linux or even U-Boot partition on the boot flash becomes corrupted, you most likely will need access to the serial port (RS232) on the board to restore it.
- Try a ping to the camera. If there are still replies but the camera is not reachable over higher level protocols (telnet/SSH/FTP) you probably have run into a familiar problem. It means that the boot loader (and actually Linux as well) still works and the camera just hangs during the startup script for your application due to a shell bug. This should only occur on uClinux versions 1.0-p4 or lower. Proceed with Users Guide Using uClinux#wiki-Disabling_automatic_application_startup.
- If pinging does not work but the bi-color on-board LED turns off or changes to green after a while, Linux still boots and starts your application. Make sure that you are trying the correct IP address and that your network setup is correct.
- If you are running uClinux version v1.2 or greater, you can simply unplug the network and let the camera boot. It will reset to the default IP configuration (192.168.1.10) and not start any applications (see Users Guide Using uClinux#wiki-Disabling_automatic_application_startup_temporarily and Users Guide Using uClinux#wiki-Resetting_the_IP_address_of_the_camera). You have 10 minutes to connect to the camera and resolve the problem before it reboots.
- If you have an old uClinux version, and are sure that you are trying the correct IP address, the application that is automatically launched may somehow lock up the operating system. Proceed with Users Guide Using uClinux#wiki-Disabling_automatic_application_startup_in_U-Boot.
- If you came to this step, at least uClinux is corrupted on the flash and you will need to execute the steps described in Users Guide Using uClinux#wiki-Getting_access_to_the_serial_port_of_the_camera. Then, open a terminal connection to the camera during bootup and analyze what you are seeing.
- No output: Either the hardware is broken, the serial cable connection is not working properly or U-Boot on the flash has been corrupted. Try to make the camera boot over the serial port as described in Users Guide Using uClinux#wiki-(Re-)load_bootloader_onto_camera.
- U-Boot starts booting and after a very short while you see the prompt: 'Press any key to stop booting 5' and a small countdown. Proceed to Users Guide Using uClinux#wiki-(Re-)load_uClinux_onto_camera to reload the Linux image onto the camera.
- The boot process moves past the countdown and the camera boots into Linux. If that is the case you now have a Linux console open and can undo any undesired changes you made, set the IP address to a known value etc.
If you have an uClinux image version v1.2 or greater installed on your system and it has not explicitely been disabled, booting into fallback mode is supported (see Users Guide Using uClinux#wiki-Boot_procedure_of_uClinux for details). Fallback mode is entered if the network cable is not plugged in during boot.
After ten minutes, the camera reboots automatically, so the recommended procedure is:
- Prepare the network settings of your host to be able to reach an IP in the 192.168.1.xxx range.
- Unplug network cable and plug in camera.
- Wait for one minute until the camera has booted to fallback mode. Don't wait too long as the camera will reboot automatically after 10 minutes.
- Plug in the network cable and open a console (e.g. telnet 192.168.1.10) to the camera.
- Change the IP address to the desired value.
- Reboot camera (or let it reboot automatically). It will come up again with the IP settings configured in the environment variables.
Follow the procedure in Users Guide Using uClinux#wiki-Getting_access_to_the_serial_port_of_the_camera to be able to communicate with the camera over the serial port. Make sure the boot jumper is NOT set on the camera. Open a terminal to the camera und plug it in. You will see the output from the boot process of the camera. Very early during the boot process, U-Boot will display a prompt like this
Press any key to stop booting 5
and a countdown. Pressing any key during this countdown will bring you right to the bootloader console prompt.
The following commands are quite useful: Check if the machine with Host-IP is reachable over the network.
ping [Host-IP]
Print out all environment variables. These are the same variables that can be set in Linux using fw_printenv/fw_setenv:
printenv
Set an environment variable temporarily to a new value. This will not be stored persistently but just be set to the new value for this session in the console. Omitting [Value] will delete the variable. Specifying a new variable name will create the variable.
setenv [Variable] [Value]
Save the current state of the environment variables to flash:
saveenv
You will have to craft a cable to connect your camera to the PC over the serial port. See Users Guide Using uClinux#wiki-Crafting_a_cable_for_serial_access for how to do that. Additionally you will need a terminal client like Hypterterminal on Windows or minicom on Linux. Configure the terminal client like described in Users Guide Board Connectivity#wiki-Serial_interface_(UART).
Most modern computers unfortunately do not have an exterior serial port anymore. They only have a 9-pin connector on the motherboard to which adapters exist that occupy one of the card slots on the back of your computer and contain a DB9 plug. If you need to boot over the serial port because the bootloader is corrupted, you will have to get one of these or a serial port interface card, since booting over a USB-to-serial converter does not work in our experience. If you just need to get access to the bootloader console, a USB-to-serial converter will do fine.
You find the position of the connector for one side of the cable in the Hardware Manual pdf under Downloads. Search for "RS232C Interface Header". The pin furthest away from the lens holder is Pin3 (Ground). The other end of the cable should attach to your computers serial port (also called COM under Windows) over a DB9 connector. You need to connect the 3 pins Rx/Receive, Tx/Transmit and Ground (for the pinout of the DB9 connector, see for example here: http://www.lammertbies.nl/comm/cable/RS-232.html).
For Linux version v1.2 or higher, the camera will boot in fallback mode if no network cable is attached during bootup and fallback mode has not explicitely been disabled. See Users Guide Using uClinux#wiki-Boot_procedure_of_uClinux for a more elaborate explanation. Fallback mode also resets the IP address to the default address (192.168.1.10) apart from not executing the automatic startup script. After ten minutes, the camera reboots automatically, so the recommended procedure is:
- Prepare the network settings of your host to be able to reach an IP in the 192.168.1.xxx range.
- Unplug network cable and plug in camera.
- Wait for one minute until the camera has booted to fallback mode.
- Plug in the network cable and open a console (e.g. telnet 192.168.1.10) to the camera.
- Disable application startup permanently (see Users Guide Using uClinux#wiki-Disabling_automatic_application_startup_in_Linux)
- Reboot camera (or let it reboot automatically). It will come up again with the IP settings configured in the environment variables.
Either:
- Disable the automatic startup script execution entirely.
fw_setenv runscript
If later, you would like to reenable the script, type
fw_setenv runscript /mnt/app/<Your-application>/run.sh
For this, you need access to the bootloader console (see Users Guide Using uClinux#wiki-Accessing_the_bootloader_console). Then, simply type:
 setenv runscript
 saveenv
To reenable startup from Linux after the problem has been resolved see Users Guide Using uClinux#wiki-Disabling_automatic_application_startup_in_Linux.
http://docs.blackfin.uclinux.org/doku.php?id=bootloaders:u-boot:loading#wiki-boot_via_the_uart_Bootloaders_U-Boot_loading contains a manual on how to load a U-Boot image over the UART port. We found the option using the Windows program ldrviewer to work best under Windows XP. Under Windows 7 on the other hand, the command line tool ldr-utils executed from a Linux environment (the leanXcam SDK) generally works better. Both variants are described under above link. Make sure to place the Boot Jumper described in the hardware manual before attempting this.
This just places the bootloader in RAM and stores nothing on the flash. To write it to the flash persistently, place the u-boot.ldr file in the tftp-root (see Setting up TFTP) on the host and execute the following sequence of commands in the terminal connected to the UART port of the camera after loading U-Boot to RAM:
 $> setenv serverip [SERVER-IP]
 $> setenv ipaddr [BOARD-IP]
 $> setenv ethaddr [MAC-ADDRESS]
$> run upduboot
The MAC-ADDRESS can be found on a sticker on the board. If there is already a MAC-ADDRESS configured, setting it may fail. In this case you can continue safely anyway.
To store the changed environment variables permanently in the flash memory, write
$> saveenv
This requires a working boot loader. If this is not the case, see previous section.
Place the uImage file in the tftp-root of the host and start the (see TFTP) server. Follow the instructions in Users Guide Using uClinux#wiki-Accessing_the_bootloader_console to get into the bootloader console and there type:
 $> setenv serverip [SERVER-IP]
 $> run updlinux
where [SERVER-IP] is the IP of your host.
The leanXcam memory can be extended with a Micro SD-Card. With standard configuration you can simply insert the SD-Card and it will be mounted to the folder /mnt/sdcard. Additionally the device /dev/mmcblk0 and it's partition /dev/mmcblk0p1 will appear. With dmesg you should see an output like this:
 mmc_spi spi0.2: requested mode not fully supported
 mmc_spi spi0.2: can't change chip-select polarity
 mmc0: host does not support reading read-only switch. assuming write-enable.
 mmc0: new SD card on SPI
 mmcblk0: mmc0:0000 SU02G 1.84 GiB
  mmcblk0: p1
If you can see this output but the folder /mnt/sdcard does not exist you need to format the card first. Type
mkfs.vfat /dev/mmcblk0p1
and reinsert the card. Now it should be mounted to /mnt/sdcard.
By default, the card is mounted with the option sync. This option disables the uClinux write cache and every change will be written immediately to the card. The advantage of sync mode is that you can remove the card without explicitly unmounting it.
To mount the SD-Card in async mode (with more than double the writing performance), you can set the U-Boot variable sd_mount_opt to async with the command:
fw_setenv sd_mount_opt async
Be careful: if you remove the card in async mode without manually unmounting, it can lead to data loss!
You can manually unmount the card with
umount /mnt/sdcard
Most of the Micro SD-Cards and also Micro SDHC (SD High Capacity) should work, but it is not guaranteed that every Card is supported. To be on the save side, use a SanDisk Micro SD-Card.
The performance was tested with a SanDisk Micro SD-Card with 2GB.
With mount option sync:
 Version  1.94       ------Sequential Output------ --Sequential Input- --Random-
 Concurrency   1     -Per Chr- --Block-- -Rewrite- -Per Chr- --Block-- --Seeks--
 Machine        Size K/sec %CP K/sec %CP K/sec %CP K/sec %CP K/sec %CP  /sec %CP
 blackfin       300M    47  90   634   3   377   3   149  83   935   3  55.8   2
 Latency               812ms    3948ms    4639ms     184ms   31999us     792ms
 Version  1.94       ------Sequential Create------ --------Random Create--------
 blackfin            -Create-- --Read--- -Delete-- -Create-- --Read--- -Delete--
              files  /sec %CP  /sec %CP  /sec %CP  /sec %CP  /sec %CP  /sec %CP
                 16     7  99  6954 100   110  98    10  99  8770  99    21  93
 Latency               660ms    4000us     127ms     632ms    4000us     779ms
Write performance (write a 500MB file):
 $> time dd if=/dev/zero of=big_file.tmp bs=1M count=500
 real    38m 12.08s				        --> 223 kB/s
 user    0m 0.02s
 sys     1m 6.26s
with mount option async:
 $> time dd if=/dev/zero of=big_file.tmp bs=1M count=500
 real    13m 35.40s				        --> 628 kB/s
 user    0m 0.01s
 sys     0m 31.66s
Comparison with the internal flash:
 $> time dd if=/dev/zero of=file.tmp bs=1M count=10
 real    0m 16.58s				        --> 618 kB/s
 user    0m 0.00s
 sys     0m 3.11s