Getting started
Your leanXcam comes preconfigured to the following Ethernet address:
 ip address:  192.168.1.10
 subnet mask: 255.255.255.0
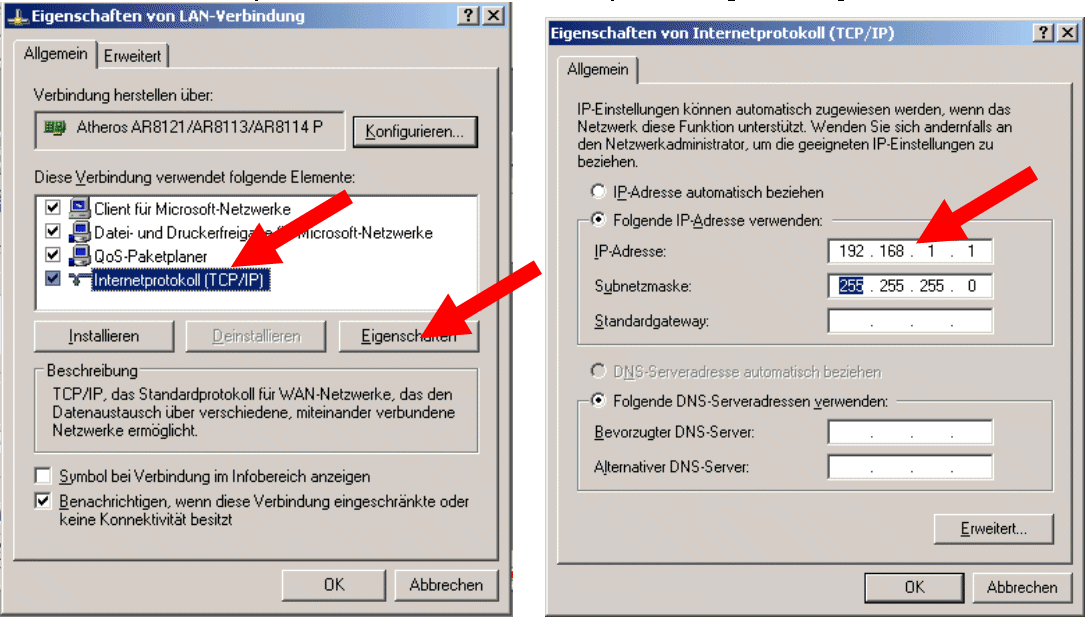
In order to connect to leanXcam, you need to set the IP-Address of your Ethernet adapter to an address in the same IP subnet, e.g. 192.168.1.1
In Windows XP, this can be done as follows:
- Click on the windows [Start] button
- Click on [Connect]
- Click on [Show]
- A window opens with your network cards
- Right-Click on your Ethernet adapter and choose [Properties]

- A new window opens in which you select [TCP/IP] and click on [Properties]
- in the next window, you enter the IP-Address of your computer (e.g. 192.168.1.1)

- Click [OK] to close the configuration windows
- Connect the leanXcam to a power plug and connect the Ethernet cable between leanXcam and your computer. It might take 60 to 90 seconds for the leanXcam to start up and connect to the Ethernet.
- Now, you can open a browser and enter the address of your leanXcam (192.168.1.10) to get your first picture from the camera!
- If you loose internet connection on your host computer when connecting to the leanXcam: Your internet connection (e.g. WLAN) might use the same IP address as leanXcam. Then change the IP address of the leanXcam as described here, e.g. to 192.168.2.10.
- After you worked with leanXcam, you might want to set back the IP address to Obtain IP address automatically in the last window in order to connect to a DHCP server or your gateway
If you like to log in to the camera, simply open a telnet connection to the camera:
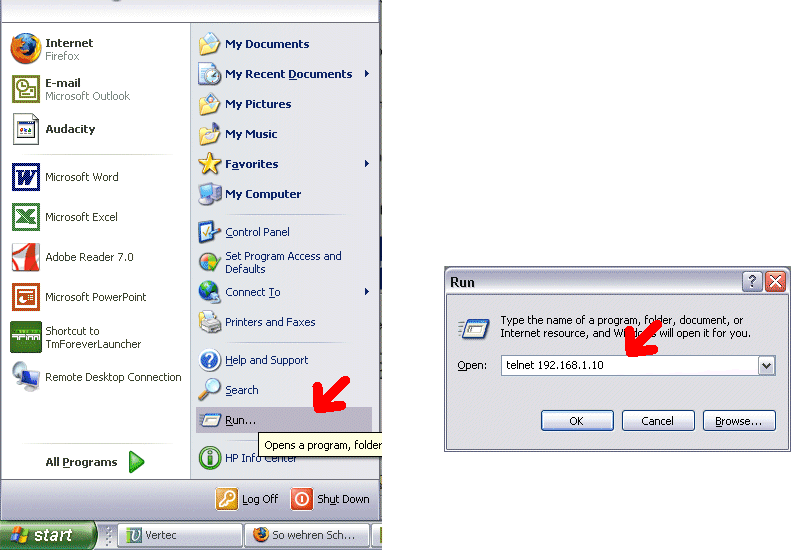
- Click on [Start] and then [Run] ([Ausführen])
- A window appears where you can enter the telnet 192.168.1.10 command (in Windows Vista, Telnet is disabled by default. To enable it, see http://www.netzwerktotal.de/vistatelnet.htm)
- After that, a window opens and you are connected to the camera:

- Enter a few linux-commands in the telnet-window and see what happens:
 ls -l
 uname -a
 cat /proc/cpuinfo
The leanXcam SDK runs in a virtual machine by VirtualBox. The virtual machine runs Ubuntu Linux and you will find all necessary development tools pre-installed, e.g. Eclipse. Your host computer (PC/Laptop) must meet the following minimum requirements:
- 15GiB free disk space (the disk image of the virtual machine is set to use a maximum of 12 GiB).
- 1 GiB memory (the virtual machine requires 512 MB and it is good to have at least the same amount for the host machine)
- Download the VirtualBox virtualization solution from Sun Microsystems from the VirtualBox website.
- Start the installer to complete the process using the default settings. After the installation has finished, start VirtualBox. If VirtualBox shows the VirtualBox Registration Dialog, you can skip the registration process by clicking Cancel. You must not to define a virtual machine in VirtualBox manually, this will be done automatically when installing the SDK.
- Now you are ready to import the leanXcam SDK from the DVD that came with your leanXcam or you have downloaded from our website:
- Put the DVD into the drive of your computer and run VirtualBox. In VirtualBox select Import Appliance... from the File menu. Then use the button Choose... in the window Appliance Import Wizard to locate and open the leanXcam SDK.ovf file in the leanXcam SDK directory on the DVD. If you have downloaded leanXcam SDK.ovf from our website locate it where you have saved it.
- Continue the wizard by clicking on the buttons Next > and Import >. This will start the import process which copies the image to your hard disk which may take a few minutes.
- After the import has completed, you will need to set up a Shared Folder so you can move files between the virtual machine and the host (e.g. Windows) system. To do this, select the leanXcam SDK virtual machine and click the Settings button. In the window leanXcam SDK - Settings, select Shared Folders in the list on the left. From there, use the button on the right with a plus sign to add a shared folder. In the window Add Share, in the field Folder Path: select a directory on your host (e.g. Windows) system that you want to access from the virtual machine. In the field Folder Name: write the name share and click OK. The folder you have selected will be available from the virtual machine under /media/share. Be careful naming your shared folders: Using capital letters might cause problems. It is recommended to use different folder names on host and guest.
- After you have closed the settings dialog, you can start the virtual machine using the Start button.
Once you have your virtual machine up and running, you can install the updates for Ubuntu 9.10 in the virtual machine using the Update Manager. To avoid any system conflicts, it is not recommended to upgrade to a new distribution release, e.g. Ubuntu 10.x.
Read the users guide about some more basics: Users guide
Start the DVD which comes with the leanXcam starter kit. On the DVD youll find the documentation about how you can install the development environment.
Read the further documentation on this website.
If you have further questions, ideas or if you even like to contribute to our open source community, please post to https://github.com/scs/leanXcam/issues and you will get quick answers.