playground
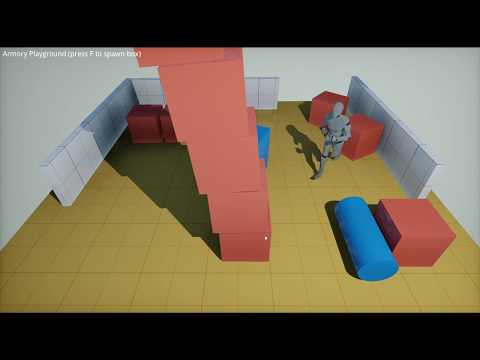
This tutorial walks you through the Armory basics. We will create a playground-like scene showcasing the essential features step-by-step.
- Get the .blend file for this tutorial.
- Try it online
- Hello World
- Objects
- Modifiers
- Materials
- Animation
- Lights
- Environment
- Physics
- Asset Import
- Logic Nodes
- Haxe Scripts
- Bundled Scripts
- UI Canvas
- Render Path
- Exporter
Pick-up where we left in the setup tutorial. Open Blender, save the project and press Armory Player - Run (F5) to play in window.
In the Armory Player panel you can:
-
Select the
Runtimeto use:-
Kromto play in stand-alone player. -
Browserfor HTML5 deploy.
-
-
Select a
Cameramode:-
Sceneto start the game from the point of active scene camera. -
Viewportto start the game from the viewport view. This is useful for quick scene preview as it also lets you control the camera.
-
-
Specify a
Sceneto launch or leave blank to use the current active scene.
Additionally, you can tweak the Dimensions in the Properties - Output tab for window size. To run in fullscreen, select Armory Project - Window - Mode - Fullscreen.

We will start with some Blender basics on how to manipulate scene objects:
- In 3D View, hit
F3and typeAdd Planeto create a plane object (or doAdd - Mesh - Planefrom the 3D View header). - Press
Sto scale up the plane,Rto rotate, orGto grab and translate. - Delete objects by pressing
X.
Blender has a variety of modifiers which apply procedural effects on the active object. Select Cube, navigate to the Modifiers tab and add Bevel modifier to make the cube edges look polished.

Select Cube and switch to Shader Editor. Enable Use Nodes. Now you can tweak the material color and roughness using the default Principled BSDF node.

Next, switch back to 3D View and select Plane. We want to put a texture on it. Create a new material in Material tab. Switch to Shader Editor like we did before.


Save the images above and simply drag-and-drop the files onto the node canvas in Blender. Connect the Image Texture nodes to the Base Color and Roughness sockets of the Principled BSDF node.

Following these steps, a basic scene is already shaping up. Hit F5 to play the scene in Armory!

Let's create an animation rotating the cube. Locate the Timeline and go to frame 1. Select Cube and press I - Rotation to insert keyframes for the rotation. Next, go to frame 60 in the timeline. With Cube selected, press R to rotate it desired amount and press I - Rotation again.

Select light object from hierarchy and switch to Object Data tab. You can set the light type and tweak the light color and strength.

World nodes are used to setup the environment. Switch to Shader Editor - World to access the nodes. In this tutorial, we use Sky Texture node to render procedural sky. If we were to add an environment map, we would use the Environment Texture node coupled with .hdr file.

With object selected, navigate to the Physics tab and press the Rigid Body button. Set desired shape representing the object in the Collision panel.
In the Rigid Body panel, set object mass and type:
- Select
Activefor objects which are freely affected by physics. - Select
Passivefor objects which are static or animated on the timeline.

With Blender, we can easily import common asset formats.
- Select
File - Importto import file formats. - Select
File - Appendto import objects from other .blend files. - Select
File - Linkto link objects from other .blend files.
We will animate the cylinder procedurally using logic nodes. Logic nodes provide a visual way of creating interactive scenes. When you build your project, created node trees are automatically compiled to Haxe scripts. An in-depth introduction to logic node can be found here.
Switch to the Logic Editor area and press New to create a new node tree. Each node tree has to be attached to an object. Select the cylinder and create a new Nodes trait in Properties > Object > Armory Traits. Enter our newly created node tree as Tree entry, or if the node tree is open on your screen you can click on From Node Editor.
Hit Shift + A to browse all available nodes or click on the Add menu item in the editor header. Clicking on a node in the menu will place it in the editor.
- Search for the
On Updatenode and place it. This node will activate its output each frame. - Connect it to the
Ininput of theSet Object Locationnode. If you keep theObjectfield empty, the object that is executing this logic tree will be used. In our case, this is the cylinder. - Add a
Vectornode and connect its output socket to theLocationinput of theSet Object Locationnode. So now, the cylinder location will be set to this vector on each frame. - For the
Xlocation of the vector, add aMathnode and set it toSine. - Add a
Get Application Timenode to drive the sine node. This will move the cylinder back and forth. - Add another
Mathnode to scale the sine output (this will let the cylinder move further on each side). - We want to keep the
YandZlocation unchanged, so we need to set it according to the current cylinder position. Add aGet Object Locationnode, connect it to aSeparate XYZnode to split the vector into its XYZ values and then connect the Y and Z values to the Y/Z inputs of theVectornode that we added earlier.
The node tree should now look like this:

Note: To see the the output of the Print node, open Blender from a terminal (or on Windows: Window > Toggle System Console), or enable Armory Project > Flags > Debug Console. The debug console is explained in Wiki: Debug/Debug Console.
We can program object traits directly using the Haxe programming language. Let's create a trait which spawns a box after pressing a key.
First, create a cube and name it "Box". Enable Rigid Body and Active for the cube in the Physics tab.
Create an empty object in the scene (F3 - Add Empty). The location of this object will serve as the spawning point. Create a new Haxe trait in Properties - Object - Armory Traits. Press the New Script button.
Afterwards, press Edit Script to open the script file in your selected code editor. In this tutorial, Kode Studio, which is a dedicated code editor that includes code completion and debugging support, is used.
The API documentation is available here.
package arm;

import iron.object.Object;
import iron.system.Input;
import iron.Scene;
import armory.trait.physics.RigidBody;

class SpawnBox extends iron.Trait {
	public function new() {
		super();
		// We want to get notified every frame
		notifyOnUpdate(update);
	}

	function update() {
		// f key was pressed
		if (Input.getKeyboard().started("f")) {
			// Spawn Box object
			Scene.active.spawnObject("Box", null, boxSpawned);
		}
	}

	// Box just got spawned
	function boxSpawned(o:Object) {
		// Translate cube to the location of empty object
		var traitOwner = object;
		o.transform.loc.setFrom(traitOwner.transform.loc);
		// Box object has a rigid body trait
		// Notify physics system to take new location into effect!
		o.getTrait(RigidBody).syncTransform();
	}
}
Armory comes with a set of pre-created bundled scripts written in Haxe. Similar to a regular script, a bundled script can be attached to an object as a trait. In this tutorial, we will use the PhysicsDrag trait. When this trait is attached to physics-enabled object, it lets us drag this object around using the mouse.
You can also edit bundled scripts by clicking on Edit Script under the trait list. The script will then be copied to your project directory.
Examining bundled scripts is a good way to learn trait scripting!
To build a game interface, a dedicated tool called Armory2D is used.
Apart from objects, scenes itself can contain traits as well. This is a good fit for UI traits. Switch to the Scene tab and add a new UI trait in the Armory Traits panel. Press the New Canvas button. Afterwards, clicking on Edit Canvas will launch Armory2D.
In Armory2D, press the Text button to spawn a text object. Adjust the text in the Properties panel and hit Save. If you launch the game now, the canvas will get displayed.

Armory is powered by a programmable render path system. Navigate to the Render - Armory Render Path panel to access the settings. When creating a new render path, several presets are available for simple configuration.
Multiple render paths can be created. When exporting the project, you can use the render path which best suits the target hardware.

When we are ready to publish our project, Properties - Render - Armory Exporter does the job.
You can create multiple export presets, each specifying a target platform, graphics API, render path and start-up scene. Select desired platform and hit Publish button. Once finished, hit Triangle - Open Folder to view the exported files.

- Continue to the Tanks tutorial