Tilesheets
This page describes what tilesheets are in Armory and how they can be used.
Tilesheets are one of the few ways in Armory to animate something in an object's shader. It is basically an animation, which has all its frames in one image. They can be used for making 2D style animations (see below), as masks controlling other things in the shader, as normal maps, etc.
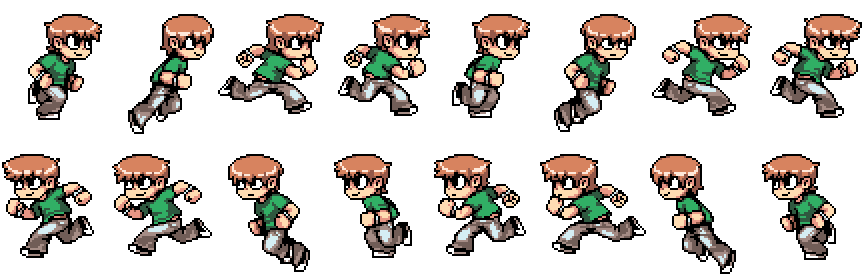
First, you need to create a tilesheet. You don't have to care about the size of the tilesheet, since it can be defined later in Armory. But you have to allign your frames to a grid. Once you're done, your tilesheet can look something like this:
First, add a plane to your scene. This is going to be the carrier of the tilesheet. Resize it to roughly match one frame of your animation.

After that's done, you can create a shader to use our tilesheet. In our case, we use the tilesheet in base color and its alpha channel for the alpha input of our shader as shown here:

You can also use tilesheets for different things. For example, you can make an animated mask to control your alpha, your roughness, etc. Once this is done, we should have something like this:

Now we don't need to worry about the black parts, they are transaparent in Armory. But what we need to worry about is the texture coordinates. We need to modify our UV map to show only one frame of our animation at a time, like so:

After this is done, the shading part is all complete. Now we need to define the tilesheet. In the Material Properties panel, scroll down to Armory Tilesheet and add a new one. Here you define the tilesheet dimensions and its framerate. Our tilesheet has 8 columns and 2 rows, so we'll define it in the X and Y dimension. Framerate can be set to whatever you like, I'll choose 6.
Now we need to define an action. Action is basically a part of the tilesheet we want to use. As you can see, our tilesheet has 8 frames of running to right and 8 frames of running to left. We only care about running to right right now, so we start at frame 0 and end at frame 8. After that your Armory Tilesheet menu should look like this:

There are two more things we need to do to use it in-game. First is defining the tilesheet and action in Object Properties - Armory Props like this:

The second one is to implement it in the script. For our purposes we only say When game initializes, then play tilesheet. You can of course link it to button presses and a bunch of other stuff, but here we'll just do the simplest version:

When you boot your game now, the tilesheet should play flawlessly
- If you see parts of different frames on the edges when playing a tilesheet in Armory, you have to resize your plane or move the UV map
- If you get a black screen after booting, you probably forgot to define the tilesheet and action in
Object Properties - Armory Props(see above) - When creating the node controller, you need to write the name of the action, not the tilesheet. This is because you can have multiple actions for just one tilesheet
- In your node script, you can't drive the Play Tilesheet node with pulses that occur every frame, like On Update and Keyboard set to Down. This is simply because when the node recieves a pulse, it starts playing the tilesheet from the beggining. When the input gets triggered every frame, the tilesheet shows the first frame over and over