Tutorial Server
(For version 1.000)
This tutorial describes the basic configuration of the AlertR server. It can be used as foundation to develop your own AlertR system setup. If you are not familiar yet with the basic AlertR terminology and how the infrastructure looks like, please read the article Infrastructure first.
The server is described as the following by the installation:
sqall@towel:~$ ./alertRinstaller.py -l

[...]
AlertR Server
-------------
Instance:
server

Type:
server

Version:
0.800-0

Dependencies:
1: bcrypt (pip packet: bcrypt) (lowest version: 3.1.4)
2: requests (pip packet: requests) (lowest version: 2.20.0)

Description:
The server handles the logic of the AlertR system. It is mandatory in order to use AlertR. It uses SQLite as storage backend and a CSV file as user backend.
[...]
In order to install the AlertR server, we first have to fulfill all prerequisites. On a Debian/Ubuntu Linux you can install everything with the following commands:
root@towel:/home/sqall# apt-get install python3-pip

root@towel:/home/sqall# pip3 install bcrypt requests
It is always a good idea to have an own user for a daemon. Therefore, we create a user that runs the AlertR server called "alertr":
root@towel:/home/sqall# adduser --disabled-password alertr
Adding user `alertr' ...
Adding new group `alertr' (1002) ...
Adding new user `alertr' (1002) with group `alertr' ...
Creating home directory `/home/alertr' ...
Copying files from `/etc/skel' ...
Changing the user information for alertr
Enter the new value, or press ENTER for the default
    Full Name []:
    Room Number []:
    Work Phone []:
    Home Phone []:
    Other []:
Is the information correct? [Y/n] y
To switch into this user in the terminal you can use the following command:
root@towel:/home/sqall# su alertr
Please note that this is only possible as root user. If you are trying this command as another user you will get a password prompt for the user alertr, which does not have a password.
Afterwards you can use the installation script provided by AlertR to install the server.
alertr@towel:~$ wget https://raw.githubusercontent.com/sqall01/alertR/master/alertRinstaller.py

alertr@towel:~$ mkdir server

alertr@towel:~$ chmod 755 alertRinstaller.py

alertr@towel:~$ ./alertRinstaller.py -i server -t ./server/
The following describes the configuration of the AlertR server. It shows a basic configuration that can be used as a template for own installations.
For security reasons, it is strongly recommended to use a TLS connection for your AlertR system. Hence, all tutorials will use TLS. However, for testing purposes AlertR gives you the option to disable TLS. If you do so, you have to disable it for the complete AlertR system.
To use TLS you have to create your own certificate before you can start the server. With the following commands, you can create a self-signed certificate that can be used by the AlertR server:
alertr@towel:~/server/config$ openssl genrsa -aes256 -out alertr_server.key 4096
Generating RSA private key, 4096 bit long modulus
..................................................++
....................................................................++
e is 65537 (0x10001)
Enter pass phrase for alertr_server.key: password
Verifying - Enter pass phrase for alertr_server.key: passwordalertr@towel:~/server/config$ openssl req -new -key alertr_server.key -out alertr_server.csr
Enter pass phrase for alertr_server.key: password
You are about to be asked to enter information that will be incorporated
into your certificate request.
What you are about to enter is what is called a Distinguished Name or a DN.
There are quite a few fields but you can leave some blank
For some fields there will be a default value,
If you enter '.', the field will be left blank.
-----
Country Name (2 letter code) [AU]: some country
State or Province Name (full name) [Some-State]: some state
Locality Name (eg, city) []: somewhere
Organization Name (eg, company) [Internet Widgits Pty Ltd]: somewhat
Organizational Unit Name (eg, section) []: server
Common Name (e.g. server FQDN or YOUR name) []: alertR server
Email Address []:
Please enter the following 'extra' attributes
to be sent with your certificate request
A challenge password []:
An optional company name []:alertr@towel:~/server/config$ cp alertr_server.key alertr_server.key.orgalertr@towel:~/server/config$ openssl rsa -in alertr_server.key.org -out alertr_server.key
Enter pass phrase for alertr_server.key.org: password
writing RSA keyalertr@towel:~/server/config$ openssl x509 -req -days 365 -in alertr_server.csr -signkey alertr_server.key -out alertr_server.crt
Signature ok
subject=/C=DE/ST=NRW/L=somewhere/O=somewhat/OU=server/CN=alertR server
Getting Private key
The generated certificate is valid for 365 days. So remember to check the log files if AlertR stops working in 365 days. It might be that you have to renew your certificate.
Additionally, AlertR supports client certificates. This means that a client must not only have valid credentials, but also a valid certificate. In this basic server setup we do not use client certificates. But we highly recommend to use them if you have AlertR clients that connect to your AlertR server from the Internet.
Before starting to configure your AlertR server, you have to think about the context you are using AlertR in and the infrastructure design you want to have. In this tutorial, we set up the AlertR system in an alarm system context. As a result, we want the AlertR system to have two global states: "Activated" and "Deactivated".
We can map these two global states with AlertR's System Profiles. Therefore, we create the following two System Profiles:
| Profile ID | Name | Functionality |
|---|---|---|
| 0 | Activated | Used when the alarm system is activated. |
| 1 | Deactivated | Used when the alarm system is deactivated. |
Profile 0 with the name "Activated" is used to activate the alarm system. For example, if a window or door was opened while in this global state, the alarm system reacts and notifies about a break in attempt.
Profile 1 with the name "Deactivated" is used to deactivate the alarm system. For example, if a window or door was opened while in this global state, nothing happens.
After deciding what kind of system profiles are needed for the context we want AlertR to use in, we have to think about the Alert Levels we are going to need. Alert Levels group sensors and alerts of the AlertR system together. Since we set up AlertR in an alarm system context, we need the following Alert Levels:
| Alert Level | Name | Profiles | Functionality |
|---|---|---|---|
| 0 | Dummy | Activated, Deactivated | Used for sensors that do not trigger. |
| 1 | Silent Notification | Activated, Deactivated | Used to "silently" notify the user. |
| 2 | Urgent Notification | Activated | Used to "loudly" notify the user. |
Alert Level 0 is used for all sensors that are not meant to trigger a Sensor Alert. For example, this can be sensors that are just used to monitor a state or data such as temperature sensors in a room.
Alert Level 1 is used for sensors that trigger a Sensor Alert, but not an urgent one. For example, this can be just a notification about an opened door or that the Internet connection is down. This Alert Level is member of every System Profile and thus triggers always.
Alert Level 2 is used for sensors that trigger urgent Sensor Alerts, such as a break in attempt. These sensors should notify the user immediately and loudly at best. This Alert Level is only member of the System Profile "Activated" and will only trigger if this System Profile is used.
Every AlertR installation has a template configuration file with detailed comments that describe the functionality of each option. To use it as a draft, you can just copy the template file and modify your new configuration file.
alertr@towel:~/server/config$ cp config.xml.template config.xml

alertr@towel:~/server/config$ chmod 700 config.xml
The configuration file itself is split into the following parts:
- General
- Update
- Alert Levels
- InternalSensors
In this tutorial, we are going through each of these parts separately and describe why we configured it like that.
The general section is used for options such as certificate file locations. In our tutorial configuration, the section looks like this:
    <general>

        <log
            dir="./logfiles/"
            level="INFO" />

        <server
            port="44556" />

        <ssl
            enabled="True"
            noSSLv2="True"
            noSSLv3="True"
            noTLSv1_0="True"
            noTLSv1_1="True"
            noTLSv1_2="False">

            <server
                certFile="./config/alertr_server.crt"
                keyFile="./config/alertr_server.key" />

            <client
                useClientCertificates="False"
                clientCAFile="/path/to/some_CA.pem" />

        </ssl>

        <survey
            participate="True" />

    </general>
Section log is used to configure the log file setup. The dir attribute sets the directory in which the log files are written to. Make sure it exists and is writable by the user that starts the AlertR server. Otherwise the server will not start. For example, the directory /var/log is usually only writable by the "root" user and users of the group "syslog". If you want the server log files in this directory, please create a sub-directory for the AlertR server log files and set the correct permissions on it. The level attribute sets the log level. Possible values are DEBUG, INFO, WARNING, ERROR, CRITICAL.
Section server is used to configure the server connection setup. The port attribute sets the port that is used for the server. In this tutorial, we use the port 44556.
Section ssl is used to configure the TLS/SSL setup. The enabled attributes gives you the option to disable or enable it. This setting has to be the same for your complete AlertR setup. It is strongly recommended to enable TLS/SSL and only disable it in a testing environment. In this tutorial, we enable TLS/SSL. The remaining switches in the ssl section configure the TLS/SSL version used for the connection. Each one disallows the given version. In order to be as secure as possible, we only allow the highest version that is supported by all our hosts. However, since TLSv1.3 is not widely adopted yet (OpenSSL version 1.1.1), we also allow TLSv1.2. Therefore, we set the attributes noSSLv2, noSSLv3, noTLSv1_0, and noTLSv1_1 to "True". To allow TLSv1.2 we set noTLSv1_2 to "False". The certFile attribute in the server section sets the location of the certificate file and the keyFile attribute the location of the corresponding key file. Both files were created during the tutorial (see Certificate). Section client is used to configure the client connection setup. The useClientCertificates attribute determines if the client needs a certificate to connect to the server or not. The clientCAFile attribute sets the location of the client certificate that is used to verify the client connection. Since this tutorial is not using client certificates, we do not have to set a sane value here.
Section survey is used to configure if you are participating in the AlertR survey or not. The data that is transfered are the AlertR instances that your setup uses, the version and revision of each instance, and what repository you are using for updates. This is sent once a week to a central server and used to get a better notion of what of AlertR is actually used. The participation to this survey is completely voluntarily, but it would help to get a better understanding on the usage of AlertR (or if it is used after all).
The update section is used for options such as update checking. In our tutorial configuration, the section looks like this:
    <update>

        <server
            url="https://raw.githubusercontent.com/sqall01/alertR/master/" />

    </update>
Section server is used to configure the remote update repository. Normally, the default configuration can be used here (which is this repository). The url attribute gives the remote server location of the repository. Only the https protocol is allowed here if you want to change it.
The alertLevelprofile section configures the System Profiles. In our tutorial configuration, the section looks like this:
    <profile>

        <profile>

            <general
                id="0"
                name="Activated" />

        </profile>

        <profile>

            <general
                id="1"
                name="Deactivated" />

        </profile>

    </profile>
Each configured System Profile is set up in its own <profile>...</profile> context. The context has one section: general. The following describes the settings of this section.
Section general is used to configure the System Profile settings. The id attribute gives the unique id of the configured System Profile. It is used as an identifier and has no other meaning. For example, an Alert Level that is a member of this System Profile uses the id to determine it. Please note, the AlertR system enforces the existence of a System Profile with the id 0. The name attribute gives the name of the System Profile. This name is only used as a description for the user.
The alertLevels section configures the Alert Levels. In our tutorial configuration, the section looks like this:
    <alertLevels>

        <alertLevel>

            <general
                level="0"
                name="Dummy"
                triggerAlertTriggered="False"
                triggerAlertNormal="False" />

            <instrumentation
                activated="False"
                cmd="/path/to/script.py"
                timeout="10" />

            <profile>0</profile>
            <profile>1</profile>

        </alertLevel>

        <alertLevel>

            <general
                level="1"
                name="Silent Notification"
                triggerAlertTriggered="True"
                triggerAlertNormal="True" />

            <instrumentation
                activated="False"
                cmd="/path/to/script.py"
                timeout="10" />

            <profile>0</profile>
            <profile>1</profile>

        </alertLevel>

        <alertLevel>

            <general
                level="2"
                name="Urgent Notification"
                triggerAlertTriggered="True"
                triggerAlertNormal="True" />

            <instrumentation
                activated="False"
                cmd="/path/to/script.py"
                timeout="10" />

            <profile>0</profile>

        </alertLevel>

    </alertLevels>
Each configured Alert Level is set up in its own <alertLevel>...</alertLevel> context. The context has two main sections: general and instrumentation. The following describes the settings of each section.
Section general is used to configure the basic Alert Level settings. The level attribute gives the unique id of the configured Alert Level. It is used as an identifier and has no other meaning. For example, a sensor that is a member of this Alert Level uses the level to determine it. The name attribute gives the name of the Alert Level. This name is only used as a description for the user. The triggerAlertTriggered attribute determines if the Alert Level should trigger a Sensor Alert event for the state "triggered" (e.g., a window was opened). The triggerAlertNormal attribute determines if the Alert Level should trigger a Sensor Alert event for the state "normal" (e.g., a window was closed again).
Section instrumentation sets up an instrumentation script that can be used by an Alert Level. The activated attribute defines if the a instrumentation is activated. The cmd attribute defines the path of the script, whereas the timeout attribute defines the timeout in seconds of the instrumentation. In our tutorial, we do not use instrumentation. Therefore it is deactivated and the cmd as well as the timeout attribute do not have to be set with meaningful values. If you are interested how instrumentation works and what you can do with it, please refer to the Instrument Sensor Alerts on the Server tutorial.
Section profile is used to configure the System Profiles this Alert Level is a member of.
The internalSensors section is used for options that configure the internal sensors that are used by the AlertR server for fail states. In our tutorial configuration, the section looks like this:
    <internalSensors>

        <nodeTimeout
            activated="True"
            description="Internal: Node Timeout">

            <alertLevel>0</alertLevel>
            <alertLevel>1</alertLevel>

        </nodeTimeout>

        <profileChange
            activated="True"
            description="Internal: Profile Change">

            <alertLevel>0</alertLevel>

        </profileChange>

        <versionInformer
            activated="True"
            description="Internal: Version Informer"
            interval="86400">

            <alertLevel>0</alertLevel>

        </versionInformer>

        <alertLevelInstrumentationError
            activated="True"
            description="Internal: Alert Level Instrumentation Error">

            <alertLevel>0</alertLevel>
            <alertLevel>1</alertLevel>

        </alertLevelInstrumentationError>

        <sensorErrorState
            activated="True"
            description="Internal: Sensor Error State">

            <alertLevel>0</alertLevel>
            <alertLevel>1</alertLevel>

        </sensorErrorState>

    </internalSensors>
Each configured internal sensor is set up in its own context. The following describes the settings of each sensor.
Section nodeTimeout is used to configure the internal sensor that triggers a Sensor Alert if a node of the system times out (Sensor Alert with state "triggered" when a node times out and a Sensor Alert with state "normal" if the node reconnects). The AlertR server only checks the nodes that are configured as "persistent". Non-persistent nodes are allowed to disconnect from the system. The activated attribute determines if this sensor is activated or not. The description attribute sets the description for this sensor that is shown on each client. To set up the Alert Levels which should be triggered by this sensor, a list of Alert Levels is given (at least one has to be set). Obviously, the configured Alert Level has to exist.
Section profileChange is used to configure the internal sensor that triggers a Sensor Alert if the System Profile that is used is changed (Sensor Alert with state "triggered" is sent and the ID of the used System Profile as data). This can be used to instrument the change of the System Profile. More specifically, in the our tutorial the activation/deactivation of the alarm system. The activated attribute determines if this sensor is activated or not. The description attribute sets the description for this sensor that is shown on each client. To set up the Alert Levels which should be triggered by this sensor, a list of Alert Levels is given (at least one has to be set). Obviously, the configured Alert Level has to exist.
Section versionInformer is used to configure the internal sensor that triggers a Sensor Alert when a new version of an AlertR instance is available. When this is activated, the online repository that was set up in the update section is regularly checked for new versions. This not only checks for a new version for the server, but also for all connected clients. The activated attribute determines if this sensor is activated or not. The description attribute sets the description for this sensor that is shown on each client. The interval attribute gives the interval in seconds in which the online repository is checked. To set up the Alert Levels which should be triggered by this sensor, a list of Alert Levels is given (at least one has to be set). Obviously, the configured Alert Level has to exist.
Section alertLevelInstrumentationError is used to configure the internal sensor that triggers a Sensor Alert if an instrumentation script of an Alert Level fails (e.g., your script has some kind of error and fails during execution). Activating this internal sensor only makes sense if you are using instrumentation scripts. The activated attribute determines if this sensor is activated or not. The description attribute sets the description for this sensor that is shown on each client. To set up the Alert Levels which should be triggered by this sensor, a list of Alert Levels is given (at least one has to be set). Obviously, the configured Alert Level has to exist.
Section sensorErrorState is used to configure the internal sensor that triggers a Sensor Alert if any sensor in your system has an error (e.g, not able to read a temperature value or a timeout during an Internet connection). This internal sensor allows you to be notified if any sensor in your system does not work as expected instead of silently fail. The activated attribute determines if this sensor is activated or not. The description attribute sets the description for this sensor that is shown on each client. To set up the Alert Levels which should be triggered by this sensor, a list of Alert Levels is given (at least one has to be set). Obviously, the configured Alert Level has to exist.
The AlertR server needs to authenticate the clients that connect to the server. As a result, it needs some place to store the user credentials and information about them.
At the moment, only a .csv file is supported for the user authentication. In order to keep it as transparent as possible, the AlertR server has an additional script called manageUsers.py to manage the users. It is placed directly in the installation directory.
Let us assume you want the Raspberry Pi sensor client as a client of your AlertR system. It should have the username client_raspi_kitchen and password totally_secret_pw. First, we have to get the instance name of it.
alertr@towel:~$ ./alertRinstaller.py -l

[...]
AlertR Sensor Client Raspberry Pi
---------------------------------
Instance:
sensorClientRaspberryPi

Type:
sensor

Version:
0.800-0

Dependencies:
1: RPi.GPIO (lowest version: 0.5.2)

Description:
[...]
As we can see, the instance name is "sensorClientRaspberryPi". In order to add it, we can use the prompt provided by manageUsers.py or directly via arguments. When adding it via the prompt, it looks like the following:
alertr@towel:/home/alertr/server# ./manageUsers.py -a

Please make sure that the AlertR Server is not running while adding a user.
Otherwise it can lead to an inconsistent state and a corrupted database.
Are you sure to continue?
(y/n): y

Please enter username:
client_raspi_kitchen

Please enter password:

Please verify password:

####################################################################################################
No.  | Option
####################################################################################################
---------------------------------------- Type: alert -----------------------------------------------
1.   | Use instance 'alertClientDbus'.
2.   | Use instance 'alertClientExecuter'.
3.   | Use instance 'alertClientMail'.
4.   | Use instance 'alertClientPushNotification'.
5.   | Use instance 'alertClientRaspberryPi'.
6.   | Use instance 'alertClientTemplate'.
7.   | Use instance 'alertClientXBMC'.
---------------------------------------- Type: manager ---------------------------------------------
8.   | Use instance 'managerClientConsole'.
9.   | Use instance 'managerClientDatabase'.
10.  | Use instance 'managerClientKeypad'.
---------------------------------------- Type: sensor ----------------------------------------------
11.  | Use instance 'sensorClientDevelopment'.
12.  | Use instance 'sensorClientExecuter'.
13.  | Use instance 'sensorClientFIFO'.
14.  | Use instance 'sensorClientICalendar'.
15.  | Use instance 'sensorClientLightning'.
16.  | Use instance 'sensorClientPing'.
17.  | Use instance 'sensorClientRaspberryPi'.
18.  | Use instance 'sensorClientWeatherService'.
---------------------------------------- Type: other -----------------------------------------------
19. Enter instance and node type manually.

Please choose an option: 17
If we want to add the credentials without the prompt, we can just use the argument options:
alertr@towel:/home/alertr/server# ./manageUsers.py -a -u client_raspi_kitchen -p totally_secret_pw -t sensor -i sensorClientRaspberryPi

Please make sure that the AlertR Server is not running while adding a user.
Otherwise it can lead to an inconsistent state and a corrupted database.
Are you sure to continue?
(y/n): y
If you want to see all options the user management script has, just use the argument --help.
If you want the AlertR server to start automatically after a reboot of the host, you have to set it up. In this tutorial, I will give two examples on how to set up the autostart of the AlertR server depending on your system using systemd or just init.d.
An init.d script is provided by the AlertR installation. The only thing you have to do is to copy and configure it correctly. The following command copies it to the correct location, sets the permissions correctly and installs it:
root@towel:/home/alertr/server/init.d_example# cp alertRserver.sh /etc/init.d/

root@towel:/etc/init.d# chown root:root alertRserver.sh
root@towel:/etc/init.d# chmod 755 alertRserver.sh

root@towel:/etc/init.d# update-rc.d alertRserver.sh defaults
 Adding system startup for /etc/init.d/alertRserver.sh ...
   /etc/rc0.d/K20alertRserver.sh -> ../init.d/alertRserver.sh
   /etc/rc1.d/K20alertRserver.sh -> ../init.d/alertRserver.sh
   /etc/rc6.d/K20alertRserver.sh -> ../init.d/alertRserver.sh
   /etc/rc2.d/S20alertRserver.sh -> ../init.d/alertRserver.sh
   /etc/rc3.d/S20alertRserver.sh -> ../init.d/alertRserver.sh
   /etc/rc4.d/S20alertRserver.sh -> ../init.d/alertRserver.sh
   /etc/rc5.d/S20alertRserver.sh -> ../init.d/alertRserver.sh
Next we have to configure the init.d script correctly. The following changes have to be made to the script:
[...]
# change USER to the user which runs the alertRserver
USER=alertr
# change DAEMON to the path to run the alertRserver
DAEMON=/home/alertr/server/alertRserver.py
[...]
In order to work correctly, the AlertR server has to be executable. With the following, we change the permissions of the AlertR server:
alertr@towel:~/server$ chmod 755 alertRserver.py
To start the server as daemon, we can now execute:
root@towel:/home/alertr/server# /etc/init.d/alertRserver.sh start
The log file of the server (it is created in the directory you have configured in the General Section) should now show the following:
[...]
06/12/2016 11:58:46 INFO: [alertRserver.py] Starting sensor alert manage thread.
06/12/2016 11:58:46 INFO: [alertRserver.py] Starting manager client manage thread.
06/12/2016 11:58:46 INFO: [alertRserver.py] Starting server thread.
06/12/2016 11:58:46 INFO: [alertRserver.py] Starting watchdog thread.
06/12/2016 11:58:46 INFO: [alertRserver.py] Starting update check thread.
06/12/2016 11:58:46 INFO: [alertRserver.py] Starting survey executer thread.
06/12/2016 11:58:46 INFO: [alertRserver.py] Server started.
If your system uses systemd for its autostart, you have to configure the AlertR server a bit different. Copying the template and setting permissions is still the same:
root@towel:/home/alertr/server/init.d_example# cp alertRserver.sh /etc/init.d/

root@towel:/etc/init.d# chown root:root alertRserver.sh
root@towel:/etc/init.d# chmod 755 alertRserver.sh
Configuring the init.d script correctly is also the same:
[...]
# change USER to the user which runs the alertRserver
USER=alertr
# change DAEMON to the path to run the alertRserver
DAEMON=/home/alertr/server/alertRserver.py
[...]
Now, systemd has to be configured. For this we copy the template service file to the correct location and install the service:
root@towel:/home/alertr/server/init.d_example# cp alertRserver.service /etc/systemd/system/

root@towel:/home/alertr/server# systemctl enable alertRserver.service
The AlertR server can be started with the following command:
root@towel:/home/alertr/server# service alertRserver.sh start
The AlertR server status can be checked with the following command:
root@towel:/home/alertr/server# service alertRserver.sh status
The log file of the server (it is created in the directory you have configured in the General Section) should now show the following:
[...]
06/12/2016 11:58:46 INFO: [alertRserver.py] Starting sensor alert manage thread.
06/12/2016 11:58:46 INFO: [alertRserver.py] Starting manager client manage thread.
06/12/2016 11:58:46 INFO: [alertRserver.py] Starting server thread.
06/12/2016 11:58:46 INFO: [alertRserver.py] Starting watchdog thread.
06/12/2016 11:58:46 INFO: [alertRserver.py] Starting update check thread.
06/12/2016 11:58:46 INFO: [alertRserver.py] Starting survey executer thread.
06/12/2016 11:58:46 INFO: [alertRserver.py] Server started.
If you experience problems, please check the log files first. If it is not helpful, change the log level to DEBUG and check again. If no error can be seen, please start the AlertR server manually and check if an error occurs that is not printed into the log file. This can be done by just executing the AlertR server as the user that it normally runs with.
alertr@towel:~/server$ ./alertRserver.py
If you still have problems and do not know how to solve them, you can ask on the community page on reddit or you can use the Github Issues.
The server has some additional programs to help manage your AlertR system.
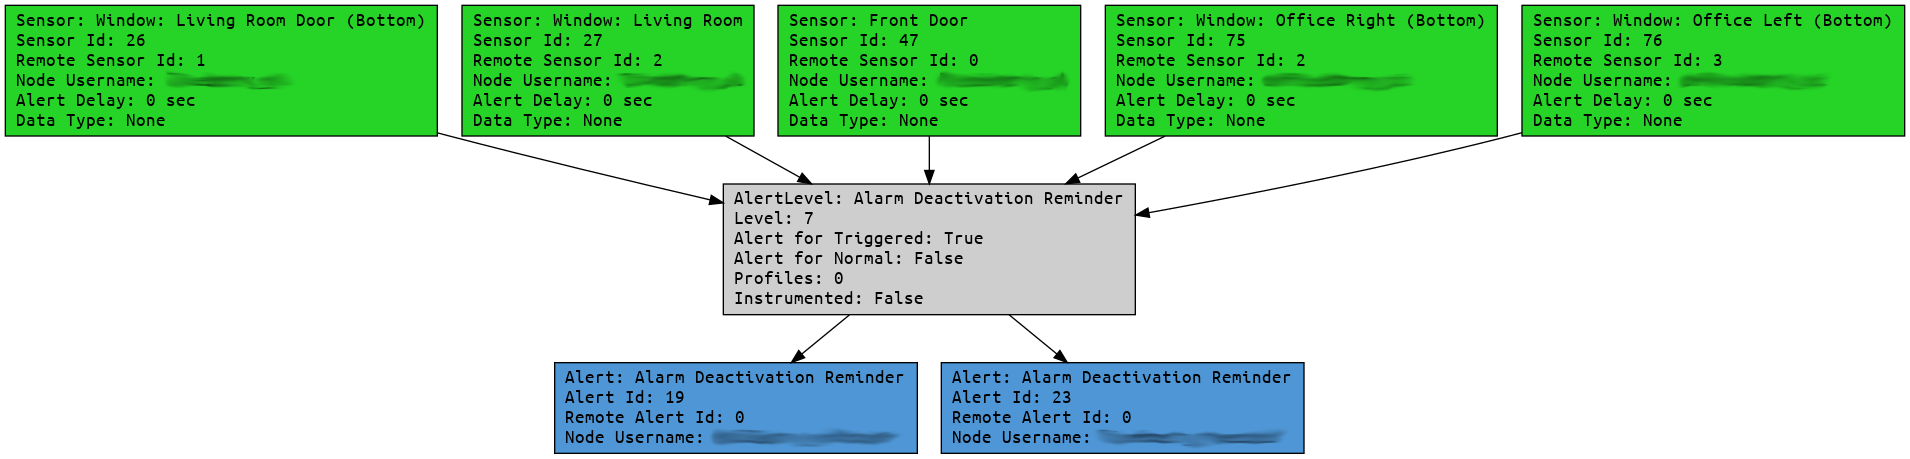
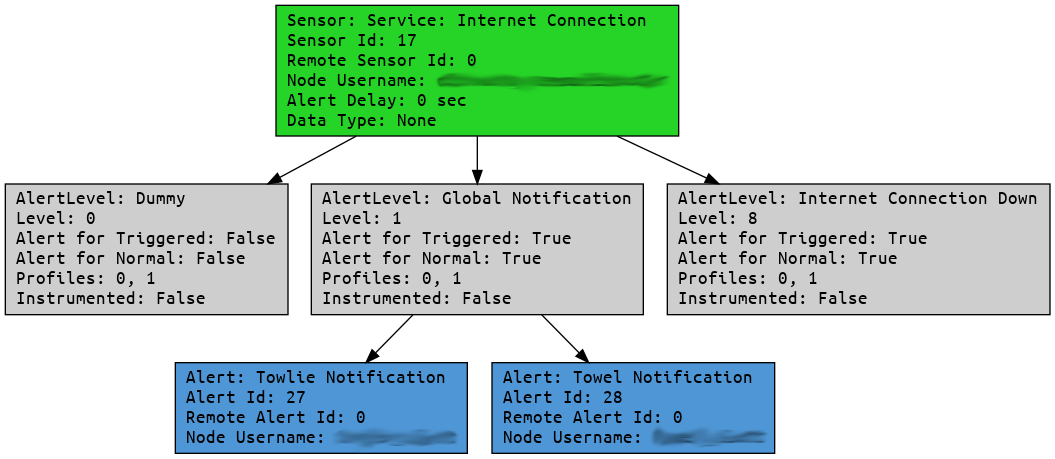
The server provides a utility script called graphExport.py which allows you to export your Alert, Alert Level, and Sensor setup as graph. This is useful if your setup is getting a complexity where it is beginning to get hard to oversee what Sensor triggers which action. The graph is exported as .dot file, however, if you do not want to install a dot-viewer you can also export the graph as .png file.
The script allows you to export the whole setup (which can get rather confusing depending on the size and setting), or filtered version focusing on only a single Alert/Alert Level/Sensor (see the help output of the script for the corresponding parameters).
An export filtered for an Alert Level might look like this:
An export filtered for a Sensor might look like this:
The server provides a utility script called manageUsers.py to add, modify, or delete AlertR user accounts. It is currently the only way to manage your AlertR user accounts. This utility script allows you to perform the desired action directly by providing it with the data via arguments or in an interactive way where it asks you for the needed data. If you choose the interactive way, it tries to connect to the configured AlertR repository in order to gather information about the available AlertR instances to make the configuration easier. However, if you do not want to make this connection, you can disable it (see the help output of the script for the corresponding parameters).
Note that adding a user with this utility script does not require the server to be stopped. However, deleting or modifying does or otherwise your database gets corrupted. Please keep this in mind if you use this script (and choose to ignore the warning message).