Tutorial Developer InstrumentSensorAlerts Server
This tutorial describes how you can instrument a Sensor Alert event in the AlertR system on the server, more specifically, deciding to modify, drop, or plainly trigger it. The tutorial is explained at a practical example that I use in my own network. The instrumentation feature was added in version 0.700. Prior to this version, instrumentation was only possible with a combination of clients as explained in this tutorial.
The following gives you an example on how to instrument Sensor Alert events and process them externally with a script you wrote. This allows you to extend your alarm system to your needs in a flexible manner. The example shown in this tutorial is a simpler version of an instrumentation I deployed in my own network.
This is the same scenario used to explain the instrumentation using a combination of clients. Hence, you can easily compare both methods.
The scenario in this example is the following: I have multiple roof windows in my apartment (for example in my bedroom). When I open them after I woke up in order to get fresh air into the room, I often forget that I had opened them. In summer this is completely fine, however, in winter the room will cool down so much that it takes a lot of heating energy to get a mild temperature in it again. So, in order to remind me of the open window (and save energy in winter), I want a reminder that I have them still open. However, I only want this reminder in winter (or if we are really fancy, if the temperature outside is lower than a certain threshold). Since I have sensors on each window in my apartment already and a running AlertR system monitoring them, the question is: how can I easily instrument this without changing any code in AlertR?
Since version 0.700, AlertR provides the possibility to integrate your own scripts into the Sensor Alert processing on the server. The following graphic shows how the whole instrumentation works:
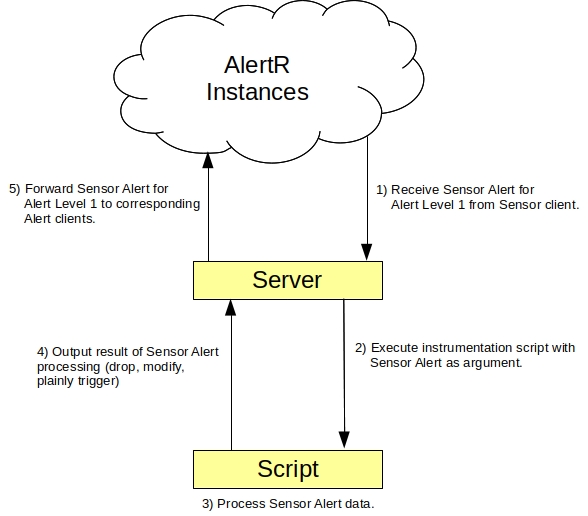
Some sensors in your network trigger a Sensor Alert for the Alert Level 1. This Sensor Alert is sent to the server in step 1). Alert Level 1 is configured to execute your instrumentation script and thus the Sensor Alert is passed as argument in json format to your script in step 2). The instrumentation script processes the Sensor Alert and decides what to do with it in step 3) (it can modify values of the Sensor Alert, plainly trigger it without changes or drop it). The instrumentation script outputs the result which is then used by the AlertR server in step 4). Finally, the server forwards the instrumented Sensor Alert to all clients registered for Alert Level 1 in step 5).
What does this mean in our scenario? Well, the bedroom window triggers the Sensor Alert in Alert Level 1 if it gets opened. The server receives it and passes it to my instrumentation script. The instrumentation script checks if we do not have summer and waits 10 minutes. After the 10 minutes (and we are outside of summer), it outputs the Sensor Alert so the server can process it. The server forwards a Sensor Alert for Alert Level 1 to the client that notifies me (for example, sending a push notification, sending an email or playing a sound in the apartment).
So, how do we actually set everything up. Well, we use the alarm system context from our AlertR Server tutorial for the System Profiles and define new Alert Levels. We use the following configuration:
| Alert Level | Name | Profiles | Functionality |
|---|---|---|---|
| 1 | Window Reminder | Activated, Deactivated | Used to remind about open window. |
Alert Level 1 is used to trigger our processing script that instruments the event that the window was opened. Since the processing is done on the server (in contrast to the instrumentation using a combination of clients), we can also use this Alert Level to perform the action of notifying us about the open window by a push notification, playing a sound or whatever else we want. This Alert Level is member of both System Profiles and thus triggers always.
The Alert Level configuration of the server then looks something like this:
    <alertLevels>

        <alertLevel>

            <general
                level="1"
                name="Window Reminder"
                triggerAlertTriggered="True"
                triggerAlertNormal="True" />

            <instrumentation
                activated="True"
                cmd="./scripts/reminder_window.py"
                timeout="630" />

            <profile>0</profile>
            <profile>1</profile>

        </alertLevel>

    </alertLevels>
The important part here is that the Alert Level trigger always. Otherwise, our instrumentation would only work if the alarm system is activated. Also, the Alert Level has to be triggered for both states: triggered and normal. Otherwise, we only would detect if the window was opened or was closed, but not both cases. Furthermore, the instrumentation has to be activated and the path to the script given (the script needs execution permission on the file system). Since we want the reminder that the window is still open after 10 minutes, we set the timeout of the instrumentation to 630 seconds (which are 10 minutes and 30 seconds). If the timeout is lesser than 10 minutes, we would never get a reminder. A complete AlertR Server example configuration can be seen in the tutorial in detail.
Next, we take a look at the AlertR Sensor Client Raspberry Pi configuration. An example configuration to read the switches of our window would look like this:
    <sensors>

        <sensor>

            <general
                id="0"
                description="Window Bedroom"
                alertDelay="0"
                triggerAlert="True"
                triggerAlertNormal="True" />

            <alertLevel>1</alertLevel>

            <gpio
                type="polling"
                gpioPin="24"
                triggerState="1"
                stateCounter="2" />

        </sensor>

    </sensors>
The setup of a Raspberry Pi with the AlertR sensor client is explained in detail in the AlertR Sensor Client Raspberry Pi tutorial. The important part in this configuration is that we trigger a Sensor Alert for both states: triggered and normal (caused by the options triggerAlert and triggerAlertNormal set to True). The Sensor Alert should be triggered for the Alert Level 1 which signalizes that the bedroom window was opened or closed.
The last part missing is our instrumentation script. However, before we can write it we should take a look how the Sensor Alert argument looks like that is passed by the server. It looks like the following json string for a triggered Sensor Alert (window opened):
{"description": "Window: Bedroom", "hasLatestData": false, "changeState": true, "optionalData": null, "triggeredAlertLevels": [1], "dataType": 0, "timeReceived": 1604342185, "alertLevels": [1], "alertDelay": 0, "state": 1, "sensorId": 48, "nodeId": 21, "data": {}, "hasOptionalData": false}
And it looks like the following for a normal Sensor Alert (window closed):
{"description": "Window: Bedroom", "hasLatestData": false, "changeState": true, "optionalData": null, "triggeredAlertLevels": [1], "dataType": 0, "timeReceived": 1604342185, "alertLevels": [1], "alertDelay": 0, "state": 0, "sensorId": 48, "nodeId": 21, "data": {}, "hasOptionalData": false}
The difference between both is the state signaled. The triggered has the state 1 and the normal the state 0. A detailed explanation about each field in the message is given in the protocol documentation.
Now we can take a look at our script. It is a simplified version of the one I am using in my setting at home:
#!/usr/bin/python3

import sys
import json
import time
import fcntl
import datetime

state_file = "/tmp/alertr_filter_bedroom_state.txt"
wait_time = 600


def load_state():
    old_state = 0
    try:
        with open(state_file, 'r') as fp:
            old_state = int(fp.read())

    except:
        pass
    return old_state


def write_state(curr_state):
    with open(state_file, 'w') as fp:
        fcntl.lockf(fp, fcntl.LOCK_EX)
        fp.write("%d" % curr_state)
        fcntl.lockf(fp, fcntl.LOCK_UN)


def wait_and_trigger(sensor_alert):
    # Wait 10 minutes before triggering sensor alert.
    for _ in range(wait_time):
        time.sleep(1)

        # Check if the window was closed during our wait time.
        curr_state = load_state()
        if curr_state == 0:
            print(json.dumps(dict()))  # drop sensor alert
            return

    print(json.dumps(sensor_alert))  # trigger sensor alert


def main():
    old_state = load_state()

    sensor_alert = json.loads(sys.argv[1])
    state = int(sensor_alert["state"])

    # Check reminder active
    # (deactivated approximately from June to August).
    curr_week_no = datetime.date.today().isocalendar()[1]
    if 23 < curr_week_no < 37:
        print(json.dumps(dict()))  # drop sensor alert
        return

    # Only consider state changes.
    if old_state == state:
        print(json.dumps(dict()))  # drop sensor alert
        return

    write_state(state)

    # Window opened, trigger our reminder.
    if state == 1:
        wait_and_trigger(sensor_alert)

    # Window closed, stop our reminder (if necessary)
    else:
        print(json.dumps(sensor_alert))  # trigger sensor alert

if __name__ == '__main__':
    # Check if we have an argument otherwise do nothing.
    if len(sys.argv) == 2:
        main()
What does this script do. Well, first of all it checks if it has the json string argument. Otherwise, it does simply nothing. If it has, it checks if we have summer or not. Only outside of summer we want to get a reminder. Since the script tracks the state of the window, it checks if we have a new state (open or close). If the window was opened, then we start a counter that reminds us in 10 minutes. The protocol used to pass the result to the server is described in detail in the protocol documentation.
The script is only a simple example script. The script I use has to distinguish between two windows in the bedroom and also checks if the temperature is under 18 degree Celsius. However, with the instrumentation capability of AlertR you can do anything. The only limitation is your imagination ;).
If you experience problems, please check the log file first. If it is not helpful, change the log level to DEBUG and check again. If no error can be seen, please start the AlertR server manually and check if an error occurs that is not printed into the log file. This can be done by just executing the AlertR server as the user that it normally runs with.
alertr@towel:~/AlertRServer$ ./alertRserver.py
Also, let your script write the received argument into a file to check if everything is working fine here.
If you still have problems and do not know how to solve them, you can ask on the community page on reddit or you can use the Github Issues.