Tutorial SensorClientRaspberryPi DoorBellInterrupt
(For version 1.000)
This tutorial describes the basic configuration of the AlertR Sensor Client Raspberry Pi with a connected door bell which is detected by an interrupt. It can be used as foundation to develop an own AlertR system setup. This tutorial assumes you have set up the AlertR Server according to the provided Server Tutorial.
The client is described as the following by the installation:
sqall@towel:~$ ./alertRinstaller.py -l

[...]
AlertR Sensor Client Raspberry Pi
---------------------------------
Instance:
sensorClientRaspberryPi

Type:
sensor

Version:
0.901-0

Dependencies:
1: requests (pip packet: requests) (lowest version: 2.20.0)
2: RPi.GPIO (pip packet: RPi.GPIO) (lowest version: 0.5.2)

Description:
This client handles Raspberry Pi GPIO pins as sensors. It either polls the state of a GPIO pin or uses an interrupt on a falling/rising edge and triggers an alert if the state has changed/interrupt has occurred (or a state change if it goes back from a state in which it triggers an alert to a normal state). This means it notifies the server if an alert was triggered by a sensor. A sensor connected to the GPIO pin can be anything you like, for example, a PIR (Passive InfraRed) sensor, a magnetic switch on a window, a water leak alarm sensor, a smoke detector and so on. Furthermore, this client also supports DS18B20 temperature sensors.
[...]
In order to install the AlertR Sensor Client Raspberry Pi, we first have to fulfill all prerequisites. On a Debian/Ubuntu Linux you can install everything with the following commands:
root@towel:/home/sqall# apt-get install python3-pip

root@towel:/home/sqall# pip3 install RPi.GPIO requests
Obviously, the AlertR Sensor Client Raspberry Pi should be installed on a Raspberry Pi. Please note that older versions of the Raspberry Pi packages need root permissions in order to access the GPIO pins. If you are installing the AlertR instance on an older Raspberry Pi operating system with older packages, make sure it works without root permissions before creating a new user account for the AlertR instance. If it only works with root permissions, please omit all steps that use the new alertr user and instead use the root user account.
It is always a good idea to have an own user for a daemon. Therefore, we create a user that runs the AlertR Sensor Client Raspberry Pi called "alertr":
root@towel:/home/sqall# adduser --disabled-password alertr
Adding user `alertr' ...
Adding new group `alertr' (1002) ...
Adding new user `alertr' (1002) with group `alertr' ...
Creating home directory `/home/alertr' ...
Copying files from `/etc/skel' ...
Changing the user information for alertr
Enter the new value, or press ENTER for the default
    Full Name []:
    Room Number []:
    Work Phone []:
    Home Phone []:
    Other []:
Is the information correct? [Y/n] y
Additionally, the user has to be in the group gpio in order to access the GPIO pins:
root@towel:/home/sqall# addgroup alertr gpio
To switch into this user in the terminal you can use the following command:
root@towel:/home/sqall# su alertr
Please note that this is only possible as root user. If you are trying this command as another user you will get a password prompt for the user alertr, which does not have a password.
Afterwards, you can use the installation script provided by AlertR to install the client.
alertr@towel:~$ wget https://raw.githubusercontent.com/sqall01/alertR/master/alertRinstaller.py

alertr@towel:~$ mkdir sensorClientRaspberryPi

alertr@towel:~$ chmod 755 alertRinstaller.py

alertr@towel:~$ ./alertRinstaller.py -i sensorClientRaspberryPi -t ./sensorClientRaspberryPi/
This tutorial connects a door bell to the Raspberry Pi. This can be useful if you want to see if someone was at your door or to trigger, for example, a webcam that takes pictures of the one that rang your door bell.
The circuit diagram to connect the door bell to the Raspberry Pi looks like this:
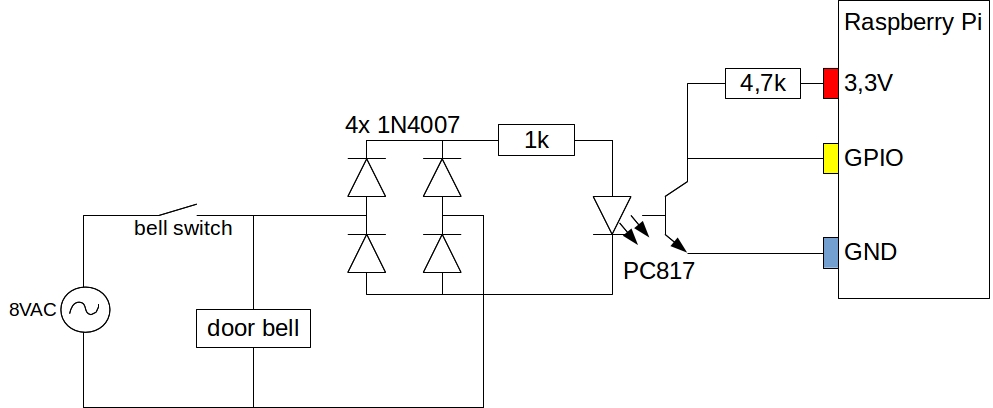
This is a quite more complicated circuit in comparison to a pull up for a switch. It needs two resistors, four LEDs, and one optical coupler.
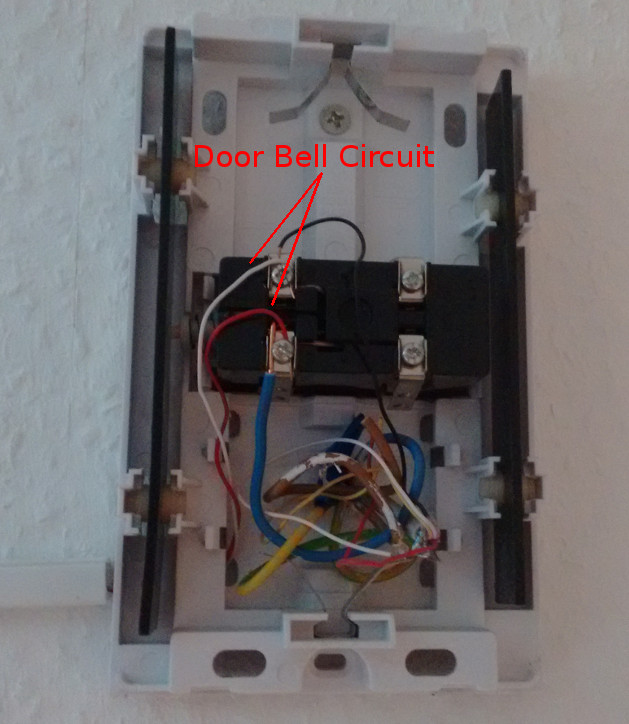
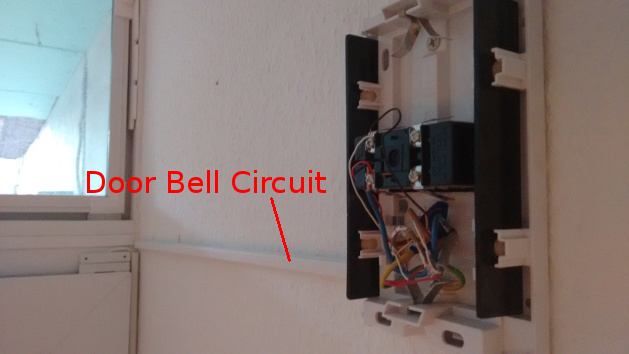
In Germany, the door bell usually works with 8V alternating current (as far as I know). The power supply unit can usually be found in the circuit breaker box of your home and looks something like this:

The circuit transforms the alternating current into direct current that is used for the signal at the GPIO pin. As can be seen, it is directly connected to the door bell.
Since the Raspberry Pi uses edge detection to generate the interrupt, we get problems with signal bouncing on the cable with this circuit. We tackle this problem in the software later (since I have no clue how to do it in a circuit).
Let us assume for this tutorial, the circuit is connected to GPIO pin 24. A picture of the pin numbers can be found on this website (for the Raspberry Pi Model B/B+). The pin number is the actual number of the pin and not the name of the pin (since the name changes depending on the used Raspberry Pi revision). This means on the picture, the GPIO pin 24 is the one with the name "GPIO8 / SP10_CE0_N".
A helper script to check the correct GPIO configuration is provided by the installation in the directory /home/alertr/sensorClientRaspberryPi/helperScripts. The script raspberryPiGpioInputInterruptTest.py has to be modified to check the correct GPIO pin.
[...]

# NOTE: this is the actual pin number (not the number of the GPIO)
inputPin = 24

pulledUpDown = GPIO.PUD_UP

edge = GPIO.FALLING

[...]
When we execute the script and then use the door bell, the output looks like the following:
alertr@towel:~/sensorClientRaspberryPi/helperScripts$ python3 raspberryPiGpioInputInterruptTest.py
Trigger no.: 1
Trigger no.: 2
Trigger no.: 3
Trigger no.: 4
We see that using the door bell only once, triggers a lot of interrupts due to signal bouncing. In the AlertR client, this is tackled by counting the interrupts before triggering a Sensor Alert. In this case, using the door bell triggered 4 interrupts. As a result, we set our counter to 3 in the GPIO settings of the AlertR Client Raspberry Pi which is addressed in a later section.
Furthermore, the edge detection is also sensitive enough to trigger when we start other electrical devices, such as a vacuum cleaner. As the cable also acts as an antenna, a signal is detected by the Raspberry Pi which triggers an interrupt. This is also prevented by counting the numbers of interrupts before actually trigger a Sensor Alert. Note that this number can vary and perhaps needs some fine tuning when the AlertR client is already set up and running (because some Sensor Alerts are triggered when a vacuum cleaner is used for example).
The following describes the configuration of the AlertR Sensor Client Raspberry Pi. It shows a basic configuration that can be used as a template for own installations.
For security reasons, it is strongly recommended to use a TLS connection for your AlertR system. Hence, all tutorials will use TLS. However, for testing purposes AlertR gives you the option to disable TLS. If you do so, you have to disable it for the complete AlertR system.
During the installation of the AlertR server, you created a certificate file with the name alertr_server.crt. This file is needed by the client in order to verify the connection. Please copy it to the host you are installing this client on. This tutorial assumes that you have stored the certificate file in the following location: /home/alertr/sensorClientRaspberryPi/config/alertr_server.crt.
The client has to authenticate itself before it can work with the server. Therefore, we need to set up user credentials on the AlertR server for this client. We execute the following command with the manageUsers.py script of the server which is located in the installation directory of the server (see Users Management for further information):
alertr@towel:/home/alertr/server# ./manageUsers.py -a -u user_interrupt_pi -p password_interrupt_pi -t sensor -i sensorClientRaspberryPi

Please make sure that the AlertR Server is not running while adding a user.
Otherwise it can lead to an inconsistent state and a corrupted database.
Are you sure to continue?
(y/n): y
This tutorial assumes the Alert Levels configured in the AlertR Server tutorial. The client will use the following for its configuration:
| Alert Level | Name | Profiles | Functionality |
|---|---|---|---|
| 1 | Silent Notification | Activated, Deactivated | Used to silently notify the user. |
Alert Level 1 is used for sensors that trigger a Sensor Alert, but not an urgent one. This silent notification should be triggered when the door bell rings. This Alert Level is member of every System Profile and thus triggers always.
Every AlertR installation has a template configuration file with detailed comments that describe the functionality of each option. To use it as a draft, you can just copy the template file and modify your new configuration file.
alertr@towel:~/sensorClientRaspberryPi/config$ cp config.xml.template config.xml

alertr@towel:~/sensorClientRaspberryPi/config$ chmod 700 config.xml
The configuration file itself is split into the following parts:
- General
- SMTP
- Update
- Sensors
In this tutorial, we are going through each of these parts separately and describe why we configured it like that.
The general section is used for options such as certificate file location. In our tutorial configuration, the section looks like this:
    <general>

        <log
            file="./logfile.log"
            level="INFO" />

        <server
            host="localhost"
            port="44556" />

        <ssl
            enabled="True">

            <server
                caFile="./config/alertr_server.crt" />

            <client
                certificateRequired="False"
                certFile="/path/to/client.crt"
                keyFile="/path/to/client.key" />
        </ssl>

        <credentials
            username="user_interrupt_pi"
            password="password_interrupt_pi" />

        <connection
            persistent="True" />

    </general>
Section log is used to configure the log file setup. The file attribute sets the location for the log file. Make sure it exists and is writable by the user that starts the AlertR client. Otherwise the client will not start. For example, the directory /var/log is usually only writable by the "root" user and users of the group "syslog". If you want the client log file in this directory, please create a sub-directory for the AlertR client log file and set the correct permissions on it. The level attribute sets the log level. Possible values are DEBUG, INFO, WARNING, ERROR, CRITICAL.
Section server is used to configure the server connection setup. The host and port attribute sets the address and port of the AlertR server. The port was previously configured in the server configuration file. The address can either be a name that can be resolved by the DNS system or an IP address.
Section ssl is used to configure the TLS/SSL setup. The enabled attributes gives you the option to disable or enable it. This setting has to be the same for your complete AlertR setup. It is strongly recommended to enable TLS/SSL and only disable it in a testing environment. In this tutorial, we enable TLS/SSL. The caFile attribute in the server section sets the location of the certificate file that is used to authenticate the server (see Certificate). Section client is used to configure the client connection setup. The certificateRequired attribute determines if the client needs a certificate to connect to the server or not. The certFile and keyFile are used to determine the client certificate and key file. Since this tutorial is not using client certificates, we do not have to set sane values here.
Section credentials is used to configure the login credentials of this client. The credentials were configured in a previous step of this Tutorial and must be the same as in this configuration file.
Section connection is used to configure the connection to the server. The persistent attribute is used to configure if the connection to the server has to be persistent. This means that if the client disconnects, a Sensor Alert is created by the server.
The smtp section is used for options that configure the used SMTP server. In our tutorial configuration, the section looks like this:
    <smtp>

        <general
            activated="True"
            fromAddr="sensorClientRaspberryPi@alertr.de"
            toAddr="myalarmaddress@example.org" />

        <server
            host="127.0.0.1"
            port="25" />

    </smtp>
Section general is used to configure the basic options of the eMail notification. The eMail notification is used if problems on the AlertR client occur that can not be solved (like connection problems). The activated attribute determines if the eMail notification is activated or not. If it is deactivated, the rest of the options in the whole smtp section are ignored. The fromAddr attribute sets the used eMail address from which the eMail notification is sent. The toAddr attribute determines the eMail address the notification is sent to.
Section server is used to configure the SMTP server that is used to send the eMail notification. The host attribute sets the address and the port attribute sets the port of the used SMTP server. At the moment, only "127.0.0.1" is allowed as address and port 25. This means you have to set up a local SMTP server in order to send eMail notifications. Personally, I would suggest to set up a local Postfix SMTP server that can forward eMails like in this Tutorial. Please note that the local SMTP server has to accept eMails from localhost without any authentication since it is not supported by AlertR yet.
The update section is used to give the online repository for updates. In our tutorial configuration, the section looks like this:
    <update>

        <server
            url="https://raw.githubusercontent.com/sqall01/alertR/master/" />

    </update>
Section server is used to configure the remote update repository. Normally, the default configuration can be used here (which is this repository). The url attribute gives the remote server location of the repository. Only the https protocol is allowed here if you want to change it.
The sensors section configures the sensors of this client. In our tutorial configuration, the section looks like this:
    <sensors>

        <sensor>

            <general
                id="0"
                description="Door Bell"
                alertDelay="0"
                triggerAlert="True"
                triggerAlertNormal="False" />

            <alertLevel>1</alertLevel>

            <gpio
                type="interrupt"
                gpioPin="24"
                edge="0"
                pulledUpOrDown="1"
                delayBetweenTriggers="10"
                timeSensorTriggered="5"
                edgeCountBeforeTrigger="3" />

        </sensor>

    </sensors>
Each configured sensor is set up in its own <sensor>...</sensor> context. The context has three main sections: general, alertLevel and gpio. The following describes the settings of each section.
Section general is used to configure the basic sensor settings. The id attribute gives the local id of the configured sensor. This id has to be unique for each sensor of this client. Since we configure two sensors, we give them the id 0 and 1. The description attribute gives a short description of the sensor. The alertDelay attribute sets how long in seconds the server has to wait until a Sensor Alert is triggered. Normally, this is set to 0 to immediate react on a Sensor Alert. But in some situations it might be necessary to react on a Sensor Alert after a certain time and not directly. For our tutorial sensors we set this value to 0. The triggerAlert attribute sets if the sensor triggers a Sensor Alert with the state "triggered" and triggerAlertNormal sets if the sensor triggers a Sensor Alert with the state "normal". The door bell should trigger a Sensor Alert only when it is used and hence only a Sensor Alert for the state "triggered" should be sent to the server.
The alertLevel sections set the Alert Level the sensor triggers. In our tutorial, the door bell triggers Alert Level 1. But it is not limited to only one Alert Level per sensor. If another Alert Level should be triggered, an additional alertLevel section is added with the corresponding Alert Level.
Section gpio configures the GPIO sensor settings. The type attribute sets the type of the GPIO sensor. In this case, it is set to "interrupt" since the sensor state is not polled by the client but triggered on an interrupt. The gpioPin attribute sets the number of the pin that is used by the sensor. In our tutorial, it is the pin number 24. The edge attribute sets on which edge the interrupt is triggered (either the falling or rising edge). In our case, we want an interrupt triggered on the falling edge. The pulledUpOrDown attribute sets if the GPIO pin has a pull up or down resistor (to avoid a floating state) set. In this case, a pull up resistor is set. The delayBetweenTriggers attribute sets the delay in seconds that is waited before this sensor can trigger again. In the case of the door bell, it is used to prevent pranks like knock down ginger. The timeSensorTriggered sets the time in seconds how long the sensor is set to the state "triggered" after a Sensor Alert. The edgeCountBeforeTrigger attribute sets the number of interrupts that have to occur before a Sensor Alert is triggered. As described in the setup section, this is used to tackle signal bouncing.
If you want the AlertR client to start automatically after a reboot of the host, you have to set it up. In this tutorial, I will give two examples on how to set up the autostart of the AlertR client depending on your system using systemd or just init.d.
An init.d script is provided by the AlertR installation. The only thing you have to do is to copy and configure it correctly. The following command copies it to the correct location, sets the permissions correctly and installs it:
root@towel:/home/alertr/sensorClientRaspberryPi/init.d_example# cp alertRsensorRaspberryPi.sh /etc/init.d/

root@towel:/etc/init.d# chown root:root alertRsensorRaspberryPi.sh
root@towel:/etc/init.d# chmod 755 alertRsensorRaspberryPi.sh

root@towel:/etc/init.d# update-rc.d alertRsensorRaspberryPi.sh defaults
 Adding system startup for /etc/init.d/alertRsensorRaspberryPi.sh ...
   /etc/rc0.d/K20alertRsensorRaspberryPi.sh -> ../init.d/alertRsensorRaspberryPi.sh
   /etc/rc1.d/K20alertRsensorRaspberryPi.sh -> ../init.d/alertRsensorRaspberryPi.sh
   /etc/rc6.d/K20alertRsensorRaspberryPi.sh -> ../init.d/alertRsensorRaspberryPi.sh
   /etc/rc2.d/S20alertRsensorRaspberryPi.sh -> ../init.d/alertRsensorRaspberryPi.sh
   /etc/rc3.d/S20alertRsensorRaspberryPi.sh -> ../init.d/alertRsensorRaspberryPi.sh
   /etc/rc4.d/S20alertRsensorRaspberryPi.sh -> ../init.d/alertRsensorRaspberryPi.sh
   /etc/rc5.d/S20alertRsensorRaspberryPi.sh -> ../init.d/alertRsensorRaspberryPi.sh
Next we have to configure the init.d script correctly. The following changes have to be made to the script:
[...]
# change USER to the user which runs the alertRclient
# NOTE: older versions of the Raspberry Pi packages need to be run as "root"
# in order to access the GPIO pins
USER=alertr
# change DAEMON to the path to run the alertRclient
DAEMON=/home/alertr/sensorClientRaspberryPi/alertRclient.py
[...]
In order to work correctly, the AlertR client has to be executable. With the following, we change the permissions of the AlertR client:
alertr@towel:~/sensorClientRaspberryPi$ chmod 755 alertRclient.py
To start the client as daemon, we can now execute:
root@towel:/home/alertr/sensorClientRaspberryPi# /etc/init.d/alertRsensorRaspberryPi.sh start
The log file of the client (it is created in the directory you have configured in the General Section) should now show the following:
[...]
07/27/2016 19:42:26 INFO: [alertRclient.py] Initializing sensors.
07/27/2016 19:42:27 INFO: [alertRclient.py] Connecting to server.
07/27/2016 19:42:28 INFO: [alertRclient.py] Starting watchdog thread.
07/27/2016 19:42:28 INFO: [alertRclient.py] Starting update check thread.
07/27/2016 19:42:28 INFO: [alertRclient.py] Client started.
If your system uses systemd for its autostart, you have to configure the AlertR client a bit different. Copying the template and setting permissions is still the same:
root@towel:/home/alertr/sensorClientRaspberryPi/init.d_example# cp alertRsensorRaspberryPi.sh /etc/init.d/

root@towel:/etc/init.d# chown root:root alertRsensorRaspberryPi.sh
root@towel:/etc/init.d# chmod 755 alertRsensorRaspberryPi.sh
Configuring the init.d script correctly is also the same:
[...]
# change USER to the user which runs the alertRclient
# NOTE: older versions of the Raspberry Pi packages need to be run as "root"
# in order to access the GPIO pins
USER=alertr
# change DAEMON to the path to run the alertRclient
DAEMON=/home/alertr/sensorClientRaspberryPi/alertRclient.py
[...]
Now, systemd has to be configured. For this we copy the template service file to the correct location and install the service:
root@towel:/home/alertr/sensorClientRaspberryPi/init.d_example# cp alertRsensorRaspberryPi.service /etc/systemd/system/

root@towel:/home/alertr/sensorClientRaspberryPi# systemctl enable alertRsensorRaspberryPi.service
The AlertR client can be started with the following command:
root@towel:/home/alertr/sensorClientRaspberryPi# service alertRsensorRaspberryPi.sh status
The log file of the client (it is created in the directory you have configured in the General Section) should now show the following:
[...]
07/27/2016 19:42:26 INFO: [alertRclient.py] Initializing sensors.
07/27/2016 19:42:27 INFO: [alertRclient.py] Connecting to server.
07/27/2016 19:42:28 INFO: [alertRclient.py] Starting watchdog thread.
07/27/2016 19:42:28 INFO: [alertRclient.py] Starting update check thread.
07/27/2016 19:42:28 INFO: [alertRclient.py] Client started.
If you experience problems, please check the log file first. If it is not helpful, change the log level to DEBUG and check again. If no error can be seen, please start the AlertR client manually and check if an error occurs that is not printed into the log file. This can be done by just executing the AlertR client as the user that it normally runs with.
alertr@towel:~/sensorClientRaspberryPi$ ./alertRclient.py
If you still have problems and do not know how to solve them, you can ask on the community page on reddit or you can use the Github Issues.