Tutorial AlertClientPushNotification
(For version 1.000)
This tutorial describes the basic configuration of the AlertR Alert Client Push Notification. It can be used as foundation to develop an own AlertR system setup. This tutorial assumes you have set up the AlertR Server according to the provided Server Tutorial and read the Push Notification Service Description.
The client is described as the following by the installation:
sqall@towel:~$ ./alertRinstaller.py -l

[...]
AlertR Alert Client Push Notification
-------------------------------------
Instance:
alertClientPushNotification

Type:
alert

Version:
0.901-0

Dependencies:
1: requests (pip packet: requests) (lowest version: 2.20.0)
2: lightweightpush (pip packet: lightweightpush) (lowest version: 0.0.5)

Description:
This client handles triggered sensor alerts and is written to send an end-to-end encrypted push notification on the configured channel when it receives a sensor alert. It needs an account at https://alertr.de and the receiving devices to have the AlertR App installed. For each alert you configure, you can customize the message content by using template files. Special keywords will be replaced by information about the received sensor alert.
[...]
In order to install the AlertR Alert Client Push Notification, we first have to fulfill all prerequisites. On a Debian/Ubuntu Linux you can install everything with the following commands:
root@towel:/home/sqall# apt-get install python3-pip

root@towel:/home/sqall# pip3 install lightweightpush requests
It is always a good idea to have an own user for a daemon. Therefore, we create a user that runs the AlertR Alert Client Push Notification called "alertr":
root@towel:/home/sqall# adduser --disabled-password alertr
Adding user `alertr' ...
Adding new group `alertr' (1002) ...
Adding new user `alertr' (1002) with group `alertr' ...
Creating home directory `/home/alertr' ...
Copying files from `/etc/skel' ...
Changing the user information for alertr
Enter the new value, or press ENTER for the default
    Full Name []:
    Room Number []:
    Work Phone []:
    Home Phone []:
    Other []:
Is the information correct? [Y/n] y
To switch into this user in the terminal you can use the following command:
root@towel:/home/sqall# su alertr
Please note that this is only possible as root user. If you are trying this command as another user you will get a password prompt for the user alertr, which does not have a password.
Afterwards, you can use the installation script provided by AlertR to install the client.
alertr@towel:~$ wget https://raw.githubusercontent.com/sqall01/alertR/master/alertRinstaller.py

alertr@towel:~$ mkdir alertClientPushNotification

alertr@towel:~$ chmod 755 alertRinstaller.py

alertr@towel:~$ ./alertRinstaller.py -i alertClientPushNotification -t ./alertClientPushNotification/
This tutorial uses the AlertR push notification service. This service is written to send an end-to-end encrypted message to your Android devices. End-to-end encrypted means, that even as you use a third party service no one but you can read the messages. In order to use it, you have to register an account at alertr.de. Without the account, you cannot use this service.
The following describes the configuration of the AlertR Alert Client Push Notification. It shows a basic configuration that can be used as a template for own installations.
For security reasons, it is strongly recommended to use a TLS connection for your AlertR system. Hence, all tutorials will use TLS. However, for testing purposes AlertR gives you the option to disable TLS. If you do so, you have to disable it for the complete AlertR system.
During the installation of the AlertR server, you created a certificate file with the name alertr_server.crt. This file is needed by the client in order to verify the connection. Please copy it to the host you are installing this client on. This tutorial assumes that you have stored the certificate file in the following location: /home/alertr/alertClientPushNotification/config/alertr_server.crt
The client has to authenticate itself before it can work with the server. Therefore, we need to set up user credentials on the AlertR server for this client. We execute the following command with the manageUsers.py script of the server which is located in the installation directory of the server (see Users Management for further information):
alertr@towel:/home/alertr/server# ./manageUsers.py -a -u user_alert_push -p password_alert_push -t alert -i alertClientPushNotification

Please make sure that the AlertR Server is not running while adding a user.
Otherwise it can lead to an inconsistent state and a corrupted database.
Are you sure to continue?
(y/n): y
This tutorial assumes the Alert Levels configured in the AlertR Server tutorial. The client will use the following for its configuration:
| Alert Level | Name | Profiles | Functionality |
|---|---|---|---|
| 1 | Silent Notification | Activated, Deactivated | Used to silently notify the user. |
| 2 | Urgent Notification | Activated | Used to "loudly" notify the user. |
Alert Level 1 is used for sensors that trigger a Sensor Alert, but not an urgent one. This Alert Level is member of every System Profile and thus triggers always.
Alert Level 2 is used for sensors that trigger urgent Sensor Alerts, such as a break in attempt. These sensors should notify the user immediately and loudly at best. This Alert Level is only member of the System Profile "Activated" and will only trigger if this System Profile is used.
This client sends notification messages to inform you about occurred sensor alerts. In order to give you the possibility to customize these messages, AlertR uses template files. An example template file is given under "config/example_template.msg" of your client installation.
In this tutorial we use two message templates. In order to create them, we copy the example template file:
alertr@towel:~/alertClientPushNotification/config$ cp example_template.msg info_template.msg
alertr@towel:~/alertClientPushNotification/config$ cp example_template.msg alarm_template.msg
The "info_template.msg" looks like the following:
Following information sensor alert was received.

Sensor: $SENSORDESC$

Time: $TIMERECEIVED$

Sensor State: $STATE$

Sensor Message: $MESSAGE$

Sensor Data: $SENSORDATA$

Best,
AlertR
The "alarm_template.msg" looks like the following:
Following alarm sensor alert was received.

Sensor: $SENSORDESC$

Time: $TIMERECEIVED$

Sensor State: $STATE$

Sensor Message: $MESSAGE$

Sensor Data: $SENSORDATA$

Best,
AlertR
Keywords like "$TIMERECEIVED$" are replaced by the corresponding value of the received sensor alert. A complete list of keywords is given in the template file.
Every AlertR installation has a template configuration file with detailed comments that describe the functionality of each option. To use it as a draft, you can just copy the template file and modify your new configuration file.
alertr@towel:~/alertClientPushNotification/config$ cp config.xml.template config.xml

alertr@towel:~/alertClientPushNotification/config$ chmod 700 config.xml
The configuration file itself is split into the following parts:
- General
- SMTP
- Update
- Alerts
In this tutorial, we are going through each of these parts separately and describe why we configured it like that.
The general section is used for options such as certificate file location. In our tutorial configuration, the section looks like this:
    <general>

        <log
            file="./logfile.log"
            level="INFO" />

        <server
            host="localhost"
            port="44556"
            caFile="./config/alertr_server.crt" />

        <client
            certificateRequired="False"
            certFile="/path/to/client.crt"
            keyFile="/path/to/client.key" />

        <credentials
            username="user_alert_push"
            password="password_alert_push" />

        <connection
            persistent="True" />

    </general>
Section log is used to configure the log file setup. The file attribute sets the location for the log file. Make sure it exists and is writable by the user that starts the AlertR client. Otherwise the client will not start. For example, the directory /var/log is usually only writable by the "root" user and users of the group "syslog". If you want the client log file in this directory, please create a sub-directory for the AlertR client log file and set the correct permissions on it. The level attribute sets the log level. Possible values are DEBUG, INFO, WARNING, ERROR, CRITICAL.
Section server is used to configure the server connection setup. The host and port attribute sets the address and port of the AlertR server. The port was previously configured in the server configuration file. The address can either be a name that can be resolved by the DNS system or an IP address.
Section ssl is used to configure the TLS/SSL setup. The enabled attributes gives you the option to disable or enable it. This setting has to be the same for your complete AlertR setup. It is strongly recommended to enable TLS/SSL and only disable it in a testing environment. In this tutorial, we enable TLS/SSL. The caFile attribute in the server section sets the location of the certificate file that is used to authenticate the server (see Certificate). Section client is used to configure the client connection setup. The certificateRequired attribute determines if the client needs a certificate to connect to the server or not. The certFile and keyFile are used to determine the client certificate and key file. Since this tutorial is not using client certificates, we do not have to set sane values here.
Section credentials is used to configure the login credentials of this client. The credentials were configured in a previous step of this Tutorial and must be the same as in this configuration file.
Section connection is used to configure the connection to the server. The persistent attribute is used to configure if the connection to the server has to be persistent. This means that if the client disconnects, a Sensor Alert is created by the server.
The smtp section is used for options that configure the used SMTP server. In our tutorial configuration, the section looks like this:
    <smtp>

        <general
            activated="True"
            fromAddr="alertClientPushNotification@alertr.de"
            toAddr="myalarmaddress@example.org" />

        <server
            host="127.0.0.1"
            port="25" />

    </smtp>
Section general is used to configure the basic options of the eMail notification. The eMail notification is used if problems on the AlertR client occur that can not be solved (like connection problems). The activated attribute determines if the eMail notification is activated or not. If it is deactivated, the rest of the options in the whole smtp section are ignored. The fromAddr attribute sets the used eMail address from which the eMail notification is sent. The toAddr attribute determines the eMail address the notification is sent to.
Section server is used to configure the SMTP server that is used to send the eMail notification. The host attribute sets the address and the port attribute sets the port of the used SMTP server. At the moment, only "127.0.0.1" is allowed as address and port 25. This means you have to set up a local SMTP server in order to send eMail notifications. Personally, I would suggest to set up a local Postfix SMTP server that can forward eMails like in this Tutorial. Please note that the local SMTP server has to accept eMails from localhost without any authentication since it is not supported by AlertR yet.
The update section is used to give the online repository for updates. In our tutorial configuration, the section looks like this:
    <update>

        <server
            url="https://raw.githubusercontent.com/sqall01/alertR/master/" />

    </update>
Section server is used to configure the remote update repository. Normally, the default configuration can be used here (which is this repository). The url attribute gives the remote server location of the repository. Only the https protocol is allowed here if you want to change it.
The alerts section configures the alerts of this client. In our tutorial configuration, the section looks like this:
    <alerts
        username="alertr@alertr.de"
        password="<SECRET>" >

        <alert>

            <general
                id="0"
                description="Notify Normal Alarms" />

            <alertLevel>1</alertLevel>

            <push
                channel="normal_alarms"
                secret="MyComplicatedMsgSecret"
                subject="Info: $SENSORDESC$"
                templateFile="./config/info_template.msg" />

        </alert>

        <alert>

            <general
                id="1"
                description="Notify Important Alarms" />

            <alertLevel>2</alertLevel>

            <push
                channel="important_alarms"
                secret="MyComplicatedMsgSecret"
                subject="Alarm: $SENSORDESC$"
                templateFile="./config/alarm_template.msg" />

        </alert>

    </alerts>
First a basic setting has to be done that is used for each configured alert. In the alerts section, the username and password attributes set the user credentials of your alertr.de account.
Each configured alert is set up in its own <alert>...</alert> context. The context has three main sections: general, alertLevel and push. The following describes the settings of each section.
Section general is used to configure the basic alert settings. The id attribute gives the local id of the configured alert. This id has to be unique for each alert of this client. Since we configure two alerts, we give them the id 0 and 1. The description attribute gives a short description of the alert.
The alertLevel sections set the Alert Level the alerts are triggered by. In our tutorial, one alert triggers by Alert Level 1 and one alert triggers by Alert Level 2.
Section push configures the push notification alert settings. The channel attribute sets the channel on which the notification is sent. This is used to give you the possibility to reach multiple Android devices at once. For more detailed information about channels, please read the corresponding wiki article. In our tutorial, we use two channels. One for an more verbose information notification and one for an alarm notification. The secret attribute sets the secret that is used to encrypt your notification for the end-to-end encryption. This is important to prevent other users (or the alertr.de push server or google services) to read your notifications. The same value has also to be configured on all your Android devices. The subject attribute sets the subject of the notification. For the subject, you can also use keywords that are replaced by the corresponding values of the received sensor alert. In this tutorial, we use the keyword "$SENSORDESC$" which is replaced by the description of the sensor alert. For a complete list of keywords, please take a look at the "config/example_template.msg" of your client installation. The templateFile sets the location of the message template that is used to create the message of the notification. In this tutorial, two different templates are used. Both template files were created earlier in this tutorial (Message Templates).
In order to receive push notifications with your Android device, you have to install the AlertR app from the Google Play Store. When it is installed, it has to be configured in order to receive your notifications. The settings menu looks like the following:
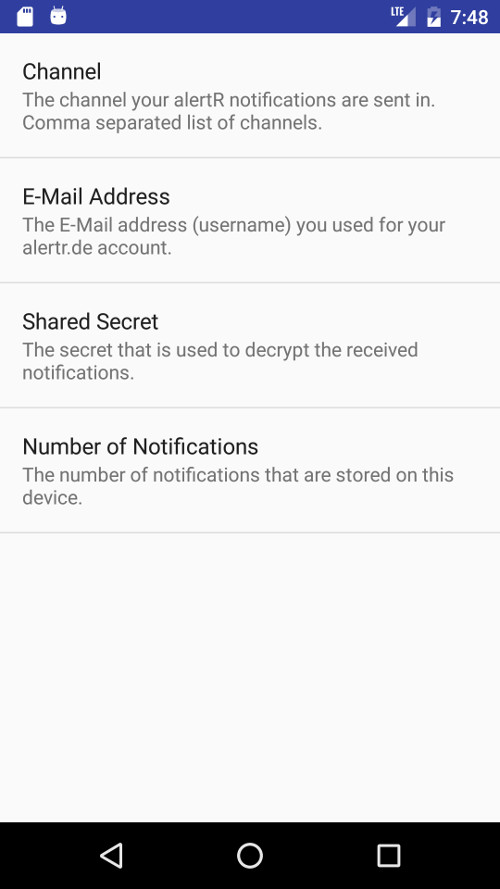
In the Channel setting, we configure all channels this Android device is listening to. It is a comma separated list of channels. Since we want to listen to two different channels, we use the following value:
normal_alarms, important_alarms
The E-Mail Address setting is your used alertr.de username. It is used to link your configured channels to your account. For this tutorial, we used the username:
alertr@alertr.deThe Shared Secret setting is used to decrypt the received notification. For this, we use the same secret we configured before in our AlertR client installation:
MyComplicatedMsgSecret
The "Number of Notifications" setting sets the number of notifications that is stored on the Android app. In this tutorial, we set it to 100.
After the AlertR client and the Android app are configured, we can send a test notification. For this, the AlertR client provides a testing script that uses your AlertR client configuration to send messages. The "testPushConfiguration.py" script is located in the installation directory of your installation. With the following command we can execute it:
alertr@towel:~/alertClientPushNotification$ ./testPushConfiguration.py
After executing it, you should receive a test message for each channel you have configured.
If you want the AlertR client to start automatically after a reboot of the host, you have to set it up. In this tutorial, I will give two examples on how to set up the autostart of the AlertR client depending on your system using systemd or just init.d.
An init.d script is provided by the AlertR installation. The only thing you have to do is to copy and configure it correctly. The following command copies it to the correct location, sets the permissions correctly and installs it:
root@towel:/home/alertr/alertClientPushNotification/init.d_example# cp alertRalertClientPushNotification.sh /etc/init.d/

root@towel:/etc/init.d# chown root:root alertRalertClientPushNotification.sh
root@towel:/etc/init.d# chmod 755 alertRalertClientPushNotification.sh

root@towel:/etc/init.d# update-rc.d alertRalertClientPushNotification.sh defaults
 Adding system startup for /etc/init.d/alertRalertClientPushNotification.sh ...
   /etc/rc0.d/K20alertRalertClientPushNotification.sh -> ../init.d/alertRalertClientPushNotification.sh
   /etc/rc1.d/K20alertRalertClientPushNotification.sh -> ../init.d/alertRalertClientPushNotification.sh
   /etc/rc6.d/K20alertRalertClientPushNotification.sh -> ../init.d/alertRalertClientPushNotification.sh
   /etc/rc2.d/S20alertRalertClientPushNotification.sh -> ../init.d/alertRalertClientPushNotification.sh
   /etc/rc3.d/S20alertRalertClientPushNotification.sh -> ../init.d/alertRalertClientPushNotification.sh
   /etc/rc4.d/S20alertRalertClientPushNotification.sh -> ../init.d/alertRalertClientPushNotification.sh
   /etc/rc5.d/S20alertRalertClientPushNotification.sh -> ../init.d/alertRalertClientPushNotification.sh
Next we have to configure the init.d script correctly. The following changes have to be made to the script:
[...]
# change USER to the user which runs the alertRclient
USER=alertr
# change DAEMON to the path to run the alertRclient
DAEMON=/home/alertr/alertClientPushNotification/alertRclient.py
[...]
In order to work correctly, the AlertR client has to be executable. With the following, we change the permissions of the AlertR client:
alertr@towel:~/alertClientPushNotification$ chmod 755 alertRclient.py
To start the client as daemon, we can now execute:
root@towel:/home/alertr/alertClientPushNotification# /etc/init.d/alertRalertClientPushNotification.sh start
The log file of the client (it is created in the directory you have configured in the General Section) should now show the following:
[...]
08/20/2016 14:28:46 INFO: [alertRclient.py] Connecting to server.
08/20/2016 14:28:46 INFO: [alertRclient.py] Starting watchdog thread.
08/20/2016 14:28:46 INFO: [alertRclient.py] Initializing alerts.
08/20/2016 14:28:46 INFO: [alertRclient.py] Starting update check thread.
08/20/2016 14:28:46 INFO: [alertRclient.py] Client started.
If your system uses systemd for its autostart, you have to configure the AlertR client a bit different. Copying the template and setting permissions is still the same:
root@towel:/home/alertr/alertClientPushNotification/init.d_example# cp alertRalertClientPushNotification.sh /etc/init.d/

root@towel:/etc/init.d# chown root:root alertRalertClientPushNotification.sh
root@towel:/etc/init.d# chmod 755 alertRalertClientPushNotification.sh
Configuring the init.d script correctly is also the same:
[...]
# change USER to the user which runs the alertRclient
USER=alertr
# change DAEMON to the path to run the alertRclient
DAEMON=/home/alertr/alertClientPushNotification/alertRclient.py
[...]
Now, systemd has to be configured. For this we copy the template service file to the correct location and install the service:
root@towel:/home/alertr/alertClientPushNotification/init.d_example# cp alertRalertClientPushNotification.service /etc/systemd/system/

root@towel:/home/alertr/alertClientPushNotification# systemctl enable alertRalertClientPushNotification.service
The AlertR client can be started with the following command:
root@towel:/home/alertr/alertClientPushNotification# service alertRalertClientPushNotification.sh status
The log file of the client (it is created in the directory you have configured in the General Section) should now show the following:
[...]
08/20/2016 14:28:46 INFO: [alertRclient.py] Connecting to server.
08/20/2016 14:28:46 INFO: [alertRclient.py] Starting watchdog thread.
08/20/2016 14:28:46 INFO: [alertRclient.py] Initializing alerts.
08/20/2016 14:28:46 INFO: [alertRclient.py] Starting update check thread.
08/20/2016 14:28:46 INFO: [alertRclient.py] Client started.
If you experience problems, please check the log file first. If it is not helpful, change the log level to DEBUG and check again. If no error can be seen, please start the AlertR client manually and check if an error occurs that is not printed into the log file. This can be done by just executing the AlertR client as the user that it normally runs with.
alertr@towel:~/alertClientPushNotification$ ./alertRclient.py
If you still have problems and do not know how to solve them, you can ask on the community page on reddit or you can use the Github Issues.