Tutorial Developer CalendarSchedule
This tutorial describes how you can built a schedule in a calendar and utilize the reminder notifications as Sensor Alerts in your AlertR system. These Sensor Alerts are then used to switch on, for example, a light, connected to a Raspberry Pi GPIO as well as executing a script. It is explained at a practical example that I used in my own network. For this to work, we assume you have set up the AlertR Server, the AlertR Sensor Client iCalendar, the AlertR Alert Client Raspberry Pi, and the AlertR Alert Client Executer. Tutorials to set them up are linked.
The setting explained in this tutorial works only from version 0.700 upwards.
The following gives you an example on how to use your calendar (for example the Google Calendar) as a schedule for your AlertR system. This allows you to utilize the AlertR system easily as automation system in a flexible manner. The example shown in this tutorial is a simpler version of an instrumentation I deployed in my own network.
The scenario in this example is the following: We have a light connected to our Raspberry Pi GPIO port and want to switch it on and off according to a schedule. Furthermore, we have also a script which we want to start according to a schedule. To have a comfortable way to schedule things, we want to use our Google Calendar. Switching things on/off and executing scripts with AlertR is easily done. The question is: how can I schedule events with an external calendar?
AlertR already provides all necessary components to do this. As mentioned before, you need the AlertR Server, AlertR Sensor Client iCalendar, AlertR Alert Client Executer and AlertR Alert Client Raspberry Pi for it. The following graphic shows how the whole instrumentation works:
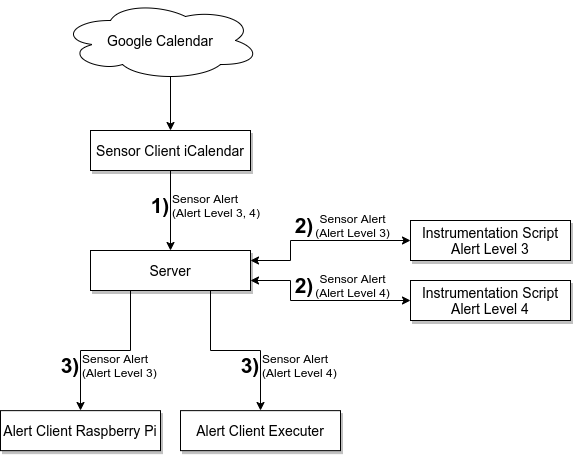
The AlertR Sensor Client iCalendar periodically fetches your Google Calendar and processes it. If a reminder is triggered on your calendar, the AlertR Sensor Client iCalendar transforms this reminder into a Sensor Alert in step 1). In our setting, this Sensor Alert is for Alert Level 3 and 4. The AlertR Server uses instrumentation scripts for Alert Level 3 and 4 in step 2). The instrumentation scripts filter if the Sensor Alert received is either for executing the script (Alert Level 4) or switching the light on or off (Alert Level 3). The result comes back to the AlertR Server which then processes it further. In step 3), the server then sends a Sensor Alert (depending on the result of the instrumentation script) either to the AlertR Alert Client Raspberry Pi or AlertR Alert Client Executer.
What does this mean in our scenario? Well, simply depending on the entry in our calendar, either the light is switched on/off or the script is executed.
So, how do we actually set everything up. Well, we use the alarm system context from our AlertR Server tutorial for the System Profiles and define new Alert Levels. We use the following configuration:
| Alert Level | Name | Profiles | Functionality |
|---|---|---|---|
| 3 | Light Switch | Activated, Deactivated | Used to switch light on/off. |
| 4 | Execute Script | Activated, Deactivated | Used to execute script. |
Alert Level 3 is used to switch the light connected to the GPIO on the Raspberry Pi on or off. Since we want two different actions, it is important that the Alert Level in this case triggers for the "normal" and "triggered" state. This Alert Level is member of both System Profiles and thus triggers always.
Alert Level 4 is used to execute a script. Since we only want to execute the script with the same arguments, this Alert level only needs to trigger for the "triggered" state. This Alert Level is member of both System Profiles and thus triggers always.
The Alert Level configuration of the server then looks something like this:
    <alertLevels>

        <alertLevel>

            <general
                level="3"
                name="Light Switch"
                triggerAlertTriggered="True"
                triggerAlertNormal="True" />

            <instrumentation
                activated="True"
                cmd="./scripts/calendar_schedule.py"
                timeout="10" />

            <profile>0</profile>
            <profile>1</profile>

        </alertLevel>

        <alertLevel>

            <general
                level="4"
                name="Execute Script"
                triggerAlertTriggered="True"
                triggerAlertNormal="False" />

            <instrumentation
                activated="True"
                cmd="./scripts/calendar_schedule.py"
                timeout="10" />

            <profile>0</profile>
            <profile>1</profile>

        </alertLevel>

    </alertLevels>
The important part here is that the Alert Level trigger always by being a member of all System Profiles. Otherwise, our instrumentation would only work if the AlertR system uses a specific System Profile. Also, the Alert Level 3 has to be triggered for both states triggered and normal (to turn the light on or off), while Alert Level 4 only needs to trigger for the state "triggered" (execute the script). Furthermore, the instrumentation has to be activated and the path to the script given (the script needs execution permission on the file system). Since the instrumentation script only filters locally, it is fast and a timeout of 10 seconds is more than sufficient. Furthermore, we can use the same instrumentation script for both Alert Levels. A complete AlertR Server example configuration can be seen in the tutorial in detail.
Next, we take a look at the AlertR Sensor Client iCalendar configuration. An example configuration to fetch your Google Calendar looks as the following:
    <sensors>

        <sensor>

            <general
                id="0"
                description="My Google Calendar"
                alertDelay="0"
                triggerAlert="True"
                triggerAlertNormal="False" />

            <alertLevel>3</alertLevel>
            <alertLevel>4</alertLevel>

            <icalendar
                name="google_calendar"
                intervalFetch="1800"
                intervalProcess="10"
                location="https://www.google.com/calendar/ical/my_gmail_account%40gmail.com/private-231d23bac23628bda11adac0d1238eb5/basic.ics"
                htaccessAuth="NONE"
                htaccessUser=""
                htaccessPass="" />

        </sensor>

    </sensors>
The setup of a Google Calendar with the AlertR sensor client is explained in detail in the AlertR Sensor Client iCalendar tutorial. The important part in this configuration is that we trigger a Sensor Alert for Alert Level 3 and 4.
The next configuration step concerns the AlertR Alert Client Raspberry Pi. The important configuration part looks like the following:
    <alerts>

        <alert>

            <general
                id="0"
                description="Light" />

            <alertLevel>3</alertLevel>

            <gpio
                gpioPin="11"
                gpioPinStateNormal="0"
                gpioPinStateTriggered="1" />

                <triggered
                    activated="True"
                    state="1" />

                <normal
                    activated="True"
                    state="0" />

                <profilechange
                    activated="False">

                </profilechange>

                <reset
                    activated="False"
                    time="900" />

        </alert>

    </alerts>
The basic setup of a the AlertR Alert Client Raspberry Pi is explained in detail in a separated tutorial. The important part in this configuration is that we have a light connected to the GPIO pin 11. This GPIO pin is set to HIGH when a Sensor Alert for Alert Level 3 with the state "triggered" is received and the GPIO pin is set to LOW if the Sensor Alert is for the state "normal". Nothing happens with the GPIO pin if the System Profile changes. Furthermore, we deactivate the reset function for the GPIO pin.
Then we have to setup the AlertR Alert Client Executer to execute our instrumentation script:
    <alerts>

        <alert>

            <general
                id="0"
                description="Some Script" />

            <alertLevel>4</alertLevel>

            <executer
                execute="/home/alertr/some_script.py">

                <triggered
                    activated="True">
                    <argument>start</argument>
                </triggered>

                <normal
                    activated="False">
                </normal>

                <off
                    activated="False">
                </off>

            </executer>

        </alert>

    </alerts>
Everything used here is explained in detail in the AlertR Alert Client Executer tutorial. The important part shortly summarized: When a Sensor Alert with Alert Level 4 for the state "triggered" is received, the script /home/alertr/some_script.py is executed with the argument "start". Nothing happens if a Sensor Alert for the state "normal" is received or the System Profile changes.
The last part missing on the AlertR side is our instrumentation script. However, before we can write it we should take a look how the argument for the instrumentation script looks like. It looks like the following json string for a Sensor Alert for a calendar reminder:
{"nodeId": 3, "sensorId": 6, "description": "test alertr schedule", "timeReceived": 1613647505, "alertDelay": 0, "state": 1, "hasOptionalData": true, "optionalData": {"message": "Reminder for event 'Test Alert' at 02/18/21 12:25:00", "calendar": "alertr_schedule", "type": "reminder", "title": "Test Alert", "description": "I am a description", "location": "I am a Location", "trigger": 1613647500, "start": 1613647500}, "changeState": false, "alertLevels": [3, 4], "hasLatestData": false, "dataType": 0, "data": {}, "instrumentationAlertLevel": 4}
The expected output of the instrumentation script has the same structure.
Next we have to figure out a way to tell the instrumentation script that we want to switch on or off the light or that we want to execute the script. As we can see in our example json argument above, optionalData fields are added by the AlertR Sensor Client iCalendar (the fields are explained in detail in the optional data for iCalendar sensor client of the protocol). Thus, we can just use one of these fields for data we want to provide to the instrumentation script. In our example, we use the "description" of the calendar event to transfer our information to the script.
Now we can take a look at our script. It is a simplified version of the one I am using in my setting at home:
#!/usr/bin/env python3

import sys
import json


def main(arg: str) -> bool:

    data = {}

    # Parse argument.
    try:
        sensor_alert = json.loads(arg)

        if "instrumentationAlertLevel" not in sensor_alert.keys():
            raise ValueError("Sensor Alert does not hold instrumentationAlertLevel.")

        if ("hasOptionalData" not in sensor_alert.keys()
                or not sensor_alert["hasOptionalData"]
                or "optionalData" not in sensor_alert.keys()):
            raise ValueError("Sensor Alert does not hold optionalData.")

        optional_data = sensor_alert["optionalData"]

        if "description" not in optional_data.keys():
            raise ValueError("Optional Data does not hold description data.")

        # Data in description stored as "key1: value1\nkey2: value2"
        rows = optional_data["description"].strip().split("\n")

        for row in rows:
            line = row.strip().split(":")
            if len(line) != 2:
                raise ValueError("Illegal description format.")
            key = line[0].strip()
            value = line[1].strip()
            data[key] = value

        if "alertLevel" not in data.keys():
            raise ValueError("Description data does not hold alertLevel.")

        if "state" not in data.keys():
            raise ValueError("Description data does not hold state.")

    except Exception as e:
        print("Sensor Alert argument '%s' invalid: %s" % (arg, str(e)))
        return False

    # Check if Sensor Alert is meant for this Alert Level and suppress Sensor Alert if not.
    try:
        target_alert_level = int(data["alertLevel"])

    except Exception:
        print("Target alert level '%s' has to be an integer." % data["alertLevel"])
        return False

    if sensor_alert["instrumentationAlertLevel"] != target_alert_level:
        print(json.dumps({}))
        return True

    # Update state value.
    try:
        target_state = int(data["state"])
        sensor_alert["state"] = target_state

    except Exception:
        print("Target state '%s' has to be an integer." % data["state"])
        return False

    print(json.dumps(sensor_alert))
    return True


if __name__ == '__main__':
    if len(sys.argv) == 2:
        if not main(sys.argv[1]):
            sys.exit(1)
    else:
        print("Usage: %s <Sensor Alert Json>" % sys.argv[0])
What does this script do. Well, first of all it checks if it has the json string argument. Otherwise, it does simply nothing. If it has, it will parse the data from the json argument and process it. The important part is it expects data in the "description" field of the calendar event. More specifically, it expects the "description" field to have the data in the following form:
key1: value1
key2: value2
key3: value3
Expected keys and values are "alertLevel" and "state". The "alertLevel" is expected to have the Alert Level as an integer as value. In our example, it should either be 3 or 4 (depending on if the reminder should switching the light on or off or executing the script). The instrumentation script will check if the value of the "alertLevel" field is the same as the Alert Level that is currently triggered by the AlertR system (and thus continue processing it or dropping it). The "state" is expected to be either 0 or 1. If the "state" is 1, then the Sensor Alert is rewritten to be for the state "triggered". If the "state" is 0, then the Sensor Alert is rewritten to be for the state "normal". This is important for Alert Level 3 to switch the light on or off. If we set the "state" to 1 in our calendar event description field, then the reminder will turn the light on. If we set the "state" to 0 in the description field, then the reminder will turn the light off. For the script (Alert Level 4), we always have to use "state" with the value 1 since a value of 0 will do nothing.
The last thing we have to do now is to set our schedule in our Google Calendar. An example schedule could look like the following:
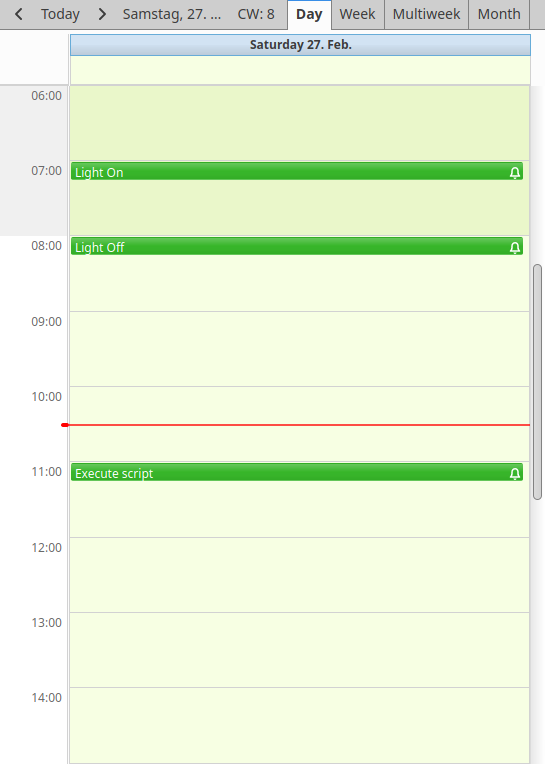
An event to turn on the light looks like this:
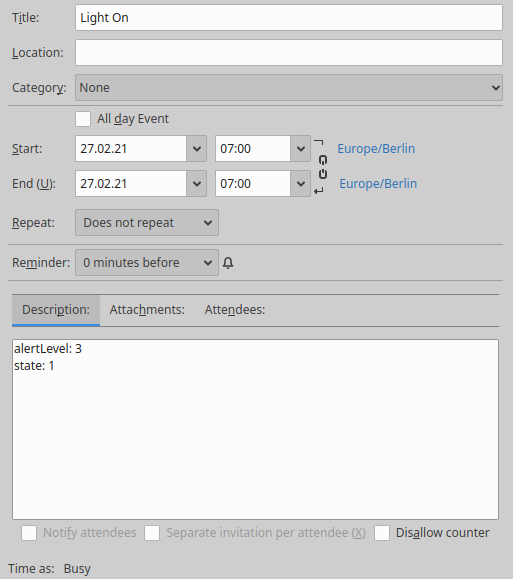
Note two things here: first, the reminder is set to trigger. This is the most important part because otherwise AlertR would not create a Sensor Alert for this event. In this example it is set to trigger 0 minutes before the event, meaning exactly at 7am when the event starts. This is in my opinion the most convenient setting since you can see exactly what is executed at what time. Second, the description contains as explained in the Instrumentation Script section the key-value pairs for the instrumentation script ("alertLevel" and "state"). The Alert Level is set to 3 which is our configured Alert Level to switch the light on or off and the state is set to 1 ("triggered") to switch the light on.
This is only a small example how you can build a schedule with a calendar compatible to the AlertR Sensor Client iCalendar. You can make it more complex and powerful, for example, by adding additional key-value pairs which are processed by the instrumentation script (or by the script that is executed by the AlertR Alert Client Executer since the optional data can also be passed as argument there). As usual, the only limitation is your imagination ;). In my personal setting, I use the calendar schedule, for example, to set my thermostats to specific temperatures. The values for the temperature are also set in the description field of the event.
If you experience problems, please check the log file first. If it is not helpful, change the log level to DEBUG and check again. If no error can be seen, please start the AlertR client manually and check if an error occurs that is not printed into the log file. This can be done by just executing the AlertR client as the user that it normally runs with.
alertr@towel:~/AlertRInstance$ ./alertRclient.py
Also, let your script write the received argument into a file to check if everything is working fine here.
If you still have problems and do not know how to solve them, you can ask on the community page on reddit or you can use the Github Issues.