Tutorial: Build a Social Network
This is a short laboratory to get to know Speedment. The goal of the laboratory is to give you an insight of how easy and fast you can write applications with Java 8 and Speedment, without the hassle of writing SQL queries. To illustrate this we have chosen to build a server for an image-sharing network. The server will respond to request over a standard HTTP protocol and make sure that the users of the site can browse a flow of pictures and find interesting people to follow.
To use the lab you will need the following:
- A server running MySQL
- Your favorite IDE
- Maven
- JDK 8+
The Social Photo Network is a stand-alone app that users can download to share low-resolution images with each other. In the app, the user can set a profile photo, browse a flow of pictures, find other people, follow interesting authors and upload their own creations. Each operation is sent to a server running Speedment using a standard HTTP-request. The server decodes the request, authenticates the user, makes any changes to the database and then returns a result. If the result is anything other than a boolean, JSON is used to encode the result.
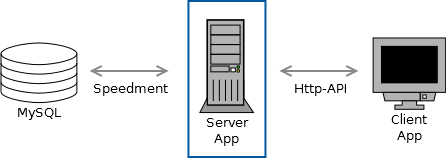
The blue rectangle illustrates what is covered in this tutorial.
A description of the API used by the server and client is available at the following address. This goal in this lab is to implement each operation as specified by this documentation.
Link to the Social Photo Network API
Before we get started with the actual coding, we will need to set a few things up.
Speedment is the perfect tool when you have an existing SQL database that you want to build a new java application for. To illustrate how easy this is, we will setup the SQL structure by loading it from an existing database dump. It can be downloaded here:
Link to the database (.sql) setup file
The name of the schema is "socialnetwork". For the sake of this example, we will assume that the database is located at "localhost" with the username "root" and no password. This might, of course, be different in your case.
To try out our solution, we have prepared a graphical client that can be used to log onto the network, browse around for interesting pictures and also publish new photos.
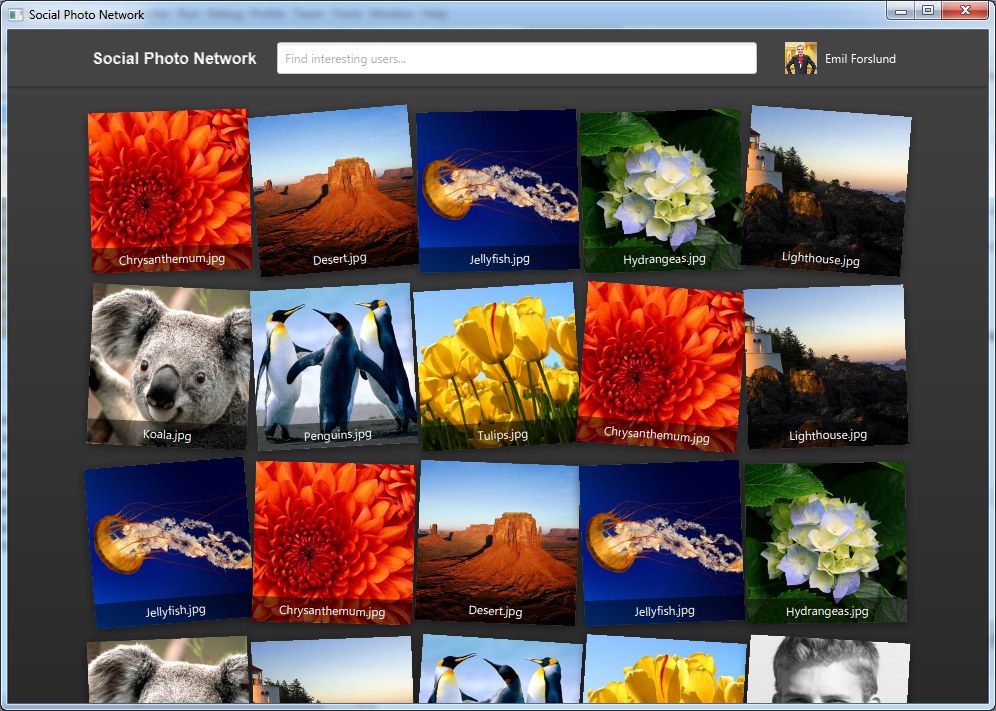
The client is also available open source and we recommend you to use it to make sure your server is working correctly.
Link to the clients GitHub page
The client executable can be downloaded from the GitHub-page. This is also where you will find the source code of the app if you are interested. The client application is not covered by this lab, however.
To upload pictures, simply drag and drop them into the application.
The last step before we can start coding is to create the Speedment project. To make this process easier, we have prepared a blank server for you to start with. The server can be found here:
Link to the server project on GitHub
The first thing you will notice if you open the pom.xml-file is that there are four dependencies. Speedment is of course required to generate files from the database and to model the database in the memory. The second dependency is the "NanoHttpd"-file that acts as a basic HTTP-server for out project, the third is a dependency to basic log4j logging functionality and the fourth is a dependency on he needed MySQL driver.
We have prepared some files to the lab in advance so your project view will probably look something like this:
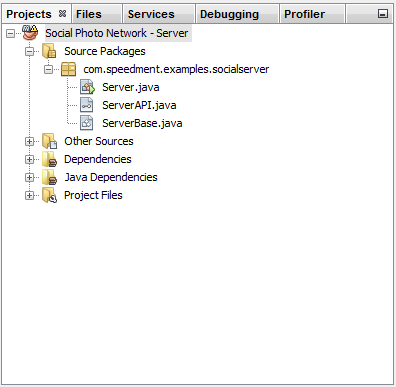
Three files have been provided to help you get started. The first file, Server.java, is the entry point of our program and the file where we will write our business logic. As you can see, the file already contains empty shells for the methods defined in the social photo network API. The second file, ServerAPI.java, is an interface for the same API methods that Server implements. Finally, ServerBase.java is a helper class for receiving HTTP requests can delegating them to the correct API method.
Now when the project is setup it is time to connect to our database and generate some code. Clean and build the entire server project so that all the dependencies are downloaded from the Maven central and then execute the speedment:tool-goal. It should start the GUI.
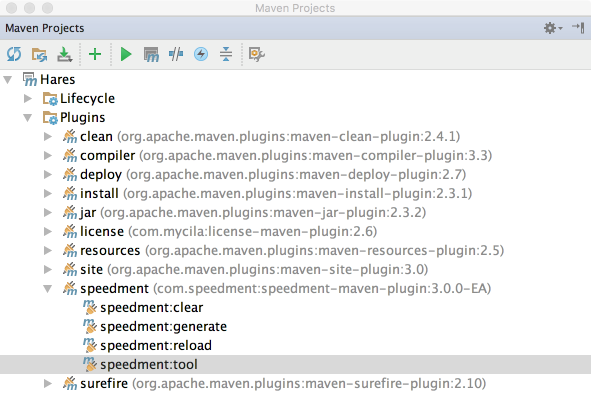
A complete guide for using the GUI is available here if you encounter any problems.
Now when all the files have been generated, we can get started with the real fun! It is time to gritty ourselves with some actual coding. Below is a roadmap to the different API-commands we are going to implement.
Open up the Server.java-file which is where your solution should end up. It looks like this:
⋮
/**
 *
 * @author Emil Forslund
 */
public class Server extends ServerBase {

    protected final Random random = new SecureRandom();

    public Server() {
    }

    @Override
    public String onRegister(String mail, String password) {
        // TODO: Write register function.
        return "false";
    }

    ⋮
First, we need to initialize Speedment and add a Manager for each table we want to handle. To do this, add these rows the Server.java-file and to a new default constructor.
⋮
public class Server extends ServerBase {

    private final Random random = new SecureRandom();
    private final SocialnetworkApplication application;
    private final UserManager users;
    private final ImageManager images;
    private final LinkManager links;
    private final Map<String, Long> sessions;
    private final JsonEncoder<User> jsonUserEncoder;
    private final JsonEncoder<User> jsonUserAllEncoder;

    public Server() {
       application = new SocialnetworkApplicationBuilder()
                .withUsername("root")
                .withBundle(MySqlBundle.class)
                .withBundle(JsonBundle.class)
                .build();
        users = application.getOrThrow(UserManager.class);
        images = application.getOrThrow(ImageManager.class);
        links = application.getOrThrow(LinkManager.class);
        sessions = new HashMap<>();

        final JsonComponent jsonComponent = application.getOrThrow(JsonComponent.class);

        jsonUserEncoder = jsonComponent.allOf(users).remove(User.PASSWORD);

        jsonUserAllEncoder = jsonComponent.allOf(users);
    }

    @Override
    public String onRegister(String mail, String password) {
        // TODO: Write register function.
        return "false";
    }

    ⋮
The SocialnetworkApplication-class and the Manager classes are generated by Speedment and will do all the ugly initializing and database connecting for us. Great! The next step is to write some business logic.
In our social network, users should be able to log in and maintain a session during their stay. To avoid sending the user credentials multiple times, we will generate a session key when the user logs in and keep a reference to it on the server. To do this, we define a simple Map.
    ⋮
    private final Map<String, Long> sessions;

    public Server() {
         ⋮
         sessions = new HashMap<>();
    }

    private String newSession(User user) {
        final String key = nextSessionId();
        sessions.put(key, user.getId());
        return key;
    }
    ⋮
The User-object that we take as a parameter is one of the newly generated entity classes. The nextSessionId()-method is just a convenient method supplied to get started more quickly and can be find at the bottom of the Server.java-file.
The next step is to create a method for verifying that a user is logged in. The easy way out would be to just check if a supplied key exists in the map, but since we might need more information about the user, we can just as well do a search and locate the correct User object in the Speedment graph. To do this, we use the Java 8-stream API.
    ⋮
    private String createSession(User user) {
        final String key = nextSessionId();
        sessions.put(key, user.getId());
        return key;
    }

    private Optional<User> getLoggedIn(String key) {
        final Optional<Long> userId = Optional.ofNullable(sessions.get(key));

        return userId.flatMap(id ->
                users.stream()
                        .filter(User.ID.equal(id))
                        .findAny()
        );
    }

    @Override
    public String onRegister(String mail, String password) {
        // TODO: Write register function.
        return "false";
    }
    ⋮
We find the current session using sessions.get(), we wrap it in a Java 8 Optional and if it exists, we stream the data managed by the Manager of users for a match and returns it.
Now we have the infrastructure in place for creating our first API command. Since the "Register"-command is the first to be called when the user visits the social network, we begin with that.
To create a new entity in the database, we begin with creating a new bean for that table, fill in all the mandatory information and then call the method persist() with the users Manager as a parameter. The social network API also requires us to return a session key if the operation succeeded, else the string "false". For an example, if a user already exists with the specified mail address, the operation should fail and "false" should be returned. We don't have to worry about that though. Since the mail-column in the database is unique, Speedment will do that for us.
    ⋮
    @Override
    public String onRegister(String mail, String password) {
        try {
            final User user = users.create()
                    .setMail(mail)
                    .setPassword(password);
            return newSession(users.persist(user));
        } catch (SpeedmentException e) {
            e.printStackTrace();
            return "false";
        }
    }
    ⋮
Since the users.persist(user)-method call throws an Exception if something goes wrong, we can just return false in case there is a database issue.
Now would be a good time to start the server and try it out with the client. The client is predefined to access a server at localhost. If you are trying this out on an external host, modify the settings.properties-file in the root of the client project to access the IP-address of your server.
The login command is very basic. We filter a stream based on the User-table by the specified mail and password, and if we get a match, we create a session and return the key.
    ⋮
    @Override
    public String onLogin(String mail, String password) {
        // TODO: Write login function.
        return users.stream()
                .filter(MAIL.equalIgnoreCase(mail))
                .filter(PASSWORD.equal(password))
                .map(this::newSession)
                .findAny()
                .orElse("false");
    }
    ⋮
The stream filters those user(s) having the same (ignore-case) mail and password as given in the parameters. Then, if there is at least one match, the first match will be mapped using the newSesstion() method (whereby we get a new session id for the user) and we return that. However, since findAny() returns an Optional we will return false if there are no matches.
This command is also very easy to implement. When the user logs into the network or opens the profile page, this command will be called to retrieve a json-encoded string with all the information about the currently logged in user. Since we already have a method for finding the current user (remember getLoggedIn() we wrote earlier?), this will go fast. The somewhat tricky part is to encode the retrieved entity object into json. Luckily for us, Speedment has a utility class for this called JsonEncoder.
The JsonEncoder is available in the json-stream speedment plugin which becomes available by adding an explicit dependency in the project pom.xml file. Add the following lines to the list of dependencies near the end of the pom.xml.
    ⋮
    <dependencies>
        ⋮
        <dependency>
            <groupId>com.speedment.plugins</groupId>
            <artifactId>json-stream</artifactId>
            <version>3.2.10</version>
        </dependency>
    </dependencies>
</project>
First off, we need to define the encoders.
At the top of the file, we will create two encoders that will be used to json encode users, one without exposing sensitive information, and another to encode all fields of a user object.
    ⋮
    private final JsonEncoder<User> jsonUserEncoder;
    private final JsonEncoder<User> jsonUserAllEncoder;

    public Server() {
        ⋮
        final JsonComponent jsonComponent = application.getOrThrow(JsonComponent.class);
        jsonUserEncoder = jsonComponent.allOf(users).remove(User.PASSWORD);
        jsonUserAllEncoder = jsonComponent.allOf(users);
        ⋮
    }
    ⋮
And then we can use that method to parse the user retrieved from the getLoggedIn() function, returning "false" if the user was not logged in.
    ⋮
    @Override
    public String onSelf(String sessionKey) {
        final Optional<User> user = getLoggedIn(sessionKey);
        return user.map(jsonUserEncoder::apply)
                .orElse("false");
    }
    ⋮
If you are interested in how the json-parsing works in detail or want even more control over the process then you can read more about that here.
In this lab, we use base64-encoded strings to store images in the database. Since the encoding and decoding are done by the client, all we have to think about is making sure the user is authorized, and if so, add a row to the correct table.
    ⋮
    @Override
    public String onUpload(String title, String description,
                           String imgData, String sessionKey) {
        try {
            return getLoggedIn(sessionKey)
                    .map(user-> {
                                images.persist(images.create()
                                        .setTitle(title)
                                        .setDescription(description)
                                        .setImgData(imgData)
                                        .setUploaded(new Timestamp(
                                            System.currentTimeMillis()
                                        ))
                                        .setUploader(user.getId())
                                );
                                return "true";
                            }
                    ).orElse("false");
        } catch (SpeedmentException se) {
            se.printStackTrace();
            return "false";
        }
    }
    ⋮
The getLoggedIn()-method returns an Optional<User> that is present if the user is logged in and not otherwise. If a user is logged in, we create an ImageBuilder, fill in all the details and persist it in the database. Notice that we get the user id from the user object currently stored in the session map. If the user is not present or if the upload fails for some reason, the Optional will not be present at the end and false will be returned.
Transactions can fail if the database refuses the operation. A common example of this is that a constraint like a unique index or a foreign key prevents us from adding a row with that information. In the onUpload example above, the operation should never fail as long as the logged in user has not been removed manually from the schema.
The find-command is one of the most interesting tasks to implement. The purpose is to locate interesting users on the network based on a free text search. The users found should also be encoded to a JSON string. The method takes a sessionKey as the search result might be customized depending who is asking the question.
We will do this in three steps. First off, we write a solution that returns all users and format them correctly, without any filtering. This will be an acceptable solution, even though it is not very good.
    ⋮
    @Override
    public String onFind(String freeText, String sessionKey) {
        // TODO: Write find function.
        if (getLoggedIn(sessionKey).isPresent()) {
            return "{\"users\":[" + users.stream()
                    .filter(
                            User.FIRST_NAME.contains(freeText).or(
                                    User.LAST_NAME.contains(freeText).or(
                                            User.MAIL.contains(freeText)))
                    )
                    .map(jsonUserEncoder::apply)
                    .collect(joining(", "))
                    + "]}";
        } else {
            return "{\"users\":[]}";
        }
    }
    ⋮
We do a basic stream of all users, separate them with commas (",") to create a string and surround the result in the json structure. If the user is not logged in, the Optional will be empty from the beginning and "false" will be returned. Now we can start with the actual logic. First, we only want to see users that match the inputted text in some way. To do this, we create a custom predicate that checks if any field starts with the inputted text.
    ⋮
            final Stream<User> found = users.stream()
                // If the free text matches any field.
                .filter(
                       User.FIRSTNAME.contains(freeText).or(
                       User.LASTNAME.contains(freeText).or(
                       User.MAIL.contains(freeText)))
                )

                // Limit result to 10 persons.
                .limit(10);

            final String result = found
                .map(User::toJson)
                .collect(joining(", "));
    ⋮
Here we can see one of the great features of the Java 8 predicate interface. Using the "or" concatenator, we can create nested predicates with many complex criteria to express our query. The solution above should work now if you want to try it out. There are still plenty of room for improvement though.
One irritating thing you will notice is that we show up in the list. Following yourself is unnecessary as you will always see your own pictures so this needs to be filtered out. We also need to remove all users that we are already following to make room for new, more interesting uploaders.
    ⋮
                .filter(
                    User.FIRST_NAME.startsWith(freeText).or(
                    User.LAST_NAME.startsWith(freeText)).or(
                    User.MAIL.startsWith(freeText))
                )

                // And this is not us.
                .filter(User.ID.notEqual(me.getId()))

                // Remove people we already follow
                .filter(them -> !links.findBackwardsBy(Link.FOLLOWER, me)
                    .anyMatch(Link.FOLLOWS.equal(them.getId()))
                )


                // Limit result to 10 persons.
                .limit(10);
    ⋮
We should also remove all passwords from the result before sending them to the client. To do this we can reuse the same jsonUserEncoder as we created earlier.
    ⋮
            final String result = found
                .map(jsonUserEncoder::apply)
                .collect(joining(", "));
    ⋮
The final code should look like this:
    @Override
    public String onFind(String freeText, String sessionKey) {
        final Optional<User> user = getLoggedIn(sessionKey);

        if (user.isPresent()) {
            final User me = user.get();

            final Stream<User> found = users.stream()
                    // If the free text matches any field.
                    .filter(
                            User.FIRST_NAME.startsWith(freeText).or(
                                    User.LAST_NAME.startsWith(freeText)).or(
                                    User.MAIL.startsWith(freeText))
                    )

                    // And this is not us.
                    .filter(User.ID.notEqual(me.getId()))

                    // Remove people we already follow
                    .filter(them -> !links.findBackwardsBy(Link.FOLLOWER, me)
                            .anyMatch(Link.FOLLOWS.equal(them.getId()))
                    )

                    // Limit result to 10 persons.
                    .limit(10);

            final String result = found
                    .map(jsonUserEncoder::apply)
                    .collect(joining(", "));

            return "{\"users\":[" + result + "]}";
        }

        return "false";
}To follow another user, we simply create and persist a Link entity in the database. This is very similar to the onUpload command.
    ⋮
    @Override
    public String onFollow(long userId, String sessionKey) {
        // TODO: Write follow function.
        try {
            return getLoggedIn(sessionKey)
                    .map(user -> {
                        links.persist(links.create()
                                .setFollower(user.getId())
                                .setFollows(userId)
                        );
                        return "true";
                    }).orElse("false");
        } catch (SpeedmentException se) {
            se.printStackTrace();
            return "false";
        }
    }
⋮This command is called every 10th second for every client to poll the server for new images. The command has two optional parameters for limiting the amount of pictures to load to a certain timespan.
Since this command requires us to parse images to json and our current formatter only supports users we will have to define an additional one called jsonImageFormatter. An image is a bit more complex than a regular user, mainly because it consists of two levels. In addition to the image data, we also need some information about the uploader. The resulting syntax should look like this:
{
    "images" : [
        {
            "id" : <long>,
            "title" : "<string>",
            "description" : "<string>",
            "imgdata" : "<base64>"
            "uploaded" : <localdatetime>,
            "uploader" : {
                "id" : <long>,
                "mail" : "<string>",
                "firstName" : "<string>",
                "lastName" : "<string>"
            }
        }, (...)
    ]
}
To achieve this we use one of the .put()-methods from the JsonFormatter class. This will allow us to override a certain parameter and define our own format for the result. In this case, we need to override the format for uploaded and uploader. For the former, we want the timestamp to be represented as a Long instead of a String and the uploader we need a hierarchical structure.
    ⋮
    private final JsonEncoder<Image> jsonImageEncoder;

    public Server() {
        ⋮
        final JsonComponent jsonComponent = application.getOrThrow(JsonComponent.class);
        jsonImageEncoder = jsonComponent.allOf(images)
                .putLong(Image.UPLOADED.identifier().getColumnId(), image ->
                        image.getUploaded().getTime())
                .put(Image.UPLOADER, jsonComponent.allOf(users)
                        .remove(User.AVATAR)
                        .remove(User.PASSWORD)
                );
        ⋮
    }
    ⋮
The onBrowse method is a bit longer than the rest, but not more complex. After making sure the user is logged in we define a stream of all the people that should appear in our feed. This includes ourselves as well as people we follow. We then flatMap this stream to get the images uploaded by everyone in the stream. The images are filtered to only show the ones uploaded to the selected timespan. Finally, we use our newly created jsonImageEncoder to display the images as json.
    ⋮
   public String onBrowse(String sessionKey, OptionalLong from, OptionalLong to) {
        final Optional<User> user = getLoggedIn(sessionKey);

        if (user.isPresent()) {
            final User me = user.get();

            final Stream<User> visibleUsers = StreamComposition.concatAndAutoClose(
                    Stream.of(me),
                    links.stream()
                        .filter(Link.FOLLOWER.equal(me.getId()))
                        .map(users.finderBy(Link.FOLLOWS))
            );

            final Stream<Image> displayedImages = visibleUsers
                    .flatMap(images.finderBackwardsBy(Image.UPLOADER))
                    .filter(img -> !from.isPresent() ||
                        img.getUploaded().after(new Timestamp(from.getAsLong())))
                    .filter(img -> !to.isPresent()   ||
                        img.getUploaded().before(new Timestamp(to.getAsLong())))
                    ;

            final String result = displayedImages
                    .map(jsonImageEncoder::apply)
                    .collect(joining(","));

            return "{\"images\":[" + result + "]}";
        }

        return "false";
    }
    ⋮
The images shown should be custom to the user currently logged in.
The last operation in the tutorial is the update command. It allows the user to edit his or her profile by changing the name, email or profile avatar. This is a little bit different from earlier operations as updating an existing entity is done with the update() method. It returns an Optional<User>, and here is the tricky part, this is a completely new java object! From the moment the update method is called, the old entity should be discarded and allowed to garbage collect. Holding references to it will only waste space in the memory.
    ⋮
    @Override
    public String onUpdate(String mail, String firstname,
                           String lastName, Optional<String> avatar,
                           String sessionKey) {
        final Optional<User> user = getLoggedIn(sessionKey);

        if (user.isPresent()) {
            try {
                final User ub = users.create()
                        .setMail(mail)
                        .setFirstName(firstname)
                        .setLastName(lastName);
                avatar.ifPresent(ub::setAvatar);
                users.update(ub);

                return jsonUserAllEncoder.apply(ub);
            } catch (SpeedmentException se) {
                return "false";
            }
        }
        return "false";
    }
⋮This was all for this tutorial! The server should run without any more modifications. If you want to continue with this example, a good next step might be to implement a more advanced find operation or to change the ordering of the pictures based on some other parameter than time. You can also check out the client code and modify it to do other things.
Have fun with Speedment!