Skyflash User Guide

- Introduction
- Installation & Upgrade
-
Workflow
- Step 1: Select & Verify Skybian Base Image
- Step 2: Network Configuration
- Step 3: Image Generation
- Step 4: Flashing Skybian
- Windows 10 Issues
Skyflash is a custom flashing & configuration software that prepares the Skybian base image for usage. It enables you to build the images using any IP addresses you prefer or need and flash the built images on your micro sd cards afterwards!
Flashing an image to a micro SD Card is a privileged operation and Skyflash has built a mechanism to acquire those privileges at some point.
Depending on your operating system you will be prompted with a popup box that asks for credentials during the process. On Windows, the privilege request happens at the start of the app, on Linux/OSX it occurs at the start of each flash operation (granting permission once is enough though).
The following article guides you through the process of using Skyflash to install the Skywire software by configuring & flashing the Skybian OS.
Skyflash is a standalone app (often called a "portable app"). To install it, you simply download the app and run it. The latest version can be found under releases. Make sure to download the correct version for your operating system!
Updating is as simple as deleting the old downloaded release and getting the new one from the release page.
Please extract the downloaded file and then mark it as executable by right-clicking on it, selecting the 'properties' menu and switching to the 'Permissions' tab. Then checkmark 'Allow executing file as program'. Once that is done you will be able to start Skyflash by simply clicking on it.
You do not have to mark the downloaded file as executable. Simply execute the .exe by clicking on it and Skyflash will start. Please go to the Windows 10 Issues section in case Windows Defender blocks the execution.
Installation instructions can also be found in the Skyflash readme.md
Skyflash will perform the following tasks for you:
- Select and verify a Skybian base image, either from a local file or downloading a copy from the internet.
- Setting your particular network configuration (default settings are for official Skyminers).
- Build the images for a manager and as many nodes you need (make sure that you comply with the Skywire Testnet Rules)
- [Optionally] Burn the images to micro SD Cards to insert into your Orange Pi Prime SBC. You may use other flashing software to flash the configured images.
Once you run it for the first time you will be presented with a window like this Running Skyflash for the first time will present you with the following window: (If you are un Windows you will see an extracting dialog first, wait until it finishes)
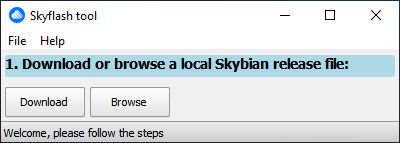
You are presented with two choices:
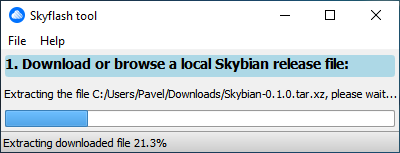
A word of caution: if your internet connection is unstable, limited or slow please don't try this option. Make sure that bandwidth consumption is not an issue - the download process will consume about 600 MB of data and has no resume option (blame Github on that); if your download gets interrupted at 99% it will start over from scratch (0%) again!
Selecting this option will download the Skybian base image for you.
This is the alternative option if the download option is not the best choice for you because the above mentioned speed/stability issues in your internet connection.
Please relocate to a place with a steady and fast internet connection and use whatever device you have (cellphone, tablet, laptop, etc.) to download the latest Skybian base image. Visit the Skybian release page and download the latest available release file (it's the big file ending on .tar.xz) into a directory of your choice.
Independent on which option you chose to proceed with (downloading or selecting a local copy), Skyflash will extract the compressed Skybian file and then check the data integrity. User feedback during this process is provided:
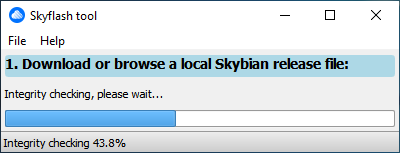
It may take a few minutes since the extracted image size is ~2GB and every single bit is verified to ensure that no data corruption occured.
If Skyflash encounters any issue when performing the extraction & verification steps (mainly due to corrupt download files) it will prompt you with a warning dialog box. In any case, the solution is to download the Skybian release file (by using the download option of Skyflash or downloading it manually) once again and start over.
We incorporated a magic effect into Skyflash to ease your life, go & close the app at this point and re-open it... you will see it knows that it has already a Skybian base image and it will show ready for next steps.
Skyflash creates a Skyflash folder in a specific location when you run it for the first time (or manually deleted it afterward). This enables scanning for previously downloaded and built images when restarting Skyflash.
The following are the paths of the Skyflash folder dependent on your OS:
| Operating System | Path | Comments |
|---|---|---|
| Windows | My Documents\Skyflash | Default Documents Folder |
| Linux | ~/Skyflash | Inside your home directory |
| MacOS | ~/Skyflash | Inside your home directory |
Please take the time to navigate & search for this folder. Inside, you will find at least the following:
- A
Downloadsfolder: this is where the downloaded Skybian base image will be stored when using the inbuilt download option as well as the extracted Skybian image and its checksums. - A file called
skyflash.log: this is the log of actions with debug info in case of troubles or if you'd like to report a bug. - A file called
skyflash.conf: this file stores the configuration state of the software between executions. - This folder will also be the default place for your custom Skybian images (you can change this later); Do not forget this path.
Mac OS users may have issues because there is no explicit home directory bookmark in Finder. Simply search for the documents folder in Finder and press cmd + up; this will get you to your home folder. Please save the location by dragging it to the bookmarks.
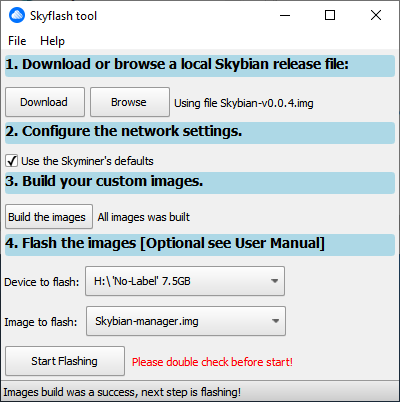
At this step, Skyflash will look like this:
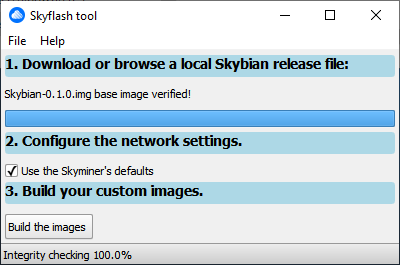
Anybody that wants to install Skybian on an official Skyminer can directly continue with step 3 - the default settings already match your requirements.
If you plan to use the Skybian images in an already existing network, you can tweak the network parameters by un-ticking the Use Skyminer's defaults box. This will look like this:
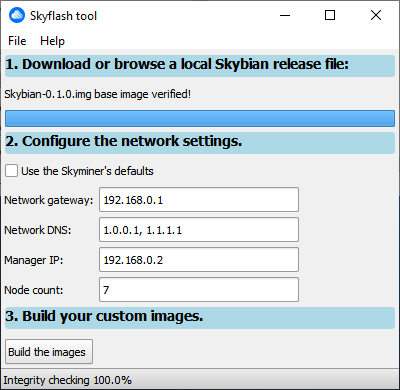
The app has some logic rules you need to obey when modifying the network settings:
- We use a
/24network segment (255.255.255.0 netmask). - Thus, the
Manager IPaddress must need to be in the same network segment as theGateway. - We use CloudFlare/OpenDNS DNS servers instead of Google ones, if you want to use a local one/a different one put it in first spot and move the CloudFlare/OpenDNS DNS servers to second place. Up to three nameserver IPs can be configured.
- The node count refers only to the nodes, the manager is not included (7 nodes + one manager). This is due to the fact that Skyflash assumes that you always want to built a manager node. Specifying node count = 0 will only built a manager Skybian image (useful for a quick test of the overall work flow, and for developing purposes).
If you manage to break some of these rules, the app will complain suggesting where the trouble is coming from.
Once the network config is in place, it's time to generate the custom Skybian images. Click on the Build the images button, this will prompt you with the following popup:
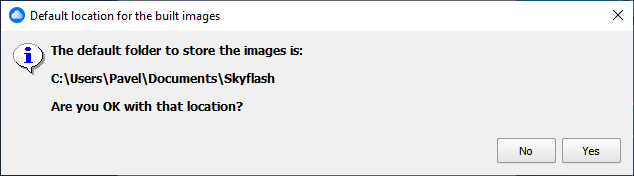
Click Yes to use the suggested path or No to select one of your choice. Clicking on No option will open a regular file chooser dialog for you to select a new path.
Selecting a manual storage path is useful in case you want to built multiple different Skybian image configs for multiple Skyminers with different network config requirements.
After the storage path has been selected, just click the Build Images button and go for a soft drink/beer/coffee as the building procedure may take a couple minutes.
The process of building the images is a I/O intensive task and depending on your computer it may take from 3 up to more than 5 minutes to generate the eight (8) images. In this period your PC may appear unresponsive at times, be patient and wait until the building process is finished.
During the image generation you can follow the process:
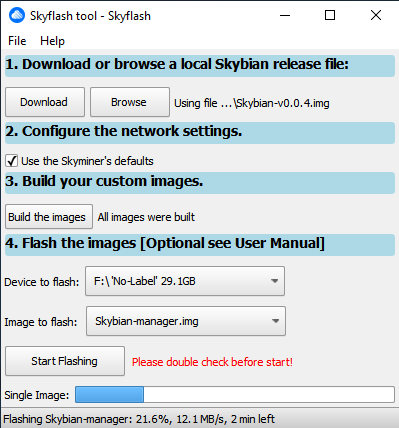
Once the building process is done, the built images are stored in the selected folder path. The naming convention is Skybian-manager.img & Skybian-node-1.img etc.
The flash process can be performed now or later after restarting Skyflash. By reopening Skyflash, it will look for previously built Skybian images in the previously used storage path.
Warning: if you built more than one set of images with different network configs, Skyflash will only remember the last storage path that was used. In this case it may be useful to flash the built images with BalenaEtcher.
The flashing process is not reversible! Please double (triple) check that the selected device on the drop down box is the correct one - you may flash the Skybian image to one of your USB Flash drives, rendering it unusable and resulting in data loss! The process to detect the correct micro SD card device is tricky and we have to extend it to a few common devices. Thus false detection of detecting flash thumb drives may occur.
We recommend to only have the micro SD card inserted before continuing. Please disconnect any other USB storage device before picking the selecting the flashing target device; at the end double and triple check again that the selected device is the micro SD card that's inserted!
After this you can click the Start flashing button to start the flashing procedure. A sample flashing in progress looks like the following:

You may use third party flashing software like balenaEtcher in case you encounter issues when using Skyflash.
Once the flashing is done, a popup dialog will inform you that can now remove the micro SD card from the computer and insert the next one to continue with the flashing procedure.
Please wait a few moments for the newly inserted card to be detected, then select the next image from the drop down menu and hit the Start flashing button once again; repeat these steps until you flashes all of the built images.
The duration of the flashing procedure depends on the speed of your micro SD card & utilized hardware: using a Class 10 or higher micro SD cards is pretty much mandatory. Low performance and long flashing procedures may occur when using slow cards and cheap USB micro SD card readers.
The status bar at the bottom of the Skyflash window display the writing speed on the card as well as the estimated time to finish. The screenshot from above was taken while flashing an A-DATA Class 10 micro SD card via a USB-C hub from Lenovo; top hardware speed is accomplished, as usual you experience may vary.
Flashing one Skybian image may take about 2 to 6 minutes.
Once the flashing procedure is done, please proceed with the installation guide.
Users on Windows 10 (Windows) in general might encounter some issues when using Skyflash. The following is a list of known issues and their resolution.
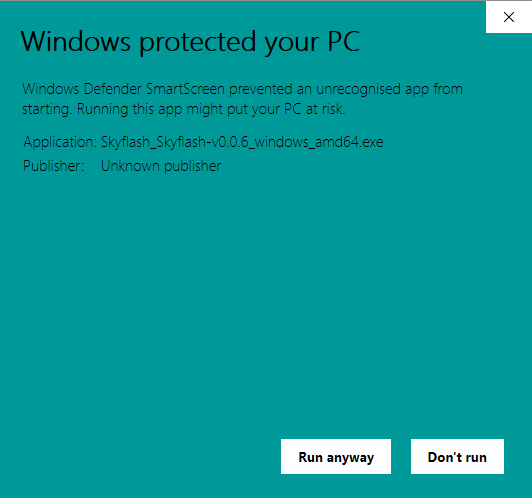
Skyflash might be falsely flagged as dangerous by the Windows Defender. You will be prompted with the following popup if that happens:
Please click on 'More info'. This will enable you to execute the file anyways:
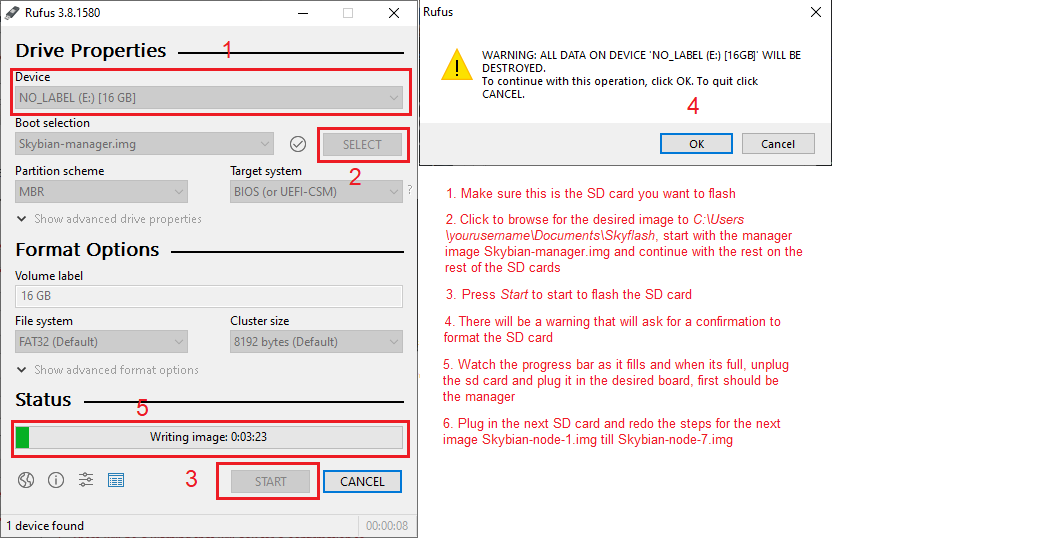
Skyflash might not flash the SD card outputing an error like the one from the picture below:
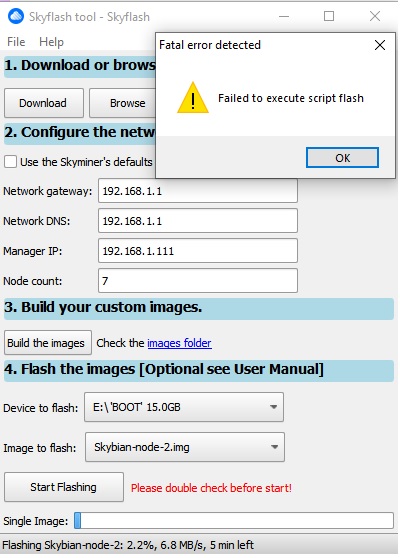
To fix this issue use Rufus to flash the created images: