Time Interval Annotations
This document provides an introduction to performing time interval annotations in Platform for Situated Intelligence Studio. It explains how to construct your own annotation schemas and definitions, and how to create annotation streams. The tutorial is structured in the following sections:
- Overview: explains the capabilities of the annotations system in PsiStudio.
- Unrestricted Annotation Schemas: explains the structure of unrestricted annotation schemas.
- Enumerable Annotation Schemas: explains the structure of enumerable annotation schemas.
- Loading Annotation Schema Files: explains how PsiStudio loads annotation schemas.
- Creating an Annotation Stream: explains how to create a new annotation stream in PsiStudio.
- Annotation Editing: explains how to add, edit, and delete annotations in PsiStudio.
- Saving Changes: explains how to save your changes after editing.
NOTE: As of release 0.16, PsiStudio supports multi-track annotations, where temporal annotations on a single stream may overlap with each other. The documentation below has not yet been updated to reflect this additional functionality. We plan to update it shortly.
Platform for Situated Intelligence Studio (or PsiStudio) enables the creation of time interval annotations, that is, annotated temporal events with specified start and end times. Time interval annotations may contain any number of attributes, and each attribute may use its own annotation value schema. For example, the image below illustrates temporal annotations performed to identify utterances, together with two attributes: their transcript, and their valence.
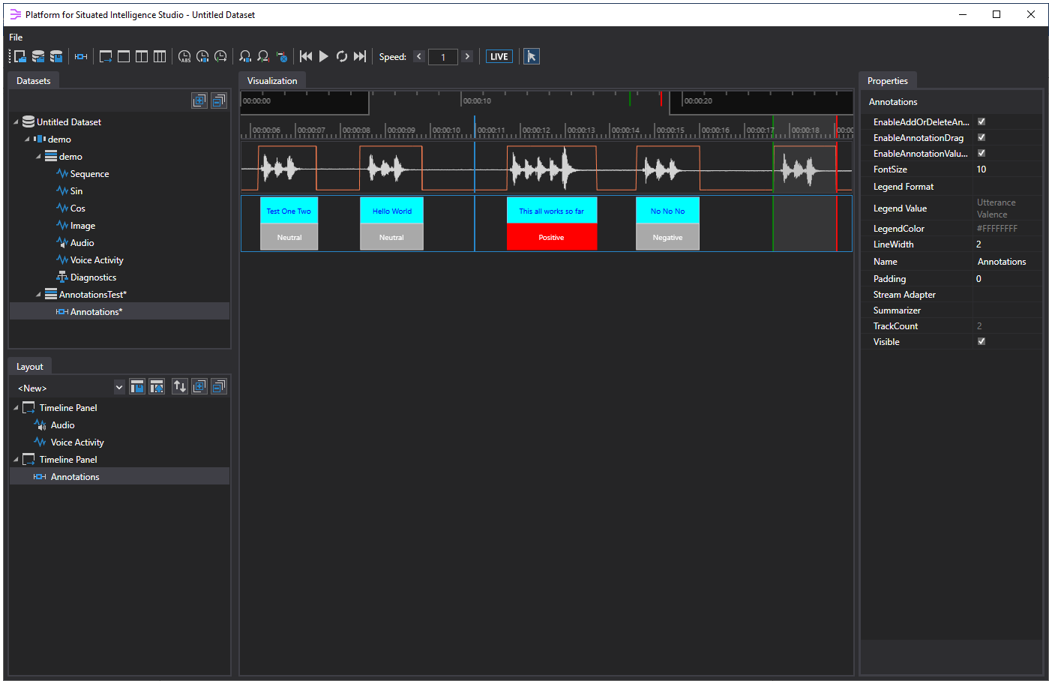
Psistudio supports both unrestricted annotation value schemas, in which the set of possible values an attribute might take is open, or unrestricted - such as the transcriptions above, as well as enumerable annotation value schemas, where the set of possible values an attribute may take is known in advance - such as the valence above, which can have one of three possible values: positive, negative, or neutral.
An unrestricted annotation schema is one where no constraints are imposed on the possible values that an annotation may take. Annotation schemas are defined via .json files, and an example of an unrestricted annotation schema useful for performing transcriptions is shown below.
{
    "Name": "Utterance",
    "AttributeSchemas": [
	{
            "Name": "Transcript",
            "Description": "The utterance transcript",
            "ValueSchema": {
                "$type": "Microsoft.Psi.Data.Annotations.StringAnnotationValueSchema, Microsoft.Psi.Data",
                "FillColor": "Cyan",
                "TextColor": "Blue",
                "DefaultValue": "Hello World",
            }
	}
	]
    }
}
The annotation schema above defines a single attribute named "Transcript", and the ValueSchema property describes the annotation value schema for the values this attribute may take. In this case our schema is of type Microsoft.Psi.Data.Annotations.StringAnnotationValueSchema, which implements an unrestricted annotation schema with values of type System.String.
The additional visual properties of FillColor and TextColor are also specified, indicating how PsiStudio will render the attribute. Finally, DefaultValue (in this case "Hello World") specifies which value a new temporal annotation of this type is instantiated with upon creation.
An enumerable annotation schema is one where the set of valid values an annotation may take is finite and known a priori. Below, we extend the schema above with a Valence attribute that uses an enumerable annotation schema to characterize the valence of an utterance as positive, negative, or neutral:
{
    "Name": "Utterance",
    "AttributeSchemas": [
	{
            "Name": "Transcript",
            "Description": "The utterance transcript",
            "ValueSchema": {
                "$type": "Microsoft.Psi.Data.Annotations.StringAnnotationValueSchema, Microsoft.Psi.Data",
                "FillColor": "Cyan",
                "TextColor": "Blue",
                "DefaultValue": "Hello World",
            }
	},
	{
            "Name": "Valence",
            "Description": "The valence of the utterance",
            "ValueSchema": {
                "$type": "Microsoft.Psi.Data.Annotations.EnumerableAnnotationValueSchema`1[[System.String, mscorlib]], Microsoft.Psi.Data",
                "DefaultValue": "Neutral",
                "PossibleValues": [{
                    "Value": "Negative",
                    "FillColor": "Blue",
                    "TextColor": "White"
                },
                {
                    "Value": "Neutral",
                    "FillColor": "DarkGray",
                    "TextColor": "White"
                },
                {
                    "Value": "Positive",
                    "FillColor": "Red",
                    "TextColor": "White"
                }
                ]
                }
        },
	]
    }
}
Notice that in this case the $type property for an enumerable annotation schema must derive from Microsoft.Psi.Data.Annotations.EnumerableAnnotationValueSchema<T>, and in this case our schema is of type Microsoft.Psi.Data.Annotations.EnumerableAnnotationValueSchema<string>.
Most importantly, the PossibleValues array defines all the possible values for an instance of an enumerable annotation schema. An instance of this value schema may only take on one of the values defined by this array. In the example above we have three possible (or valid) values; Negative, Neutral, and Positive. Note also that we have defined the color scheme for each of these values in the same way as we did before.
When PsiStudio starts up, it scans a subfolder of the Windows MyDocuments special folder (usually located in c:\Users\<User>\Documents\PsiStudio\AnnotationSchemas) for annotation schema files (like the one above). Specifically, it looks for files with the extension .schema.json, and it will automatically load into memory any such annotation schema file that it finds. If you've previously run PsiStudio at least once then this directory will already exist, but if not you should create it now.
Next, copy and paste the above annotation schema into a text editor such as Notepad and save the file to the above directory with the filename TestDefinition.schema.json. Since PsiStudio only scans this directory at startup, if you already have PsiStudio running you should shut it down and restart so that this annotation schema is loaded.
Currently, automatic loading from the c:\Users\<User>\Documents\PsiStudio\AnnotationSchemas folder is the only mechanism for loading annotation schemas in PsiStudio. In the future, we plan to extend this by allowing creating and editing annotation schemas directly via the UI.
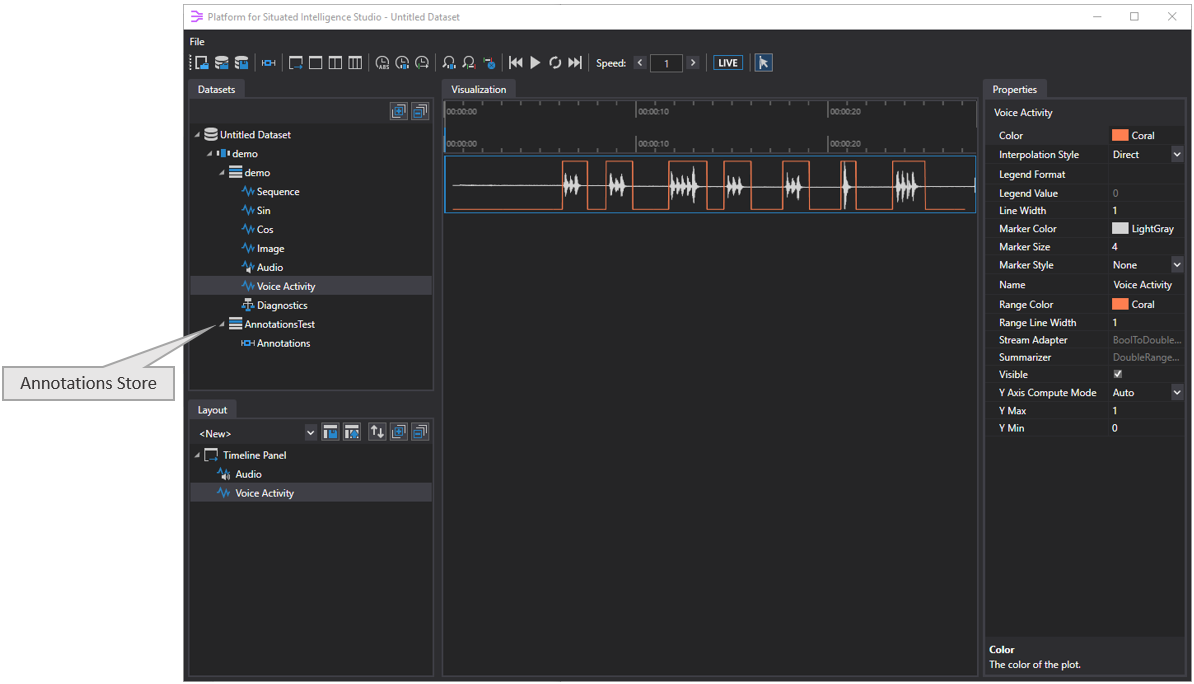
Now we need an existing store to annotate against. For this example we're going to use the store we created in the Psi Studio sample, so start up PsiStudio and load that store. Drag the Audio stream into the visualization canvas, and then drag the Voice Activity stream into the same panel, as we're going to be annotating this audio stream using the voice activity detector messages to easily set the edges of our annotation events. PsiStudio should now look like this:

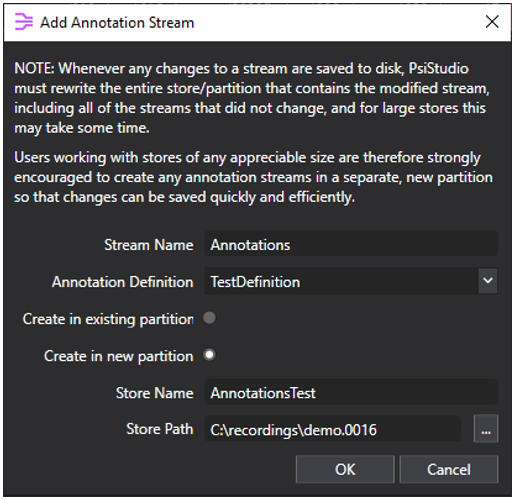
Now click the Create Annotations Stream button to launch the Add Annotation Stream dialog, it will look like the image below. There is a very important notice at the top of this dialog that should be explained. When \psi writes streams to a store, all the messages from all of the streams are written in an interleaved fashion, as they arrive, to maximize throughput. As a consequence however, when PsiStudio needs to save the changes to a single stream to the store, it must read and then rewrite ALL the streams in the entire store. If the store is large or contains many streams, this save operation could take a very long time. For this reason, we recommend that you store your annotation streams in their own store (which generally will be small in size.)

In the Stream Name field, write Annotations, then select the Create in new partition option button. The dialog will now change to look like the image below.
Give your new store a name and a path and then click OK to close the dialog and continue. You should see a new store in the dataset named AnnotationsTest containing a single annotations stream named Annotations.
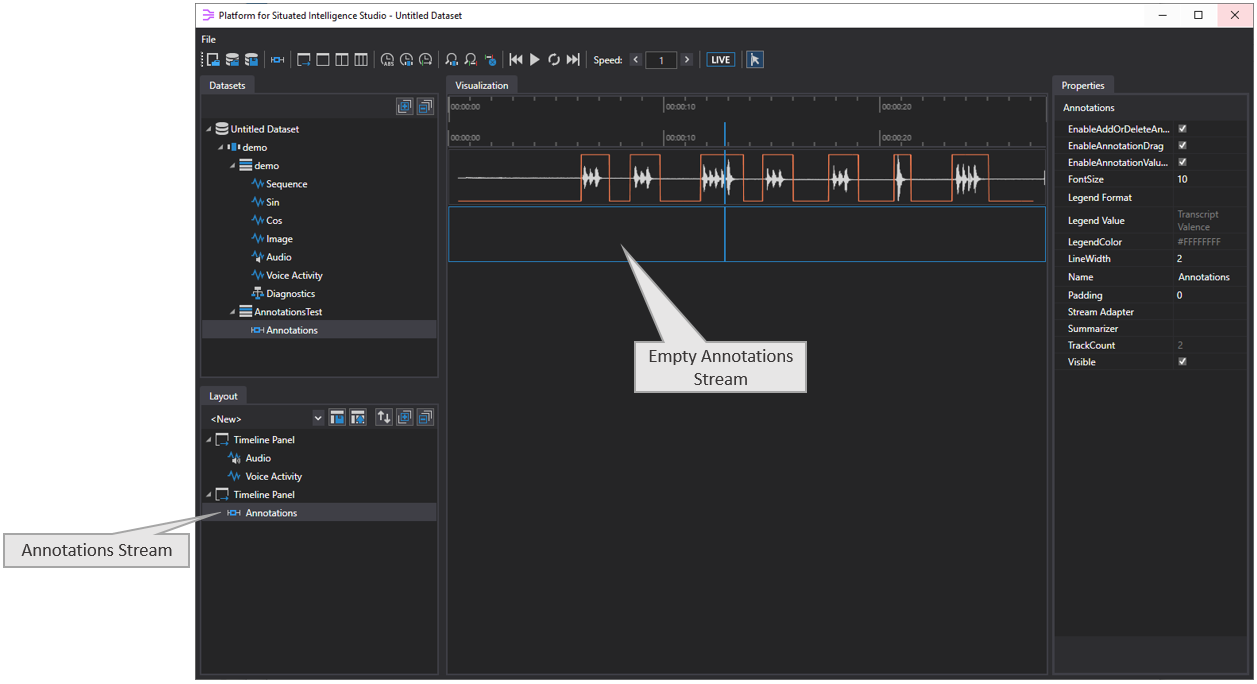
If you now drag the Annotations stream into an empty area of the visualization canvas you should see a new timeline panel containing the Annotations stream. We haven't added any annotations yet, so the timeline panel will be blank.
To add a time interval annotation, we first create a selection that will define the start and end times of the annotation event. If necessary, use the mouse scroll wheel to zoom in to an interesting area of the streams. Then, while holding the SHIFT key, left-click where you want the annotation event to start; a green Selection Start marker will be dropped where you clicked. Now, while again holding the SHIFT key, right-click where you want the annotation to end; a red Selection End marker will be dropped where you clicked.
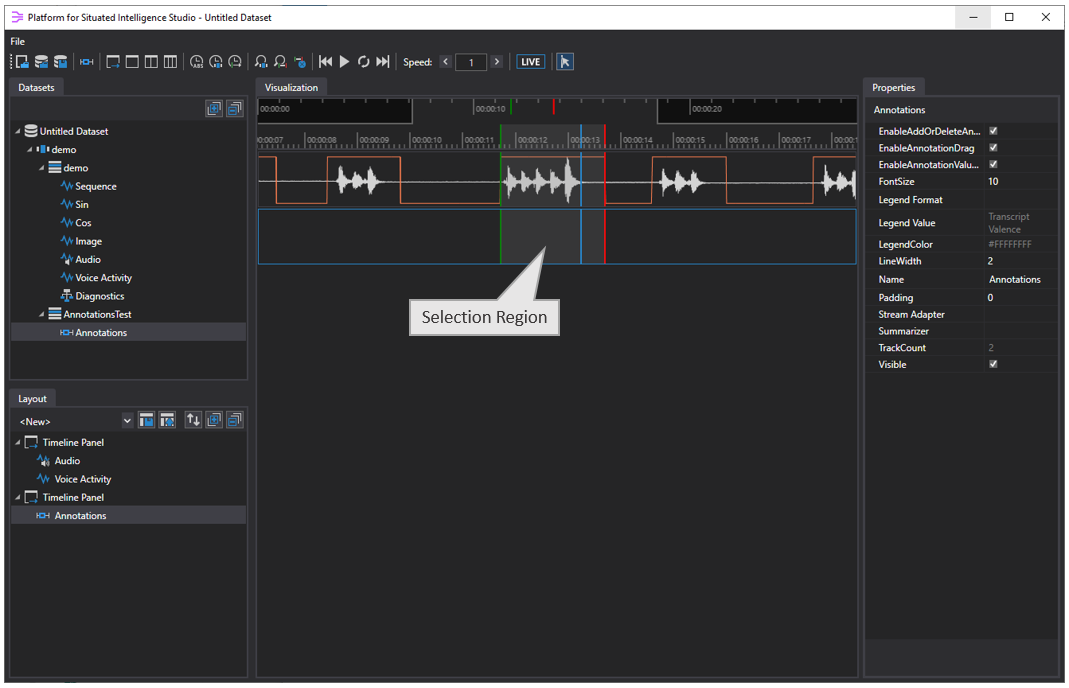
Now, in the timeline panel that contains the empty annotations stream, right click somewhere within the selection region and from the context menu select Add Annotation. A new annotation will be created between the start and end markers, with the default values for each attribute as specified by the schema.
Repeat the above steps a couple more times to create several annotations. Your stream should now look like the image below.

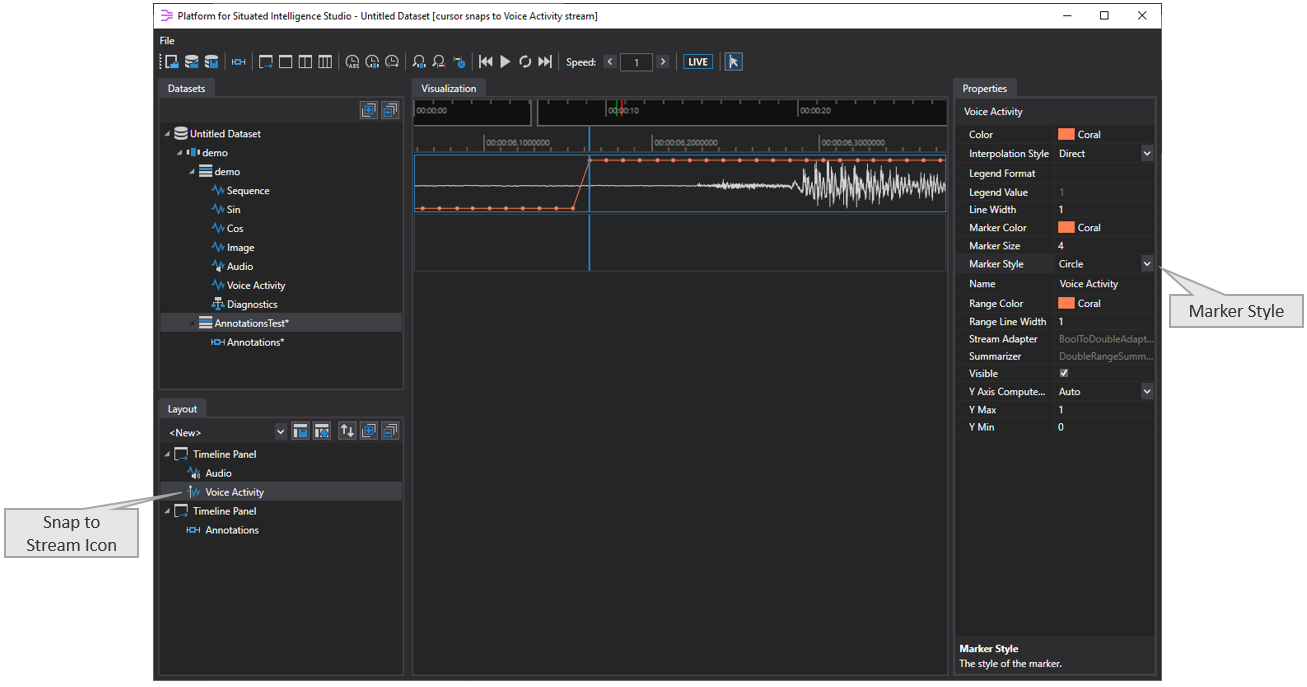
If you wish to set the start and end times of your annotations exactly on corresponding message times of one of the stores in the stream, then you can do the following. First use the mouse scroll wheel to zoom into an area of the timeline where the voice activity value transitions from 0 to 1. Now, click on the Voice Activity stream in the Layout tab to display its properties on the right of PsiStudio and change the Marker Style property to Circle. This will add a small marker to the voice activity plot for each message in the stream. Finally, right-click on the Voice Activity stream in the Layout tab and from the context menu select Snap to Stream. Notice that the icon for this stream now changes to indicate that we are snapping the cursor to this stream. If you then move the mouse over the voice activity stream in the timeline panel you should see that the timeline cursor now snaps from one message to the next as you move the mouse.
Currently all of our annotations have a Transcript value of Hello World and a Valence value of Neutral, so we need to start setting the correct values. Click on one of the annotations and its properties will be displayed in the Properties tab on the right. Notice that the StartTime and EndTime properties are displayed for the annotation as well as the current values for each track. Recall that the Transcript track is an unrestricted string annotation, so its value can be edited via a simple textbox. Changing the text of this property will be immediately reflected in the annotation itself. The Valence property, however, has an enumerable annotation value schema, so it is rendered as a dropdown combobox. If you click on the current value you can select the appropriate value from the list of possible values in the dropdown.

You can also adjust the start or end time of a time interval annotation after you have created it. Hover the mouse over one of the edges of the annotation and the mouse cursor will change to indicate the annotation instance can be resized. You can then click and drag the edge of the annotation to a new time (if the cursor is set to snap to the messages in a certain stream, it will do so throughout moving and adjusting the edge of the annotation). Note that you can drag the edge of an annotation instance no further than the edge of an adjacent annotation instance.
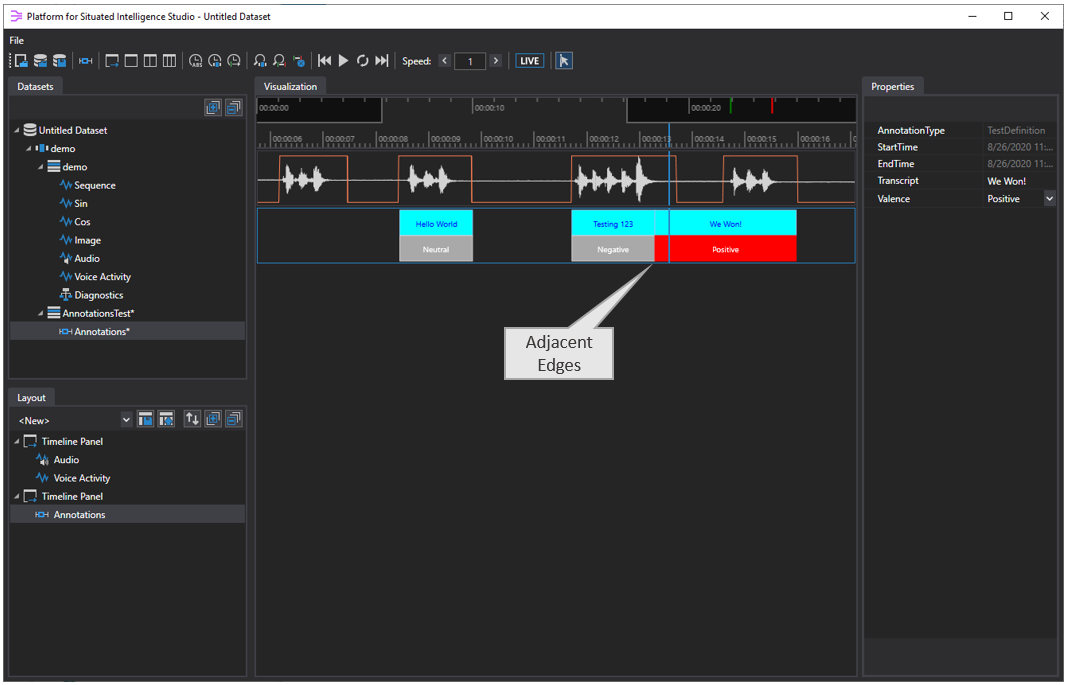
Once you've dragged the edge of an annotation instance so that it touches the edge of an adjacent annotation instance, these two edges become "locked" to each other. If you subsequently use the mouse to drag this common edge, then the edges of both annotation instances will be dragged so that they stay locked together. If you wish to "unlock" these two annotation edges, hold down the ALT key before dragging and they will separate.
To delete an annotation, right-click on it and select Delete Annotation from the context menu.
If you have made any changes to an annotation stream, then in the Datasets tab an asterisk will appear next to the annotation stream that was edited, and also next to the partition that contains the annotation stream that was edited to denote that there are unsaved changes. Recall that the partition represents the physical store on disk, so the partition name is decorated with an asterisk to indicate that the entire store will be rewritten when you save.

To save your changes to disk, right-click on the Annotations Test partition node in the Datasets tab and from the context menu select Save Changes. A progress dialog will apprear while the store is rewritten with the changes you have made and will close once the save operation has completed.