Setting up Input Controllers
From Amiberry 2.5 onwards, support is provided for universal gamepad / controller mapping.
There are two options available for this purpose:
- A standard USB or Bluetooth connected device, automatically detected by the host system
- Remapping of keyboard controls (or a keyboard controller device, such as Ultimarc's I-PAC devices) to act as a controller.
To use a keyboard controller as a joystick device, follow the guide at the Setting up Keyboard Controllers page
You can use the controller for regular in-emulation play (mapped to any Amiga port, including the optional Parallel port input), as either a classic Amiga Joystick, or a CD32 controller, or you can customise your settings to allow keyboard controls to be mapped to the controller also.
The 'first' detected controller on the host system will also be able to navigate the Amiberry menus.
Any controller which is currently picked up by the host system should be availble for use within Amiberry.
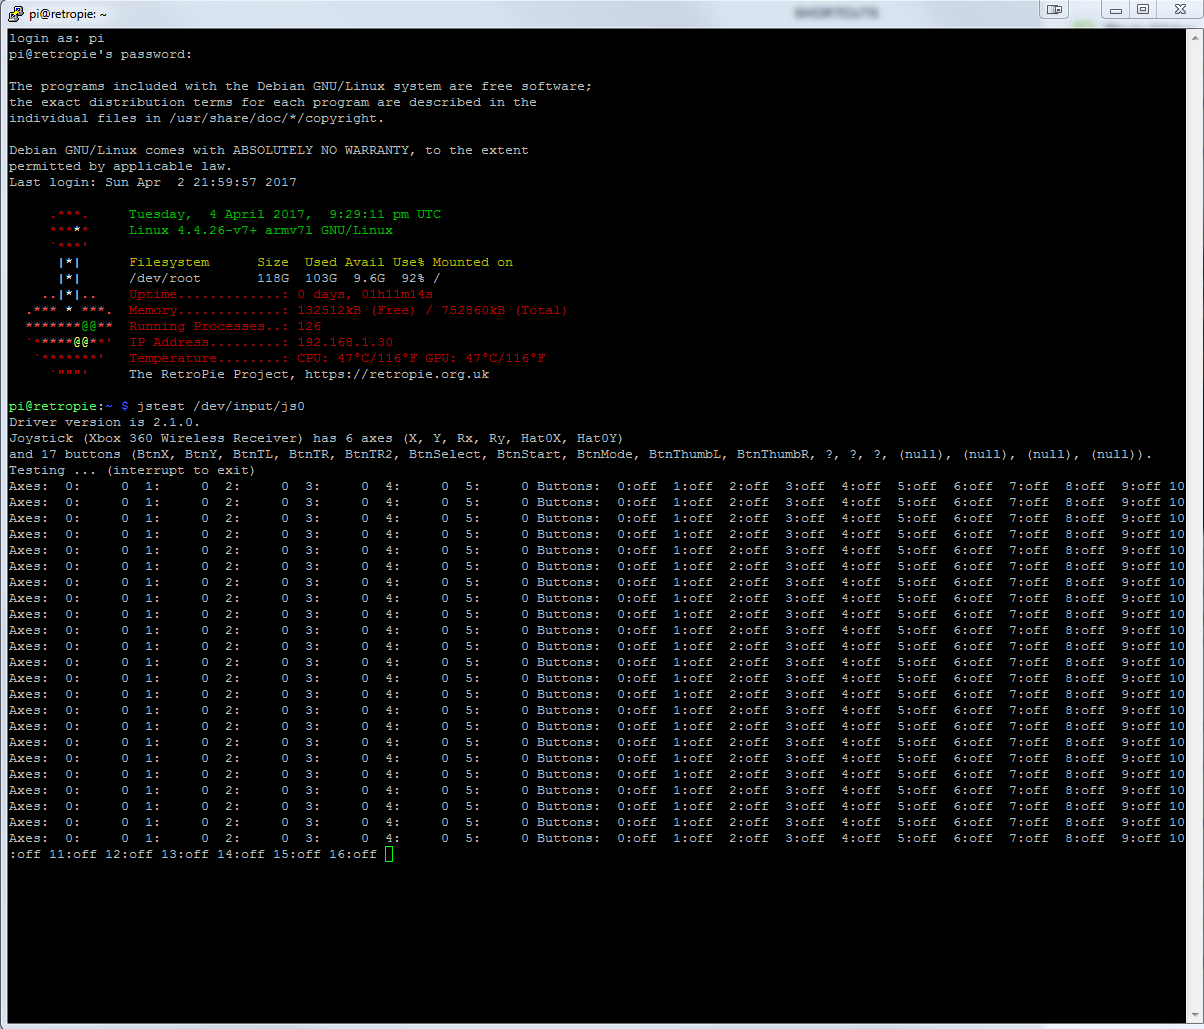
If you want, you can verify that your controller is available on the host system by using commands such as jstest (or sdl-jstest / sdl2-jstest) with the input number for your device. E.g. by typing into a command prompt jstest /dev/input/js0 will produce an output showing basic device information, such as the name.
Additional information displayed regarding the first connected "joystick" device (i.e. a controller) includes the number of buttons, hats (often used for d-pads) and axis (thumbsticks and d-pads) available, and whether or not they are presently being used.
Similar options for jstest /dev/input/js1 jstest /dev/input/js2 etc can be used if you wish to perform the same check on additional devices.
Click here to view an example output.
By default, Amiberry will assume that the "fire button" (aka 'Red' on the Amiga CD32 layout) is mapped to the button #0 of any connected device. The second button (aka 'Blue') will be on button #1 etc.
For some devices with smaller number of buttons, this may be acceptable. However, for some controllers this may not be ideal, for example where Sony's Playstation DS3 controller has the 'select' button as button #0. For these situations, a controller map will be required (see below.)
In order to ensure your controller is laid out appropriately, regardless of button numbering/ordering, you will need to create a controller map, which will tell Amiberry which buttons to map to which Amiga controls.
For this, Amiberry follows the conventions of RetroArch, as an existing standard. This is also used by the popular emulation distro RetroPie. RetroArch controller maps (.cfg files) are simply plain text files which are used to associate any part of a device (buttons, axis etc) to specific actions - this means you will be able to get the same function regardless of device used.
If you are using a pre-packaged system, such as RetroPie, controller mapping, a retroarch configuration file should be created on installation, and you may be able to skip this section.
Typically, Amiberry is looking for a config file named "Your-joystick-name".cfg:
Xin-Mo Xin-Mo Dual Arcade.cfg
You should explicitly choose the folder containing your retroarch joystick autoconfig file in the amiberry GUI and select the "rescan paths" button. If you do not have an autoconfig file, it may be necessary to create one in RetroArch beforehand (see the RetroArch documentation for information on how to do this).
If you require the creation of your own .cfg file, or wish to use a layout specifically for Amiberry, you can create a file specifically for this purpose with a plain text editor.
If you find that your joystick / D-Pad does not work but the buttons seem to be working OK, it may be an issue with one of the references in the autoconfig - Try replacing these lines:
input_up_axis = "-1"
input_down_axis = "+1"
input_left_axis = "-0"
input_right_axis = "+0"
With these:
input_l_y_minus_axis = "-1"
input_l_y_plus_axis = "+1"
input_l_x_minus_axis = "-0"
input_l_x_plus_axis = "+0"
(This autoconfig would be typical for controllers set up with a D-pad but no left analog stick).
As mentioned before, the config file must match the name of the device, as it appears in the Amiberry Input Panel's Port drop-downs.
If you are unable to read the whole of the name from here, you can used jstest /dev/input/js0 (if using sdl2-jstest this is shown after -p1name) and append the file name with '.cfg' (you should ensure that any .txt extension is removed) for example, Sony PLAYSTATION(R)3 Controller.cfg is an example filename for a common Sony Playstation DS3 controller, and will mirror the support for this controller previously provided with UAE4ARM. However, you should verify if this is correct for your specific controller (even if using a Sony PS3 controller) as this can differ depending on model number.
If you are not using an existing RetroArch system build such as RetroPie, it is recommended you save the .cfg file to a Controllers sub-folder within Amiberry's installed location, reference it from the "Paths" part of the GUI and use the "Rescan paths" button.
An example configuration is provided below:
input_up_btn = "4"
input_down_btn = "6"
input_left_btn = "7"
input_right_btn = "5"

input_a_btn = "13"
input_b_btn = "14"
input_y_btn = "15"
input_x_btn = "12"

input_select_btn = "0"
input_start_btn = "3"

input_l_btn = "10"
input_l2_btn = "8"
input_l3_btn = "1"

input_r_btn = "11"
input_r2_btn = "9"
input_r3_btn = "2"

input_l_y_minus_axis = "-1"
input_l_y_plus_axis = "+1"
input_l_x_minus_axis = "-0"
input_l_x_plus_axis = "+0"

input_r_y_minus_axis = "-3"
input_r_y_plus_axis = "+3"
input_r_x_minus_axis = "-2"
input_r_x_plus_axis = "+2"

input_menu_toggle_btn = "12"
input_enable_hotkey_btn = "0"
input_reset_btn = "14"
input_exit_emulator_btn = "3"
If your device does not use button numbering for the HAT (d-pad) of your controller, but instead uses a 'hat', this can be specified as per the following example, which would use hat 0 as standard up/down/left/right controls:
input_up_btn = "h0up"
input_right_btn = "h0right"
input_down_btn = "h0down"
input_left_btn = "h0left"
The following picture will help you associate the correct buttons with your controller. Common names are given with associated RetroArch names.
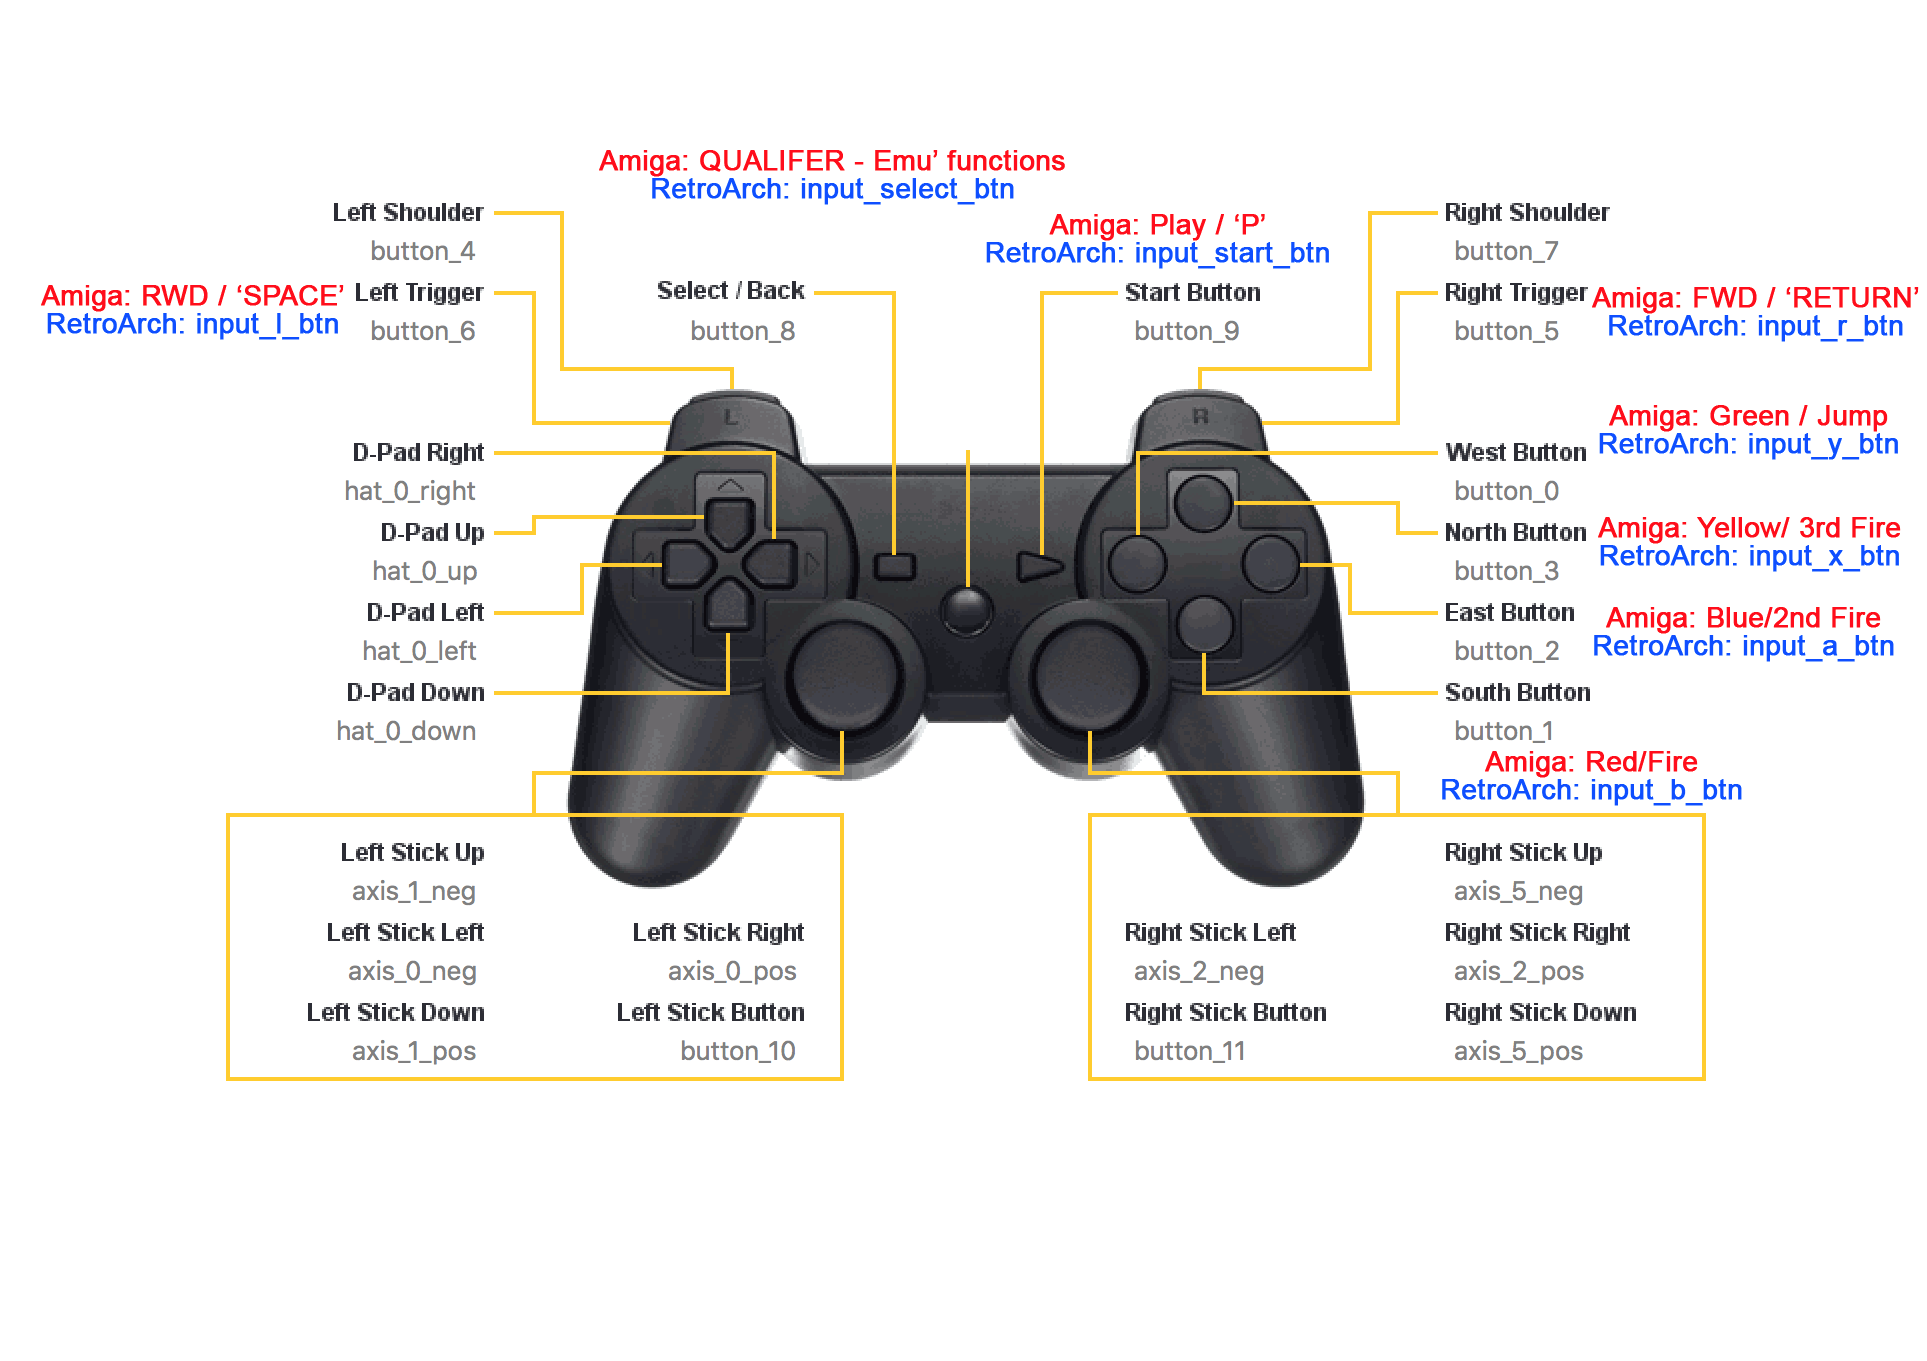
From the Amiberry GUI you should navigate to the Paths panel. From here you will need to select the location where your .cfg file(s) have been stored.
For RetroPie, you should select /opt/retropie/configs/all/retroarch/autoconfig/
Once selected, click the 'Rescan Paths' button shown at the bottom of the panel.
The easiest way to verify if your RetroArch controller map has been recognised, is to check for the [R] on the Custom Control panel, adjacent to the Input Device name. This will otherwise be displayed as [N] (Normal Controller}

It is possible to use the RetroArch settings for emulator quit, GUI/menu activation and emulation reset. More information on this can be found on the RetroArch commands page.
You can also set game-specific control customisations, e.g. mapping individual keyboard keys to controller buttons. More information for this can be found on the Custom Controls page.