TizenRT
While Tizen GNU/Linux based Operating System is powering high end devices like TV, Wearables and most devices with rich rendering, it's not designed to target low end IoT devices or baterry powered small appliances.
Tizen:RT wants to address more devices and reusing API or concepts deployed in his older brother.
If you are interested for a summary overview check this short presentation of TizenRT:

- https://www.slideshare.net/SamsungOSG/tizen-rt-a-lightweight-rtos-platform-for-lowend-iot-devices
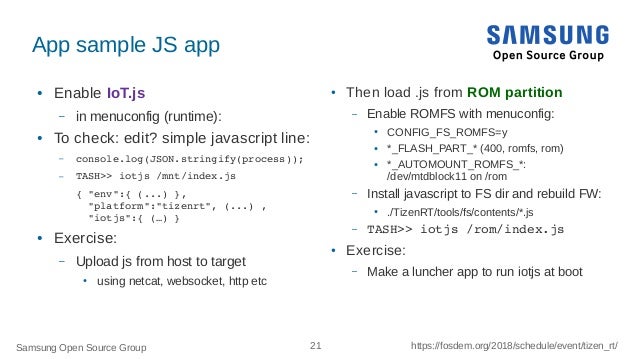
- https://archive.fosdem.org/2018/schedule/event/tizen_rt/
For deeper understanding the following link might be useful too:
For supported hardware please consider to get an ARTIK05x dev boards:
IoT.js is part of Tizen:RT, and the current master branch provides some facilities to use an older IoT.js version, but it can be upgraded.

To replicate WEBTHING-IOTJS ON ARTIK05Xs demo, please jump to the ARTIK section lower in this WiKi page, this automates the cloning of the TizenRT repo into your machine, uploading an IoT demo using the Web of Things framework, building an image of this, and flashing to your ARTIK board.
But if you need/want to work on your master TizenRT branch, you'll have to manually do the extra following steps:
If you are in a hurry you can skip this step and rely on helper scripts explained later in the ARTIK section lower in this page.
Or you can follow the supported documentation which will install tools and build and deploy sample image.
Again, if in a hurry you can rely on helper scripts and skip this chapter.
Currently webthing-iotjs is not supporting the version of IoT.js shipped into Tizen:RT, so it should be upgraded, by just applying this changes set:
- https://github.com/Samsung/TizenRT/pull/2018# (Status: under review)
- https://github.com/Samsung/iotjs/issues/1777# (Status: TODO)
- https://github.com/TizenTeam/TizenRT
- https://github.com/TizenTeam/libtuv
Again, this chapter can be skipped if using helper config made for ARTIK05X, (but you'll have to configure WiFi anyway).
To rebuild Tizen:RT with IoT.js the upstreamed launcher app should be enabled, ROMfs enabled, WiFi configured as explained in the link below:
Or start on the existing "iotjs" configuration for ARTIK05x
Finally javascripts should be placed in the contents subdir, as explained upstream:
The link below provides more information about building IoT.js master branch for TizenRT operating system on ARTIK boards:
Status: Merged
- https://github.com/Samsung/TizenRT/pull/1982# (Status: Merged)
- https://github.com/Samsung/TizenRT/pull/2009# (Status: Merged)
This section describes how to run a helper script which will clone the TizenRT operating system from github, it will add the updated Web of Things test application, configure, build and then flash the build onto the Artix board.

Before you start you should have:
- your TizenRT Artik board connected via USB and verify it works with a terminal emulator.
- Familiar with a terminal emulator like screen, cutecom and so on.
- The basic idea of flashing software onto a microprocessor board.
Test tagged version
project="tizenrt"
url="https://github.com/tizenteam/tizenrt"
branch="webthing-iotjs/master"

git clone --recursive --depth 1 -b "$branch" "$url" ; cd "$project"
make setup # Will install tools (on debian based OS) # ToDo adapt for others
make -C rules/webthing-iotjs demo extra_dir=/tmp/$USER/$PWDCreate your workspace directory and cd to it.
Setup variables for project (the URL to clone from and the current branch to be used):
In terminal type:
project="tizenrt"
url="https://github.com/tizenteam/tizenrt"
branch="sandbox/rzr/webthing/master"
Use "git clone" to clone a copy of the code and run the make setup command. This will prepare the build environment for building TizenRT for ARTIK board:
In your terminal type:
git clone --recursive --depth 1 -b "$branch" "$url" ; cd "$project"
make setup # Will install tools (on debian based OS) # ToDo adapt for othersYou should be ready to now deploy the demo.
We will use the basic UI menuconfig editor to ensure your ARTIK board will startup and use the onboard WiFi properly.
Default configuration connecting to "public" hotspot might not work, so you'll have to change settings to set your WiFi router credentials.
For that you need to run menuconfig again and edit credentials, (typically for WPA2: Auth=4 and Enc=5 or 4, use "Help" entry to list all supported modes).
Here you follow a menu driven editor to make a build that will use your WiFi SSID and password properly. Lastly you will use the 'make config' and 'make demo' command to do the build and deploy. From the command line type:
make menuconfig Navigate the simple UI menu to select the IoTJS Startup component, Connect WiFi, input SSID and passphrase, authentication type and encryption type and using menus:
Application Configuration ->
 Examples ->
   IoT.js StartUp example ->
  Connect WiFi ->
   (my-WiFi-SSID) SSID of AP
   (my-password)  Passphrase of AP
   (4)     Authentication type
   (5)     Encryption type
Save your settings and exit. There is a detailed guide for the above if you need more information to connect your hotspot shown in HowToUseIoTjs upstream's doc:
Now use the make demo command to build and deploy.
make demo tty=/dev/ttyUSB1It was tested on ARTIK055s and ARTIK053s but should be also working on ARTIK053 (see TODO section), just override machine variable in any make calls like
make menuconfig demo machine=artik053s tty=/dev/ttyUSB1If you notice a blank screen appear with no text, press the reset button on the board to reset, then you should see output from the device like below:
U-Boot 2017.01-g59977f7 (Nov 23 2017 - 16:09:52 +0900)
CPU:   Exynos200 @ 320 MHz
Model: ARTIK-053 based on Exynos T20
DRAM:  946 KiB
WARNING: Caches not enabled
BL1 released at 2017-3-13 15:00
SSS released at 2017-09-12
WLAN released at 2017-09-15
Flash: 8 MiB
*** Warning - bad CRC, using default environment

In:    serial@80180000
Out:   serial@80180000
Err:   serial@80180000
Hit any key to stop autoboot:  0
gpio: pin gpg16 (gpio 46) value is 1
|## Starting application at 0x040C�020 ...
s5j_sflash_init: FLASH Quad Enabled
uart_register: Registering /dev/console
uart_register: Registering /dev/ttyS0
uart_register: Registering /dev/ttyS1
uart_register: Registering /dev/ttyS2
uart_register: Registering /dev/ttyS3
uart_register: Registering /dev/ttyS4
System Information:
        Version: 1.1
        Commit Hash: 4fa524ccfbb5d76da971e219353bf642e811535b
        Build User: philippe@wsf1127
        Build Time: 2018-08-28 15:15:03
        System Time: 01 Jan 2010, 00:00:01 [s] UTC Hardware RTC Support
TASH>>log: iotjs_startup_wifi_connect
log: Connecting to SSID "35honeypot" (4+5)
log: Wait (1/3) sec...
i2c_uioregister: Registering /dev/i2c-0
i2c_uioregister: Registering /dev/i2c-1
log: Wait (2/3) sec...
log: Wait (3/3) sec...
[WM] T7 _handle_request:1317 state(0) evt(0)
[WM] T7 _handler_on_uninitialized_state:870 state(0) evt(0)
Starting supplicant in foreground...
1262304004.153364: Successfully initialized wpa_supplicant
1262304007.236875: wl1: callling L2_packet_init:
1262304007.236875: wl1: Own MAC address: 28:6d:FF:FF:FF:FF
[WM] T7 <-- _handle_request
[WM] T7 _handle_request:1317 state(1) evt(4)
[WM] T7 _handler_on_disconnected_state:920 state(1) evt(4)
[WM] T7 _wifimgr_connect_ap:727
[WM] T7 _wifimgr_save_connected_config:716
[WM] T7 <-- _handle_request
1262304009.302528: wl1: Associated with e4:9e:FF:FF:FF:FF
1262304009.312507: wl1: WPA: Key negotiation completed with e4:9e:FF:FF:FF:FF [PTK=CCMP GTK=CCMP]
1262304009.312507: wl1: CTRL-EVENT-CONNECTED
[WM] T12        _wifi_utils_connect_event:817
[WM] T12 _handle_request:1317 state(3) evt(9)
[WM] T12 _handler_on_connecting_state:988 state(3) evt(9)

#|{ TODO: Note IP displayed
[WM] IP address : 192.168.1.42 ----  <==
#|} TODO: to be used later when adding device to Gateway

[WM] T12        _handle_user_cb:1252
[WM] call sta connect success event
log: iotjs_startup_wifi_sta_connected status=0x0
If connecting, note IP from terminal's log:
#|{ TODO: Note IP displayed
[WM] IP address : 192.168.1.42 ----  <==
#|} TODO: to be used later when adding device to Gateway
Then device can be then added to Gateway from the Web dashboard:
- Got to settings page of Gateway
- Check that adapter is loaded in "adapter page"
- It not then add "Web Thing : Native web thing support" plugin listed on "addon page"
- Then in the thing menu press the (+) button to add thing, at bottom of page click "add by URL"
- Enter http://$ip:$port and save and add, it should be displayed minimized on main screen or expended form:
Note, GNUScreen is used to connect to serial port, to exit press "Ctrl+a" then "k". If there nothing displayed on screen, you can hit the board's reset switch.
-
Status: Devel (Snapshot)
References:
project="tizenrt"
url="https://github.com/tizenteam/tizenrt"
branch="sandbox/rzr/webthing/master"
git clone --recursive --depth 1 -b "$branch" "$url" ; cd "$project"
# docker-compose up # TODO
docker build -t tizenrt-webthing-iotjs .Check and fix I2C, ADC, SPI support:
project="TizenRT"
url="https://github.com/tizenteam/$project"
branch="sandbox/rzr/webthing/master"
git clone --recursive --depth 1 -b $branch $url
- https://github.com/Samsung/TizenRT/pull/2360# (Merged)
- https://github.com/Samsung/TizenRT/pull/2018# (Open)