Sensor
In IoT and embedded world, sensors and Actuator are key components to interact with the external physical world, which is the base of many use cases or Concepts.
To illustrate Concept, watch Sensor part of the "Smart Orchid" demo video:

The simplest use case is just basic interaction from the RaspberryPi's button to the artik ARTIK05x's LED.
To recap here are all elements we will explain in following chapters:
- ARTIK05s on board LED is simplest Actuator running on IoT.js and TizenRT
- "Button sensor" on RaspberryPi is simplest sensor running on IoT.js on RaspberryPi, (connected to earlier Actuator via Gateway)
- "Clap sensor" using webthing-node (on RaspberryPI)
- "Ambient Light" and "Temperature" using generic-sensor-lite connected to RaspberryPi
- "Moisture" Level Sensor on Extra Arduino MCU board
- Actuator RGB Lamp on ESP8266 MCU
Webthing-node is now supporting GPIO, ARTIK530 is used as reference platform because it feature 2 onboard buttons.
Or we can validate GPIO inputs using an OpenSource hardware "buttons" board "PlayPHat":
project="webthing-node"
url="https://github.com/mozilla-iot/${project}"
branch='master'
git clone --recursive --depth 1 -b "$branch" "$url" ; cd "$project"
make -C example/platform play-phat
Expected log:
NODE_PATH=.:../.. node index play-phat
log: board: play-phat: Loading
Usage:
/home/pi/.nvm/versions/node/v8.11.4/bin/node /home/pi/webthing-iotjs/example/platform/index [board] [port]
Try:
curl -H "Accept: application/json" http://localhost:8888

log: board: play-phat: Started
log: GPIO: Left: open:
log: GPIO: Right: open:
log: GPIO: Up: open:
log: GPIO: Down: open:
log: GPIO: A: open:
log: GPIO: B: open:
log: GPIO: Start: open:
log: GPIO: Select: open:

log: GPIO: Start: change: false
log: GPIO: Start: change: true
There are two onboard buttons that can be used on ARTIK 05x board, check following IoT.js code (made for TizenRT but portable to other OS):
If using Node.js and GPIO's module this example can be used as base on GPIO11 (here used for "Flex RaspberryPi hat"):
Same as nodejs but quicker but with mentioned limitations:
project="webthing-iotjs"
url="https://github.com/rzr/${project}"
branch="master"
git clone --recursive --depth 1 -b "$branch" "$url" ; cd "$project"
make -C example/platform play-phat
Expected log:
iotjs index.js play-phat
log: board: play-phat: Loading
Usage:
iotjs index.js [board] [port]
Try:
curl -H "Accept: application/json" http://localhost:8888

log: board: play-phat: Started
log: GPIO: Left: open: null (null expected)
(...)
log: GPIO: Start: change: true
(...)
- TODO: on failure after reboot, run again

Note that Pi's GPIOs input mode can be configured externally, using gpio tool. IoT.js and npm's gpio module are not (yet) supporting this.
For example check Pi Hats like TrafficPHat (and its 3 buttons mini hat):
project="webthing-iotjs"
url="https://github.com/rzr/${project}"
branch="master"

mkdir -p "${url}/${branch}"
cd "${url}/${branch}"

git clone --recursive --depth 1 -b "$branch" "$url" && cd "$project"
make start/board/traffic-phat"Smart Orchid Demo" showed a "Clap sensor", which is basically just a GPIO input of KY-037's digital pin:
I used it on a Raspberry Pi using node, but it should work on any other device.
For the record I used this Flex PiHat, and modified it to plug additional sensor in (clap):
Setup should be done using the WebUI:
- http://gateway.local:8080/settings/addons# Configure
- http://gateway.local:8080/settings/addons/config/gpio-adapter
As explained in Flex chapter, extra setup is needed:
gpio -g mode 23 up
sudo grep gpio-23 /sys/kernel/debug/gpio
gpio-23 ( |sysfs ) in hi IRQ- https://www.tindie.com/products/anavi/anavi-flex-raspberry-pi-hat-for-iot/
- https://github.com/AnaviTechnology/anavi-flex/issues/1#issuecomment-274616910
If curious check Mozilla blog post about an alternative way to build a "Clap sensing webthing" :

Status: In development, TODO: (Double check and upstream).
Analog input signal can be monitored using ARTIK530 (or 710 this is the one I used).
IoT.js is supporting Analog Digital Converter natively so it can be used easily:
Using TizenRT:
project="webthing-iotjs"
board="artik530"
image="arm32v7/debian"
url="https://github.com/rzr/${project}"
branch="master"

git clone --recursive --depth 1 -b "$branch" "$url" && cd "$project"
sed -e "s|^FROM .*|FROM $image|g" -i Dockerfile

$sudo systemctl restart docker
time docker rm "${project}"
time docker build -t "${USER}/${project}" . # <20min first time
time docker run -t \
  --volume /sys:/sys --publish 8888:8888 --net "host" \
  --name "${project}" --rm \
  "${USER}/${project}" start/board/${board}

(...)
curl -H "Accept: application/json" http://localhost:8888
(...)
log: ADC: ADC0: open: null (null expected)
log: ADC: ADC1: open: null (null expected)
(...)
log: ADC: ADC0: change: 0%
log: ADC: ADC1: change: 0%
(...)

curl http://${HOSTNAME}.local:8888/properties/ADC0


{"ADC0":0}
If using TizenRT and not iotjs defconfig make sure to enable ADC driver and device enabled:
make menuconfig

Device Drivers / Analog Device(ADC/DAC) Support (ANALOG [=y])
Hardware Configuration / Chip Selection / S5J Peripheral Support / [*] ADC
The look at generated os/.config it should be aligned to iotjs' reference defconfig files:
# build/configs/artik*/iotjs/defconfig:CONFIG_S5J_HAVE_ADC=y
# build/configs/artik*/iotjs/defconfig:CONFIG_S5J_ADC=y
# build/configs/artik*/iotjs/defconfig:CONFIG_ADC=y
Node.js is not supporting ADC natively but it's easy to get access to ADC driver, trough Linux kernel's sysfs interface (and docker needs to be exported to be used as RW):
sudo="sudo" # or setup docker for user
board="artik530"
project="webthing-node"
url="https://github.com/mozilla-iot/${project}"
branch="master"
image="node:10"
service_image="webthingnode_web"

git clone --recursive --depth 1 -b "$branch" "$url" && cd "$project"
sed -e "s|^FROM .*|FROM $image|g" -i Dockerfile
$sudo docker-compose up

time $sudo docker build -t "${service_image}" . # <20min
time $sudo docker run \
  --volume /sys:/sys --publish 8888:8888 --net "host" \
  --name "${project}" --rm \
  "${service_image}" make -- -C example/platform board/${board}

(...)
log: ADC: ADC1: update: 0x791
log: ADC: ADC1: change: 41%
(...)

curl http://${HOSTNAME}.local:8888/properties/ADC0
{"ADC0":42}
Note: --net "host" option is needed, because you'll face an Express's 403 issue if not using localhost.
Related:
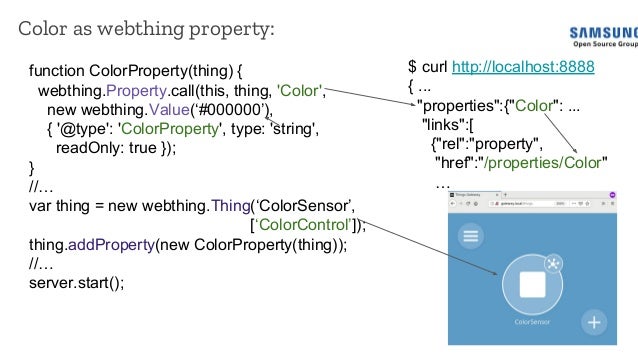
A good example to practice is this color sensor kit that provides a simulator and also a driver for I2C TCS34725 sensor.
It should work with Adafruit RGB Color Sensor with IR Filter and White LED - TCS34725 [ADA1334] :
More hints shared at:
- https://www.slideshare.net/rzrfreefr/iotjavascript2019fosdem
- https://social.samsunginter.net/@rzr/101564201618024415
Relate to:
- https://github.com/mozilla-iot/schemas/pull/37 (Merged)
- https://github.com/w3c/ambient-light/issues/9 (Open)
- https://github.com/mozilla-iot/schemas/issues/48 (Open)
- https://ams.com/search#/TMD37821
Note: It's possible to use I2C sensors on IoT.js but since some sensors changes are not yet upstreamed this chapter starts to explain the currently supported use.
In "Smart Orchid demo" "I2C sensors were connected to RaspberryPi's bus of Gateway (using Node,js runtime), then the "Generic sensors adapter" was installed as Gateway's addon (released since mozilla-iot-gateway-0.4).

The adapter is built on a high level wrapper abstract drivers, "generic-sensor-lite" module can be also used outside Gateway, check more detail on project page:
Check supported sensors For now I recommend to use either BH1650 (i2c=0x23) or BMP082 (i2c=0x77) modules, community implemented drivers, which are supported by NPM community, since my fixes were upstreamed.
Now you can try to create webthings, I suggest to start making them for supported Node.js and then port to IoT.js (in development).
IoT.js is supporting I2C API, so more sensors can be supported:
While node needs an external module:
Usage on GNU/Linux (here Raspbian):
sudo apt-get install i2c-tools make git
sudo raspi-config # Enable i2c
lsmod  | grep i2c
# i2c_bcm2835            16384  0
# i2c_dev                16384  0
ls -l /dev/i2c* || sudo reboot

sudo /usr/sbin/i2cdetect -y 1

git clone --recursive https://github.com/rzr/generic-sensors-lite
make -C generic-sensors-lite runtime=iotjs run
# (...)
# log: ambientlight: 30.833333333333336
# (...)
Then check example to make a real webthing, on GNU/Linux:
make runtime=iotjs run
make -C example/webthing runtime=iotjs run
# (...)
# log: AmbientLight: AmbientLight: change: 28.333333333333336
# log: Temperature: Temperature: change: 33
# (...)Test on Fedora 22 - armhfp on ARTIK10 (on J27):
sudo dnf install i2c-tools
ls -l /dev/i2c*
sudo /usr/sbin/i2cdetect -y 0
#      0  1  2  3  4  5  6  7  8  9  a  b  c  d  e  f
# (...)
# 60: -- -- UU -- -- -- -- -- -- -- -- -- -- -- -- --


sudo /usr/sbin/i2cdetect -y 9
Error: Can't use SMBus Quick Write command on this bus
Related:
- https://developer.artik.io/documentation/developer-guide/gpio/gpio-mapping.html
- https://developer.artik.io/forums/t/i2c-of-artik-10-board-version-3-1-not-working/226/2
- https://developer.artik.io/documentation/developer-guide/gpio/kernel-gpio.html#isup2supc-interface
On TizenRT i2c tool can be enabled for scanning bus:
TASH>>
i2c bus
BUS   EXISTS?
Bus 0: YES
Bus 1: YES
Bus 2: YES
Bus 3: YES

i2c dev -b 0 03 77
i2c dev -f 40000 -b 1 0x20 0x2f
ToDo:
- https://github.com/miroRucka/bh1750/pull/15# (Merged)
- https://github.com/miroRucka/bh1750/pull/14# (Merged)
- https://github.com/miroRucka/bh1750/pull/13# (Merged)
- https://github.com/miroRucka/bh1750/pull/10# (Released)
For the record following repos were used:
- https://github.com/TizenTeam/bh1750
- https://github.com/TizenTeam/node-blinkt
- https://github.com/TizenTeam/iotjs-modules
- https://github.com/rzr/iotjs-async
- https://github.com/TizenTeam/bmp085-sensor
- https://github.com/TizenTeam/bmp085
- https://github.com/TizenTeam/gateway
- https://developer.artik.io/documentation/artik-05x/tutorials/i2c.html# ARTIK I2C
- https://developer.artik.io/documentation/artik/tutorials/sensor-tutorial.html# ARTIK Sensor Board
- https://developer.artik.io/forums/t/artik-0530-and-i2c/5059# Support hints
- https://media.digikey.com/pdf/Data%20Sheets/Samsung%20PDFs/ARTIK-053_Dev_Brd_UG_V0.17_4-6-17.pdf# Pinout
- https://github.com/kelly/node-i2c/issues/90# (TODO)
- https://www.w3.org/das/roadmap#