Armbian
Mozilla WebThings is a platform for controlling home's devices.
Its main purpose is to give users the ability to setup and control a "smart home" on your own without relying on third party services.
This article will tell you why and how to set it up on ODROID-XU4.

Since a couple of years, cloud operated devices showed some limitations. Details about annoyances such as interoperability or reliability will not be covered, first let's just focus on the privacy concern. I personally consider that taking or revealing (any) user's data without his own free will is a problem that everyone should consider. (Those who claim that they have nothing to hide are welcome to share their credit cards numbers.) So please be wise and nice before adopting a service or connecting devices because your privacy policy will also affect other family members or even your guests.
Hopefully since a couple of years some progress are noticeable on regulations' side. Europe started with GDPR which is introducing some concepts in the chain of personal data. Precisely article 25 recommends "Privacy by Design" architectures.
{width=400}
( Icons made by Wichai.wi from www.flaticon.com )
It is reasonable to predict that connected devices market will change soon or later. Meanwhile, you can stay ahead and try FLOSS projects which did not wait regulations to enable privacy.
Since dawn of Mozilla IoT platform development the project was explicitly designed to avoid that your data go to someone else's cloud.

The key principle is pretty simple: all home devices are connected only to home's network, so data just stays in, nothing is going out of sight.
Without getting too depth in details, there are many IoT standards today, and probably none will be appropriate to match every use cases. That said a common technology can abstract many overlaps. This is the mission of W3C the organization known for the standardization of the world wide web (HTML/HTTP/XML...). W3C's "Web of Things" working group (WoT) is committed to address some IoT problems using existing web technologies and fill the missing gap.
While some described WoT as the "HTML for IoT", think that WoT protocols are mostly for machines instead of humans, technically we are talking about REST APIs and JSON Schema for semantics.
The WebThings framework is based on simplified WoT proposed recommendations.
Today, the implementation is composed of:
- WebThings API for devices that speak REST on HTTP.
- WebThings gateway can control devices from a nice web application.
- WebThings gateway's add-on adapter(s) to translate non WebThings devices or services to WebThings API.
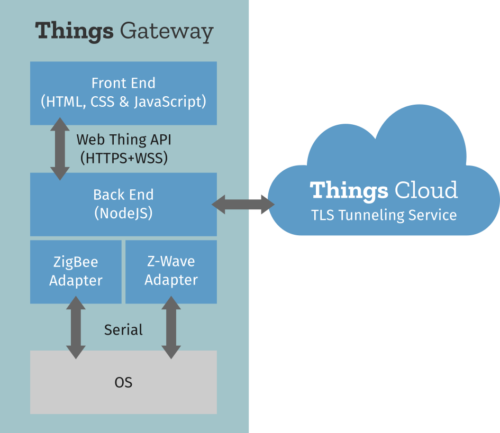
Today I will cover how can ODROID-XU4 can be a valid single board computer for hosting WebThings gateway software which was originally developed for reference target Raspberry Pi 3.
Following instructions should also work for other ODROIDs with minor adaptations. If you need to pick one, may I suggest to consider ODROID-H2 because it should be a bit simpler to develop on x86_64 CPU architecture.
Setup is not straightforward so you'll need a GNU/Linux host computer, SD-card, Serial Port and Ethernet link.
Mozilla reference image is based on Raspbian a Debian port for Raspberry Pi, this image wont work on non Pi devices.
Hopefully the Armbian project has just released images to boot latest Debian-10 on various ARM boards.
{width=400}
Debian or Ubuntu flavor of Armbian will work on ODROID-XU4, but let's download the minimal image and then dump it to a SD card.
On a GNU/Linux system, I used an USB SD adapter and these command lines:
lsblk # Will list your disks make sure to use the right one
disk='/dev/disk/by-id/usb-Generic-_USB3.0_CRW_-0_000000021716-0:0' #
file "$disk" # TODO

release="Armbian_20.02.1_ODROIDxu4_buster_current_5.4.19_minimal"
url="https://dl.armbian.com/odroidxu4/archive/${release}.7z"

sudo sync
sudo apt-get install curl 7zip-full time # Install those tools on Debian or adapt
time curl -O "$url" # 3sec 155313070c
time 7z e -so "$release.7z" "$release.img" | sudo dd bs=4MB of="$disk"
#| 562036736 bytes (562 MB, 536 MiB) copied, 142.735 s, 3.9 MB/s Then insert the SD image on ODROID-XU4, if you have the serial port configured you should be able to view the boot log:
screen /dev/ttyUSB0 115200

#| U-Boot 2017.05-armbian (Feb 17 2020 - 07:52:44 +0100) for ODROID-XU4
#|
#| CPU:   Exynos5422 @ 800 MHz
#| Model: ODROID XU4 based on EXYNOS5422
#| Board: ODROID XU4 based on EXYNOS5422
#| Type:  xu4
#| DRAM:  2 GiB
#| MMC:   EXYNOS DWMMC: 0, EXYNOS DWMMC: 1
#| MMC Device 0 ( SD ): 7.4 GiB
#| mmc_init: -5, time 4
#| *** Warning - bad CRC, using default environment
#|
#| In:    serial
#| Out:   serial
#| Err:   serial
#| Net:   No ethernet found.
#| Press quickly 'Enter' twice to stop autoboot:  0
#| (...)
A couple of minutes later, you should be able to log in as root with default password "1234".
Then system will ask setup default user:
#| Armbian 20.02.1 Buster ttySAC2
#| odroidxu4 login: root
#| Password: 1234
#| You are required to change your password immediately (root enforced)
#| Changing password for root.
#| (current) UNIX password:
#| Enter new UNIX password:
#| Retype new UNIX password:
#|   ___      _           _     _  __  ___   _ _  _
#|  / _ \  __| |_ __ ___ (_) __| | \ \/ / | | | || |
#| | | | |/ _` | '__/ _ \| |/ _` |  \  /| | | | || |_
#| | |_| | (_| | | | (_) | | (_| |  /  \| |_| |__   _|
#|  \___/ \__,_|_|  \___/|_|\__,_| /_/\_\\___/   |_|
#|
#| Welcome to Armbian buster with Linux 5.4.19-odroidxu4
#|
#| System load:   2.23 0.79 0.28   Up time:       1 min
#| Memory usage:  6 % of 1993MB    IP:            192.168.1.232
#| CPU temp:      32°C
#| Usage of /:    29% of 7.1G
#|
#| New to Armbian? Check the documentation first: https://docs.armbian.com
#|
#|
#| Thank you for choosing Armbian! Support: www.armbian.com
#|
#| Creating a new user account. Press <Ctrl-C> to abort
#| Desktop environment will not be enabled if you abort the new user creation
#|
#| Please provide a username (eg. your forename): user
#| Trying to add user user
#| Adding user `user' ...
#| Adding new group `user' (1000) ...
#| Adding new user `user' (1000) with group `user' ...
#| Creating home directory `/home/user' ...
#| Copying files from `/etc/skel' ...
#| Enter new UNIX password:
#| Retype new UNIX password:
#| passwd: password updated successfully
#| Changing the user information for user
#| Enter the new value, or press ENTER for the default
#|         Full Name []: User
#|         Room Number []:
#|         Work Phone []:
#|         Home Phone []:
#|         Other []:
#| Is the information correct? [Y/n] y
#| Dear User, your account user has been created and is sudo enabled.
#| Please use this account for your daily work from now on.
Once done let's inspect system, and install a multi-cast DNS service that will help to connect remotely using SSH.
root@odroidxu4:~# cat /etc/os-release
#| PRETTY_NAME="Debian GNU/Linux 10 (buster)"
#| NAME="Debian GNU/Linux"
#| VERSION_ID="10"
#| VERSION="10 (buster)"
#| (...)

root@odroidxu4:~# df
#| Filesystem     1K-blocks   Used Available Use% Mounted on
#| udev              950928      0    950928   0% /dev
#| tmpfs             204128   6592    197536   4% /run
#| /dev/mmcblk1p1   7505192 498264   6915480   7% /
#| tmpfs            1020628      0   1020628   0% /dev/shm
#| tmpfs               5120      0      5120   0% /run/lock
#| tmpfs            1020628      0   1020628   0% /sys/fs/cgroup
#| tmpfs            1020628      0   1020628   0% /tmp
#| /dev/zram0         49584    632     45368   2% /var/log
#| tmpfs             204124      0    204124   0% /run/user/0

root@odroidxu4:~# sudo apt-get update
root@odroidxu4:~# sudo apt-get install avahi-daemon
root@odroidxu4:~# reboot
Once rebooted, let's login using SSH with hostname.local address instead of IP that may be different for each of us.
ssh root@odroidxu4.localOptionally you can skip or use this trick to preserve SD-card's life span. I just plugged a pair of USB sticks (of 4GB each) in the two USB3 ports of ODROID.
This extra USB mass storage will be used for swap memory and docker. once mounted as follow:
sudo=$(which sudo)

dev="/dev/disk/by-id/usb-Generic_Mass-Storage-0:0" # TODO
file "$dev"
fdisk -l $dev || lsblk # Update previous line

dev='/dev/sda' # TODO update
label="docker"
yes | ${sudo} mkfs.ext4 -L "$label" "$dev" # TODO: verify $disk variable

dev=/dev/sdb # TODO: update if needed
label="swap"
fdisk -l $dev
yes | $sudo mkswap -L "$label" "$dev"
free
#|              total        used        free      shared  buff/cache   available
#| Mem:        2041260      107724     1759992        6592      173544     1865772
#| Swap:       1020628           0     1020628
sudo swapoff -a
free
#
#|              total        used        free      shared  buff/cache   available
#| Mem:        2041260      106224     1761472        6592      173564     1867272
#| Swap:             0           0           0

$sudo swapon "/dev/disk/by-label/swap"
free
#|               total        used        free      shared  buff/cache   available
#| Mem:        2041260      107912     1759716        6592      173632     1865584
#| Swap:       3943420           0     3943420
Install docker to use other USB disk:
sudo apt-get install docker.io time git lsb-release file
#| Need to get 55.9 MB of archives.
#| After this operation, 255 MB of additional disk space will be used.
#| Do you want to continue? [Y/n] Y
#| (...)

dev="/dev/disk/by-label/docker"
mnt="/var/lib/docker"

df -h "$mnt"
# /dev/mmcblk1p1  7.2G  1.2G  6.0G  17% /
$sudo systemctl stop docker
$sudo sync
$sudo mkdir -p "$mnt"
$sudo mount "$dev" "$mnt"
df -h "$mnt" # /dev/sda        3.7G   16M  3.5G   1% /var/lib/docker
$sudo systemctl restart docker
$sudo docker version # 18.09.7
There are various way to use Mozilla WebThings platform, the simplest one would be to use the deb package built for Raspbian but ARMv6 version won't be optimized for our ARMv7 CPU.
So let's try to build it again on device using docker to make sure the whole process is replicable.
It was for latest release 0.11.0, so I published "webthings-gateway_0.11.0-1_armhf-debian-buster.deb" package at:
Feel free to install this one or rebuild on device using the following steps:
sudo apt-get install docker.io time git lsb-release file
sudo apt-get install time screen
url=https://github.com/mozilla-iot/gateway-deb.git
git clone --depth 1 --recursive "${url}"
cd gateway-deb
sudo time bash ./build-docker.sh

sudo docker image ls
#| REPOSITORY           TAG                 IMAGE ID            CREATED             SIZE
#| <none>               <none>              c0edf15b50a7        About an hour ago   122MB
#| gatewaydeb_default   latest              32e5bdf8321c        8 hours ago         843MB
#| <none>               <none>              51a23a2e7130        9 hours ago         1.04GB
#| Debian               10                  3eee7456d779        3 weeks ago         92.8MB

du -hsc ./dist/*
#| 21M     ./dist/WebThings-gateway_0.11.0-1_armhf-debian-buster.deb

sudo chmod -Rv 700  ./dist/WebThings-gateway_*.deb
sudo apt install -y ./dist/WebThings-gateway_*.deb
#| Need to get 0 B/40.5 MB of archives.
#| After this operation, 180 MB of additional disk space will be used.
#| Do you want to continue? [Y/n] Y
#| (...)

sudo rebootNow the most difficult part is done (no more command lines!)
let's wear the user hat and connect to the dashboard.
Welcome page should appear as:
 | Mozilla IoT
 | Welcome
 | Choose a secure web address for your gateway:
 | [subdomain].mozilla-iot.org
 | [Email]
 | [Create]
 | [Skip]
The gateway can be registered on mozilla.org for remote management, this is optional, so let's skip subdomain as we won't use the gateway from the Internet for our first experiment.
Next page will ask to create (local) credentials:
| Welcome
| Create your first user account:
| user: [user]
| email: [user@localhost]
| password: [password]
| password: [password]
| [Next]
And now we’re ready to add some WebThings .
You can start filling your dashboard with Virtual Resources,
First hit the "burger menu" icon on top left, go to settings page, and then go to the "addons" page.
There you can enable a "Virtual Things" adapter:
 | virtual-things-adapter
 | Mozilla IoT Virtual Things Adapter
 | by Mozilla IoT
Once enabled It should be listed on the adapters page:
| VirtualThingsAdapter (virtual-things)
You can then go back to the 1st "Things page" (it’s the first entry in the menu):
We can start adding "things" by pressing the bottom "+" button.
 | Virtual On/Off Color Light
 | Color Light
 | Save
Then press "Done" at bottom.
From this point, you can decide to control a virtual lamp from the UI, and even establish some basic rules (second entry in menu) with more virtual resources.

We just validated that our setup is working using mock devices, so next step is to look at other addons.
Today there are above 100, this is a great showcase of community contributions.
A typical use of add on adapter is to connect a device that speaks an other protocol, then the addon is just translated to WebThings abstractions so the gateway can support Zigbee, ZWave devices you'll find on the market.
That said some addons might not work flawlessly on our ODROID-XU4 setup, so please report issues to related projects, I (@rzr on github) 'll be glad to share hints or fixes.
It goes even beyond than that, any stuff that has an API can be managed using WebThings platform. As an example I made the Activity Pub adapter that allows to post a public message to mastodon social network when some conditions are met.
Automation are possible using the rule engine where user can link sensors to actuators to establish "smart behaviors".
Remote control is possible from a progressive web app served by the gateway itself.
In my opinion, This is much simpler and trustworthy than you are forced to install an app from a store on personal phones to get access to the devices you bought.
To conclude, Mozilla's WebThings project is a good demonstration about how a service could look same to user but is operated totally differently what you'll find today on the IoT market.
Your feedback is welcome, then WebThings can be detailed more.
- https://iot.mozilla.org/
- https://blog.mozilla.org/blog/2018/02/06/announcing-project-things-open-framework-connecting-devices-web/
- https://fosdem.org/2020/schedule/speaker/philippe_coval/
- https://www.hardkernel.com/shop/odroid-xu4-special-price/
- https://www.armbian.com/
- https://edpb.europa.eu/our-work-tools/public-consultations-art-704/2019/guidelines-42019-article-25-data-protection-design_en
- https://mastodon.social/@rzr/103805535349436510
- https://twitter.com/RzrFreeFr/status/1237784387346989057