Making Realtime Minimaps
For one of my projects, (a dungeon crawler) I decided I wanted a minimap to help the player navigate the levels.
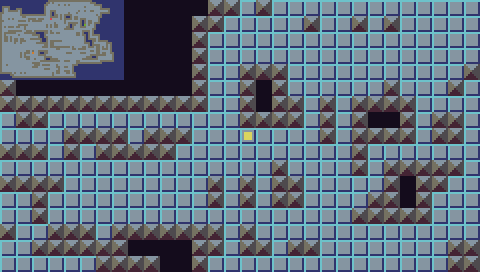
Here's a screenshot of what I wanted:
The levels are generated using the Drunk Walk algorithm so I wasn't going to be able to draw them beforehand.
I needed a way to read the map and draw a minimap based on the layout.
Immediately I thought of the pix() function.
this function is very straightforward.
It takes two or three arguments, based on the function you want:
pix( x_coor, y_coor, color_index)
This will take the pixel at the given (x,y) coordinates and make it the color you specified.
If you leave off the color_index, it will return the current color index of that pixel.
The idea of drawing the map is very similar to the section "Building Levels From Blueprints" in my tutorial on Using mset() and mget(). Again we will be using nested for loops to iterate over the entire map area. From there we will read each cell and decide what color pixel to draw based on the cell sprite's property. Here's the basic version:
--first some spite constants
SPACE=0
WALL=17

--also the map size
MINX=0
MAXX=30
MINY=0
MAXY=17

--here's the minimap function
function minimap_simple()
 --nested for loops again
 for x=MINX,MAXX-1 do
  for y=MINY,MAXY-1 do
   --check the cell property and assign an appropriate color

   --if it's a wall then make it DARK GREY
   if mget(x,y)>=WALL then pix(x,y,3) end

   --if it's not a wall then make it LIGHT GREY
   if mget(x,y)<WALL then pix(x,y,10) end

   --if it's a blank space then make it DARK BLUE
   if mget(x,y)==SPACE then pix(x,y,2) end
  end
 end
end
What's happening is we've checked if the cell is a solid or not (based on sprite placement) and draws the color we've chosen to represent that on the map. If you're confused by this then you really need to check out that tutorial on mset() and mget() here It goes into detail about setting "sprite properties".
If you look at the minimap screenshot above, You'll notice it also has three colored dots: RED GREEN and ORANGE. These represent the: PLAYER, EXIT, and ,KEY respectively. The way we make this work is to add three lines to the bottom of our code:
  --if the current pixel is over the player then make it red
  if p.x==x and p.y==y then pix(x,y,6) end

  --if the current pixel is over the exit then make it green
  if mset(x,y)==EXIT then pix(x,y,11) end

  --if the current pixel is over the key then make it orange
  if mset(x,y)==KEY then pix(x,y,9) end
This makes the little colored blips to help the player find all the stuff.
This is just a simple version...
Here's an example map, like you might find on a capture the flag game:
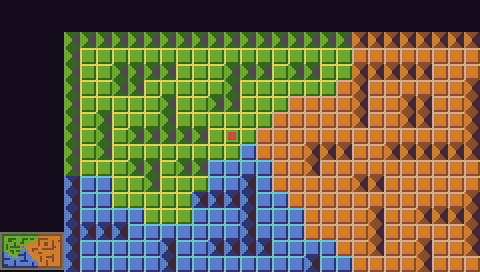
There's a few things we'll be doing to make this work like you see here. We'll add an offset to allow us to move the map to other areas on the screen. We'll also add more code to make a full colored map.
--sprite constants
SPACE=0
WALL=17

TILE_GREEN=1
TILE_BROWN=2
TILE_BLUE =3

WALL_GREEN=17
WALL_BROWN=18
WALL_BLUE =19

MOX=1     --minimap offset x
MOY=15*8-3 --minimap offset y

function mini_map()
 for x=-1,30 do
  for y=-1,17 do

   if mget(x,y)==TILE_GREEN then
    pix(x+MOX,y+MOY,11)

   elseif mget(x,y)==TILE_BROWN then
    pix(x+MOX,y+MOY,9)

   elseif mget(x,y)==TILE_BLUE then
    pix(x+MOX,y+MOY,8)

   elseif mget(x,y)==WALL_GREEN then
    pix(x+MOX,y+MOY,5)

   elseif mget(x,y)==WALL_BROWN then
    pix(x+MOX,y+MOY,4)

   elseif mget(x,y)==WALL_BLUE then
    pix(x+MOX,y+MOY,2)

   else
    pix(x+MOX,y+MOY,7) --space color
   end

   if x==p.x and y==p.y then
    pix(x+MOX,y+MOY,6) --player color
   end
  end
 end
end
This will make a color map, but you'll have to manually assign colors to each sprite. I am working towards making it read the average color of a sprite to use as the pixel color... but this is a plan for some time in the future.
Here's the code for the complete minimap above. It should be fairly straightforward to modify for other purposes:
-- title:  mini-map
-- author: Bear Thorne
-- desc:   a dynamically drawn minimap
-- script: lua

--sprite constants
SPACE=0
WALL=17

TILE_GREEN=1
TILE_BROWN=2
TILE_BLUE =3

WALL_GREEN=17
WALL_BROWN=18
WALL_BLUE =19

DUDE=33

MAXX=30
MAXY=17

U={x= 0,y=-1}
D={x= 0,y= 1}
L={x=-1,y= 0}
R={x= 1,y= 0}

DIRS={U,D,L,R}

MOX=1 --minimap offset x
MOY=15*8-3 --minimap offset y

p={x=1,y=1}

function mini_map()
 for x=-1,30 do
  for y=-1,17 do

   if mget(x,y)==TILE_GREEN then
    pix(x+MOX,y+MOY,11)

   elseif mget(x,y)==TILE_BROWN then
    pix(x+MOX,y+MOY,9)

   elseif mget(x,y)==TILE_BLUE then
    pix(x+MOX,y+MOY,8)

   elseif mget(x,y)==WALL_GREEN then
    pix(x+MOX,y+MOY,5)

   elseif mget(x,y)==WALL_BROWN then
    pix(x+MOX,y+MOY,4)

   elseif mget(x,y)==WALL_BLUE then
    pix(x+MOX,y+MOY,2)

   else
    pix(x+MOX,y+MOY,7) --space color
   end

   if x==p.x and y==p.y then
    pix(x+MOX,y+MOY,6) --player color
   end
  end
 end
end

function minimap_simple()
 for x=0,MAXX-1 do
  for y=0,MAXY-1 do
   if mget(x,y)>=WALL then pix(x,y,3) end
   if mget(x,y)<WALL then pix(x,y,10) end
   if x==p.x and y==p.y then pix(x,y,6) end
  end
 end
end

function clear_ahead(dir)
 if mget(p.x+dir.x,p.y+dir.y)<WALL_GREEN then
  return true
 else
  return false
 end
end

function draw()
 cls()
 map(p.x-14,p.y-8,MAXX,MAXY)
 minimap_simple()
 mini_map()
 spr(DUDE,14*8,8*8,0)
end

function TIC()

 if btnp(0,6,10)and clear_ahead(U) then p.y=p.y-1 end
 if btnp(1,6,10)and clear_ahead(D) then p.y=p.y+1 end
 if btnp(2,6,10)and clear_ahead(L) then p.x=p.x-1 end
 if btnp(3,6,10)and clear_ahead(R) then p.x=p.x+1 end

 draw()
end
This is the basic idea for minimaps... with a little work you could make it scroll to show a small portion of the map... or you could make it toggle on and off... or even use an item that could be found to show enemies or power-ups on the map.
Please feel free to use any portion of this code in your own projects. Just leave me a small credit at the top of you're file and bob's your uncle! :)
If you have questions or requests for future tutorials...email me at bearknucklesketching@gmail.com