Firmware Programming
NOTE: If you have a pre-assembled Greaseweazle device, or a kit with the MCU pre-soldered, then it is already programmed and you should skip this section!!
WARNING: All V4 devices are sold pre-programmed and end users should only need to perform firmware updates. However, the reflashing process is documented here in case a V4 device is ever somehow "bricked".
Firstly, the V4 board must be jumpered for programming mode:
- V4: Place a jumper across DFU and 3V3 pins on the 12-pin header block
- V4 Slim: Place a jumper across the BOOT pins on the 6-pin header block
Download and install the ArteryISP software (Windows only) via the Resources -> Tools -> ISP download link (described as In-System-Programming tool supporting AT32 MCU).
Download the latest firmware release from here.
Connect your V4 board to the Windows host machine, and run the ArteryISP software.
- Select Port Type USB DFU
- Confirm that the V4 board is found and listed
- Click Next until you reach the screen including Download to device
- Click Download to device
- Click Add and select the at32F4 hex file in the hex/ subfolder of the firmware release
- Click Next and then OK at the read-protection warning that is shown
- Click Close, disconnect the V4 board, remove the programming jumper
WARNING: Do not connect to the Greaseweazle USB port during programming. Greaseweazle is powered by your programmer: bad things may happen if you simultaneously provide USB power.
Programming requires an ST-Link v2 programmer, clones of which are available cheaply on Ebay. The clones are recommended over the official programmer because they are much cheaper, and because they also power the board during programming; the official programmer requires the Greaseweazle to be powered separately.
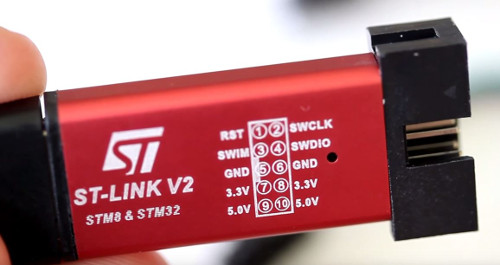
Connect the programmer to the DEBUG header of the F7 board, or the right-angle four-pin header of the Blue Pill board:
| Programmer | Blue Pill | F7 DEBUG |
|---|---|---|
| SWCLK | DCL | CK |
| SWDIO | DIO | DIO |
| GND | GND | GND |
| 3.3V | 3.3 | 3V31 |
- F7 PCB Rev 1: Pin is named VCC
WARNING: Do not connect to the programmer's 5.0V pin as you will destroy your STM32 chip!
Windows:
- Download the latest firmware zip file from here.
- Download and run the ST-Link software (STSW-LINK004).
- Connect your ST-Link programmer (not Greaseweazle!) to your Windows PC via USB.
- Click Connect to the target in the ST-Link software.
- Click Open file, navigate to the hex/ subfolder, and open the correct hex file for your board
- f1 hex file for Blue Pill, f7 hex file for F7 boards
- Click Program verify
MacOS / Linux:
- Download the latest firmware zip file from here.
- Install stlink:
brew install stlink - Connect your ST-Link programmer (not Greaseweazle!) to your Mac via USB.
- Identify the correct hex file for your board in the hex/ subfolder
- f1 hex file for Blue Pill, f7 hex file for F7 boards
- Write the file:
st-flash --reset --format ihex write filename - Ensure no errors were reported