Android
Table of Contents
- Download the Android SDK and NDK
- Initialize the Android Build Environment
- Create an AVD
- Download the Android Kernel Source Code
- Cross Compile the Kernel
- Emulate the Custom Kernel with your AVD
- Download and Cross Compile LiME
- Load the LiME LKM on the Android Device
- Extract the Memory Dump File
- Verify Your Dwarfdump Installation
- Build a Volatility Profile
- Examine the Memory Dump with Volatility
- Troubleshooting
- Related Links
Choose the proper packages for your host operating system. We strongly recommend doing this on Linux (x64 Ubuntu) or Mac. Windows is not currently supported. Download the "Bundle" option which includes the Eclipse IDE, platform tools, and Android Emulator.
- Android SDK: http://developer.android.com/sdk/index.html
- Android NDK: http://developer.android.com/tools/sdk/ndk/index.html
There is no installation, just extract the archives to disk in locations such as:
- ~/android-sdk
- ~/android-ndk
Type "java" into a terminal. If its not already installed, get the [http://www.oracle.com/technetwork/java/javase/downloads/index.html Sun Java JDK] and make sure "java" is in your PATH.
Follow the instructions described at the URLs below:
- Initialize a build environment: http://source.android.com/source/initializing.html
- Download the source code: http://source.android.com/source/downloading.html
- Build the system: http://source.android.com/source/building.html
Our exact steps for Mac OS X are shown below.
$ hdiutil create -type SPARSE -fs 'Case-sensitive Journaled HFS+' -size 40g ~/android.dmg
created: /Users/Michael/android.dmg.sparseimage

$ hdiutil attach ~/android.dmg.sparseimage -mountpoint /Volumes/android
/dev/disk2              GUID_partition_scheme
/dev/disk2s1            EFI
/dev/disk2s2            Apple_HFS                       /Volumes/android

$ curl https://storage.googleapis.com/git-repo-downloads/repo > repo
  % Total    % Received % Xferd  Average Speed   Time    Time     Time  Current
                             Dload  Upload   Total   Spent    Left  Speed
100 22889  100 22889    0     0  26917      0 --:--:-- --:--:-- --:--:--  137k

$ chmod a+x repo

$ mkdir /Volumes/android/dev
$ cd /Volumes/android/dev

$ ~/repo init -u https://android.googlesource.com/platform/manifest
Get https://gerrit.googlesource.com/git-repo/clone.bundle
Get https://android.googlesource.com/platform/manifest
  % Total    % Received % Xferd  Average Speed   Time    Time     Time  Current
                                 Dload  Upload   Total   Spent    Left  Speed
100 96126  100 96126    0     0   333k      0 --:--:-- --:--:-- --:--:-- 1445k
Receiving objects: 100% (398/398), 85.13 KiB, done.
Resolving deltas: 100% (143/143), done.

$ ~/repo sync
.....
Checking out files: 100% (96/96), done.
Checking out files: 100% (453/453), done.ng out files:  16% (77/453)
Checking out files: 100% (4428/4428), done.
Syncing work tree: 100% (316/316), done.

$ source build/envsetup.sh
including device/generic/armv7-a-neon/vendorsetup.sh
including device/generic/armv7-a/vendorsetup.sh
including device/generic/mips/vendorsetup.sh
including device/generic/x86/vendorsetup.sh
including sdk/bash_completion/adb.bash

$ lunch full-eng
PLATFORM_VERSION_CODENAME=AOSP
PLATFORM_VERSION=4.2.2.2.2.2.2.2.2.2
TARGET_PRODUCT=full
TARGET_BUILD_VARIANT=eng
TARGET_BUILD_TYPE=release
TARGET_BUILD_APPS=
TARGET_ARCH=arm
TARGET_ARCH_VARIANT=armv7-a
HOST_ARCH=x86
HOST_OS=darwin
HOST_OS_EXTRA=Darwin-10.8.0-i386-64bit
HOST_BUILD_TYPE=release
BUILD_ID=OPENMASTER
OUT_DIR=out

$ echo $PATH
/System/Library/Frameworks/JavaVM.framework/Versions/1.6/Home/bin:/Volumes/android/dev/out/host/darwin-x86/bin:/Volumes/android/dev/prebuilts/gcc/darwin-x86/arm/arm-linux-androideabi-4.7/bin:/Volumes/android/dev/prebuilts/gcc/darwin-x86/arm/arm-eabi-4.7/bin:/Volumes/android/dev/prebuilts/gcc/darwin-x86/mips/mipsel-linux-android-4.7/bin:/Volumes/android/dev/development/emulator/qtools:/Volumes/android/dev/prebuilts/gcc/darwin-x86/arm/arm-linux-androideabi-4.7/bin:/Volumes/android/dev/prebuilts/gcc/darwin-x86/arm/arm-eabi-4.7/bin:/Volumes/android/dev/development/scripts:/Library/Frameworks/Python.framework/Versions/2.7/bin:/usr/bin:/bin:/usr/sbin:/sbin:/usr/local/bin:/usr/local/git/bin:/usr/local/MacGPG2/bin:/usr/X11/bin
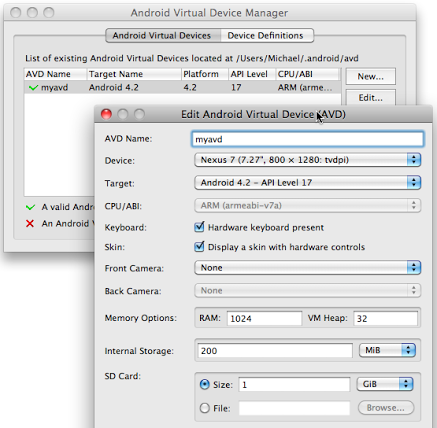
After extracting the SDK, you should create Virtual Android Device (AVD). The easier way is to launch Eclipse and go to Window -> Android Virtual Device Manager, however you can also use the command-line android tool.
Create a new AVD for your desired target device (Galaxy Nexus, Nexus One, etc). If you plan to dump memory to your sdcard, make sure to assign enough room to the sdcard.
Get the kernel source code from your device manufacturer's website. If you just want to experiment with Android memory analysis and you don't have an Android device, you can use the Android Emulator (a.k.a Goldfish) source code, as shown below:
$ git clone https://android.googlesource.com/kernel/goldfish.git ~/android-source
Cloning into '/Users/Michael/android-source'...
remote: Total 2442118 (delta 2048282), reused 2442118 (delta 2048282)
Receiving objects: 100% (2442118/2442118), 501.84 MiB | 395 KiB/s, done.
Resolving deltas: 100% (2048284/2048284), done.

$ cd ~/android-source/

$ git branch -a
* master
  remotes/origin/HEAD -> origin/master
  remotes/origin/android-goldfish-2.6.29
  remotes/origin/android-goldfish-3.4
  remotes/origin/linux-goldfish-3.0-wip
  remotes/origin/master

$ git checkout -t remotes/origin/android-goldfish-2.6.29 -b goldfish
Checking out files: 100% (26821/26821), done.
Branch goldfish set up to track remote branch android-goldfish-2.6.29 from origin.
Switched to a new branch 'goldfish'
When you're done, you should have a directory layout similar to the following:
$ ls ~/android-source/
COPYING     Kbuild      Makefile    arch        drivers     include     kernel      net     security    usr
CREDITS     Kconfig     README      block       firmware    init        lib     samples     sound       virt
Documentation   MAINTAINERS REPORTING-BUGS  crypto      fs      ipc     mm      scripts     tools
Set the following environment variables to assist with cross-compilation.
$ export ARCH=arm
$ export SUBARCH=arm
$ export CROSS_COMPILE=arm-eabi-
Before you can compile the kernel, you need a working config. If you are working with a real Android device, and it exports its config (not all of them do), you can pull it off the device using adb (Android Debug Bridge):
$ cd ~/android-sdk/platform-tools
$ ./adb pull /proc/config.gz
Once you have config.gz, decompress it, and copy it to your ~/android-source directory as ".config". Alternately, if you're working with the Goldfish Emulator, there's a pre-existing config you can use located at ~/android-source/arch/arm/configs/goldfish_armv7_deconfig.
$ make goldfish_armv7_defconfig
........
arch/arm/configs/goldfish_armv7_defconfig:294:warning: override: FB_EARLYSUSPEND changes choice state
#
# configuration written to .config
#
Once your .config is in the ~/android-source directory, ensure the following settings exist and are enabled.
CONFIG_MODULES=y
CONFIG_MODULES_UNLOAD=y
CONFIG_MODULES_FORCE_UNLOAD=y
Now you can build the kernel. If all goes well, you'll have a new ~/android-source/arch/arm/boot/zImage file.
$ make
.....
  CC      arch/arm/boot/compressed/misc.o
  LD      arch/arm/boot/compressed/vmlinux
  OBJCOPY arch/arm/boot/zImage
  Kernel: arch/arm/boot/zImage is ready
  Building modules, stage 2.
  MODPOST 1 modules
  CC      drivers/hid/hid-dummy.mod.o
  LD [M]  drivers/hid/hid-dummy.ko
$ cd ~/android-sdk/sdk/tools/

$ ./emulator -avd myavd -kernel ~/android-source/arch/arm/boot/zImage -show-kernel -verbose
emulator: found SDK root at /Users/Michael/android-sdk/sdk
emulator: Android virtual device file at: /Users/Michael/.android/avd/myavd.ini
emulator: virtual device content at /Users/Michael/.android/avd/myavd.avd
emulator: virtual device config file: /Users/Michael/.android/avd/myavd.avd/config.ini
emulator: using core hw config path: /Users/Michael/.android/avd/myavd.avd/hardware-qemu.ini
emulator: Found AVD target API level: 17
emulator: 'magic' skin format detected: 800x1280
emulator: autoconfig: -skin 800x1280
emulator: autoconfig: -skindir (null)
emulator: writing default keyset file to /Users/Michael/.android/default.keyset
emulator: found SDK root at /Users/Michael/android-sdk/sdk
emulator: trying to load skin file '/Users/Michael/android-sdk/sdk/tools/lib/emulator/skins/dynamic//layout'
emulator: loaded dynamic skin width=800 height=1280 bpp=16

emulator: autoconfig: -ramdisk /Users/Michael/android-sdk/sdk/system-images/android-17/armeabi-v7a//ramdisk.img
emulator: Using initial system image: /Users/Michael/android-sdk/sdk/system-images/android-17/armeabi-v7a//system.img
emulator: autoconfig: -initdata /Users/Michael/.android/avd/myavd.avd/userdata.img
emulator: autoconfig: -cache /Users/Michael/.android/avd/myavd.avd/cache.img
emulator: autoconfig: -sdcard /Users/Michael/.android/avd/myavd.avd/sdcard.img
emulator: Physical RAM size: 1024MB
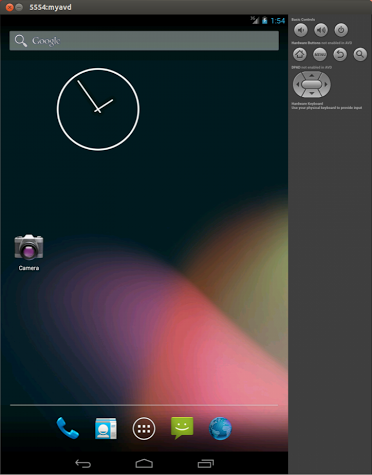
You should see an emulated Android device on your screen now, such as the following:
For the most up to date instructions on compiling LiME, see the project's documentation.
Below, we checked out trunk, made the following changes to the Makefile for cross-compiling.
$ git clone https://github.com/504ensicsLabs/LiME.git
$ cd LiME/src
$ svn diff
Index: Makefile
===================================================================
--- Makefile    (revision 14)
+++ Makefile    (working copy)
@@ -26,12 +26,12 @@
 lime-objs := tcp.o disk.o main.o

 KVER := $(shell uname -r)
-
+KDIR_GOLDFISH := ~/android-source
+CCPATH := ~/android-ndk/toolchains/arm-linux-androideabi-4.7/prebuilt/darwin-x86/bin
 PWD := $(shell pwd)

 default:
-   $(MAKE) -C /lib/modules/$(KVER)/build M=$(PWD) modules
-   strip --strip-unneeded lime.ko
-   mv lime.ko lime-$(KVER).ko
+   $(MAKE) ARCH=arm CROSS_COMPILE=$(CCPATH)/arm-linux-androideabi- -C $(KDIR_GOLDFISH) EXTRA_CFLAGS=-fno-pic M=$(PWD) modules
+   mv lime.ko lime-goldfish.ko

    $(MAKE) tidy
The final step is to make and then verify that you have an output lime-goldfish.ko file.
$ make
$ ls
Makefile        Makefile.sample     disk.c          lime-goldfish.ko    lime.h          main.c          tcp.c
We use the Android Debug Bridge (adb) to upload the LiME driver onto the device:
$ cd ~/android-sdk/sdk/platform-tools/
$ ./adb push ~/lime-forensics/src/lime-goldfish.ko /sdcard/lime.ko
238 KB/s (10716 bytes in 0.043s)
As described in the LiME documentation, you can either acquire memory over TCP or to your device's sdcard. We will use the sdcard method.
$ adb shell
root@android:/ # insmod /sdcard/lime.ko "path=/sdcard/lime.dump format=lime"
root@android:/ # ls -al /sdcard/lime.dump
----rwxr-x system   sdcard_rw 872415264 2013-02-25 16:48 lime.dump
The adb channel is slow, so its not good for transferring large files. We can use TSK to extract the lime.dump file from our device's sdcard. When executing the emulator with -verbose, you see a line like this:
emulator: autoconfig: -sdcard /Users/Michael/.android/avd/myavd.avd/sdcard.img
That tells you where the emulated sdcard device exists on your host operating system.
$ fls -r /Users/Michael/.android/avd/myavd.avd/sdcard.img
d/d 3:  LOST.DIR
d/d 6:  .android_secure
r/r 8:  lime.dmp
v/v 33423107:   $MBR
v/v 33423108:   $FAT1
v/v 33423109:   $FAT2
d/d 33423110:   $OrphanFiles

$ icat /Users/Michael/.android/avd/myavd.avd/sdcard.img 8 > ~/lime.dmp
The next step will require a working dwarfdump installation. If you're on Linux, try apt-get install dwarfdump or the libdwarf-tools package. The stock dwarfdump command in OS X does not support the -d parameter, so if you're on a Mac, then you must build a new one from source.
First build libdwarf and then build dwarfdump (no make install for either):
$ tar -xvzf libdwarf-20130207.tar.gz
$ cd dwarf-20130207/libdwarf
$ ./configure && make
$ cd ../dwarfdump
$ ./configure && make
Don't make install, because that may overwrite the dwarfdump that came with your Mac. Just record the full path to your new dwarfdump command so you can refer to it later.
Get Volatility 2.3 or greater, if you don't already have it and change into the linux directory:
$ git clone https://github.com/volatilityfoundation/volatility.git ~/android-volatility
$ cd ~/android-volatility/tools/linux
Edit the Makefile like so:
obj-m += module.o
KDIR := ~/android-source
CCPATH := ~/android-ndk/toolchains/arm-linux-androideabi-4.7/prebuilt/darwin-x86/bin
DWARFDUMP := /Users/Michael/Downloads/dwarf-20130207/dwarfdump/dwarfdump
-include version.mk
all: dwarf
dwarf: module.c
    $(MAKE) ARCH=arm CROSS_COMPILE=$(CCPATH)/arm-linux-androideabi- -C $(KDIR) CONFIG_DEBUG_INFO=y M=$(PWD) modules
    $(DWARFDUMP) -di module.ko > module.dwarf
Then make the module.ko driver. The output should be a non-empty module.dwarf file.
$ make
$ head module.dwarf

.debug_info

<0><0x0+0xb><DW_TAG_compile_unit> DW_AT_producer<GNU C 4.7> DW_AT_language<DW_LANG_C89> DW_AT_name</Users/Michael/Desktop/volatility_android/tools/linux/module.c> DW_AT_comp_dir</Users/Michael/android-source> DW_AT_stmt_list<0x00000000>
<1><0x1d><DW_TAG_base_type> DW_AT_byte_size<0x00000004> DW_AT_encoding<DW_ATE_unsigned> DW_AT_name<long unsigned int>
<1><0x24><DW_TAG_pointer_type> DW_AT_byte_size<0x00000004> DW_AT_type<<0x0000002a>>
....
Now combine module.dwarf and the System.map from your android kernel source code into a zip file. Put it in the volatility/plugins/overlays/linux directory of your Volatility package:
$ zip ~/android-volatility/volatility/plugins/overlays/linux/Golfish-2.6.29.zip module.dwarf ~/android-source/System.map
  adding: module.dwarf (deflated 90%)
  adding: Users/Michael/android-source/System.map (deflated 73%)
Android is based on Linux so you can use any of the Linux Command Reference to analyze your memory dump.
$ cd ~/android-volatility/

$ python vol.py --info | grep Linux
Volatility Foundation Volatility Framework 2.4
LinuxGolfish-2_6_29x86 - A Profile for Linux Golfish-2.6.29 x86

$ python vol.py --profile=LinuxGolfish-2_6_29x86 -f ~/lime.dump linux_pslist
Volatility Foundation Volatility Framework 2.4
Offset     Name                 Pid             Uid             Gid    DTB        Start Time
---------- -------------------- --------------- --------------- ------ ---------- ----------
0xf3812c00 init                 1               0               0      0x33b04000 2013-02-25 16:42:16 UTC+0000
0xf3812800 kthreadd             2               0               0      ---------- 2013-02-25 16:42:16 UTC+0000
0xf3812400 ksoftirqd/0          3               0               0      ---------- 2013-02-25 16:42:16 UTC+0000
.....
If you get the following error:
$ make
....
scripts/mod/mk_elfconfig.c:4:17: error: elf.h: No such file or directory
scripts/mod/mk_elfconfig.c:9: warning: unused variable ‘ei’
make[2]: *** [scripts/mod/mk_elfconfig] Error 1
make[1]: *** [scripts/mod] Error 2
make: *** [scripts] Error 2
Install Libelf from http://freecode.com/projects/libelf. Then copy elf.h to /usr/include. This should only be necessary on Mac.
If you get the following error:
$ make
....
  CC      net/netfilter/xt_tcpudp.o
  CC      net/netfilter/xt_CLASSIFY.o
make[2]: *** No rule to make target `net/netfilter/xt_CONNMARK.o', needed by `net/netfilter/built-in.o'.  Stop.
make[1]: *** [net/netfilter] Error 2
make: *** [net] Error 2
Disable CONFIG_NETFILTER in the kernel's .config. This should only be necessary on Mac.
-
http://blog.opensecurityresearch.com/2012/04/acquiring-volatile-memory-from-android.html - "Acquiring volatile memory from Android based devices with LiME Forensics, Part I" By Ismael Valenzuela
-
http://digitalforensicssolutions.com/papers/android-memory-analysis-DI.pdf - "Acquisition and analysis of volatile memory from android devices" by Joe Sylve, Andrew Case, Lodovico Marziale, and Golden G. Richard.
-
http://blog.markloiseau.com/2012/07/how-to-compile-the-android-goldfish-emulator-kernel/ - "How to compile the Android Goldfish kernel" by Mark Loiseau
-
https://source.android.com/source/downloading.html - "Downloading the Source"