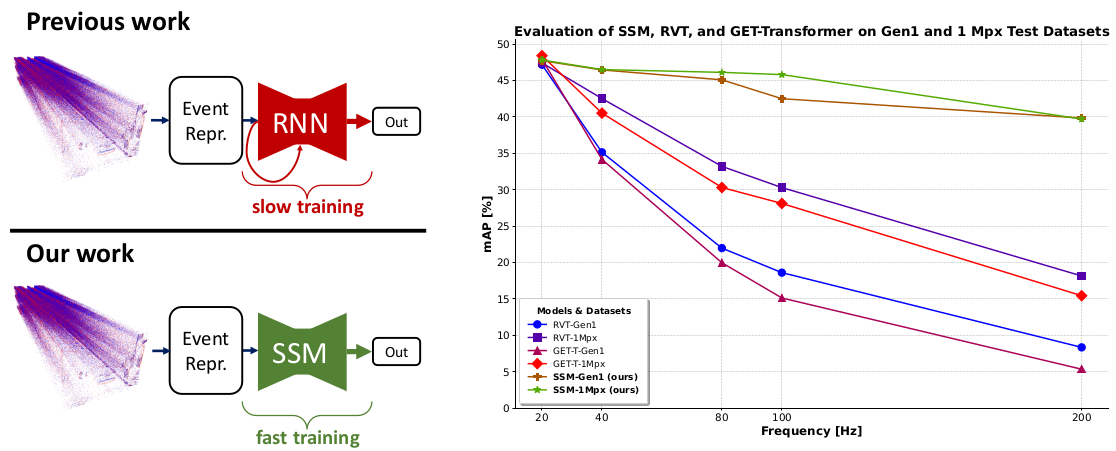
This is the official PyTorch implementation of the CVPR 2024 paper State Space Models for Event Cameras.
April. 19th, 2024: The code along with the best checkpoints is released! The poster and video will be released shortly before CVPR 2024.
If you find this work and/or code useful, please cite our paper:
@InProceedings{Zubic_2024_CVPR,
  author  = {Zubi\'c, Nikola and Gehrig, Mathias and Scaramuzza, Davide},
  title   = {State Space Models for Event Cameras},
  booktitle = {Proceedings of the IEEE/CVF Conference on Computer Vision and Pattern Recognition (CVPR)},
  year    = {2024},
}- S5 model used in our SSM-ViT pipeline can be seen here.
- In particular, S5 is used instead of RNN in a 4-stage hierarchical ViT backbone, and its forward function is exposed here. What is nice about this approach is that we do not need a 'for' loop over sequence dimension, but instead we employ a parallel scanning algorithm. This model assumes that a hidden state is being carried over.
- For a model that is standalone, and can be used for any sequence modeling problem, one does not use by default this formulation where we carry on the hidden state. The implementation is the same as the original JAX implementation and can be downloaded in zip format from ssms_event_cameras/RVT/models/s5.zip.
We highly recommend using Mambaforge to reduce the installation time.
conda create -y -n events_signals python=3.11
conda activate events_signals
conda install pytorch==2.2.1 torchvision==0.17.1 torchaudio==2.2.1 pytorch-cuda=11.8 -c pytorch -c nvidia
pip install lightning wandb pandas plotly opencv-python tabulate pycocotools bbox-visualizer StrEnum hydra-core einops torchdata tqdm numba h5py hdf5plugin lovely-tensors tensorboardX pykeops scikit-learn To evaluate or train the S5-ViT model, you will need to download the required preprocessed datasets:
| 1 Mpx | Gen1 | |
|---|---|---|
| pre-processed dataset | download | download |
| crc32 | c5ec7c38 | 5acab6f3 |
You may also pre-process the dataset yourself by following the instructions.
| S5-ViT-Base | S5-ViT-Small | |
|---|---|---|
| pre-trained checkpoint | download | download |
| S5-ViT-Base | S5-ViT-Small | |
|---|---|---|
| pre-trained checkpoint | download | download |
-
Evaluation scripts with concrete parameters that we trained our models can be seen here.
-
Set
DATA_DIRas the path to either the 1 Mpx or Gen1 dataset directory -
Set
CKPT_PATHto the path of the correct checkpoint matching the choice of the model and dataset -
Set
MDL_CFG=baseorMDL_CFG=small
to load either the base or small model configuration.
-
Set
GPU_IDto the PCI BUS ID of the GPU that you want to use. e.g.GPU_ID=0. Only a single GPU is supported for evaluation
python RVT/validation.py dataset=gen4 dataset.path=${DATA_DIR} checkpoint=${CKPT_PATH} \
use_test_set=1 hardware.gpus=${GPU_ID} +experiment/gen4="${MDL_CFG}.yaml" \
batch_size.eval=12 model.postprocess.confidence_threshold=0.001python RVT/validation.py dataset=gen1 dataset.path=${DATA_DIR} checkpoint=${CKPT_PATH} \
use_test_set=1 hardware.gpus=${GPU_ID} +experiment/gen1="${MDL_CFG}.yaml" \
batch_size.eval=8 model.postprocess.confidence_threshold=0.001We set the same batch size for the evaluation and training: 12 for the 1 Mpx dataset, and 8 for the Gen1 dataset.
Evaluation should give the same results as shown below:
- 47.7 and 47.8 mAP on Gen1 and 1 Mpx datasets for the base model, and
- 46.6 and 46.5 mAP on Gen1 and 1 Mpx datasets for the small model.
-
Set
DATA_DIRas the path to either the 1 Mpx or Gen1 dataset directory -
Set
MDL_CFG=baseorMDL_CFG=small
to load either the base or the small configuration.
-
Set
GPU_IDSto the PCI BUS IDs of the GPUs that you want to use. e.g.GPU_IDS=[0,1]for using GPU 0 and 1. Using a list of IDS will enable single-node multi-GPU training. Pay attention to the batch size which is defined per GPU. -
Set
BATCH_SIZE_PER_GPUsuch that the effective batch size is matching the parameters below. The effective batch size is (batch size per GPU)*(number of GPUs). -
If you would like to change the effective batch size, we found the following learning rate scaling to work well for all models on both datasets:
lr = 2e-4 * sqrt(effective_batch_size/8). -
The training code uses W&B for logging during the training. Hence, we assume that you have a W&B account.
- The training script below will create a new project called
ssms_event_cameras. Adapt the project name and group name if necessary.
- The training script below will create a new project called
- The effective batch size for the 1 Mpx training is 12.
- For training the model on 1 Mpx dataset, we need 2x A100 80 GB GPUs and we use 12 workers per GPU for training and 4 workers per GPU for evaluation:
GPU_IDS=[0,1]
BATCH_SIZE_PER_GPU=6
TRAIN_WORKERS_PER_GPU=12
EVAL_WORKERS_PER_GPU=4
python RVT/train.py model=rnndet dataset=gen4 dataset.path=${DATA_DIR} wandb.project_name=ssms_event_cameras \
wandb.group_name=1mpx +experiment/gen4="${MDL_CFG}.yaml" hardware.gpus=${GPU_IDS} \
batch_size.train=${BATCH_SIZE_PER_GPU} batch_size.eval=${BATCH_SIZE_PER_GPU} \
hardware.num_workers.train=${TRAIN_WORKERS_PER_GPU} hardware.num_workers.eval=${EVAL_WORKERS_PER_GPU}
If you for example want to execute the training on 4 GPUs simply adapt GPU_IDS and BATCH_SIZE_PER_GPU accordingly:
GPU_IDS=[0,1,2,3]
BATCH_SIZE_PER_GPU=3- The effective batch size for the Gen1 training is 8.
- For training the model on the Gen1 dataset, we need 1x A100 80 GPU using 24 workers for training and 8 workers for evaluation:
GPU_IDS=0
BATCH_SIZE_PER_GPU=8
TRAIN_WORKERS_PER_GPU=24
EVAL_WORKERS_PER_GPU=8
python RVT/train.py model=rnndet dataset=gen1 dataset.path=${DATA_DIR} wandb.project_name=ssms_event_cameras \
wandb.group_name=gen1 +experiment/gen1="${MDL_CFG}.yaml" hardware.gpus=${GPU_IDS} \
batch_size.train=${BATCH_SIZE_PER_GPU} batch_size.eval=${BATCH_SIZE_PER_GPU} \
hardware.num_workers.train=${TRAIN_WORKERS_PER_GPU} hardware.num_workers.eval=${EVAL_WORKERS_PER_GPU}This project has used code from the following projects:

