Troubleshooting DisplayMagician
If you've just installed DisplayMagician and you're not sure how to use it, have a look at the Initial DisplayMagician Setup page. It will guide you through setting up DisplayMagician properly.
Windows 11 has made some small changes to the display configuration returned from the Windows Display API, but those changes are enough to stop DisplayMagician from working.
Unfortunately, if you have a Display Profile that you created in Windows 10, it will NOT work with Windows 11. You will need to delete any Windows 10 Display Profiles, and you will need to recreate them on Windows 11. These new Windows 11 Display Profiles will work.
If you have any Game Shortcuts that used the Windows 10 Display Profiles then you will need to edit each of them, and select one of the new Windows 11 Display Profiles as the one used by that Game Shortcut.
This error is generally due to the way the game loads. DisplayMagician attempts to figure out what game processes have been loaded, but some games are pretty darn sneaky in how they load up. DisplayMagician's process monitoring sometimes gets confused, and monitors the incorrect process. An example of that is Assetto Corsa Competitione.
But have no fear! You can **easily ** override the automatic detection by manually choosing the exe to monitor.
- Run your game yourself from your game launcher (e.g. Steam) and wait for it to start
- Press Ctrl + Shift + Esc to start Task Manager
- Change to the 'Details' tab
- Look through Task Manager for any Process names with the same name as the game (e.g. AC2-Win64-Shipping.exe, acc.exe)
- Look at the memory usage column, and figure out which process is using the most amount of memory...that's probably the game! (AC2-Win64-Shipping.exe in my example at 3GB memory usage versus acc.exe at 3MB)
- Take note of the process name of the game executable you want to monitor and try and shutdown the game.
- Next, find the game executable on your computer (e.g. AC2-Win64-Shipping.exe) so that you know where it is
- Once you have found the game executable, edit your game shortcut in DisplayMagician.
- Click on the 'Choose Game to start' tab
- Check the 'Monitor different executable' checkbox
- Click on the 'Choose' button, and select the game executable you found earlier (e.g. AC2-Win64-Shipping.exe)
- Save your Game Shortcut, and (hopefully) now DisplayMagician will monitor your game correctly!
Note: If DisplayMagician doesn't work with that game executable, try a different one. One of them will work, you just need to find the best one!
You've previously saved a DisplayMagician Display Profile, and you've been using it fine, then one day, when DisplayMagician loads, it tells you that your display configuration hasn't been saved! (see the image below for an example)
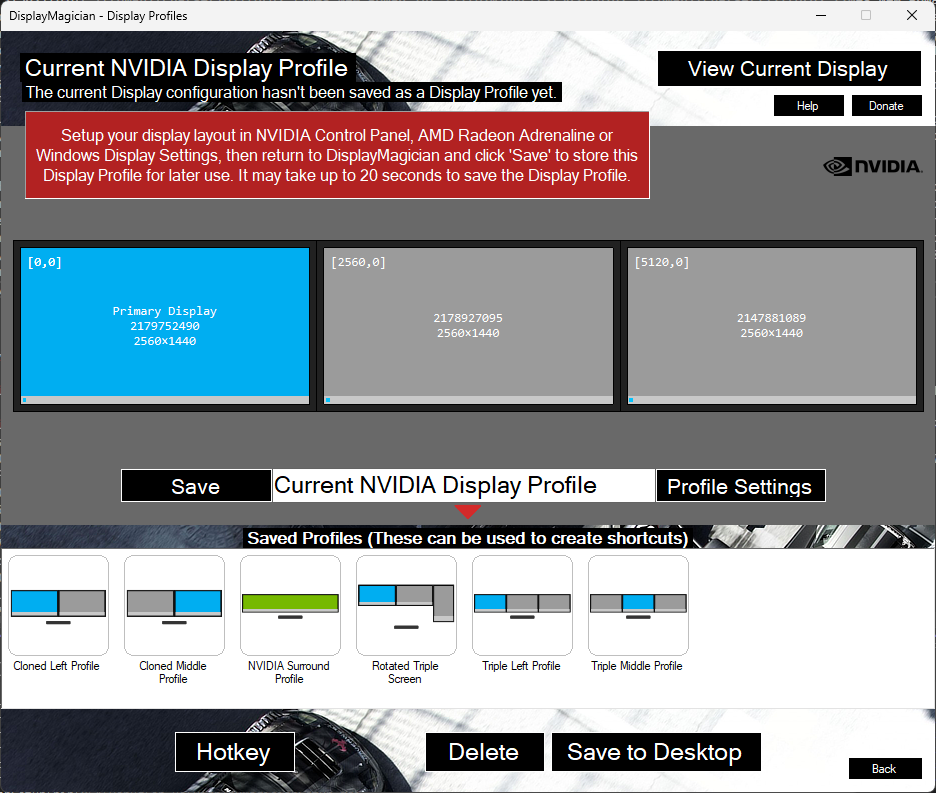
This is due to one or more display settings currently being used being different from the settings in the saved display profile.
In the image above, you can see that the display layout that DisplayMagician has shown looks very similar to 'Triple Left Profile', so it would seem like the Display Profiles should match. But they don't. This means that at least one setting is different between both the display profiles.
This issue can be caused by changing settings in NVIDIA Control Panel, AMD Radeon Software Adrenaline or Windows Display Settings, or by running any other software that makes display settings changes. Upgrading your video card driver may also adjust settings, and therefore stop the DisplayMagician display profile from matching.
NOTE: You will still be able to use your new Display Profile, it just won't 'match' the Display Profile currently in use, so DisplayMagician will always ask you to save your new profile when you are in the Display Profiles window.
What do I do?
In this case, the only solution to get rid of this annoying error is to recreate your Display Profile again. The easiest way to do this is to click on the 'old' Display Profile ('Triple Left Profile' in my example image) and apply it, then once it has been applied, save a new Display Profile with a new name. This new profile will then match correctly when DisplayMagician starts.
You can then delete the old Display Profile, but please note if you choose to do so, then you will need to also update all your Game Shortcuts to use the new Display Profile as well so that they will still work.
The NVIDIA Control Panel doesn't update the 3D Settings window when DisplayMagician makes changes. This means that if your Display Profile makes changes to the NVIDIA 3D Settings, then those updated values won't be shown in the NVIDIA 3D Control Panel until you exit and restart the NVIDIA 3D Control Panel. Once you have restarted the NVIDIA 3D Control Panel and go back to the 3D Settings window you should see the correct values.
This isn't really an NVIDIA bug, but more that the NVIDIA Control Panel believes it should be the only thing changing the NVIDIA 3D settings (which is a fair enough assumption to have!). So just remember that sometimes you may need to restart the NVIDIA Control Panel to be able to see what NVIDIA values are really set.
Some people prefer to have a single 'setup my PC for racing' Game Shortcut that they can use for any racing game. They then do all their racing, and then when they are ready, then run another DisplayMagician Game Shortcut to set everything back to the way it was.
DisplayMagician wasn't really designed for doing this, but it can be done.
Firstly, you need to create a game shortcut that doesn't run a game, and that doesn't revert everything back once the game is finished - it's permanent. You need to create a new game shortcut, and set the '5. What happens after' options to leave things permanently set when finished. You also want to select 'No Game' for the monitoring option. You then go ahead and select the Display Profile you want to apply, and add any Start Programs you want to run. Save that as a shortcut. You will click on that shortcut when you want to set up your PC for racing.
Next, create another game shortcut, also with no game monitored, and set to leave the settings permanent. The difference is that we want this game shortcut to shutdown all the start programs that you started in the first game shortcut. You can do this by running a taskkill command for each process that was started in the other game shortcut.
In this way you would use one game shortcut to set things up, and the other game shortcut to tear things down.
An example is probably in order. Let's say you start your 'Heusinkveld Smart Control' software in your first game shortcut. In your second game shortcut you want to stop that software. In order to stop the software we need to know what the process name is, so that we can stop it.
How do you find the process name? The easiest way is to look at Windows Task Manager and look at the list of processes and find Heusinkveld Smart Control in that list. Right-click on the Windows Start Button, and select Task Manager from the menu shown. Click on the 'Details' tab so that you can see all the processes running in Windows. Windows uses process names that are the same name as the exe that runs, but minus the '.exe'. So to get the process name all you do is take the name from the Name column in the Details view in Task Manager, and you ignore the '.exe'.
For example Heusinkveld Smart Control 1.4.1 has an executable name of 'SmartControl V1.4.1.exe'. The Process Name is therefore 'SmartControl V1.4.1'. This becomes important when we want to stop the process.
As we want to stop Heusinkveld Smart Control 1.4.1, we can use that process name in the following taskkill command:
taskkill /FI "imagename eq SmartControl*"
Note the extra * in the command above. This is a wildcard character, meaning that it makes taskkill any processes whose process names start with SmartControl. This means that the above command will still keep working even if we upgrade to Heusinkveld Smart Control 1.4.2 - something we probably want to happen :).
If you prefer PowerShell, then you can use the following Powershell command instead:
Stop-Process -Name "SmartControl*"
Hope that helps! Good luck.