A plugin for the Vim editor for handling any interpreter in a Notebook style.
This plugin is intended to create documents with an interpreter running in the background and evaluating some "cells" containing code whenever asked. Of course, it is very easy to execute some code from vim, but the standard way of doing it will involve a new session of the interpreter at each call, losing variables, etc. With this plugin, a single interpreter is waiting in the background with a persistent state between calls.
It follows the philosophy of the Vim editor better than some similar plugins: rather than launching an interactive interpreter within a buffer, it keeps it in the background and makes it write into the buffer when the user needs it.
Since version 1.2.0 the plugin is compatible with the vim-markdown plugin (by Tim Pope). Fenced code blocks are now detected and correctly handled.
Thus, Vim will behave like several well-known "notebook" software:
- iPython Notebook
- Maple
- Mathematica
- etc.
It has been tested with several interpreters and seems to work well with Julia,
Octave, Maxima, GNU APL, J, etc. as well as with some standard tools
like bc or sh.
A demo can be seen there (another one which is related to the Julia programming language can also be found there).
The plugin uses Unix background processes, special files, etc. and will only work on Unix-like operating systems; it has been tested under Linux and Mac OS X.
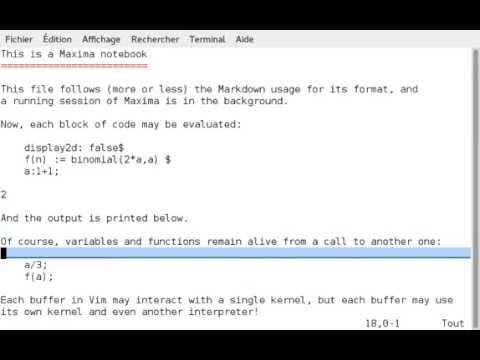
When the kernel is launched, the filetype of the document will be set to "markdown" and the standard syntax file for the Markdown type will be used; syntax highlighting will also be enabled. This standard syntax file defines a "markdownCodeBlock" element made with lines of code beginning with 4 spaces:
this is an example of "markdownCodeBlock"
When the cursor is on such a line, using the NotebookEvaluate command will make the whole
block (no matter where the cursor is exactly in the block) be sent to the interpreter
and the output will be printed below.
Of course, the document may contain anything else: headers, text, etc. It should follow the Markdown style, though it is not absolutely mandatory.
Just copy the notebook.vim file in your ~/.vim/plugin directory.
By default, the plugin will use sh when launched; you will have to configure it
for the interpreter you want to use.
Several global variables are involved in the configuration of the plugin; you should set them in your ~/.vimrc configuration file.
You should probably map the the NotebookEvaluate command to some convenient key.
For instance:
map µ :NotebookEvaluate<CR>
will map the µ key to the function evaluating code blocks.
The code block being evaluated can be highlighted until the output has been printed:
let g:notebook_highlight = 1
By default, the cursor is on the last line of the output after evaluation. If you want rather the cursor staying at the initial location, just set:
let g:notebook_resetpos = 1
The previous setting has no effect when evaluating all the cells at a time.
Many famous interpreters are given below; you will find relevant settings for them. However, you may want to configure some settings by yourself; here are the options used by the plugin.
The main option is g:notebook_cmd which contains the command for starting the
interpreter. Most of the time it is the name of your interpreter (sometimes you
may want to add some "quiet" flags for reducing the output). Sometimes, the
interpreter has to be encapsulated in some other command for solving issues (see
below).
The g:notebook_sendinit option allows to send some initialization command; for
instance it should be used for disabling prompts, removing any escape sequences, etc.
After each block of code sent to the interpreter, an "invisible" command is sent
to it for making an arbitrary key being printed; generally some print or echo
command will be used for that purpose; that command is in g:notebook_send.
Intercommunication between processes can be easely lost as soon as the previous
key isn't detected properly; with many interpreters, each new command will be
interpreted even if an error has occured. However an extra command may be
sent after the block of code and before the request for the key. If g:notebook_send0
is not an empty string, it is sent to the interpreter before the previous command.
In order to let the plugin know that the evaluation of the block is finished, it
has to detect the arbitrary key printed by the interpreter. The g:notebook_detect option must contain the exact line written by the interpreter. Some
interpreters add spaces before or after the printed key and they have to be included; such spaces may be difficult to detect when trying to configure the plugin, and it is suggested to study the behaviour of your interpreter in a script session (editing the typescript file after that will allow to see if spaces
have been added anywhere).
The plugin is intended to handle the interpreter in the cleanest way; a command
has to be provided for closing it properly; it is set in g:notebook_stop.
Just start it with:
:NotebookStart
(or add some shortcut in your configuration file).
Then, a block of code (at the position of the cursor) may be evaluated with:
:NotebookEvaluate
The whole notebook document may be evaluated with:
:NotebookEvaluateAll
The kernel may be stopped with one of the two following commands:
:NotebookStop
:NotebookClose
The kernel may be stopped and restarted with:
:NotebookRestart
By default the plugin uses /bin/sh as an internal process; it is known to work
also with bash. You may set this with:
let g:notebook_shell_internal = '/bin/sh'
let g:notebook_shell_internal = '/bin/bash'
etc.
in your configuration file; it looks like some interpreters work better with bash and you should try it if you encounter some issues.
Not all interpreters will work with the plugin, but it is intended to allow many ways of hacking and you should be able to use many different programs anyway. Have a look at different settings in order to understand them.
The interpreter should not use any buffering when writing to the standard output.
If it is the case, it should still be possible to use the interpreter with the
help of the stdbuf command (see below).
This is the default setting:
let g:notebook_cmd = '/bin/sh 2>&1'
let g:notebook_stop = 'exit'
let g:notebook_send = 'echo NOTEBOOK-VIM-INTERNAL-KEY'
let g:notebook_detect = 'NOTEBOOK-VIM-INTERNAL-KEY'
let g:notebook_send0 = ''
The first line is the command to be used for starting the interpreter. In order
to catch error messages as well we added 2>&1 to the command.
The second line is the command to be sent to the interpreter for leaving.
The third line is a command for the interpreter making it print some arbitrary
and complicated string. The fourth line is the exact string printed by the
interpreter from the previous command.
The last line is a hack; here no setting is provided; some more complicated
interpreters may need it (see below).
let g:notebook_cmd='bc 2>&1'
let g:notebook_stop='quit'
let g:notebook_send='print \"VIMBCNOTEBOOK\n\"'
let g:notebook_detect="VIMBCNOTEBOOK"
let g:notebook_send0=""
The settings are similar to the previous ones.
let g:notebook_cmd='dc 2>&1'
let g:notebook_stop='q'
let g:notebook_send='[][VIMDCNOTEBOOK][]pnnpn'
let g:notebook_detect='VIMDCNOTEBOOK'
let g:notebook_send0=''
The settings are similar to the previous ones.
let g:notebook_cmd='~/contribs/julia/julia -qi'
let g:notebook_stop='exit()'
let g:notebook_send0=""
let g:notebook_send='println(); println(\"VIMJULIANOTEBOOK\")'
let g:notebook_detect='VIMJULIANOTEBOOK'
Ocatve should work with no problem with following settings:
let g:notebook_cmd='octave'
let g:notebook_stop='exit'
let g:notebook_send='printf \"VIMOCTAVENOTEBOOK\n\"'
let g:notebook_detect='VIMOCTAVENOTEBOOK'
let g:notebook_send0=""
let g:notebook_shell_internal = '/bin/bash'
It looks like the shell sh does not work here.
The plugin was written with Maxima in mind and it should work quite well with it. But since Maxima can be compiled in many different ways, the following settings may have to be adjusted. Here are some working settings:
let g:notebook_cmd='stdbuf -i0 -o0 -e0 /usr/bin/maxima'
   \ . ' --disable-readline --very-quiet'
let g:notebook_stop="quit();"
let g:notebook_send0="\;"
let g:notebook_send='print(\"VIMMAXIMANOTEBOOK\")\$'
let g:notebook_detect='VIMMAXIMANOTEBOOK '
The command is prefixed with stdbuf -i0 -o0 -e0 in order to unbuffer the following
command because intercommunication between processes is highly sensitive and the
whole system could be stuck otherwise.
The last line contains an espace character in the string; this is because Maxima
seems to add an espace when printing the string. If you encounter some issues with
these settings, you should carefully study wether your version of Maxima behaves
like that or not (you can do it by launching Maxima in a script session and then
study the resulting typescript file).
Furthermore, the g:notebook_send0 setting may be used here. It will send
some more characters after each command and before asking for the internal key.
If this setting is not used, the user should never forget the final ; in
the code being evaluated. If the ; (or $ character) is forgotten, the whole
session will be lost and the kernel will have to be killed and restarted.
Several hacks can be used; the user can choose to never use the ; but to add it
in the g:notebook_send0 variable:
let g:notebook_send0="\;"
Adding ; by mistake will print an error message but the communication between
processes will remain alive.
Another strategy can be something like that:
let g:notebook_send0=" 0\$"
Now the user has to use the ; (or $) syntax; a strange error will be printed
when forgotten but the communication between processes will remain alive also.
The plugin should work well with Pari-GP; however it has been tested with an old out-of-date version of Pari-GP; the settings should be something like:
let g:notebook_cmd='gp -q'
let g:notebook_stop='quit()'
let g:notebook_send='print(\"VIMPARIGPNOTEBOOK\");'
let g:notebook_detect='VIMPARIGPNOTEBOOK'
let g:notebook_send0=''
let g:notebook_sendinit='default(\"readline\",0); default(\"colors\",\"no\");'
The julia interpreter seems to work very well with the plugin:
let g:notebook_cmd='julia'
let g:notebook_stop='exit()'
let g:notebook_send0=''
let g:notebook_send='println(\"VIMJULIANOTEBOOK\")'
let g:notebook_detect='VIMJULIANOTEBOOK'
The scilab-cli-bin client has to be installed; then usable settings are:
let g:notebook_cmd = '{ script -qfc scilab-cli-bin /dev/null; }'
    \ . ' | grep --line-buffered -Pv "\x0d$"'
let g:notebook_stop = "quit"
let g:notebook_send0=""
let g:notebook_send = 'disp(\"VIMSCILABNOTEBOOK\")'
let g:notebook_detect = ' VIMSCILABNOTEBOOK   '
Output is not absolutely perfect however.
It is possible to use the Wolfram engine with the plugin. It has to be launched
in a pseudo-terminal with script. Right now, the output contains many escape
sequences; how to clean it will be explained later.
let g:notebook_cmd='{ script -c wolfram /dev/null; }'
let g:notebook_stop="Quit"
let g:notebook_send0=""
let g:notebook_send='Print []; Print [ \"VIMWOLFRAMNOTEBOOK\" ]; Print []'
let g:notebook_detect='VIMWOLFRAMNOTEBOOK'
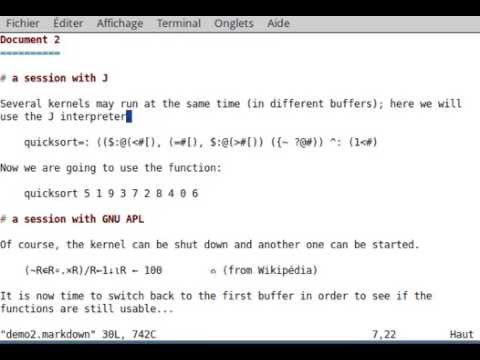
GNU APL works very well with the following settings:
let g:notebook_cmd = '/home/pi/APL/svn/trunk/src/apl --noSV --rawCIN --noColor'
let g:notebook_stop = ')OFF'
let g:notebook_send0=""
let g:notebook_send = "'VIMGNUAPLNOTEBOOK'"
let g:notebook_detect = 'VIMGNUAPLNOTEBOOK'
Nick Nickolov, the author of NGN APL, was kind enough to add the ⎕off command in order to
make its interpreter compatible with the plugin. Later he also made his interpreter
easier to embed in vim-notebook. First check you have the last version of
NGN APL. Of course, you must install nodejs in order to make it work. The following settings
work very well:
let g:notebook_cmd = 'nodejs ~/APL/apl.js --linewise'
let g:notebook_stop = "⎕off"
let g:notebook_send0=""
let g:notebook_send = "'VIMNGNAPLNOTEBOOK'"
let g:notebook_detect = 'VIMNGNAPLNOTEBOOK'
Dyalog APL works very well with the following settings (tested on a Raspberry Pi):
let g:notebook_cmd = 'dyalog'
let g:notebook_stop = ")off"
let g:notebook_send0=""
let g:notebook_send = "'VIMDYALOGAPLNOTEBOOK'"
let g:notebook_detect = 'VIMDYALOGAPLNOTEBOOK'
let g:notebook_shell_internal = '/bin/sh'
The three-spaces prompt may be an issue. A quick fix can be:
let g:notebook_cmd = '~/j/j801/bin/jconsole'
let g:notebook_stop = "exit ''"
let g:notebook_send0="''"
let g:notebook_send = "'VIMJNOTEBOOK'"
let g:notebook_detect = '   VIMJNOTEBOOK'
You have to be careful when copying lines 3 (no-op like) and 5 (with three spaces).
The interpreter for the R programming language works very well with the following settings:
let g:notebook_cmd='R --vanilla --no-readline --slave'
let g:notebook_stop='q()'
let g:notebook_send0=""
let g:notebook_send='cat(\"VIMRNOTEBOOK\n\")'
let g:notebook_detect="VIMRNOTEBOOK"
I don't use this interpreter myself, but sinc eI am interested in APL variants, I downloaded the free version and saw if I could make it work. It seems to work very well with the following settings:
let g:notebook_cmd='/home/thomas/q/l32/q'
let g:notebook_stop='\\\\'
let g:notebook_send0=""
let g:notebook_send='\"VIMQNOTEBOOK\"'
let g:notebook_detect='\"VIMQNOTEBOOK\"'
Of course, you will have to change the path of your executable command.
I don't use FriCAS much, but I think the following settings should work fine:
let g:notebook_cmd='{ script -qfc "fricas -nogr -noht -nox -noclef" /dev/null; }'
  \ . '| grep --line-buffered -Pv "\x0d$"'
let g:notebook_stop=')quit'
let g:notebook_send0=""
let g:notebook_send='output \"\"; output \"VIMFRICASNOTEBOOK\"'
let g:notebook_detect='   VIMFRICASNOTEBOOK'
I don't use OpenAxiom much, but I think the following settings should work fine:
let g:notebook_cmd='{ script -qfc "open-axiom -nogr -noht -nox -noclef" /dev/null; }'
  \ . '| grep --line-buffered -Pv "\x0d$"'
let g:notebook_stop=')quit'
let g:notebook_send0=""
let g:notebook_send='output \"\"; output \"VIMOPENAXIOMNOTEBOOK\"'
let g:notebook_detect='   VIMOPENAXIOMNOTEBOOK'
Two things may complicate the configuration: buffering and detection of a terminal.
If the interpreter uses buffering when printing to its output stream, the plugin
will not be able to detect the key at the end of the evaluation. In some cases
you can easely fix it by using stdbuf. For instance with Maxima:
let g:notebook_cmd='stdbuf -i0 -o0 -e0 /usr/bin/maxima'
   \ . ' --disable-readline --very-quiet'
Another issue can result when the interpreter has two different behaviours, one
when connected to a terminal (interactive use) or to a pipe (batch use). Whta you
want is probably the interactive use; this can be solved with script. For instance
you can start bc with
let g:notebook_cmd='{ script -c bc /dev/null; }'
Older versions of NGN APL were needing the following syntax; I leave it here in order to help integrating new interpreters:
let g:notebook_cmd = '{ script -qfc "nodejs ~/Downloads/apl.js" /dev/null; }'
  \ . ' | grep --line-buffered -Pv "\x0d$"'
In the main video, interpreters are launched from a menu. This menu is not a part of
the plugin; however I add my personal mynotebook.vim plugin containing my own
settings; you may hack it according to your own needs. This second plugin basically
adds a menu configuring vim-notebook for each interpreter.
In my own .vimrc I mapped the menu to the ~ key:
map ² :emenu Notebook.<C-Z>
An older demo can be seen there.