Apple II
The Apple ][ was the first complete home computer to hit American store shelves. It soon became historically significant as one of the longest lasting computer series, introduced in 1978 and chugging all the way to the late 80s.
A good price for a functional Apple ][ unit by itself (with disk drive, of course!) is $50-70. If it is bundled with extras (expansion cards, monitors, peripherals), higher prices might be a good deal. Avoid overpaying unless there are tons of extras bundled in, or it is an extremely rare unit.
Tip: Sometimes these old home computers have yellowed over time, due to the deterioration of the flame retardant within. But don't bother paying top dollar for a pearly white case. Just make some Retrobright and spread it over the case to clean that yucky color away.
-
Apple ][c - If you're a first time buyer, the Apple ][c is strongly recommended, since it is quite common, and integrates all the important expansion cards into the motherboard; nowadays, those cards are rare and expensive. This model also packs in the "mousetext" graphics from the ][e Enhanced, making it the most graphically capable.
- Apple ][c Plus - This was the best Apple ][ ever produced (until the ][gs); and thus, it is an expensive collectible. It integrated a CPU accelerator card that allowed it to run at 10MHz, along with all the Apple ][c features. It also has modern amenities, such as a typical PSU three-prong power supply, and a hardier 3.5-inch floppy drive (working blank disks are easier to obtain). However, the ][c Plus was not as popular in it's day, since nearly all genuine Apple ][ software was released on 5-inch drives. This means that you must use or write disk images from ADTPro or the Apple ][ Pi.
-
Apple ][e - If you want an Apple ][ that really does look "retro", look for an Apple ][e. It is hands down the most common system, yet retains that old-timey feel.
- Apple ][e machines shipped with two expansion cards; the 16K of additional RAM (giving you 64K), which allows you to use most of the Apple ][ programs; and the all important Floppy Disk driver.
- Apple ][ and ][+ These were the very first Apple ][ machines made; and they're for collectors only. They're not as common and are hard to come across at a good price. Also, these machines require a ton of expansion cards to make them usable with most Apple ][ programs. Some of the earliest machines don't even include a floppy disk card, as Steve Wosniak hadn't invented them yet!
The Apple ][GS is the final line of evolution in the Apple ][ series. It came with a very nice multi-color Trinitron display (while most Apple ][ systems had green screens), so this is probably the better bet if you want to seriously use a Raspberry Pi with it.
However, it is much closer to the 16-bit Amiga or later Macintoshes, than the ancient Apple ][ itself, so the ][GS gets it's own section.
The Apple ][e is capable of using up to 7 expansion cards. And you're going to need them, especially the Apple Super Serial Card II and the Floppy Disk card.
Before you continue, make sure that all the cards are in the correct slots (the previous owner might have misplaced them). The Floppy Disk must be in Slot 6 for most programs to recognize it. Slot 3 cannot really be used, since it is reserved for the 80-column card (yes, even though nothing is in it).
- Anything
- Super Serial Card
- Empty (Don't put a card here, unless it is an accelerator card)
- Mouse Card
- Anything
- Floppy Disk Card
- Anything
On the Apple ][e, the 8th expansion slot below the row of 7 slots is reserved for the 80-column card. It is strongly recommended that you purchase an Extended 80 Column/64K RAM card to place into it, if you haven't already: Most of the later Apple ][ programs require 128K of RAM, and will usually only recognize this card (such as PRODOS 8).
Since the Apple ][ was invented before the advent of floppy disks, all Apple ][, ][+, and ][e models came with two 3.5mm audio jacks for recording and importing data from an audio cassette tape.
Nowadays, floppy disks are rare and difficult to collect, so crafty Apple ][ fans have invented the Apple II Game Server, whereby you connect your computer or iPhone to the cassette jack, and play audio files to send games to the Apple ][.
You can even write floppy disk software, such as ProDOS or ADTPro, to blank 360K 5.25-inch floppies (which you can find here for a dollar per disk) using the Apple II Disk Server. Amazing.
And don't forget that you can double the space of your 5.25-inch floppies by punching a hole on the left, and flipping it over. Though that's not without it's risks...
ADTPro makes it possible to communicate or send disk images to the Apple ][e or ][gs over a serial cable or a network connection. A2Server extends this by using a Raspberry Pi and it's serial port to initiate connection.
Since floppy disks are getting rarer and are beginning to fall apart, this is probably the best way to run software on your good ol' Apple ][ (though of course you could use the good ol' cassette input, but that was discontinued after the Apple ][e).
The most accessible and cheapest way to interact with the Apple ][ Serial port is with a Raspberry Pi, and a $3 RS-232 Serial Adapter.. ADTPro is based on Java, so it's no hassle to work with on Linux.
The Raspberry Pi is a $25 Linux ARM PC, which has rekindled the command-line "home computer" market in a cheap new form. When Apple ][ enthusiasts chalked up the features they wanted in a proposed modern Apple ][ successor; the Raspberry Pi fit all the criteria, 10 years later.
The most important mod you can do with the Apple ][ is to plug in a Raspberry Pi through the serial port. This allows the Raspberry Pi to access the keyboard, any Apple ][ peripherals, and even use the disk drive.
The Raspberry Pi can also send disk images to the Apple ][. Better yet, it can even emulate a max speed, max RAM Apple ][GS
There are three methods to get a serial connection:
Note: Unfortunately, the Apple ][ Pi card manufacturer is sold out of cards, and is in the process of redesigning the cards to work with the RPi Model B+.
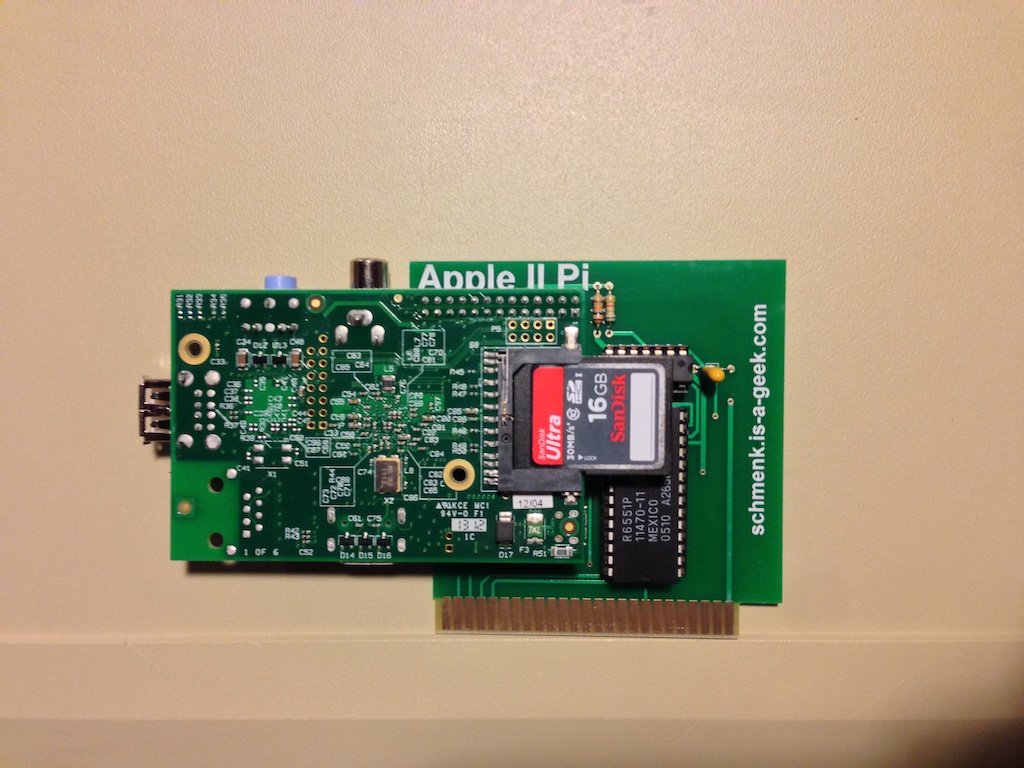
You can buy a nice little preprinted Apple ][ Pi card from Ultimate Apple ][ for $70 ($120 bundled with RPi and all cables).
Since the Apple ][ Pi card schematics are open source, you can wire your own card using a $5 Apple ][ breadboard card, the serial chip, a soldering iron, and tons of wires.
This is the cheapest method; and how Apple ][ Pi was originally developed. You just plug the RPi into the Apple ][ with a serial cable. While the concept is not as jaw-dropping as literally plugging the Raspberry Pi as an expansion card, all the features and performance is exactly the same.
This is the only method compatible with the Apple ][c; obviously because the Apple ][c has no space for expansion cards.
See the ADTPro documentation for more information; the cables required are exactly the same. Also, you'll probably need to use ADTPro to create the A2Pi floppy boot disk.
-
Super Serial Card (Apple ][, Apple ][+, Apple ][e) - These models require the Super Serial Card for serial output. This card uses the DB-25 jack, so you might need a coupler.
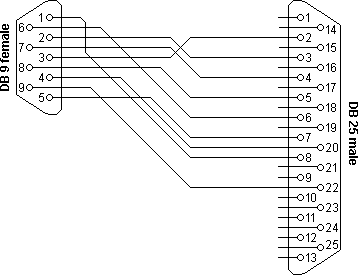
- RS-232 DB-9 Male to DB-25 Male cable (or) DB-9 cable + DB-9 to DB-25 coupler.
-
Apple ][c - This model has the SuperSerialCard built right into the motherboard. However, it uses a DE-9/DIN-5 jack for serial output, so you need to find a special cable. This cable must also give off a null modem output, so it has to be specially made.
- RS-232 DB-9 Male to DE-9/DIN-5 Female (with null modem output) - The first entry on Retrofloppy
- Apple ][gs and ][c+ - These models use MiniDIN8 jacks. However, the ][GS probably requires a SuperSerialCard (not sure if it works through this jack... Though ADTPro does, so I don't see any reason why not.)
The best place to buy cables that are known to work on the Apple ][ is Retrofloppy.
All you need to connect the Raspberry Pi to the serial port is a MAX3232 module; which can be found for just $3-5 on eBay. Make sure you get one with the serial port attached, and some GPIO wires bundled.
If you purchase it straight from the manufacturer in China, it will take several weeks to ship; so look for a US seller..
- $4 - nyplatform
- $6 - timbo-0012
- $6 - chesr_2013
- Search for more US sellers on eBay...
After that, you need to buy an RS-232 DB-9 Male to DB-25 Male cable (find the shortest one possible). Or coupler, if you plan to stuff the whole thing into the Apple ][. You can easily find one of these cables in the junkyard on the cheap; if not, buy one from eBay or Amazon for $5.

However, I happened to find something even better: a DB-9 Male Serial ribbon to 10 pin jumper, which replaces the existing jumper on the serial card itself. These were often used on old PC clones as a serial extension that would plug straight into the motherboard.

You can just unscrew the side screws with an adjustable wrench, as depicted below:

And then, just plug the DB-9 ribbon into the card itself. One interesting thing is that the Super Serial Card itself has the 10th pin
Then, you should first set up the Apple IIe with ADTPro, so you can
Once you've received the card, follow this diagram to plug the serial module into the RPi. Then plug the RS-232 DB-9 Male to Male cable into the Apple ]['s serial port.
Follow the manual provided here.
The Apple ][ Pi software can be downloaded from here.

I bought my Apple ][e from a liquidation auction, with a monitor and a single disk drive for $80 (local pickup, so no shipping costs).
Unfortunately, when I finally managed to bring it home, I found that the 5 keystem was broken. Perhaps it was damaged during transit. Worse yet, the 5-key was held down by the broken switch, making it impossible to type in any commands.
Normally, I would have just replaced that one broken key. Unfortunately, the keys are soldered in and are difficult to remove; and it is a weak, rare ALPs keystem, which I can't even find on eBay and is physically pin-incompatible with the improved SMK black keystem.
I took the easy way out, shelling out about $30 for a new keyboard + case, which was not fun.
- Apparently the Apple ][e Enhanced/Platinum keyboard (the one with the numpad) [works out of the box without having to reflash the keyboard chip.
- However, I lost that auction, so I bought a conventional Apple ][e keyboard + case from the exact same model. It was an easy replacement.
Later on, I actually found a soldering iron, and was able to 3D Print a replacement keystem to repair the 5 key (the wonders of technology!).
The first step was to to desolder the broken 5 keystem and see what's wrong. After just barely managing to fumble through my first desolder job, I managed to free the keystem. After disassembly, I discovered that the keystem had snapped into three pieces. It was a surprisingly fragile, almost flat single piece of plastic. (The black keystem is significantly in improved, such that this kind of crap is less likely to happen)
Thankfully, at my college we had a 3D printing club just for this purpose. Although there was an existing keystem design for Datanetics keyswitches, mine was an ALPS 5F. I designed my own simplified copy of the keystem, printed it on the cheap (with ABS), and put it into the switch. After soldering the keystem back on the board, the 5-key worked perfectly.
Due to an accidental slip, I accidentally shaved some of the silicon off the board; but I patched the hole up with electrical tape, and the keyboard still worked for the most part.
This leftover, spacious Apple ][e case and working keyboard gave me an idea for a conceptual Accurate Emulation Arcade.
In any case, this Apple ][e did not come with a SuperSerialCard (costs $30-50 on eBay), and I just wasn't willing to blow another $70 on the Apple ][ Pi card; which was sold out anyway.
There was a SuperSerialCard that came up for $15, so I bought it. The Apple ][ Pi mod would definitely bump up the value.
Off to eBay it goes.
The first step is to get make everything white and presentable again with Retrobright. Buyers will pay a significantly higher price if the bundle looks almost like new.
After cleaning the ugly yellow color off and replacing the keyboard, this machine was ready to go on sale, as a nice bundle.
To bump up it's value, I advertised it with the following:
- Like new white case! No Yellowing.
- (If I ever do it) Comes with the Apple ][ Pi, a Raspberry Pi attached to the serial port for floppy disk emulation, Linux OS, even an Apple ][GS emulator; all of which works through the original Apple ][ keyboard, joystick, and mouse. This is better than just a simple CF card; and you're going to need it, since 5 1/4" floppies are rare.
- Comes with 1 Apple Monitor 2, 1 Apple floppy disk drive, component cable, power cable.
In the end, it sold for $130-200, which is a nice profit for all the troubles I went through. Heck, it even paid for my Apple ][c.
The Apple ][c is a smaller, lighter, prettier version of the Apple ][, using the "Snow White" design language. Although it has no expansion card slots, it integrates all 64K RAM, mouse ports, and SuperSerialCard features into the motherboard itself; so you've got the basics down.
Although the lack of expansion ability was scandalous at the time; Nowadays, ironically, an Apple ][c is more economical than the Apple ][e for the new collector, especially since Apple ][ expansion cards are a pain to find.
The Apple ][c uses a custom, proprietary power adapter; unlike the Apple ][, which used a plain ol' PSU plug that desktop PCs still use to this day.
Thankfully, these power adapters are still being custom made for only $20. It's a godsend when Apple's 20 year old adapters are starting to fall apart. You can find them on eBay from these suppliers:
In case these sellers go defunct, you want to try using camcorder batteries, or you just want to make your own adapter; here are the schematics for the Apple IIc Power Adapter.
The Apple ][c I purchased cost only $20 plus $30 shipping. However, I paid the price for cheaping out: The Apple ][c was extremely dusty, and dirty, and the serial ports were rusted. The capacitor on the internal power card, and the floppy drive motor cover seems to be somewhat corroded; this seems to be a common issue and the ][c still powers up; but I have my doubts. The original owner must have left it in the garage.
After dusting off decades of fluff off the motherboard, (which you can see in the beautiful photo above) I finally managed to plug it in, turn it on with the TV, and it worked. At least it runs the disk drive correctly.
Unfortunately, the keyboard also had 6 nonfunctioning keyswitches. Thankfully, the ][c's broken keyswitches don't repeat; which crippled my ][e. I could have lived with it, except for one serious issue: the Return keyswitch doesn't work. This means I cannot even enter a single complete command.
Thankfully, the Apple ][c uses the Alps SKCL/SKCM "Salmon" keyswitches, which are extremely common in keyboards of the 1980's. Generally, Alps switches don't age well (especially when put in poor conditions), but they are very common, are well documented, and have known repair methods.
The first step is to fix the current keyswitches, as described in these guides. Since the keyswitches' metal prongs probably aren't hitting the contacts well, the problem is easily solved by bending the prongs. This blogger has done a similar repair for his Apple ][c. This repair requires no desoldering, just use two flathead screwdrivers to pick off the keystem.
First, pull out the Alps keycaps. You may need to use one of these Macguyver switch pullers (or just buy one from $5) Then, use a tweezer (or two credit cards) to pull apart the latches, just enough to pull the keystem out.
The keystem will come apart into four pieces: the cover, the keystem, the spring, and the metal contacts. Left on the board is the soldered contact.
First, wash the cover and the keystem, if the key tends to be a little "sticky". Then, dust off the contacts And usually, the metal contacts have been bent out of shape, such that they fail to touch the soldered contact. Just bend the metal actuator forward a bit (not too much, or the key will be hard to press) and it should be good. For a bonus mod, make the switches clickier by bending some pins.
Reassembly can be a challenge. Just put the spring and the metal contact on the board, and push the keystem/cover down on top of it, until it clicks. Make sure that the key feels right (not too easy to yield, not to hard to press); if not, you'll need to disassemble it again.
If you really need to (this is the absolute last resort), you could desolder the bad keyswitches, and replace them with Alps SKBL/SKBM switches.. It's not easy to find these switches a la carte, (though Matias switches should work) but they are so common that I might as well grab an old Alps keyboard and strip it for switches. Since even the keys that do work are a little dodgy and sticky, I might as well replace all of them; though one step at a time.
This is a very nice Trinitron monitor that came with the Apple ][GS; it also works with and fits with the style of the Apple ][c. I'm still looking for one under $50.
If I ever get it, I will also try and obtain an Apple ][GS unit, so that my Apple ][ Pi will be able to use all the amazing 16-bit colors instead of the Apple ]['s 8-bit.
It would also be awesome to use the Apple ][c with it's original flat-panel display. Games are not really easy here, but this calculator style LCD is for work on the go, not play.
Unfortunately these screens are rare and go for $150.

- Viper4Android
-
Oculus Rift DK2
- Kinect + Oculus Rift
- Nokia Lumia 1020
- Wolfson DAC
- OpenPandora
- HTC HD2
- Nokia N900
- Sony Ericsson Series
- Compaq Pocket PC Keyboard
- Windows for DOSBox
- Libreboot/Coreboot
- Phoenix BIOS Crisis Recovery - For pre-UEFI ThinkPads.
- Bricked T430 Motherboard
- HPLIP Printers - A massive family of common and cheap printers, that you can probably find from the junkyard. Most of them use open source drivers, and all work out of the box with Linux and HPLIP. Great for printing Bitcoin paper wallets.