Releases: SmoothWAN/SmoothWAN
SmoothWAN 0.99.9 HF5

Quick Setup Follow Up
Click to expandGL.iNet installation
For Flint users using old firmware <4.0 click here
- Click on the blue link ending with "luci"
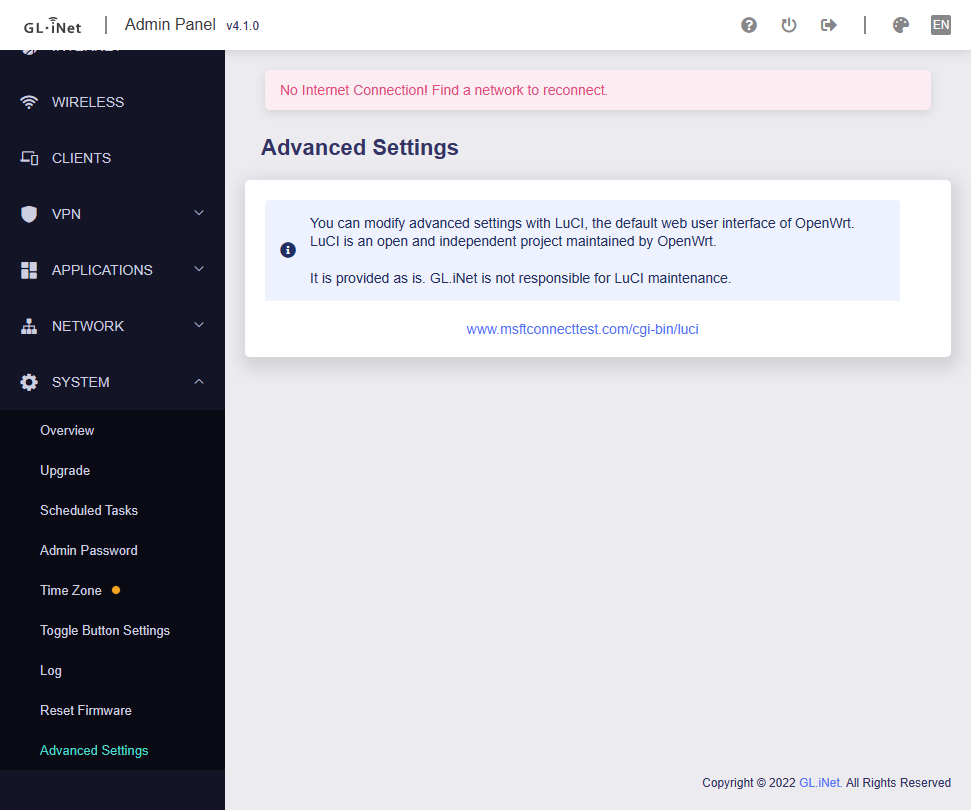
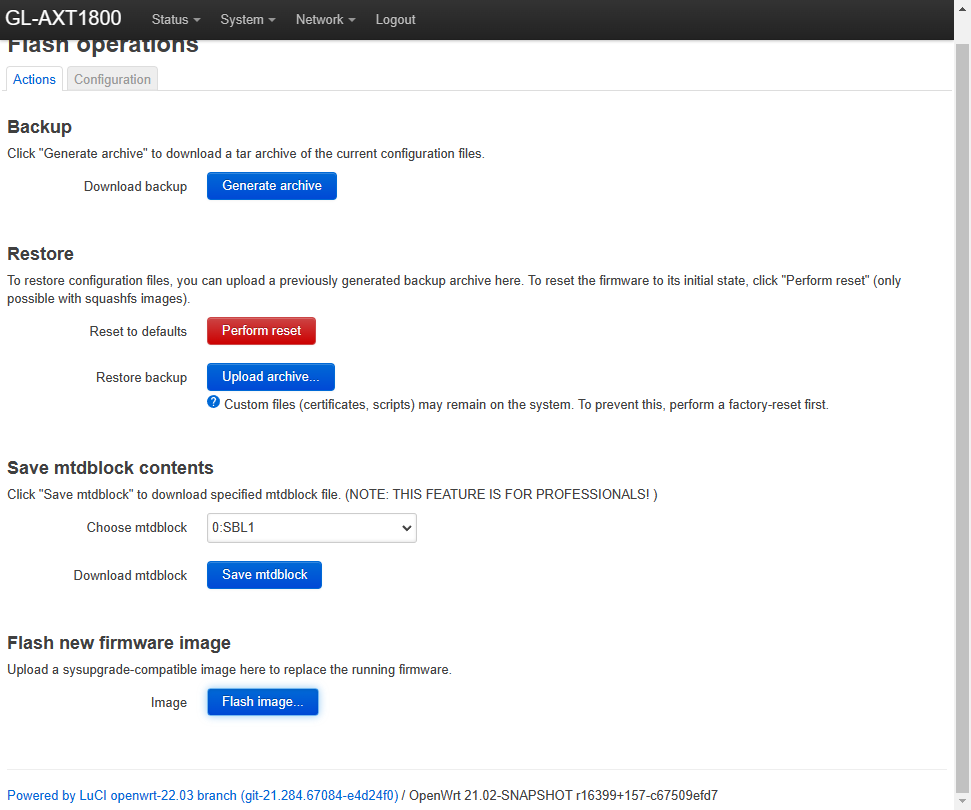
- Login and head to Backup / Flash Firmware

- Click on Flash image, choose SmoothWAN-0.99.9HF4-GL.iNet-{flint or slate}-WebUI.tar to upload, then uncheck Keep Settings
- Continue the basic tutorial in project's main page.
1. Download:
SmoothWAN-0.99.9HF5-GL.iNet-Slate-AX-WebUI.tar for Slate AX
or
SmoothWAN-0.99.9HF5-GL.iNet-Flint-WebUI.tar for Flint
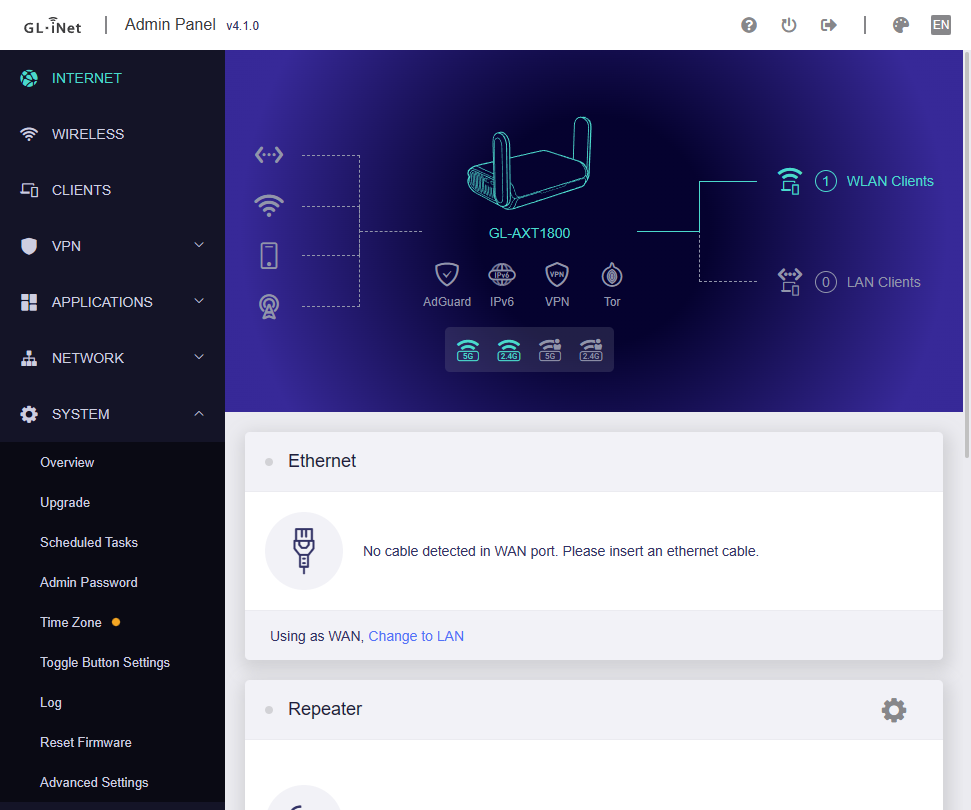
2. Setup your GL.iNet device as instructed by the device leaflet.
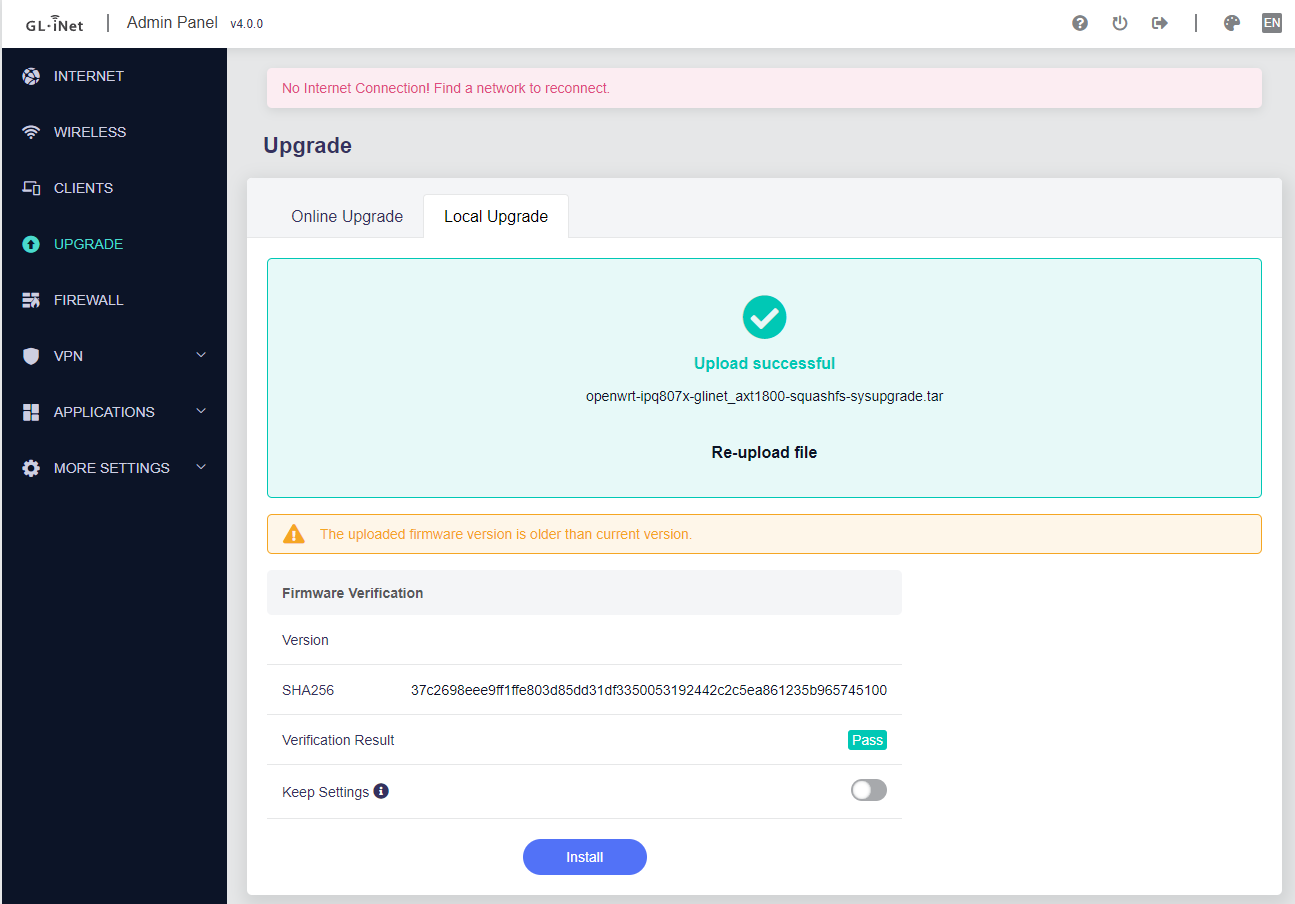
3. After logging in, head to Upgrade, choose Local Upgrade, and upload SmoothWAN-..WebUI.tar
4. Uncheck Keep settings
5. Click Install
6. Continue the basic tutorial in project's main page after 3 minutes.
Raspberry Pi 4, Pi 400 and PC installation
1. Download the file SmoothWAN-0.99.9HF5-RaspberryPi-4-SDcard.img.gz. 2. Download and install balenaEtcher from balena.io
3. Insert a microSD card using a reader to your computer. Make sure it's new and hasn't been used (e.g dashcam) for reliability.
4. After installation, balenaEtcher will automatically open, click "Flash from file:"

7. Select `SmoothWAN-_LatestVersion_-RaspberryPi4-SDcard.img.gz`

9. Click Select Target:

10. Check "SDHC" cards matching your SD size:

11. Click Flash!

12. After finish, remove the SD card from the reader and insert it to your Raspberry Pi or PC.
13. Your Pi / PC will restart twice on first start.
14. Continue the basic tutorial in project's main page.
Useful links
Build defaults
- Setup webpage address:
http://172.17.17.2 - Wi-Fi Name:
SmoothWAN Setup- Password:
brassworld
- Password:
Raspberry Pi 4 requirements
- SD card size: 4GB or more
Intel/AMD PC requirements
- RAM Size: 600MB or more
Notes
- Do not keep settings on upgrade.
- Raspberry Pi 4 build is community tested in this release.
- Banana Pi & Nano Pi images have been removed due to lack of testing, use the unofficial Speedify installer for OpenWrt for now.
Known issues
- PBR can leak P2P activity when Speedify reconnects, use Split-tunneling instead.
New features
- Option to disable unique interface renaming
- Simplified Wi-Fi configuration menu for the Slate AX and Flint
- IPv6 basic support for Speedify (/56) and LAN enabled w/o ULA (NAT6 next release for split-tunneling & /64)
- Update LuCI theme to 2022 version (better color and font)
- Automatically resize and expand disk partition for PC and Pi-4, SmoothWAN will reboot twice on first boot!
Fixes (Click to expand)
- Fix for Speedify captive portal logins
- Diagnostics download test #130
- SmoothWAN version visible in overview
- Fix Tailscale clients/subnet access for Pi/PC/BPi users
- Better handling when switching between Speedify/TinyFEC/Engarde
- Improved Engarde/TinyFEC handling during network restarts and Wi-Fi reconfiguration
- Revert to
dnsmasqby default for DHCP but with working client statistics and control in AdGuardHome - Disable
apache2service from starting with certain configuration ("It works!" text on login)
Troubleshooting
GL.iNet
GL.iNet revert to factory software
- Download your stock firmware (Web panel file) from https://dl.gl-inet.com
- Login and head to Backup / Flash Firmware
- Click on Flash image, upload the stock image, then uncheck Keep Settings
- Device is ready when the LED is blinking, done!
Raspberry Pi
Update the bootloader for the Raspberry Pi 4 (optional)
- Only update for lower power consumption (battery powered) and/or need slightly better performance.
- You can also switch to USB boot if you desire to use a flash drive instead of an SDcard.
- A safer alternative to updating from OS.
- Install and run Raspberry Pi Imager from https://www.raspberrypi.com/software/
- Follow the diagrams below:


- Select storage and click "Write"
- Insert to the device, and power up, the flashing proccess is quick, and once the green LED is blinking you can unplug power and replace/flash SD card with SmoothWAN
Existing SmoothWAN installation
How to update?
- Visit
System->Upgrade->Backup / Flash Firmware - Upload the image that includes the
WebUIfield in the filename. - Uncheck
Keep settings. - If
Force upgradeflag is visible, check it. - Click
Continue/Flash.
GL.iNet Notes
- Reset is done by holding the reset/WPS button for 10 seconds, note that the LED won't blink after 10 seconds, unlike the stock firmware.
- GL.iNet Debricking (e.g: Unplugging the power cable during installation)
Click Show assets button below to view the rest of the files on small displays
SmoothWAN v0.99.9 HF4
Useful links
- Forum
- Important announcements
- Speedify FAQ
- SmoothWAN documentation
- Check downloaded file integrity
- Credits
- Ping Tracer
Build defaults
- WebUI address/LAN:
http://172.17.17.2 - Wi-Fi SSID:
SmoothWAN Setup(5G) - Wi-Fi Pass:
brassworld
Raspberry Pi 4 requirements
- SD card size: 4GB or more
Banana Pi R64 and R3 requirements
- SD card size: 4GB or more
Notes
- If updating from previous versions, remove
https://172.17.17.2from your browser history, visithttp://172.17.17.2instead and clear cache. - Major changes, do not keep settings on upgrade.
- Speedify users: Free accounts are not supported (last update: March 2023)
- Raspberry Pi 4 build is community tested.
Force upgradewhen updating from SmoothWAN, example: #118- Unlike most routers, GL.iNet Flint and Slate AX are designed to be customizable and difficult to brick beyond recovery, I still do no take responsibility on any issue that may arise from using SmoothWAN.
- For gaming/realtime apps, use a PC instead of GL.iNet/Pi4/BPI and set transport mode to UDP to eliminate buffer bloat and jitter. (50Mbps+)
- Banana Pi testing thread: #127 #126
Known issues
- WireGuard & PPPoE users: GL.iNet Flint & Slate AX hardware acceleration is not working properly. Speed may be limited to 300Mbit compared to stock doing 800Mbit PPPoE and 500Mbit WireGuard.
Changelog
Features
- Add Banana Pi R64 and R3 basic support (untested images)
- For PBR and data capped users: New unified automatic USB network adapter rename method with unique IDs and USB hubs are now supported.
Fixes
- Fixed and tested new PBR configuration. (credits to @bt61 for testing)
- Replaced
wpad-wolfsslwithwpad-opensslfor performance improvements on Slate/Flint. - Revert to HTTP for WebUI due to new browser incompatibility with unsigned certificate WebSocket connections as in latest Safari and Firefox, check Wiki for manual HTTPS setup if needed.
Tutorial follow up (Click to expand)
GL.iNet firmware installation
1. Setup your device as instructed by the device leaflet.2. After logging in WebUI head to Upgrade, choose Local Upgrade, and upload SmoothWAN-0.99.9HF4-GL.iNet-{flint or slate}-WebUI.tar
3. Uncheck Keep settings
4. Click Install
5. Continue the basic tutorial in project's main page.
6. Note for `Flint` users, older firmware may require you to visit the advanced/LuCI interface and upgrade from there!
GL.iNet alternative installation method
1. Head to Advanced Settings2.
3. Click on the blue link ending with "luci"
4.
5. Login and head to Backup / Flash Firmware
6. Click on Flash image, choose SmoothWAN-0.99.9HF4-GL.iNet-{flint or slate}-WebUI.tar to upload, then uncheck Keep Settings
7. Continue the basic tutorial in project's main page.
GL.iNet revert to stock
1. Download your stock firmware (Web panel file) from https://dl.gl-inet.com2. Login and head to Backup / Flash Firmware
3. Click on Flash image, upload the stock image, then uncheck Keep Settings
4. Device is ready when the LED is blinking, done!
Prepare the SD card for the Raspberry Pi 4 / Pi 400
1. Download the file "SmoothWAN-0.99.9HF4-RaspberryPi-4-SDcard.img.gz" from below.2. Download and install balenaEtcher from balena.io
3. Insert the microSD card using a reader to your computer.
4. After installation, balenaEtcher will automatically open, click "Flash from file:"
5. Select `SmoothWAN-_LatestVersion_-RaspberryPi4-SDcard.img.gz`
6. Click Select Target:
7. Check "SDHC" cards matching your SD size:
8. Click Flash!
9. After finish, remove the SD card from the reader and insert it to your Raspberry Pi.
10. Continue the basic tutorial in project's main page.
Extra: Update the bootloader for the Raspberry Pi 4
- Only update for lower power consumption (battery powered) and/or need slightly better performance.
- You can also switch to USB boot if you desire to use a flash drive instead of an SDcard.
- A safer alternative to updating from OS.
- Install and run Raspberry Pi Imager from https://www.raspberrypi.com/software/
- Follow the diagrams below:
- Select storage and click "Write"
- Insert to the device, and power up, the flashing proccess is quick, and once the green LED is blinking you can unplug power and replace/flash SD card with SmoothWAN
Upgrade within SmoothWAN
- Visit
System->Upgrade->Backup / Flash Firmware - Upload the image that includes the
WebUIfield in the filename. - Uncheck
Keep settings. - If
Force upgradeflag is visible, check it. - Click
Continue/Flash.
∎ GL.iNet Debricking (example: corrupt file)
Reset is done by holding the reset/WPS button for 10 seconds.
Click show assets below to view the rest of the files on small displays
Contributors
Assets 21
SmoothWAN 0.99.9
Useful links
- Important announcements
- Speedify FAQ
- SmoothWAN documentation
- Check downloaded file integrity
- Credits
- Ping Tracer
Build defaults
WebUI address/LAN: 172.17.17.2
Wi-Fi SSID: SmoothWAN Setup (5G)
Wi-Fi Pass: brassworld
Raspberry Pi 4 requirements
SD card size for the Raspberry Pi 4 / Pi 400: 4GB or more
Notes
- Policy routing users, check issue #124
- Unlike most routers, GL.iNet Flint and Slate AX are designed to be customizable and difficult to brick beyond recovery, I still do no take responsibility on any issue that may arise from using SmoothWAN.
- Added revert to stock firmware info in the bottom for GL.iNet.
- Major changes, do not keep settings on upgrade.
- Raspberry Pi 4 build is community tested since I no longer own one and they are hard to source.
- For gaming/realtime apps, use a PC instead of GL.iNet/Pi4/BPI and set transport mode to UDP to eliminate buffer bloat and jitter. (50Mbps+)
Force upgradewhen updating from SmoothWAN, example: #118
Changelog
- Raspberry Pi CM4 fixes
- Few UI/UX improvements
- Fixed LED status for Flint
- Intel NICs fixed due to OWRT upgrade
- Add missing
usb-modeswitchpackage - Downgraded kernel for Slate AX / Flint
- Fixed DNS leaks (
resolvconf is disabled) - Add AdGuard Home password change app
- Added per-client QoS - bandwidth control app
- Added Web UI flashable image for Intel/AMD/PC/VM
- Fixed SmoothWAN cursive font issues with Safari
- Dropped support for non-ethernet mode LTE dongles
- Enabled HTTPS for LuCI, Speedify UI, and Engarde UI
- Added ntopng support with installer/configurator app
- Added more preconfigured network profiles when using USB hubs
- Ability to downgrade or specify a version for Speedify installer
- Fix Slate AX / Flint USB and SD card issue by the kernel downgrade
- Labeled Flint interface naming to ports from
eth*toPortOne...etc - PC and Raspberry Pi 4 are now running the latest OpenWRT v22.03.3 stable
- Add WAN monitoring in collectd/statistics and save statistics to storage by default
- Speedify UI is now accessible without firewall rules, needed for new OpenWRT versions
- Added notes to Wireless dialogs and Network -> Interfaces regarding metric assignments
- Simplify DNS configuration by using AdGuard Home as the main resolver in disabled state
- Fix Speedify latency spikes by preventing it from changing it's real-time process priority
- Removed MAC address based interface renamer in favor of Speedify's new ISP detection feature
- BitTorrent traffic detection log app showing client IP address (useful for Speedify non-P2P servers)
- Changed
Diagnosticsdownload test file to anycast Ubuntu ISO file (use nearest region automatically) - Removed Pi-hole due to incompatible new dependencies with Debian/LXC (may add later - replaced with ADG)
- Added new
Optionstab in Speedify LuCI app with controls: restart, stop, version override, version list - Added Engarde as self-hosting alternative to Speedify's redundant mode with one-click cloud-init server setup
- Restored
nlbwmon-Bandwidth Monitorper-client traffic monitoring app with data persistence on power cycle - Added
advertise as exit nodeparameter to Tailscale to be able to bypass Netflix absurd location / sharing restrictions - Added TinyFEC VPN for fixing a lossy unusable internet connection using forward-error-correction (single WAN - self-hosting)
- Slate AX / Flint Wi-Fi issues have been resolved, you no longer need to disable to scan, and 802.11s/Mesh is working. (may require reinstalling wpad with
--force-overwritefor802.11k/v/r, more testing is needed.)
Changelog HF1 - 13/2/2023
- Sync Pi4 with x86 configuration
- Override WAN FW zone (x86) - not automated in 22.03.3
- Remove IPTMON from collectd
- Add missing
collectd-mod-ipconfig - Flint image with Slate AX bootstrap config
Changelog HF2 - 26/2/2023
- Full
wpadwireless feature support - Clarify metric instructions
- Fix missing VPN Policy configuration for Flint
- Set ADGHome as the main DHCP server for ease-of-use #103
- Fix UPnP auto configuration for Engarde/TinyFEC #106
- Fix Tailscale with custom LAN IP addresses
- Fix WebUI access over Tailscale
- Disabled custom interface naming for better combability with customization #119 & #114
Changelog HF3 - 27/2/2023
- AdGuardHome persistent storage
- Tailscale command typo
Tutorial follow up (Click to expand)
GL.iNet firmware installation
1. Setup your device as instructed by the device leaflet.2. After logging in WebUI head to Upgrade, choose Local Upgrade, and upload SmoothWAN-0.99.9-GL.iNet-{flint or slate}-WebUI.tar
3. Uncheck Keep settings
4. Click Install
5. Continue the basic tutorial in project's main page.
6. Note for `Flint` users, older firmware may require you to visit the advanced/LuCI interface and upgrade from there!
GL.iNet alternative installation method
1. Head to Advanced Settings2.
3. Click on the blue link ending with "luci"
4.
5. Login and head to Backup / Flash Firmware
6. Click on Flash image, choose SmoothWAN-0.99.9-GL.iNet-{flint or slate}-WebUI.tar to upload, then uncheck Keep Settings
7. Continue the basic tutorial in project's main page.
GL.iNet revert to stock
1. Download your stock firmware (Web panel file) from https://dl.gl-inet.com2. Login and head to Backup / Flash Firmware
3. Click on Flash image, upload the stock image, then uncheck Keep Settings
4. Device is ready when the LED is blinking, done!
Prepare the SD card for the Raspberry Pi 4 / Pi 400
1. Download the file "SmoothWAN-0.99.9-RaspberryPi-4-SDcard.img.gz" from below.2. Download and install balenaEtcher from balena.io
3. Insert the microSD card using a reader to your computer.
4. After installation, balenaEtcher will automatically open, click "Flash from file:"
5. Select `SmoothWAN-_LatestVersion_-RaspberryPi4-SDcard.img.gz`
6. Click Select Target:
7. Check "SDHC" cards matching your SD size:
8. Click Flash!
9. After finish, remove the SD card from the reader and insert it to your Raspberry Pi.
10. Continue the basic tutorial in project's main page.
Extra: Update the bootloader for the Raspberry Pi 4
- Only update for lower power consumption (battery powered) and/or need slightly better performance.
- You can also switch to USB boot if you desire to use a flash drive instead of an SDcard.
- A safer alternative to updating from OS.
- Install and run Raspberry Pi Imager from https://www.raspberrypi.com/software/
- Follow the diagrams below:
- Select storage and click "Write"
- Insert to the device, and power up, the flashing proccess is quick, and once the green LED is blinking you can unplug power and replace/flash SD card with SmoothWAN
∎ GL.iNet Debricking (example: corrupt file)
Reset is done by holding the reset/WPS button for 10 seconds.
SmoothWAN 0.99.8
Useful links:
Build defaults:
WebUI address/LAN: 172.17.17.2
Wi-Fi SSID: SmoothWAN Setup (5G)
Wi-Fi Pass: brassworld
Raspberry Pi 4 requirements:
SD card size for the Raspberry Pi 4 / Pi 400: 2GB or more
Notes:
- Major changes, do not keep settings on upgrade
- OLED display stats is currently inconsistent with Speedify's new DoH update
- Slate AX / Flint: disable 5GHz radio before clicking the scan button when setting up a wireless WAN.
- You can now connect the Pi Type-C port to a PC/Camera and use it as a tethering device. (alternative to LAN port)
Windows Driver, others plug&play.
Changelog:
- Minor UI changes
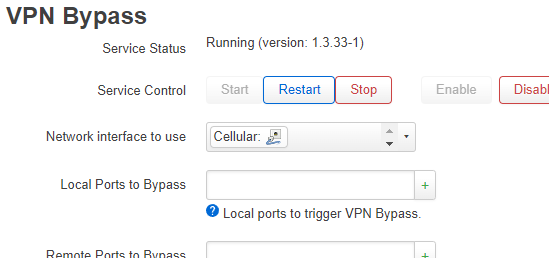
- Replace VPN-bypass with PBR
- Add GL.iNet Slate AX support
- Installation log view auto refresh
- Tailscale is now LAN IP agnostic
- Add log retrieval button in all apps
- Reduce LuCI apply time delay dialog
- Add Pi-hole custom IP address option
- Set TCP CCA to BBR as suggested by Speedify LIVE
- Hide battery status indicator if battery is not present
- Fix Speedify UI WebSocket access via Tailscale unique address
- Changing LAN IP address is now possible followed by a reboot
- Add Adguard Home for Slate AX (replaces Pi-hole due to storage)
- Set TTL to 65 on devices plugged to Pi's USB ports for bad cellular carriers
- Update OpenWRT's expired SSL certificates for Speedify's HTTPS transport mode
- Use Speedify's gateway as DNS for proper bypass function and new Bypass-DoH feature
- Use
ntp.pool.orgIP address without DNS resolution for Wireguard upstream configuration - Pi 4: Switched Wi-Fi to 5Ghz + US due to inconsistent bootloader EEPROM regulatory updates
- Configure Pi-hole to use Speedify as DNS upstream for bypass with Google DNS as backup (Speedify down)
- Replace
nlbwmonwithiptmon, connected client bandwidth monitoring is now at Statistics -> Graphs -> Firewall (check Wiki for persistance) - Network -> Diagnostics additions:
- Pi
vcgencmdutility: Bootloader-version, throttling history/status, real temperature, real CPU clock - Per-WAN direct download test, you can open two diagnostic pages to run tests per each WAN at the same time (e.g single carrier/tower bottleneck testing with two cellular modems)
- Pi
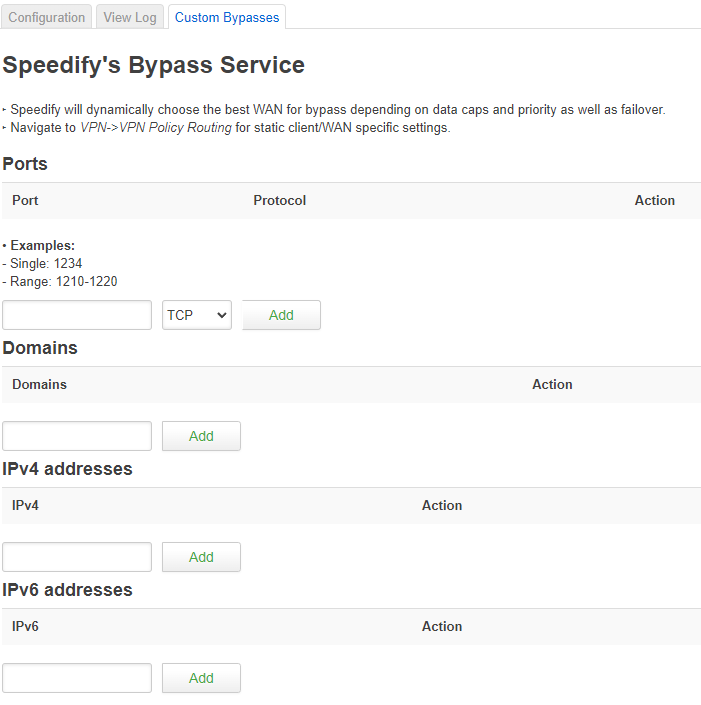
- Add "Custom Bypasses" tab in Speedify page. Use Speedify's internal functions (smart WAN selection):
Hotfix 1 - Changelog:
- Update Wi-Fi firmware for the Slate AX
- Fix
Custom Bypasstab for other browsers - Fix
Generate Logsbutton for the Slate AX - Check for OLED app - remove error from syslog
- Remove invalid repositories from gl-inet-infra builds
Flint blind development - Changelog:
- Added TEST#3 untested image with correct interface order numbering
- Downgraded to kernel 4.4 for Wi-Fi scan button fix and 802.11s (mesh) support (done in Slate AX next release)
- NOTE latest test image can be also flashed with unbrick menu
Quick Setup (Click to expand)
Tutorial follow up: GL.iNet firmware installation
1. Setup your device as instructed by the device's leaflet.2. After logging in WebUI head to `Upgrade`, choose `Local Upgrade`, upload `SmoothWAN-0.99.8-GLiNet-Slate-AX-WebUI.tar`.
3. UNCHECK `Keep settings`!
4. Click `Install`.
5. Continue the basic tutorial in project's main page.
Tip: The device is ready when the LED is white with intermittent blue blinks, the blinks indicates system load average from the last 15 seconds.
Tutorial follow up: Prepare the SD card for the Raspberry Pi 4 / Pi 400
1. Download the file "SmoothWAN-_LatestVersion_-RaspberryPi4-SDcard.img.gz" from below.2. Download and install balenaEtcher from balena.io
3. Insert the microSD card using a reader to your computer.
4. After installation, balenaEtcher will automatically open, click "Flash from file:"
5. Select `SmoothWAN-_LatestVersion_-RaspberryPi4-SDcard.img.gz`
6. Click Select Target:
7. Check "SDHC" cards matching your SD size:
8. Click Flash!
9. After finish, remove the SD card from the reader and insert it to your Raspberry Pi.
10. Continue the basic tutorial in project's main page.
Extra: Update the bootloader for the Raspberry Pi 4
- Only update for lower power consumption (battery powered) and/or need slightly better performance.
- You can also switch to USB boot if you desire to use a flash drive instead of an SDcard.
- A safer alternative to updating from OS.
- Install and run Raspberry Pi Imager from https://www.raspberrypi.com/software/
- Follow the diagrams below:
- Select storage and click "Write"
- Insert to the device, and power up, the flashing proccess is quick, and once the green LED is blinking you can unplug power and replace/flash SD card with SmoothWAN
SmoothWAN 0.99.6
Useful links:
Requirements:
Minimum SD card size for Rasp. Pi 4 / Pi 400: 2GB
Configured free space: 1800 MB
Configured gateway/web interface IP: 172.17.17.2 (fixed, adjustable next version)
Wi-Fi Setup AP SSID: SmoothWAN Setup
Wi-Fi Setup AP Password: brassworld
Notes:
- Settings unretainable on upgrade
Changelog:
- Update to OpenWRT 21.02.2
- Fixed OLED 3rd and 4th WAN line [#21]
- Fixed x86 WAN firewall settings
- Fixed Pi-hole installer systemd network issue with the new Bullseye update
- Speedify Connect at Startup is now set automatically (working with latest versions prior to login)
- Revert HT20 Wi-Fi for Pi's that never ran Raspbian before (EEPROM REG issue)
- Disable IPv6 by default for ease of use
- Revert Speedify log location to storage from RAM [#26]
- Add battery status in WebUI header for INA219 (e.g RPi UPS)
- AR9271 USB Wi-Fi dongles are officially supported (community testing for auto config is needed)
- Enabled storage scheduler
- Minor UI/UX fixes
Changelog non-upgradable hotfix 9fcb2c4:
- @bt61: Fix VPNbypass [#28] with the new OpenWRT stable
- Workaround Speedify UI caching issue
- Update first time setup instructions in Overview page
Quick Setup (Click to expand)
Tutorial follow up: Prepare the SD card for the Raspberry Pi 4 / Pi 400
1. Download the file "SmoothWAN-_LatestVersion_-RaspberryPi4-SDcard.img.gz" from below.2. Download and install balenaEtcher from balena.io
3. Insert the microSD card using a reader to your computer.
4. After installation, balenaEtcher will automatically open, click "Flash from file:"
5. Select `SmoothWAN-_LatestVersion_-RaspberryPi4-SDcard.img.gz`
6. Click Select Target:
7. Check "SDHC" cards matching your SD size:
8. Click Flash!
9. After finish, remove the SD card from the reader and insert it to your Raspberry Pi.
10. Continue the basic tutorial in project's main page.
Extra: Update the bootloader for the Raspberry Pi 4
- Only update for lower power consumption (battery powered) and/or need slightly better performance.
- You can also switch to USB boot if you desire to use a flash drive instead of an SDcard.
- A safer alternative to updating from OS.
- Install and run Raspberry Pi Imager from https://www.raspberrypi.com/software/
- Follow the diagrams below:
- Select storage and click "Write"
- Insert to the device, and power up, the flashing proccess is quick, and once the green LED is blinking you can unplug power and replace/flash SD card with SmoothWAN
Contributors
Assets 10
SmoothWAN 0.99.5
Thank you donors!
Minimum SD card size for RPi4: 2GB
Configured free space: 1800 MB
Configured gateway/web interface IP: 172.17.17.2
Wi-Fi Setup AP SSID: SmoothWAN Setup
Wi-Fi Setup AP Password: brassworld
Notes:
- This version requires fresh install, settings won't be retained until version 1.0
- Disable "Keep settings and retain the current configuration" when upgrading via Web UI
Changelog:
- Added Raspberry Pi 3B+ image for basic functionality and low bandwidth, not supported in future releases.
- Fixed Tailscale update->restart function
- Hide Tailscale interface from Speedify WAN interface detection
- Changed default LAN to a ~unique address : 172.17.17.2
- Added nano text editor for easy editing in terminal
- Enabled I2C for RPi4 for OLED display and battery controllers
- Upgraded Wi-Fi firmware from official Linux kernel tree, checksums are provided in the repo
- Added pluggable OLED stats support for RPi4 (other platforms require configuration - see Wiki):

Tutorial: Prepare an SD card for the Raspberry Pi 4 (click me)
1. Download the file "smoothwan-0.99.5-bcm27xx-bcm2711-rpi-4-ext4-factory.img.gz" from below.2. Download and install balenaEtcher from balena.io
3. Insert the microSD card using a reader to your computer.
4. After installation, balenaEtcher will automatically open, click "Flash from file:"
5. Select `smoothwan-0.99.4-bcm27xx-bcm2711-rpi-4-ext4-factory.img.gz`
6. Click Select Target:
7. Check "SDHC" cards matching your SD size:
8. Click Flash!
9. After finish, remove the SD card from the reader and insert it to your Raspberry Pi.
10. Continue the basic tutorial in project's main page.
Advanced: Updating bootloader
- Only update for lower power consumption (battery powered) and/or need slightly better performance.
- You can also switch to USB boot if you desire to use a flash drive instead of an SDcard.
- Install and run Raspberry Pi Imager from https://www.raspberrypi.com/software/
- Follow the diagrams below:
- Select storage and click "Write"
- Insert to the device, and power up, flashing proccess is fast, once the green LED is blinking you can power down and replace/flash SD card with SmoothWAN
SmoothWAN 0.99.4
Minimum SD card size for RPi4: 2GB
Configured free space: 1800 MB
Configured gateway/web interface IP: 192.168.3.1
WiFi Setup AP SSID: "SmoothWAN Setup"
WiFi Setup AP Password: "brassworld"
Notes:
- This version requires fresh install, settings won't be retained until version 1.0
- Disable "Keep settings and retain the current configuration" when upgrading via Web UI
Changelog:
- Added Multi-WAN USB Setup menu for Raspberry Pi 4

Added NCM support for modems in Multi-WAN USB (in testing)USB NCM & QMI auto configuration will be removed next release as it lacks standards, slower, USSD/SMS issues, and higher RTT on load (PPP). Use RNDIS/Hi-link only or setup manually in Interfaces page.- 'Random MAC only' devices are now supported with Multi-WAN USB (e.g USB tethering with Android R and up)
- UI fixes
- Dnsmasq -all-servers
- Update OpenWRT packages
Tutorial: Prepare an SD card for the Raspberry Pi 4 (click me)
1. Download the file `smoothwan-0.99.4-bcm27xx-bcm2711-rpi-4-ext4-factory.img.gz` from below.2. Download and install balenaEtcher from balena.io
3. Insert the microSD card using a reader to your computer.
4. After installation, balenaEtcher will automatically open, click "Flash from file:"
5. Select `smoothwan-0.99.4-bcm27xx-bcm2711-rpi-4-ext4-factory.img.gz`
6. Click Select Target:
7. Check "SDHC" cards matching your SD size:
8. Click Flash!
9. After finish, remove the SD card from the reader and insert it to your Raspberry Pi.
10. Continue the basic tutorial in project's main page.
SmoothWAN 0.99.2
Minimum SD card size for RPi4: 2GB
Configured free space: 1800 MB
Configured gateway/web interface IP: 192.168.3.1
WiFi Setup AP SSID: "SmoothWAN Setup"
WiFi Setup AP Password: "brassworld"
Notes:
- This version requires fresh install, settings won't be retained until version 1.0
- Disable "Keep settings and retain the current configuration" when upgrading via Web UI
Changelog:
- Added WAN source selection to VPNBypass app: (credits to @bt61 for testing)
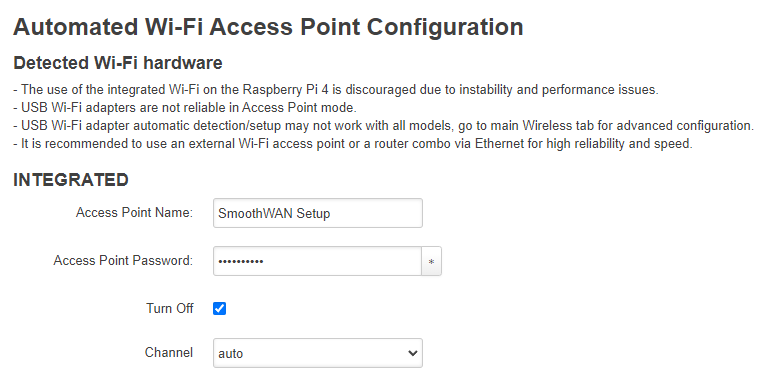
- WiFi basic AP settings page:
- Changed CCA to
hyblafor better upload speeds based on multiple reports. - Switched to EXT4 images due to #9113, enabled filesystem check and repair prior to mounting, and strict filesystem options for resiliance against abrupt power cuts. Expect slightly slower startup.
- Use US regulatory by default with strict 40Mhz width for RPi4 integrated W-Fi AP.
- Set password for Wi-Fi default setup, and hide Wi-Fi AP from Speedify
Changelog 0.99.1 (hotfix -> settings retained):
- Fixed broken Multi-WAN app caused by a new LuCI version despite being on stable OpenWRT branch...
- Updated built-in instructions and guides.
Changelog 0.99.2 (hotfix -> settings retained):
- Speedify's disk activity (logging) seems to affect it's own networking function, causing latency spikes on storage load when writing is blocked. Moved "logs" folder to RAM and copy-to-storage for now. Speedify version 11.9.0.10273.
Tutorial: Prepare an SD card for the Raspberry Pi 4 (click me)
1. Download the file `smoothwan-0.99.4-bcm27xx-bcm2711-rpi-4-ext4-factory.img.gz` from below.1. Download and install balenaEtcher from balena.io
2. Insert the microSD card using a reader to your computer.
2. After installation, balenaEtcher will automatically open, click "Flash from file:"
3. Select `smoothwan-0.99.4-bcm27xx-bcm2711-rpi-4-ext4-factory.img.gz`
4. Click Select Target:
5. Check "SDHC" cards matching your SD size:
6. Click Flash!
7. After finish, remove the SD card from the reader and insert it to your Raspberry Pi.
8. Continue the basic tutorial in project's main page.
Contributors
Assets 10
SmoothWAN 0.98.1
Minimum SD card size for RPi: 2GB
Configured free space: 1800 MB
Configured gateway/web interface IP: 192.168.3.1
WiFi Setup AP SSID: "SmoothWAN Setup"
Notes:
- Uncheck 'Keep settings' when using the upgrade image, version 1 will allow retained settings.
Changelog:
- Added missing LXC dependencies
- Added Pi-hole one-click setup
- Added Tailscale one-click setup (downloads from latest official source not OpenWRT repo)
- Added tunables section on startup: Pi's Internal GbE TCP offload and dedicated CPU IRQ. Gigabit from internal to a USB3 Ethernet under full CPU load is now possible.
- Added WiFi basic settings page (added for testing only)
- Added easy Multi-WAN autoconfiguration page
- Added easy port forwarding page for Speedify Dedicated plan
- Added 'Guide' tab in SmoothWAN apps.
- Changed TCP congestion algo. to reno (targeting TCP multiple transport)
- Changed vnstat and nlbwmon database location to persistent
- New unconfigured interfaces are automatically renamed to their MAC addresses.
*Speedify will remember data caps and consumption, and naming is persistent with USB devices (port agnostic). - Removed unneeded modules
Changelog 0.98.1:
- Removed redundant local only nginx configuration for Tailscale
- Disabled firewall rebind filter for captive portal function
- Disabled strict DNS order
- Typos
Tutorial: Prepare an SD card for the Raspberry Pi 4 (click me)
1. Download the file `smoothwan-0.99.4-bcm27xx-bcm2711-rpi-4-ext4-factory.img.gz` from below.1. Download and install balenaEtcher from balena.io
2. Insert the microSD card using a reader to your computer.
2. After installation, balenaEtcher will automatically open, click "Flash from file:"
3. Select `smoothwan-0.99.4-bcm27xx-bcm2711-rpi-4-ext4-factory.img.gz`
4. Click Select Target:
5. Check "SDHC" cards matching your SD size:
6. Click Flash!
7. After finish, remove the SD card from the reader and insert it to your Raspberry Pi.
8. Continue the basic tutorial in project's main page.
Smoothwan 0.96.1
Minimum SD card size for RPi: 1GB
Configured free space: 800 MB
Configured gateway/web interface IP: 192.168.3.1
WiFi Setup AP SSID: "SmoothWANSetup"
Notes:
- Raspberry Pi 4: Flash SDcard with Rufus using
smoothwan-0.96.1-bcm27xx-bcm2711-rpi-4-squashfs-factory.img.gz - Do not use EXT4 images for power cuts e.g RPi4, routers.
- RPi4 embedded WiFi is not recommended for use.
- PC, laptop, server etc... use "combined-efi" for UEFI and "combined" for BIOS machines. Flash appropriate img.gz file to SDcard or USB flashdrive with Rufus on Windows hosts.
- For Linux hosts: dd image after extracting gunzip archive.
- Sysupgrade/Upgradable images will be provided in future releases.
Changelog:
- Cherrypicked conflicting WiFI USB dongles modules
- Fixed WiFi AP mode
- Fixed wrong opkg repo base URL
- Enabled usbmuxd for iOS tethering (quirky)
- Replaced bandwidthd with nlbwmon for client bandwidth monitoring
- Increased Speedify UI window length for mobile
- Set performance governor by default for RPi4 for increased stability with generic power supplies
- Added missing English-only language in LuCI
- Added brief quick setup instructions in overview page prior to Speedify installation
- Added dedicated external Speedify UI link
- Added iperf3 server for LAN throughput testing and diagnoses
- Added 4x predefined interface settings for PnP quick setup with USB ethernet adapters or tethering devices.
- Added usb-modeswitch
- Added comgt-ncm