Calvin GUI
Before going ahead and ordering a bunch of sensors and devices capable of running Calvin (which of course we encourage you to do) you might want to try Calvin out in a sandboxed environment. This will also suit as an introduction to the Calvin GUI which is a great way to experiment with Calvin and to test different ways of putting together applications before deploying them.
In a web browser, goto Calvin Development GUI, you should see the following welcome screen:
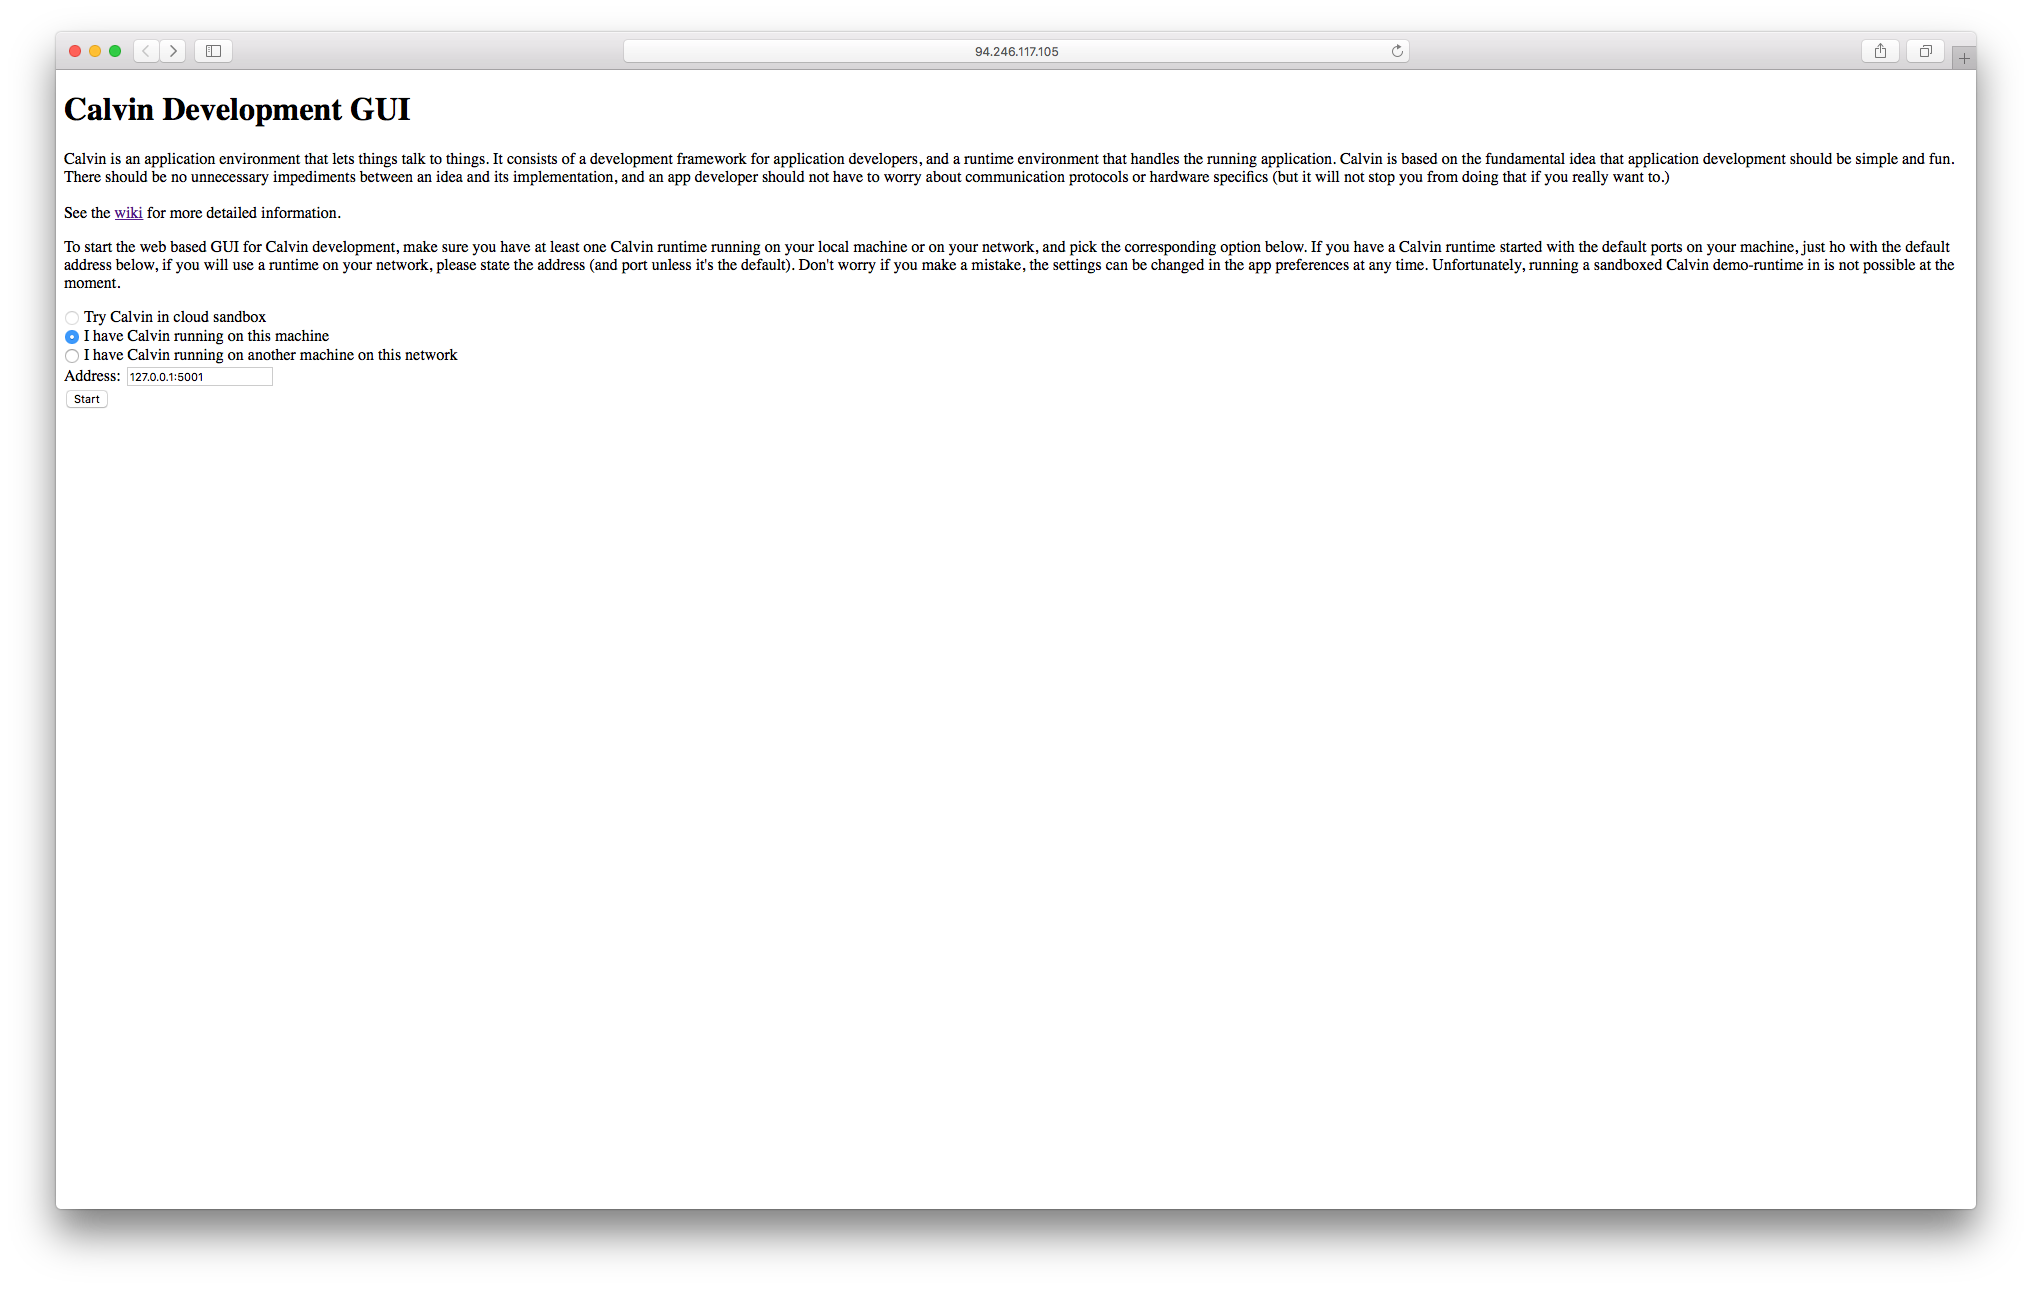
Running the Calvin GUI in a cloud sandbox is very straight forward. However, it will not provide the same flexibility and configuration possibilities as when running towards a local runtime.
- Choose Try Calvin in cloud sandbox and press Start and the GUI will start.
As of version 1.1.0, the GUI can be enabled in a runtime using the --gui
flag. By default, the GUI is available on http://localhost:8000, but this can be changed using runtime flags --gui-if and --gui-port.
In prior versions, the following method can be used (and actually still works):
When trying out this for the first time, start Calvin from the directory calvin/examples/ui_in_gui/ inside the distribution. This we make Calvin read the configuration file below at boot. The purpose of this config file is to set up a number of virtual devices that you can manipulate without the need to connect real devices.
The config file calvin.conf contains the following information:
{
  "calvinsys": {
     "capabilities": {
         "sys.timer.once": {
             "module": "sys.timer.Timer",
             "attributes": {}
         },
         "sys.timer.repeating": {
             "module": "sys.timer.Timer",
             "attributes": {"repeats": true}
         },
         "io.light": {
           "module": "ui.Actuator",
           "attributes": {"ui_def": {"image":"KY-016", "control":{"sensor":false, "type":"boolean", "default":false}}}
         },
         "io.switch": {
           "module": "ui.Sensor",
           "attributes": {"ui_def": {"image":"KY-004", "control":{"sensor":true, "type":"boolean", "default":false}}}
         },
         "io.button": {
           "module": "ui.Sensor",
           "attributes": {"ui_def": {"image":"KY-004", "control":{"sensor":true, "type":"boolean", "default":0, "behaviour":"momentary"}}}
         },
         "io.tiltswitch": {
           "module": "ui.Sensor",
           "attributes": {"ui_def": {"image":"KY-020", "control":{"sensor":true, "type":"boolean", "default":false}}}
         },
         "io.lightbreaker": {
           "module": "ui.Sensor",
           "attributes": {"ui_def": {"image":"KY-010", "control":{"sensor":true, "type":"boolean", "default":false}}}
         },
         "io.buzzer": {
             "module": "ui.Actuator",
             "attributes": {"ui_def": {"image":"KY-006", "control":{"sensor":false, "type":"int", "default":false, "behaviour":"audio"}}}
         },
         "io.pwm": {
             "module": "ui.Actuator",
             "attributes": {"ui_def": {"image":"KY-Generic", "control":{"sensor":false, "type":"float", "default":0}}}
         },
         "io.temperature": {
           "module": "ui.TriggeredSensor",
           "attributes": {"ui_def": {"image":"KY-001", "control":{"sensor":true, "type":"float", "min":-20.0, "max":120.0, "default":20.0}}}
         },
         "io.humidity": {
           "module": "ui.TriggeredSensor",
           "attributes": {"ui_def": {"image":"KY-015", "control":{"sensor":true, "type":"float", "min":0.0, "max":100.0, "default":60.0}}}
         },
         "io.distance": {
           "module": "ui.TriggeredSensor",
           "attributes": {"ui_def": {"image":"Distance", "control":{"sensor":true, "type":"float", "min":0.0, "max":4.0, "default":2.0}}}
         },
         "io.stdout": {
           "module": "ui.StandardOut",
           "attributes": {"ui_def": {"control":{"type":"console"}}}
         }
      }
   }
}
This config file informs the runtime that specific UI components are available for a number of actors in the GUI. Without it the GUI wont be able to represent any hardware components. More information about calvin configurations here.
Start a local runtime:
-
In a terminal,
cdto the directorycalvin/examples/ui_in_gui/and run the following commands:$csruntime --host 127.0.0.1 --port 5000 --controlport 5001 --name local_runtime
Note! Make sure to start the runtime from a directory containing the calvin.conf file above.
- Back to the Welcome Screen in the web browser, Choose I have Calvin running on this machine and press Start and the GUI will start.
-
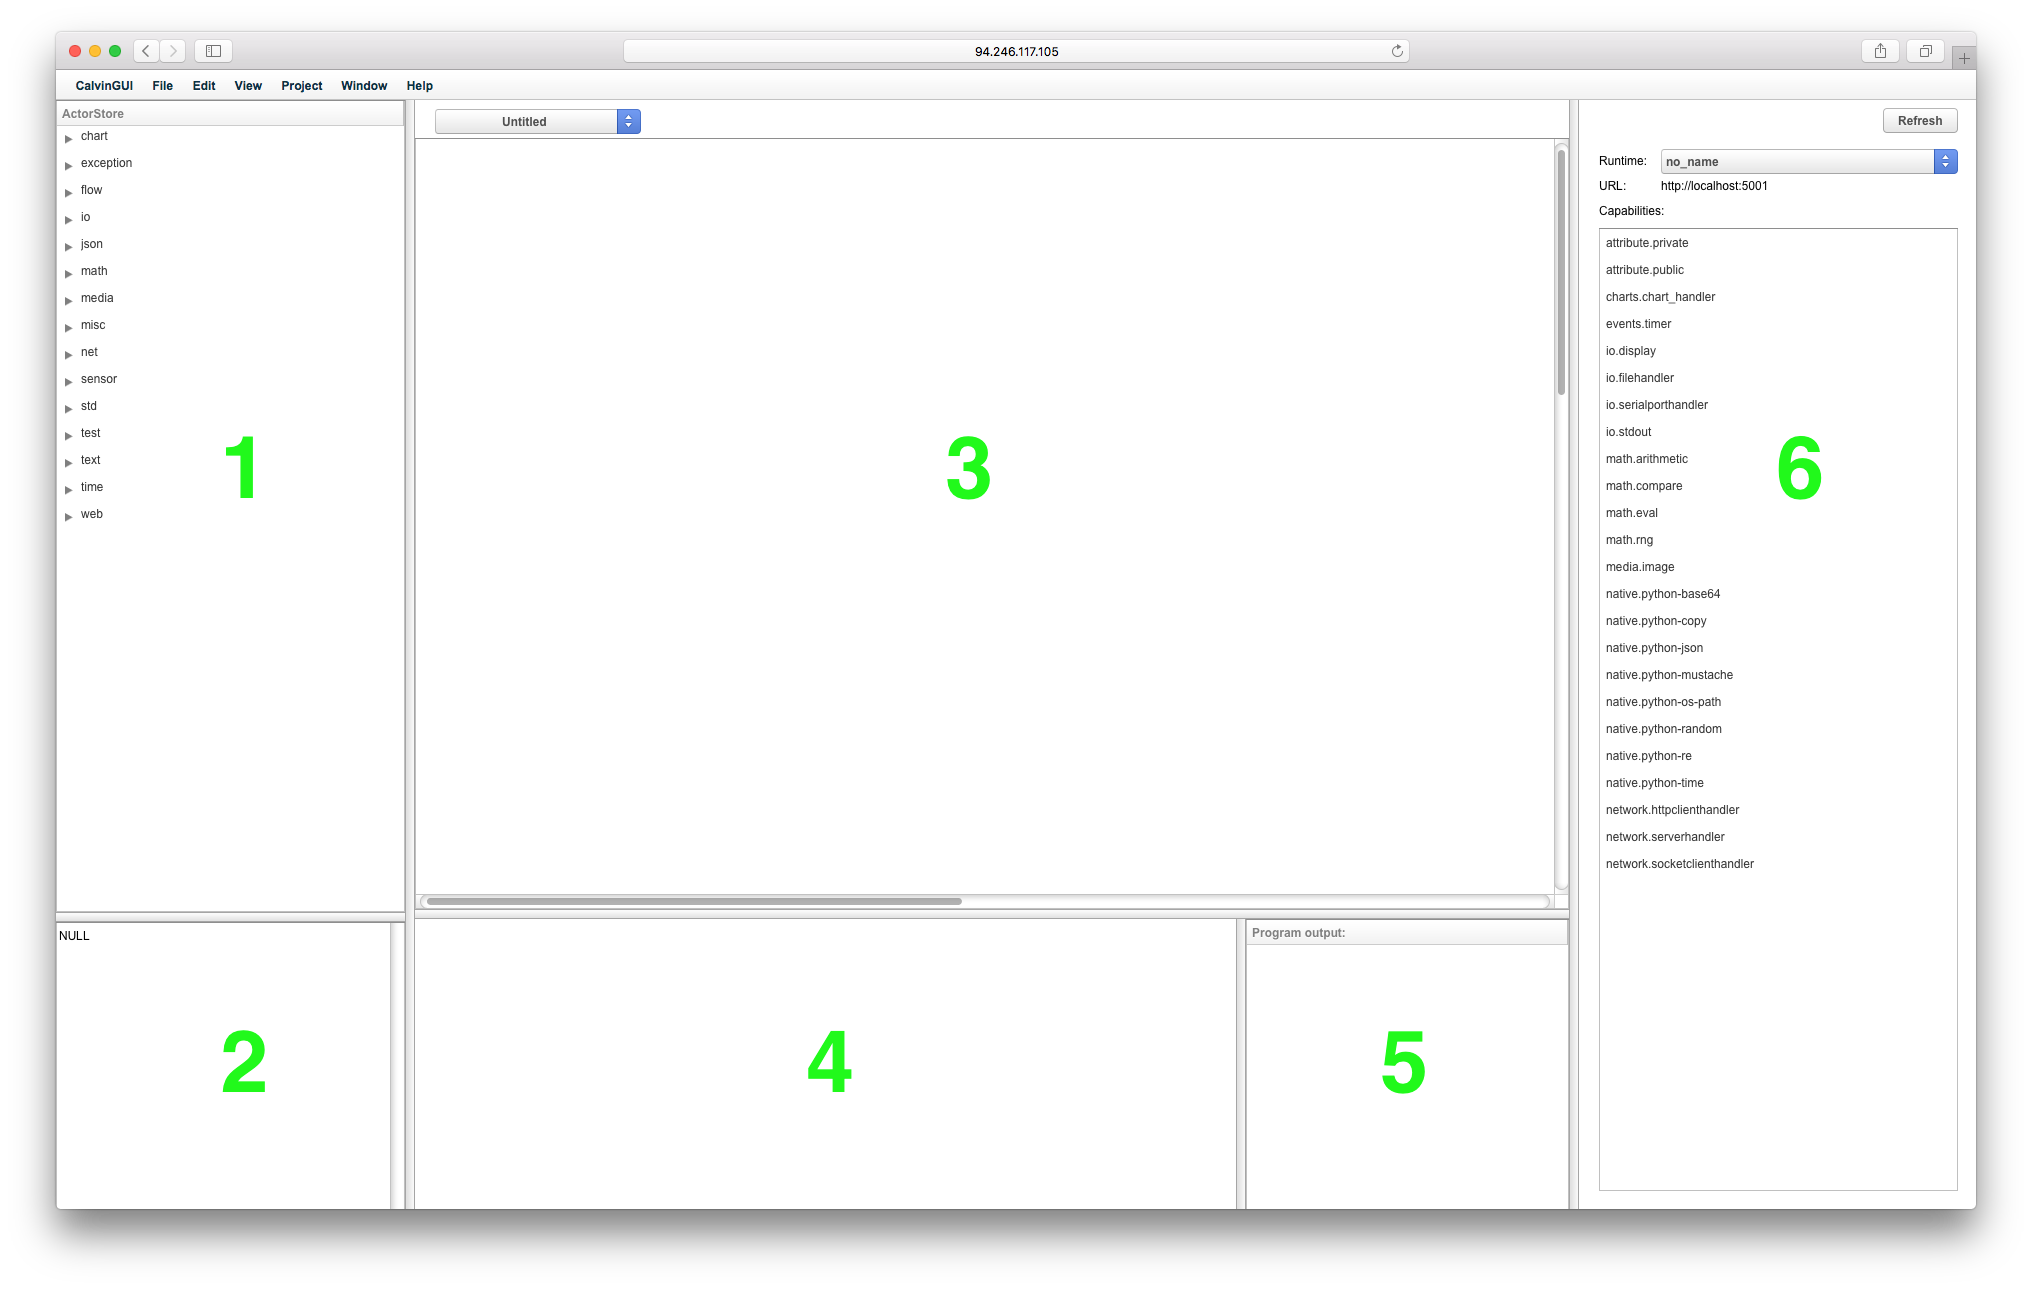
Actorstore: All available actors are listed under there respective categories. Click on a category to see its actors.
-
Documentation: When selecting an item in the actor store the documentation for the currently selected item will be shown in this frame.
-
Canvas: The canvas is the workspace, where dropped actors can be connected into applications. At the top of the canvas is a popup showing the current project. It is possible to have more than one project at the same time. Commands like “Run” and “Stop” from the project menu, and “Save” and “Open” from the file menu will operate on the currently active project.
-
Inspector: When selecting an actor placed in the canvas area the inspector will be populated with relevant information about the actor, for a non running application, init parameters and name of the actor can be set. For a running application this is the place to migrate an actor to another runtime.
-
Runtime overview: All available runtimes are presented here together with the capabilities of the runtime. This information is useful when migrating an actor to another runtime.
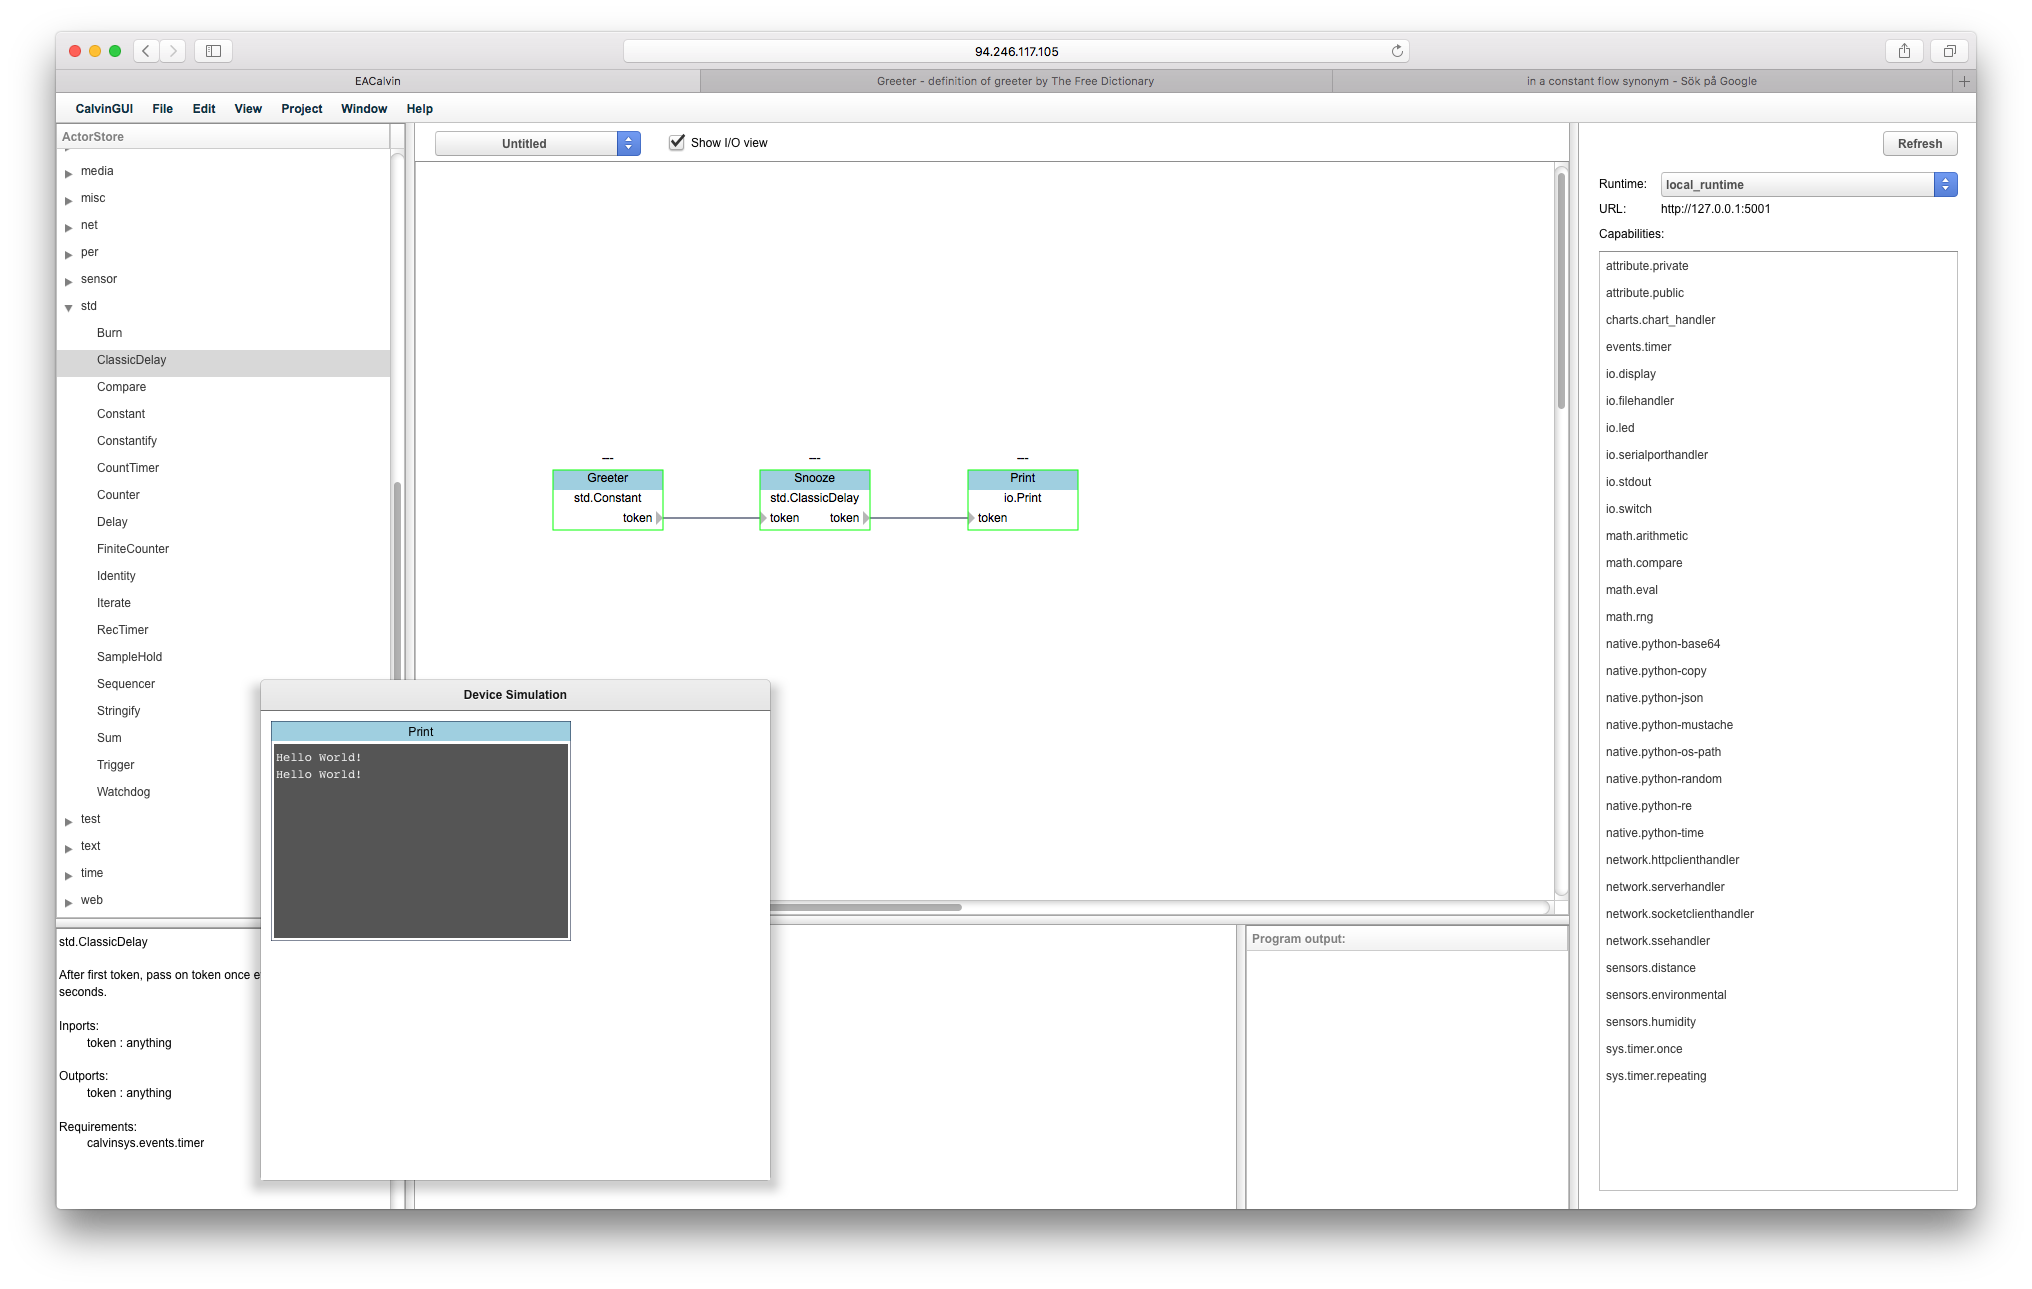
Lets start with a simple Hello World application with a small twist (migration)
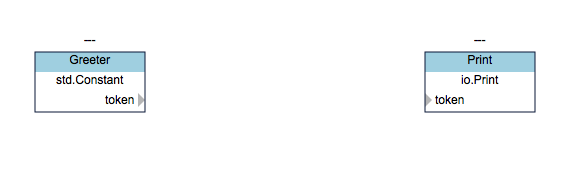
First, create a constant actor which will initiate a message.
- Pick the actor Constant found in category std in the ActorStore,
drag and drop it in the Canvas area.
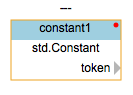
The red dot in the corner of the actor indicates that one or more arguments needs to be initiated for the actor.
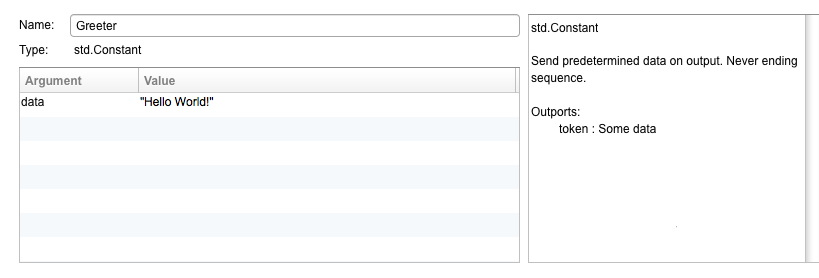
When an actor is selected in the Canvas, information about ports and requirements will be shown in the Inspector, in addition, arguments for initiating the actor are visible.
- Select the Constant actor by clicking on it.
- In the inspector frame, initiate the data argument with "Hello World!" Note! String arguments must be quoted, i.e. enclosed in "".
- It is good practice to name the actors in the application according to their purpose. Change the name of the actor to e.g. Greeter.
To print the constant to the console we need to add a Print actor. The Print actor can be found in the category io in the ActorStore.
- Drag and drop a Print actor next to the Constant actor.
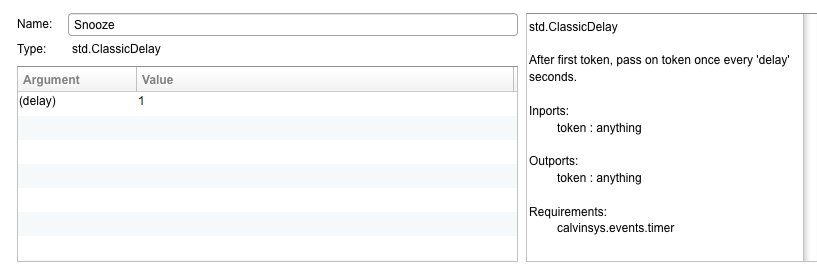
The Constant actor will send tokens in a continues stream. To be able to distinguish each print a delay is needed.
- From the category std, drag and drop a ClassicDelay or a Delay actor
between the Print and Constant actors.

- Change the Value of the delay to 1 second by selecting the ClassicDelay actor and updating the Value in the Inspector to 1.
- Also change the name of the actor as you see fit.
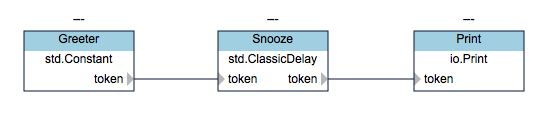
The application is now almost ready, but for data to flow between the actors their ports need to be connected.
To connect an output port (on right hand side of actor) to an input port (left hand side of actor), simply click-and-hold a port, then drag to another port, and release. Now there should be a visible connection between the actors.
To remove a connection, drag from the input port and release anywhere on the canvas (not on another port).
- Connect the actors.
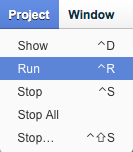
- Start the application by clicking Run in the Project menu
The application is now running and a new window containing a representation for
the terminal will pop up, if it doesn't please refer to the
Troubleshooting section section.
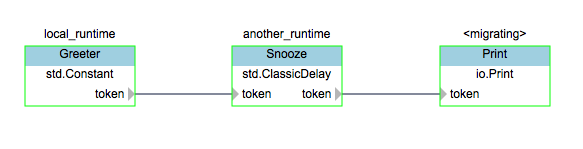
Migrating actors is one of the key features of Calvin. Migrating an actor between runtimes are very intuitive from the Calvin GUI.
Lets start with migrating the Print actor and verify that the prints currently residing in the GUI representation of a terminal moves to a local terminal instead.
Regardless whether the application is running in a sandboxed environment or on a
local runtime, one more runtime is needed. This time the runtime shall use the
default stdout_plugin and therefor no calvin.conf file is needed. Make
sure the new runtime isn't started from a directory from which it can find the
calvin.conf file. See how calvin configurations are found by the runtime in Configuration basics.
-
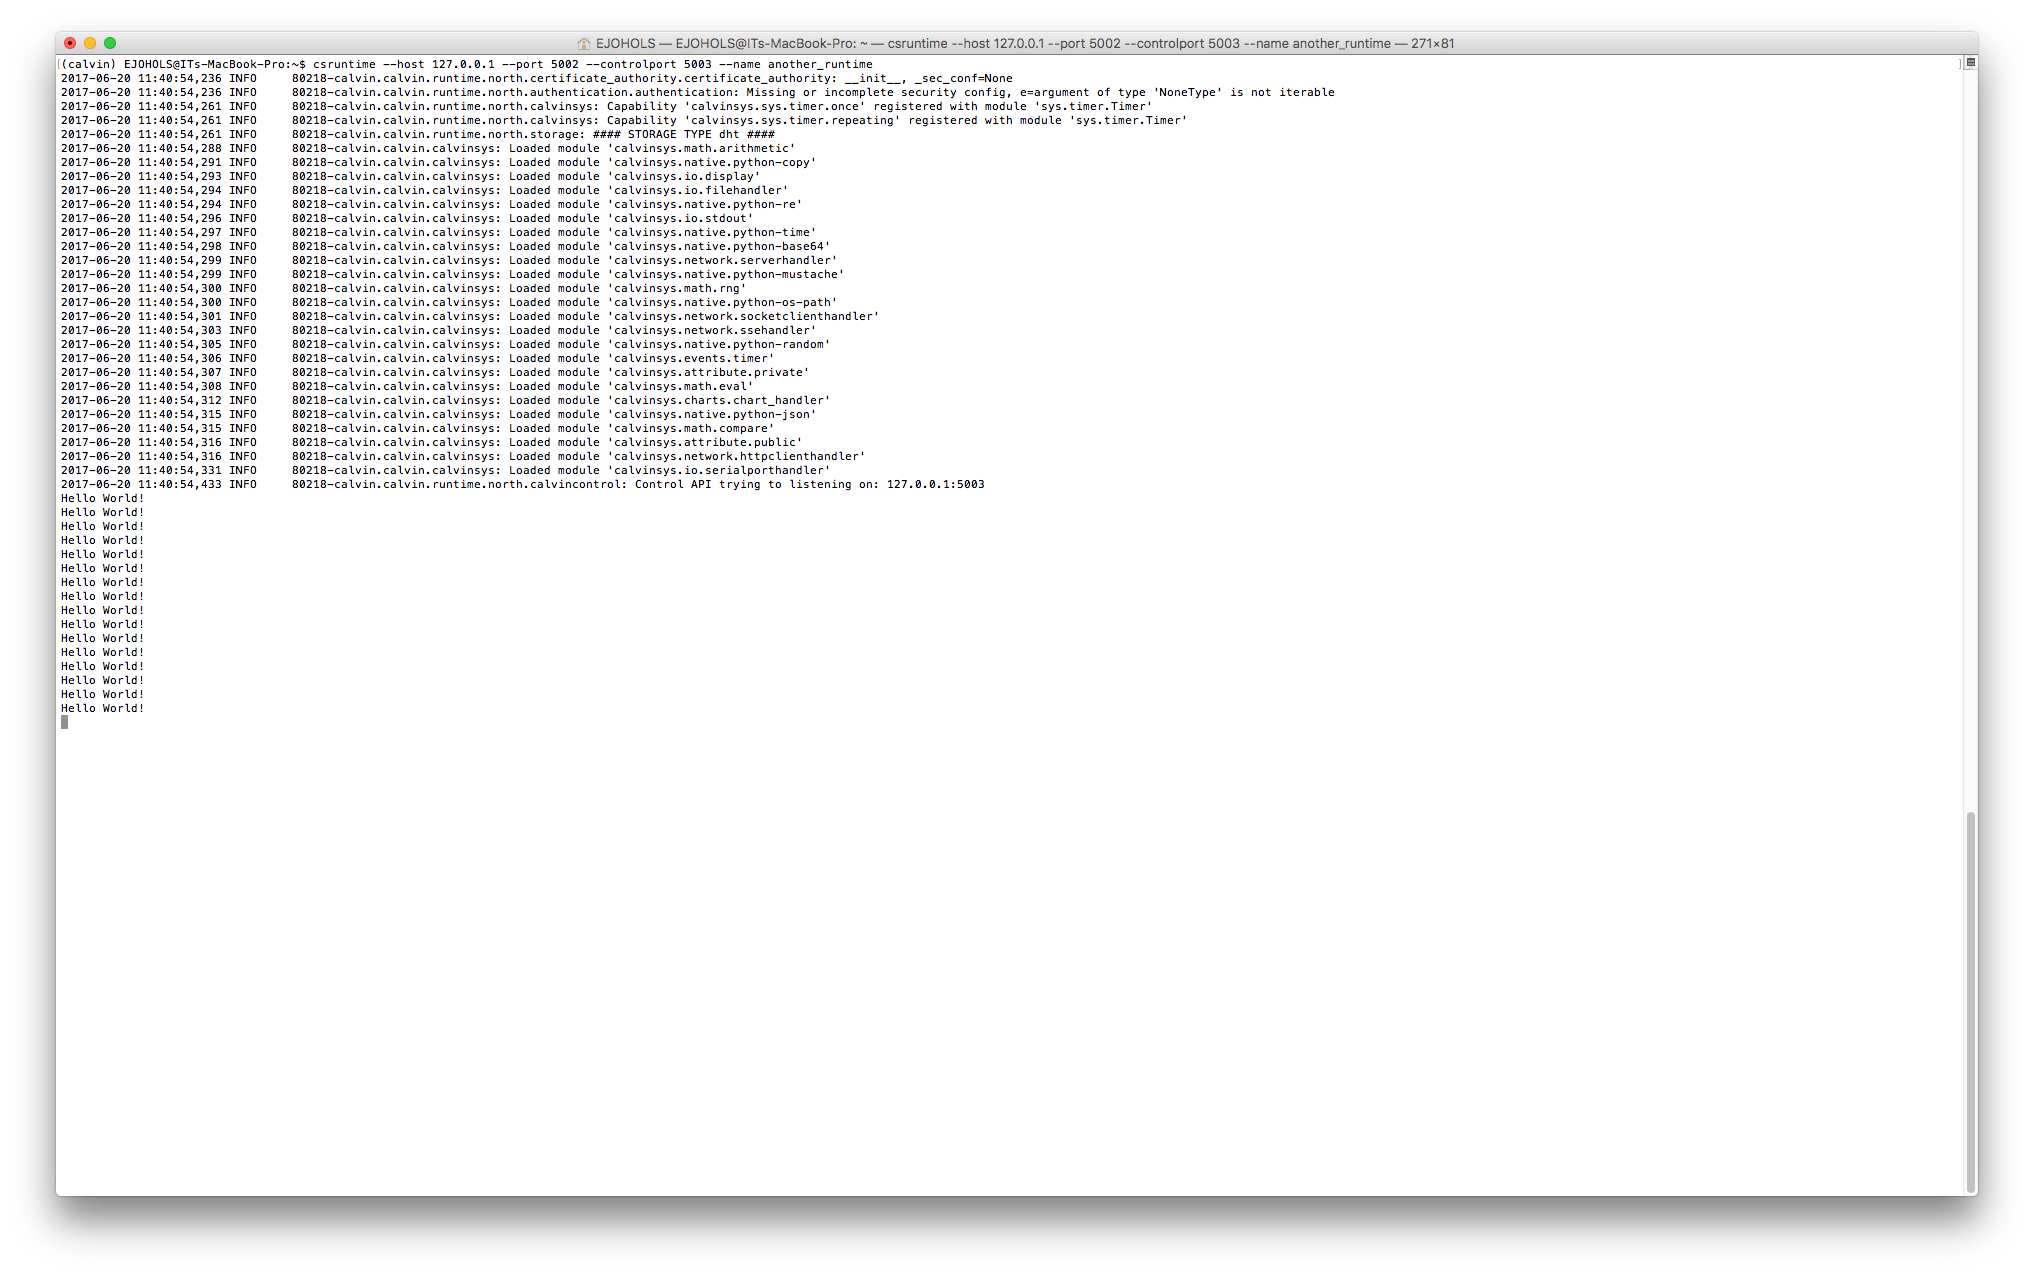
In a new terminal run the following command:
$csruntime --host 127.0.0.1 --port 5002 --controlport 5003 --name another_runtime
- Go back to the Calvin GUI and start the application if not already running.
- Select the Print actor, in the Inspector a drop down meny is available.
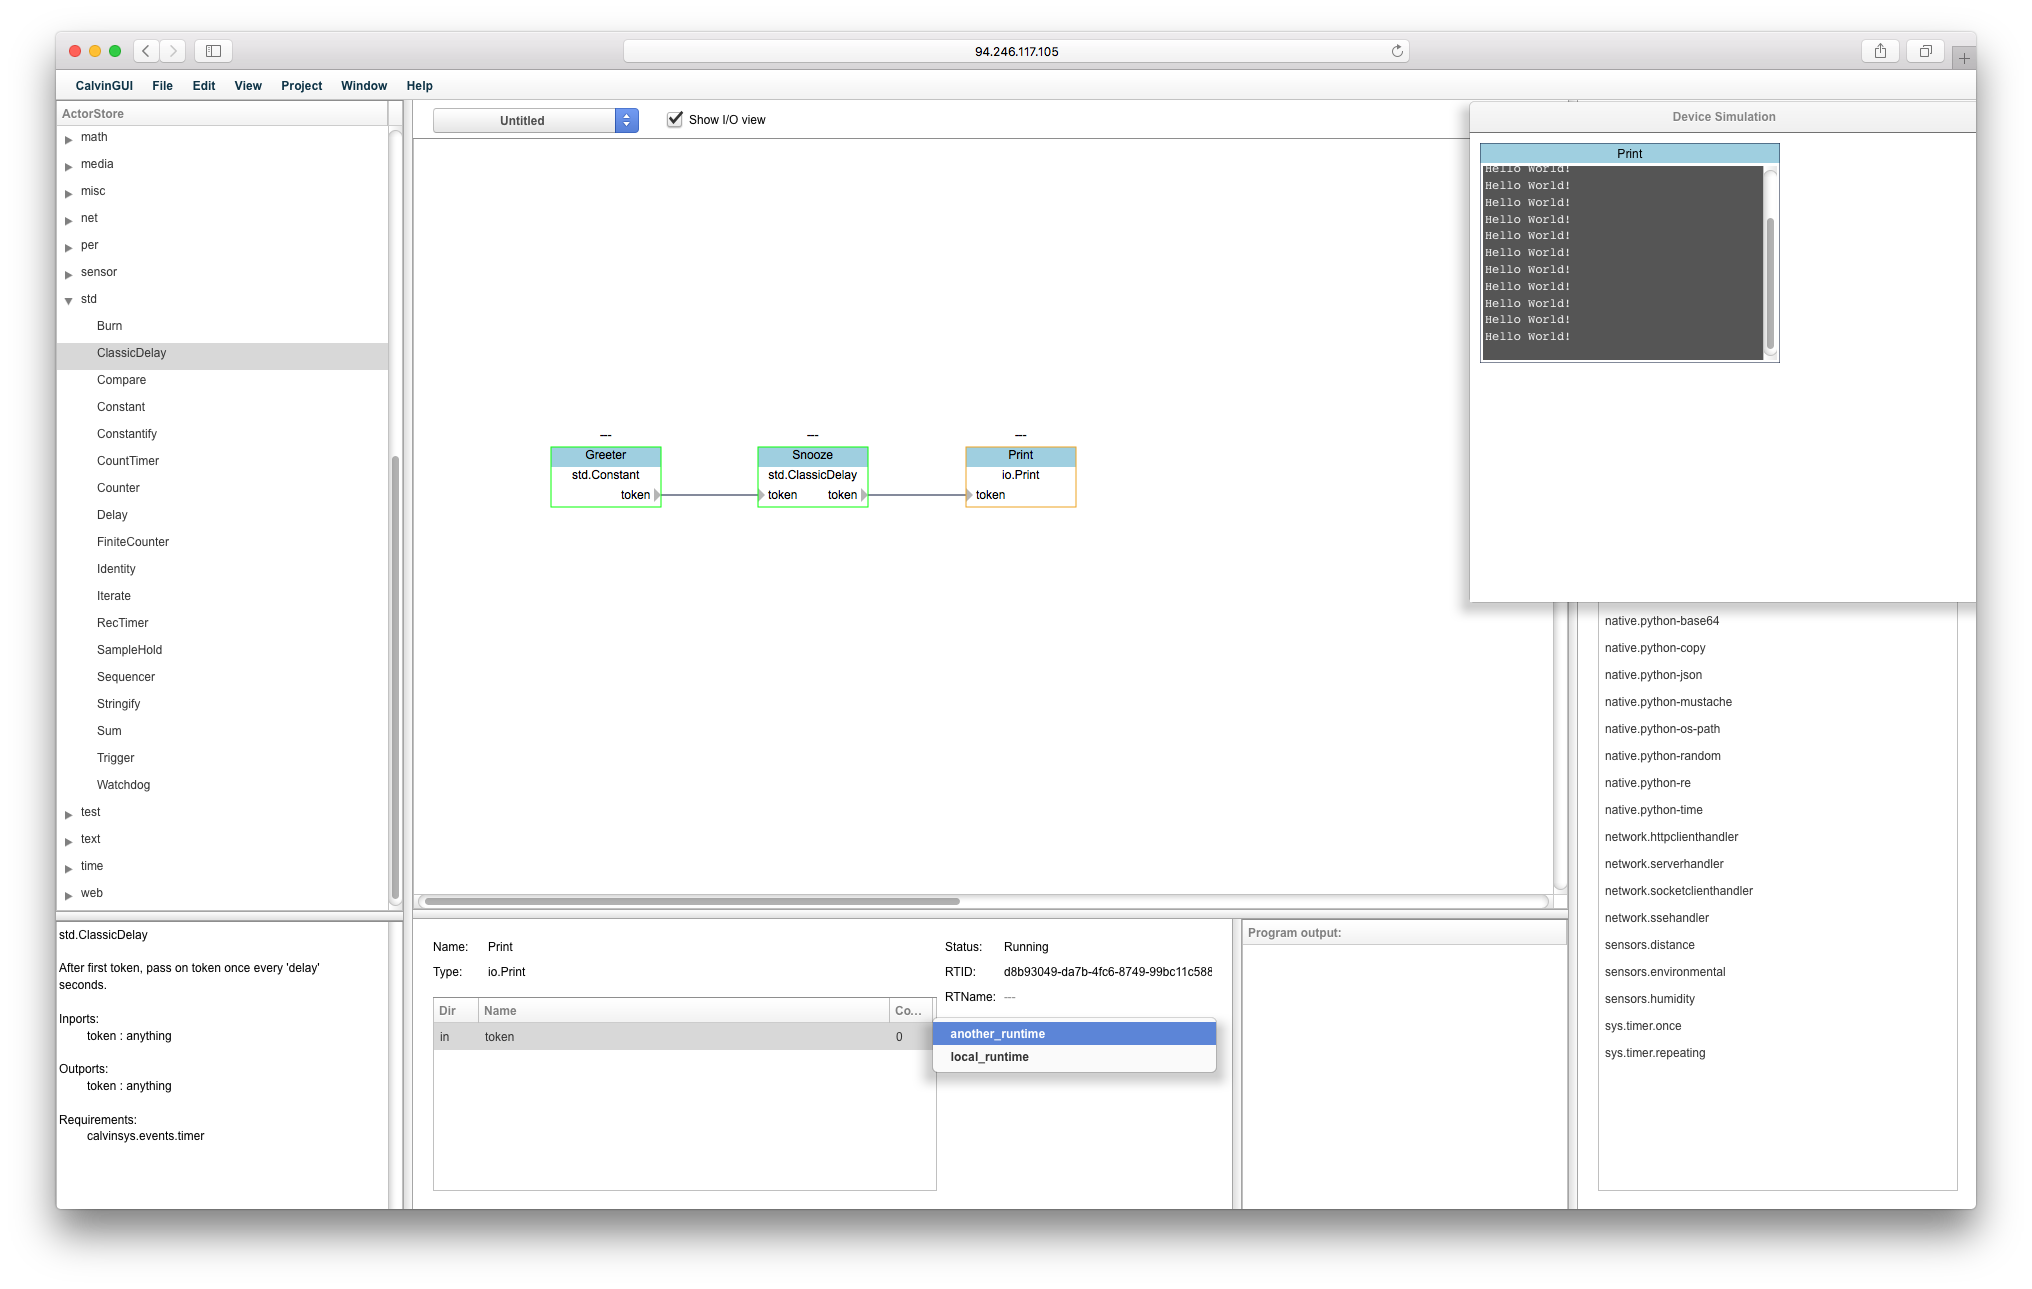
- Select
another_runtimefrom the meny. - The Print component will disappear from the Device Simulation window.
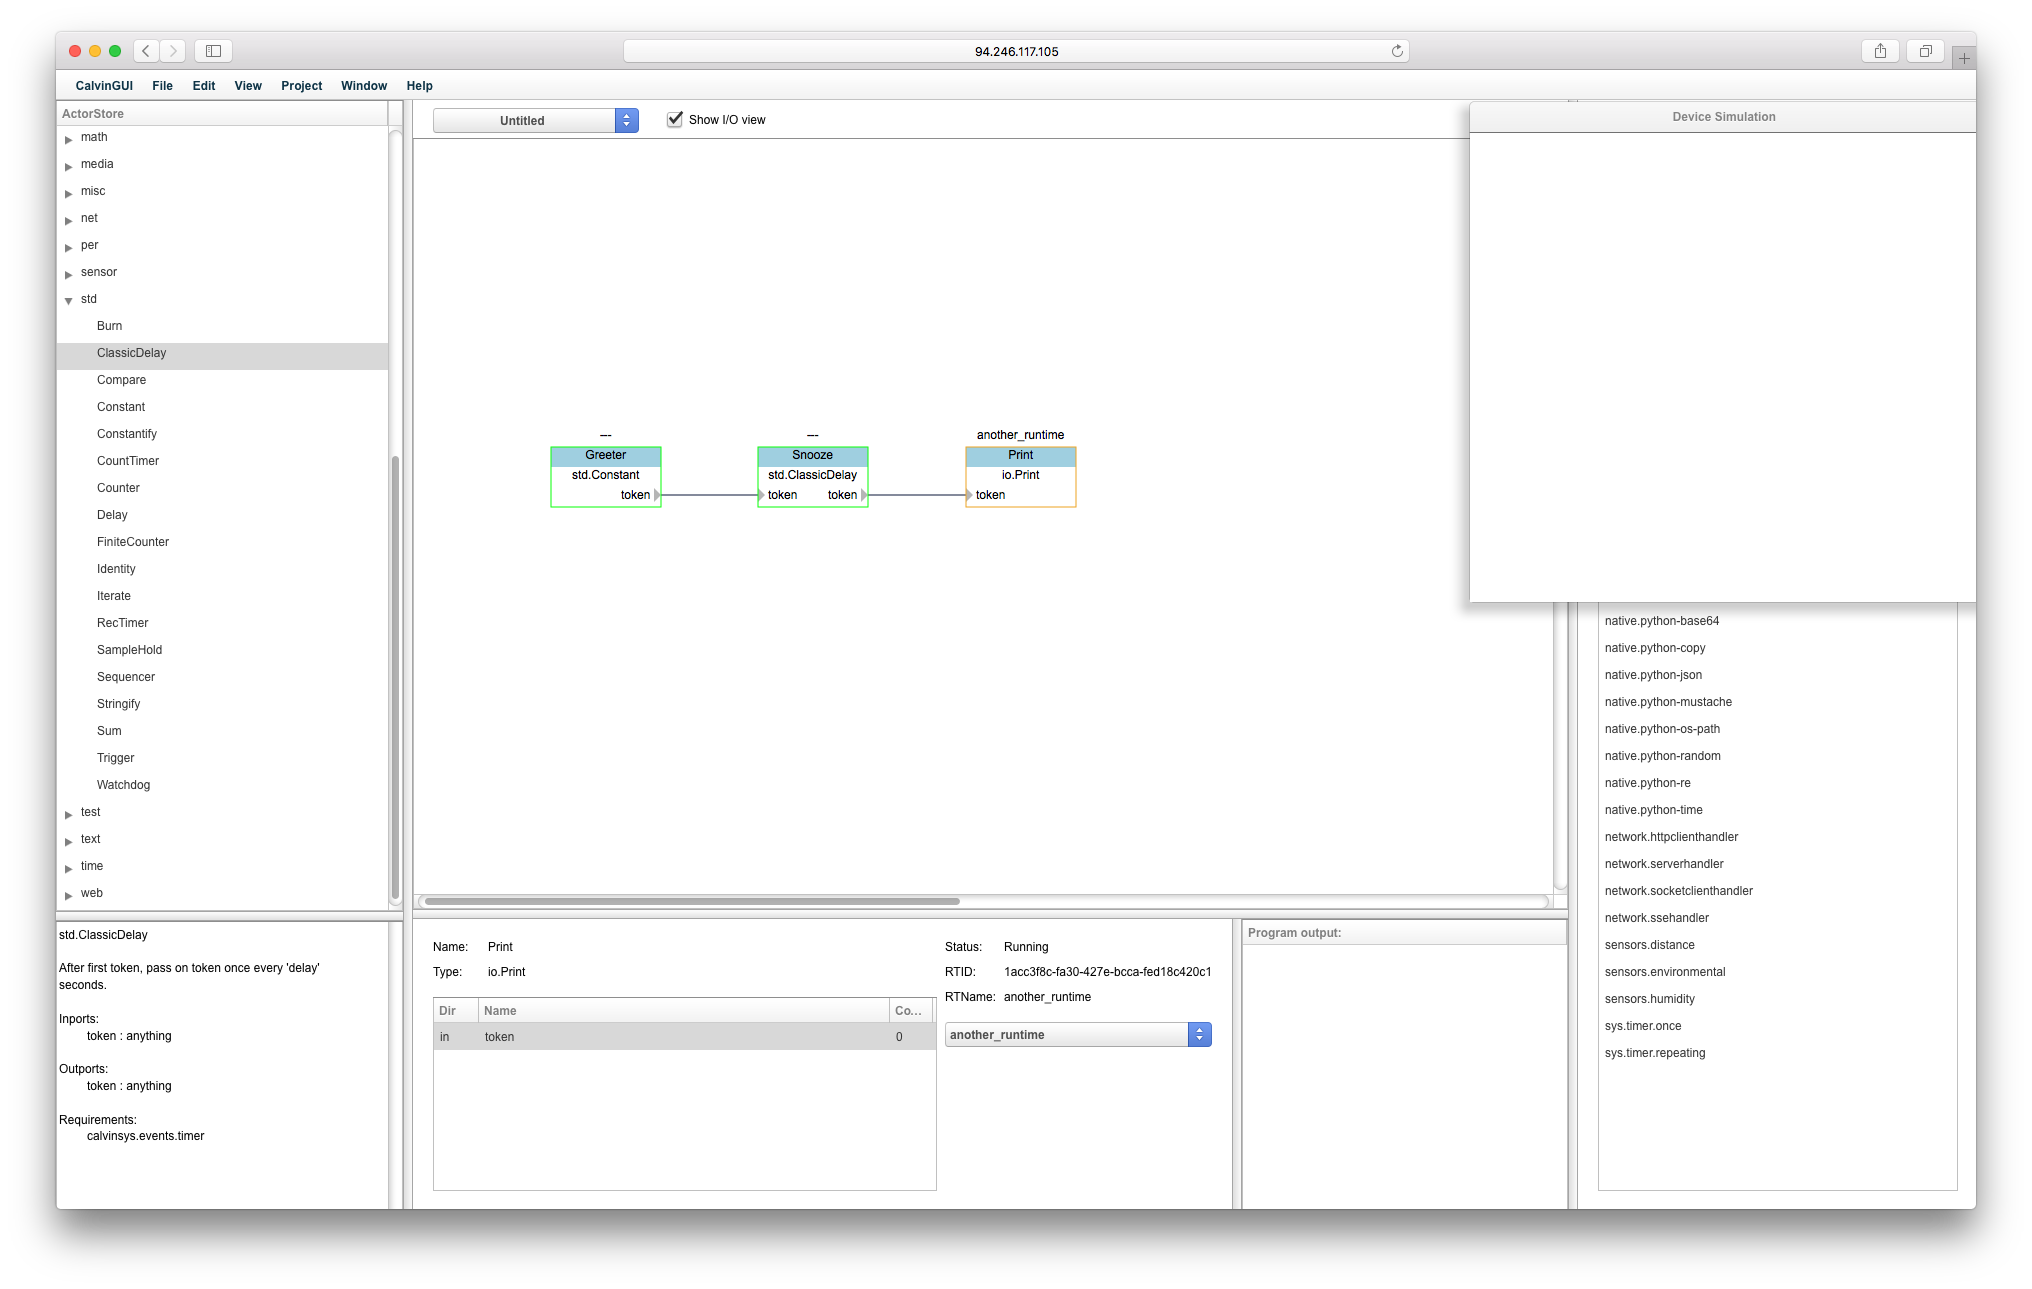
- The Print actor has migrated to the new terminal and the prints can now be seen there instead.
- Test to migrate the Print actor back and forth between the runtimes.
- The other actors can be migrated in the same manner.
- Above the actors the runtime in which the actor currently resides is labeled, in addition migration status is stated during migration.
An application can be saved for future development or...
- Stop the application if it is running.

- Save it.

- Pick a name for the project.

Now the application will be available for running or continues work in the future.
When creating large application, saving the project continuously is highly recommended.
In the following example a simple application for controlling a light with a button is introduced. The application will comprise two actors, a Button actor and a Light actor.
- Start with creating a new project.

- From the category io, drag and drop one Button actor and one Light actor to the Canvas area.
- These actors have no arguments which needs to be initiated. However, the name of the actors can be changed in the same manner as for the actors in Example 1.
- Connect the actor ports

- Start the application as earlier described.
A new window containing a representation of both the Button and Light
components will pop up.

- Try the application out by clicking the Button representation and see what happens with the Light representation.
The next step is to migrate the actors to a Raspberry Pi and try the application with real hardware. (To be continued...)
If running Calvin on a local or remote machine as opposed to running in a
sandboxed environment, make sure the runtime have access to a calvin.conf
file which specifies capabilities such that the actors can be represented
in the Calvin GUI. See calvin.conf
in the ui_in_gui example in Calvin.
Make sure no old application is running in the background by stopping all applications before trying to run the application again.

A simple way of debugging an application is to place an Identity actor between two actors in the application. The argument dump needs to be initiated to true. All tokens flowing trough the Identity actor will then be logged to the terminal window before continuing to the next actor. This approach might at least give a hint about where the problem occur.