The IOIO Manager Application
Note I: If you are looking for information on how to upgrade the application firmware on a IOIO-OTG board, this is probably the wrong page. Read about IOIODude here.
Note II: Using IOIO Manger to upgrade the application firmware on a IOIO V1 board is possible only with Android versions earlier than 4.1. Unfortunately there is technically no way to have it working on later versions as result of changes in Android.
Note III: IOIO Manager can be used to have a IOIO V1 or a IOIO-OTG to act as a programmer for another IOIO.
Click the link:
Or scan this QR code using a barcode scanner application:
IOIO Manager is an Android application which lets you install new firmware on your IOIO board. The application is open-source and is available for download free of charge from the Android Market, using the links above. In order to understand the usage of the IOIO Manager, some key concepts need to be introduced first.
The heart of the IOIO board is a microcontroller. This microcontroller runs the code ("firmware") which gives the IOIO its functionality: establishing a data connection to the Android device, controlling the pins, etc. This code is stored in Flash memory that exists inside the microcontroller. Changing the code involves writing new code to the Flash memory, an operation commonly referred to as programming the microcontroller. The IOIO firmware code comprises two main parts: bootloader and application.
The bootloader is the first code that runs every time the IOIO is restarted. What it does is establish a data connection with the Android device, and then use this data connection to check for the existence of new application code on the Android device. If it finds such an application, it installs it and then runs it. If not, it runs whatever application it already has installed.
The application firmware gives the IOIO its main functionality: it communicates with the IOIOLib code running on the Android device, which sends it commands. It then executes those commands, usually by controlling some peripherals of the microcontroller, such as digital pins or the UART module. In a more general sense, the application can be any program, not necessarily one that communicates with the Android device.
When you buy a IOIO, it comes pre-programmed with both a bootloader and an application. When newer versions of the firmware are released with new features and bug fixes, you can stay up to date by upgrading to the latest version.
Bootloader code and application code are stored in files called images. These images are simply a description of what data should be written to what addresses in Flash memory. Each bootloader image matches a specific hardware version. Each application image matches a specific platform. A platform is a combination of the firmware and hardware environment in which the application runs. When distributing application images, it is very convenient to bundle together a set of images comprising the same code built for different platforms. Similarly with bootloader images and hardware versions. These bundles, referred to as image bundles are nothing more than a zip archive with a specific file naming convention inside them, each file being an image built for a specific target.
Applications are very easy to install: the bootloader fetches an image from the Android device, which matches the platform it is running on. It follows the instructions in this image file and writes new code to Flash. The exact image to install is selected by the IOIO Manager application, as described below. After installing the new application image, the bootloader executes it. So far so good. But if this has been done naively, it could have been risky: what if a bad application image contained code that overruns the bootloader code and renders it unusable? Such an event would "brick" the IOIO, as the bootloader will not be able to install a good image again... Luckily, this is protected against - the bootloader cannot possibly overrun itself. This is usually a good thing for the reason just mentioned. However, it also means that if you do want to change the bootloader, it cannot be achieved by "self-programming" such as in the application case.
Note: Android version 4.1 (Jelly Bean) broke the compatibility with the IOIO bootloader. This means that on this version (and probably later versions too), you will not be able to use IOIO Manager for application firmware upgrades. The only current solution is to use an older Android for this purpose, until a permanent solution is found.
Programming a new bootloader involves using a device called programmer. It is a simple (and usually cheap) device that connects to your PC on one end and to the microcontroller (via the IOIO pins) on the other end. Using a special application running on your PC, you can load an image file stored on your PC and program it into the microcontroller's Flash memory. A common programmer used for programming the microcontrollers used in IOIO (Microchip PIC24F series) is called PICKit3. It can be bought online for about $50 (e.g. from SparkFun Electronics). But obviously, not everybody has access to a programmer, and with the realization that the bootloader will have to change sometimes, a better solution was found - one IOIO connected to an Android device can act as a programmer and program another IOIO! Of course, not everybody has two IOIOs too, but this is probably as good as it can get.
The IOIO Manager application lets you manage your image bundles in two libraries: application image bundles and bootloader image bundles.
When you start IOIO Manager, the first screen you see is the application image library. You have several ways of adding items to this library:
- Adding a file that is stored on your external storage (the same drive that you see when you connect your Android device to your PC and "enable USB storage"). Do this by selecting "Add from File" from the menu.
- Downloading a file from the internet by scanning a QR code that contains a link to a bundle. Do this by selecting "Scan QR" from the menu.
- Opening a file with a
.ioioappsuffix from the Web-browser on your Android device or from any other application that can fetch files or URLs (note: this sometimes doesn't work perfectly, depending on the MIME-type reported by the Web server. If that fails, download the file first, then open it).
The first two options are accessed by pressing the menu button in the application library screen. For scanning a QR code you'll need to install an application that does that, such as ZXing.
In order to remove a bundle from the library, long-click it and choose "Remove" from the context menu.
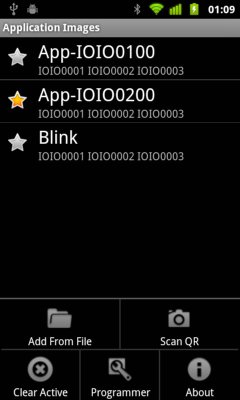
After adding some bundles, you will notice that each one of them is represented by an item in the list. Each item has:
- A name that identifies it. This is just the bundle file name without the ioioapp suffix.
- A list of platforms it can be installed on. Each platform looks something like
XXXXdddd, for exampleIOIO0001. If you bought the original board from SparkFun (V1.5), your platform isIOIO0002and the second version (V1.6) isIOIO0003. If you modify your bootloader at some point, this will change. - A star icon on the left.
At any given point in time, there's only one active application bundle. The active application is the one that will get installed then next time a IOIO board is restarted and connected to this Android device. The active application is selected by clicking the star icon on the left. If you don't want any application to be installed on a IOIO that is being connected, simply select "Clear Active" from the menu, or click the star of a starred bundle to turn it off.
For your convenience, the Downloads page contains the officially released application bundles, as well as a very simple sample "blink" application, which demonstrates how easy it is to write an application firmware and would let you practice with switching applications back and forth. Give it a try: download the latest App-xxx bundle and the Blink bundle. Make "Blink" active, by starring it. Turn the IOIO off and on again and connect it to the Android device. The yellow LED will light for a little longer than usual, signaling the the bootloader is working. Then your yellow LED will start blinking and will do so even if you disconnect from the Android device. Now, star the App-xxx bundle, power-cycle the IOIO again, and it will be back to its normal behavior!
Choosing "Programmer" from the application library screen will get you to the Programmer screen. The programmer lets you use one IOIO as a programmer and program a bootloader image on another IOIO (the target). The programmer IOIO must be running the App-IOIO0200 application or higher. You can download this application bundle from the Downloads page page and install it normally as described in the previous section.

You need to connect 5 wires between the programmer and the target according to the following table:
| Programmer | Target |
|---|---|
| 38 | 38 |
| 37 | 37 |
| 36 | mclr (the isolated pin near pins 33 and 29) |
| 3.3V | 3.3V |
| GND | GND |
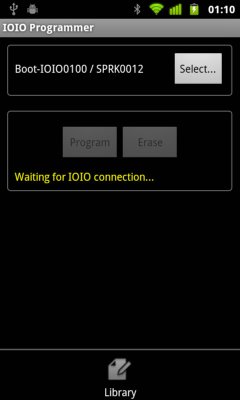
The top section of the Programmer screen is about selecting the bootloader image that you wish to install. Clicking "Select" will take you to the bootloader library for selecting an image. In the library, clicking a bundle expands it to show the images it contains - one image per supported hardware version. Clicking an image selects that image and takes you back to the programmer screen.
The bottom section of the screen contains the programmer buttons and information on the connectivity status. This status can be:
- Waiting for the programmer IOIO to connect. Once connected - its application version will be checked and if earlier than
IOIO0002an error will be displayed. - Waiting for the target to be detected. Once connected, its microcontroller model will be checked. If it is a known model - it will be displayed in green. If not, a red error message will be displayed.
When a connection to the target has been established the Program and Erase buttons can be used. Erase if very fast. Programming takes a bit more patience, and after the actual programming, validation takes place to make sure the image has been correctly written. You'll get a "Success" bubble once verification passes.
Each image in a bootloader bundle matches a certain hardware version of the target IOIO board. Each such board version uses a microcontroller of a certain model. For example the original IOIO boards sold by SparkFun (V1.5) are versioned SPRK0015 and contain a PIC24FJ128DA206 microcontroller. The IOIO Programmer application can extract the board version to which the image is targeted from the image name. It can also detect the target's microcontroller model as soon as it is connected. Basic sanity checking is done to try to warn you if your selected image does not match the target. However, some limitations prevent this check from being perfect:
- IOIO Manager cannot know which board the target is, only which microcontroller is there, since different boards may use the same microcontroller.
- If the board version reported by the image is not one that IOIO Manager knows about, it cannot possibly know which microcontroller to expect. V1.1 of the IOIO Manager application knows boards SPRK0010 through SPRK0016.
This yields the following behavior:
- If the intended board is known and the detected microcontroller doesn't match - IOIO Manager will warn you strongly about a mismatch.
- If the intended board is not known, IOIO Manager will warn you lightly.
- Otherwise, if there's a match, IOIO Manager will give you a positive (green) feedback, but this doesn't mean 100% certainty in matching.
Bottom line: you, the user, are left with the ultimate role of making sure the image version you select matches your board. Despite all the long explanation, this is usually not hard to do, and you are not likely to do any damage even if you happen to get this wrong.
Clicking the "Select" button or choosing the "Library" option from the menu of the Programmer screen gets you to the bootloader image library. It is very similar to the application image library: you can add bundles from files, by scanning QR codes or by opening files with a .ioioimg suffix from other applications. Similarly, you can delete bundles by long clicking them and selecting "Remove". Unlike the application library, the bootloader library does not have the notion of an active bundle.
As the IOIO connects to the phone via USB, and the phone has USB debugging enabled, a malicious application running on the IOIO may do things it is not supposed to. On "rooted" Android devices, the IOIO applications may run commands on the Android device acting as root, which basically means it can do whatever it wants, including freely access your private data or messing around with your data. For that reason - you should install on the IOIO only applications that come from a trusted source. In order to make sure no malicious application that you somehow got on your Android device installs a malicious application on the IOIO without your consent, the IOIO bootloader only installs firmware marked as active by the IOIO Manager application. It goes as far as checking the certificate of this application to make sure it is authentic. The authentic IOIO Manager application will make sure you get a warning dialog that you need to approve any time an external application tries to install a new bundle or to set a bundle as active (the latter is currently not physically possible yet).
When you see this confirmation dialog, please understand what it's there for and make sure you are indeed trust the provider of this firmware.
This is not intended to be a step-by-step guide. However, writing firmware applications for IOIO is very simple and can be learned by example. Basically, you're just writing a normal C program for PIC24F. The only magic is linking against the right linker scripts to make the application play nicely with the bootloader.
Check out the code under firmware/blink as reference. Post any questions you may have to the ioio-users discussion group. If you want your application to communicate with the phone, have a look at what firmware/app_layer_v1 (which is the official IOIO application) does.
Once your app is ready, package it to a ioioapp file using the script tools/make-ioio-bundle. An example execution would be:
tools/make-ioio-bundle myproject/dist mybundle.ioioapp IOIO0001 IOIO0002 IOIO0003
The first argument is the output directory ("dist") of the application project (using MPLAB-X). The second argument is the path of the desired output file. The next arguments are the target platforms, which must also be the MPLAB project configuration names.