User Guide
Scan Tailor is an interactive tool for post-processing of scanned pages. It gives the ability to cut or crop pages, compensate for skew angle, and add / delete content fields and margins, among others. You begin with raw scans, and end up with tiff's that are ready for printing or assembly in PDF or DjVu file.
Scanning, OCR, and the building of single-file multi-page documents are not included in the project objectives.
The program is developed for Windows, GNU / Linux, and other Unix-like systems such as Mac OS X.
Versions for Windows come in the form of an installer. Install the program and run through the self-explanatory menu.
If your distribution does not have Scan Tailor in its repositories (and the only distributions I know of are Alt Linux and Debian), then you have to build it from source. After assembly, you can run Scan Tailor via Alt + F2, using the command "scantailor" (without the quotes), or if you don't have a Gnome environment you can type the same command on the command line. On Mac OS X, it currently must be run from the terminal after building and installation.
Once launched, the main program window looks like this:

In the central panel we see the items "New project ...", " Open Project ... " and a list of recent projects, if any.
So, let's create our first project. First, we need the raw material - Scan Tailor requires the presence of at least one image file in the project. This source material can be scanned or photographed pages of a book or a magazine. Follow these tips for scanning to get the best results.
Click on "New Project ..." - Opens dialog "Project Files".

"Input Directory" - the folder where the original scans are located.
"Output Directory" - the folder where processed scans are stored.
"Files Not In Project" - files in a folder specified in the Input Directory, but not yet added to the project or files that were added and have been removed from the project.
"Files In Project"- files added to the project, although not necessarily from the directory entry. The project can take files from different directories to contribute to the project. You may select files from one directory, then change it, select files from there, and so on.
The buttons ">>" and "<<" between "Files Not In Project" and "Files In Project" move files from one list to another. This will only move highlighted files. It is possible to highlight all the files via "Select All", or individually - via Ctrl + Click, or a range - through Shift + Click as per standard selection procedures.
Once you've selected the files to use in the project (supported files types are *.tif, *.tiff, *.png, *.jpg, *.jpeg), click OK. Usually at this stage the process of creating the project ends, but if project files with an unspecified or clearly incorrect DPI have been selected then a "Fix DPI" dialogue window will open. See FAQ to learn more about the DPI concept.

The tab "Need Fixing" lists only those files in which the DPI is not specified or is clearly wrong. In the tab "All Pages" (Not to be confused with the same drop-down list) lists all the files at all. They also can change the DPI. If we know that all the files in the project are 300 x 300 DPI, then one can go to set the DPI for all files. To do this, highlight the row that says "All pages" with the triangle/arrow next to it (not the tab that says All pages), select the correct DPI, and click apply. You can also specify the DPI for groups of files with the same pixel size, and also for individual files. Files that have been fixed disappear from the tab "Need Fixing". When the tab is completely empty, click OK. Upon clicking OK, the process of creating the project will be completed.
At all stages of processing you have the ability to add / remove files from the project with the help of a pop-up menu, selected via a right click of the mouse in the preview window (the small thumbnails):

When you try to add a file with invalid DPI Scan Tailor will call the Fix DPI dialog. If you want to change the DPI for a file in the already created project call Fix DPI via the programm menu. The DPI settings which you specify are not written to the files - they are only stored in the Scan Tailor project file.
First, you need to understand the general concept of the program. Processing of the scanned pages in Scan Tailor is like a factory conveyor. There are stages, each of which deals with some specific manipulation of the image to produce the final product.
Let's look at the main program window:
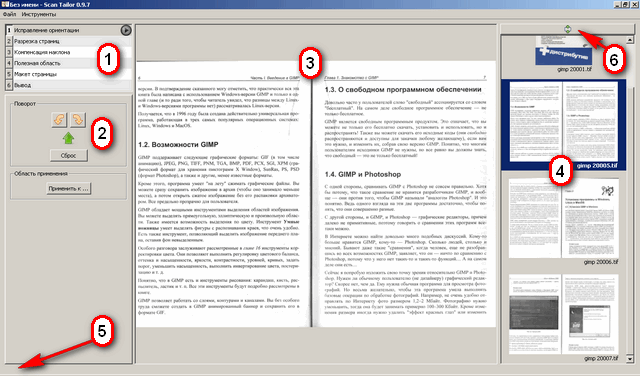
(1) List of stages, (2) Options for the current processing stage, (3) Main working area that displays the current image, as well as tools for manipulating it, (4) Preview tape, (5) Tool tips (here you can see prompts for how to use the tool or item under the mouse pointer), (6) Button "Keep the active page in the field of view" (being pressed this button causes the program to show the active page on the preview tape).
The preview tape can be considered as a conveyor belt. It is important to understand that as on a regular assembly line if the product reached a certain stage, then all the previous stages must have been completed in strict sequence. For example, if you enter the "Select Content" stage immediately after launching the program, then the page you are working on will be (invisibly) processed in all the previous stages (that is, "Split Pages" and "Deskew"). At any time you can return to one of the previous stages to see and to correct the operation that was done to the image at that stage.
The round button "Play" to the right of the name of each stage runs the batch processing, like starting the above described conveyor.

Pressing the "Play" button causes pages, one by one, to pass through all stages of processing, including the current stage. "Pass through all stages of processing" - does not necessarily mean "processed". For example if the scan had already been cut, then when it gets to the stage of cutting again it will not be cut, unless you had changed something important such as its orientation. You may stop batch processing at any stage by using the large round "stop" button during the processing of the main work area (3).

None of the stages, except the last stage, named "Output" actually record the resulting image to the disk. All stages except the last are purely analytical.

The program menu is obvious and does not require an explanation, perhaps with the exception of the "Close Project" item. This command closes the project, but not the whole program. The main window will be displayed in the form that was immediately after the start. Hot keys are displayed to the right of the menu commands. That is, pressing the key combination CTRL + S will save the project.

The Fix DPI command calls the already discussed Fix DPI dialog
The Relinking command allows you to reassign paths to images directory when copying a project from one computer to another (or moving it from one HDD to another one). If any folder is missed on the proposed path, then it is highlighted not in green, but in red. You can click on this red zone and choose a new path for the directory.

The Debug Mode command shows intermediate processing results on special tabs. These tabs will be displayed at the top of the central area after processing of a page. This mode is intended for developers.

From the Help menu, you can only call the "About" dialog, which contains information about the version of the program and its developers:
