Setup for iOS and macOS
Instead of repeating here everything that Apple explains so well on their own website, I recommend you follow their setup guide:
https://developer.apple.com/support/app-store-connect/
The below was written a while ago, when Apple's own documentation was too confusing for the average developer. It's not the case anymore: so again, better follow Apple's AppStore Connect Documentation
Also note that almost everything that applies to iOS also applies to macOS, it's the same Framework and Setup procedure.
The first step is to create an App ID, if you didn't already did so. Log onto your iOS developer account, select the Identifiers options, and click the Plus (+) button. Here I chose cc.fovea.inapptutorial as my Bundle Identifier. Note this should match your project's .plist Bundle ID.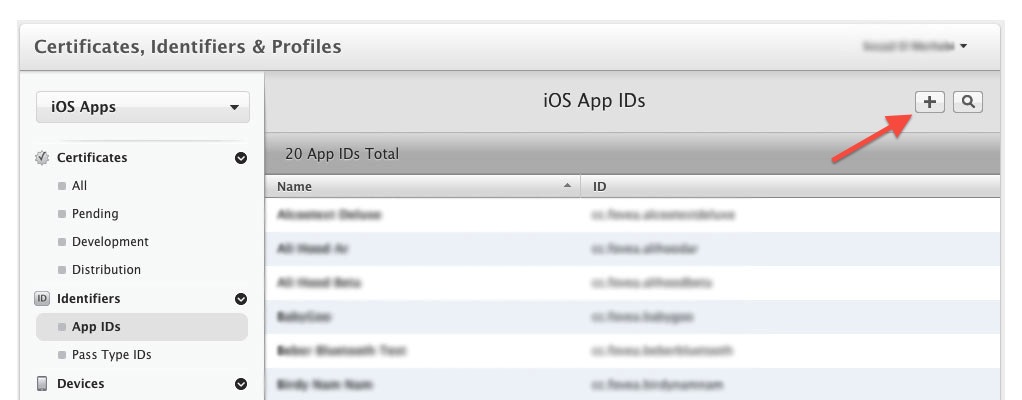
Now we'll use this to create a new Application on iTunes Connect.
Log onto iTunes Connect, click “Manage Your Applications”, and then “Add New App”. Enter in an App Name, SKU number, and the Bundle Identifier you just created. Notice you have to fill every single fields, you can just put placeholders for now and change the informations later.You need your application created. See Create iOS Applications.
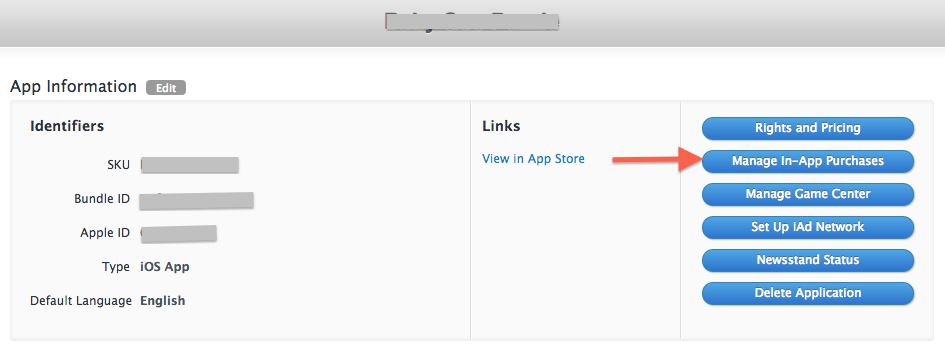
Then enter the "Manage In App Purchase" section of iTunes Connect, for this Application.
Inside the In-App Purchase Manager, click "Create New", then select the appropriate type of In-App Purchase. "Consumable" and "Non-Consumable" are the most common option. For virtual currencies, you'll select "Consumable". To unlock a feature, you'll pick "Non-Consumable".
Follow the steps, it's pretty straightforward: Name, price, descriptions and so on. The important part is the Product ID, you'll need this in your code!
Important: Don't forget to add a screenshot and to set the product to cleared for sale.
To test your In-App Purchase, you will need a "Sandbox" user account. Enter the "Manage users" section of AppStore Connect to create one (or more).
Note that if you mistakenly use your test-user-account credentials to log in to a production environment on your test device (instead of in to your test environment), your account credentials become invalid and cannot be used as a test account again. If a test user have mysteriously stopped working, try creating a new Sandbox user.
- Configure your products properly (see here and here)
- Use a test user (see here)
- From your real device, logout from iTunes (from the device settings).
- Run your application in debug mode, on an actual device.
- If this is your first in-app purchase setup, you will likely need to fill out the Tax Forms and Contacts in App Store Connect before the plugin will be able to recognize your products as valid.
When testing auto-renewable in-app purchase subscriptions in the sandbox environment, the duration times will be compressed to allow for more streamlined testing. Additionally, a sandbox subscription will only auto-renew a maximum of 6 times. After the subscription has auto-renewed 6 times, it will no longer renew in the sandbox. The compressed duration times are as follows:
   Actual duration      Sandbox duration
   1 week               3 minutes
   1 month              5 minutes
   2 months             10 minutes
   3 months             15 minutes
   6 months             30 minutes
   1 year               1 hour