The Basics
In this lesson we will begin understanding how to write code as well as some broad programming topics like printing to the console, setting variables, and instancing classes.
Open up the explorer view in visual studio and Navigate to the Main.java file located within the src/main/java/basics folder. Double-click on Main.java to edit the file. Within the open and close brackets {...} of the main method and under the comment labeled ASSIGNMENT A: write out the following line of code.
System.out.println("Hello world!");
Press F5 to run your code and watch the terminal at the bottom of the screen.
Under the comment labeled "ASSIGNMENT B:" we first need to initialize or set the input variable to a new instance of the Scanner class. This sounds like a complicated task but is quite simple in practice using the following line of code.
input = new Scanner(System.in);
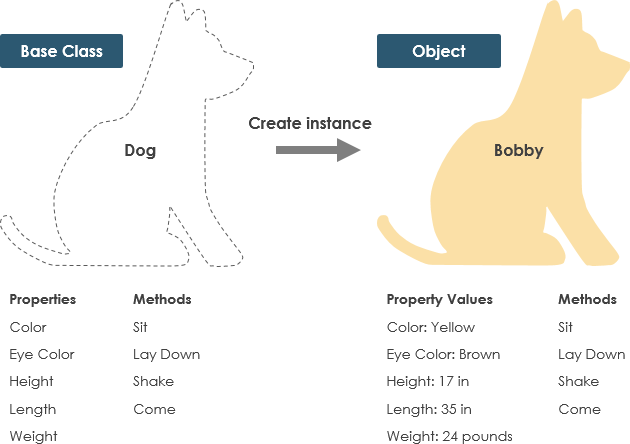
For now, don't worry about the System.in portion of the code, this is called a parameter and is used for passing values to a newly initialized class. All we have done through this code is set our input variable input = to a new instance of the Scanner class (System.in); with a parameter at the end. An instance in programming is simply a specific occurrence of a class. In this way think of a class as a template and the instance of that class is the complete template.
For a more in-depth, but potentially more confusing, understanding of instancing check out this article.
Image Source: Visual Paradigm
Next, we will ask the user for their input (not required, but helpful for the user).
System.out.println("Please enter your name below:");
To actually get the user's input we need to use the Scanner class we instanced previously. To get user input in the form of a String we need to call the nextLine(); method within the instanced Scanner class by calling input. followed by the name of the method.
input.nextLine();
However, simply calling this method isn't enough because we need somewhere to store the returned value of the user input. Luckily, we already have a String variable named name in our Main class. So we just need to set name equal to = the value returned by input.nextLine();.
name = input.nextLine();
Finally, we will print a customized welcome message for the user with their name.
System.out.println("Welcome, " + name + "!");
Now try and run your code by pressing F5 and provide input in the terminal at the bottom of the screen.
In Java, scope refers to the location where a variable or method can be accessed in a program. There are three types of scope: class level, method level, and block scope. Block level scopes can only be created in a method level scope, which in turn can only be created in a class level scope. The class level scope covers everything within a class's opening and closing curly brackets, allowing for the creation of variables and methods. Scopes determine accessibility, and keeping track of curly brackets is crucial for efficient program development.
public class ExampleClass {

    // CLASS LEVEL SCOPE
    // Variables here can be accessed by this scope and any scopes defined within it

    public void exampleMethod() {

        // METHOD LEVEL SCOPE
        // Variables here can be accessed by this scope and any block scopes defined within it, but not the class level scope that contains it

        if (...) {

            // BLOCK SCOPE
            // Variables here can be accessed by this scope and any block scopes defined within it, but not the method or class level scopes
            // that contain it

        }
    }
}
For more information on scopes and instancing check out this article by Codecadamy.
Click on the source control icon on the left of your screen to open the source control panel of visual studio code. Within this panel we'll find any feature related to git we'll be using throughout this tutorial and throughout most of your programming experience on the team. To view all the options available to you in this panel click the three dots in the top right corner of the panel. Within this panel we will be using the Commit tab and the Push feature in this step, but in the future some other common features we'll use are Pull, Fetch, and sometimes Merge (within the Branch tab). First we need to type in a commit message consisting of the changes we made. To do this enter in a message overviewing your changes at the top field labeled message in the source control panel. After that go to the Commit tab and within it select Commit All this prepares our files and commits them locally on our machine. To actually push our commit to the Github we need to select push (make sure you're connected to the internet for this step or else you will get an error).
Now your code is on Github! You can check to see if it's been properly pushed by going to the project repository and selected your branch instead of main. If everything worked you should see your latest code with your commit message.
For more information regarding source control in visual studio code check out this visual studio code documentation.
Image Source: Source Graph
