- Requirements
- Install
Add Zesty CLI (you may need to sudo this command)
npm install -g @zesty-io/cliRun the Next.js marketing
npx create-next-app --example https://github.com/zesty-io/nextjs-starterThe install process will let you use an existing account or create a new. When using an existing account you will be prompted to select from your available instances.
- Change directory to your project
# Use the name you chose for your directory
cd my-app- Start development server
npm run dev- Open application
open browser to http://localhost:3000/
As you develop your Zesty.io instance you will commonly add new content models. In order for new content pages to render in nextjs, there needs to be a relative model component in views/zesty to get the lastest models components you can run a script to sync. Do so by running the following command at the root of your project.
npm run sync
This sync script will create new files where needed, but will not overwrite existing files.
After a npm run sync a view component is created for each Zesty Content Model in the views/zesty directory. Zesty Content Items that have URL will automatically resolve to the component in that views directory that is assocaited with the content models name.
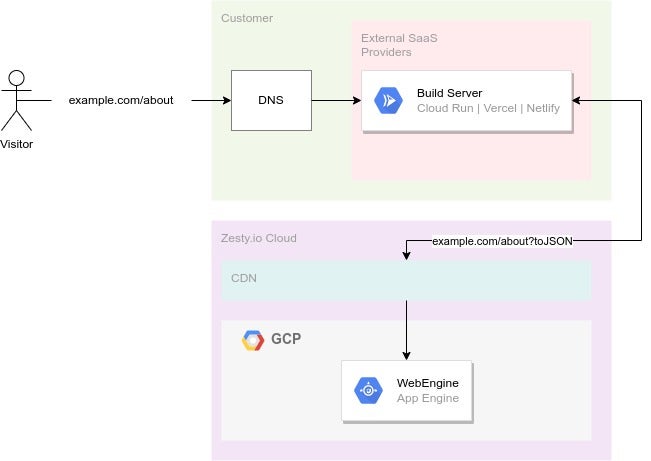
Each Component loads with a {content} object, this object is a direct feed of that URLs ?toJSON response. Read about toJSON
Here is an explanation of the next.js zesty integration, use this information to setup a custom integration or to modify this marketing in your own project.
Required files:
These files should only be modified for customize integrations.
pages/[...slug].js- this is a dynamic catch all routes file, hard written paths and files will superceed it. This file will look for content in zesty relative to the requested path/about/for example looks for content in zesty that matches the/about/path, if it fails to find content it will 404. Instead of 404ing, you can code this to default to your base application component.pages/index.js- if you intent to run zesty to power you homepage, you need index.js to reference the [...slug].js filelib/sync.jsthis file read the next.config.js file to create new views/zesty/ components to map to the connected instance's content models it can be modified to ignore specific models. Sync will attempt to overwrite your next.config.js file if there are missing values.lib/ZestyView.jsthe dynamic component which autoloads the relative content model components from views/zesty based on the url path in the request.lib/api.jsthis file includes the dynamic fetch request to get zesty content and navigation bsed on the relative url path form the request.components/ZestyHead.jsUsed by ZestyView.js, an optional<head>component that dybamic sets up meta data for zesty content items that have pages in nextjs.
Optional Files
These files can be removed if there references are removed.
components/Header.jsmarketing example file, not needed.components/Footer.jsmarketing example file, not needed.components/ZestyTutorial.jsmarketing example file, not needed.lib/zestyLink.jsan optional component which it used to make URL path lookup given a relative content ZUID. It requireszestyURL+'/-/headless/routing.jsonas the nav array, and content item ZUID e.g.7-xyz-xyz.layout/this directory is used to create a generic page layouts, and can be removed or customized.
In order for the integration to work, you need trailingSlash: true and the env.zesty: {} object. See the below example.
// generated by lib/sync.js
module.exports = {
  trailingSlash: true,
  eslint: {
    ignoreDuringBuilds: true
  },
  env: {
      zesty: {
          instance_zuid: "", // zesty unique id of content instance
          stage: "", // e.g. https://XYZ-dev.webengine.zesty.io
          production: "", // e.g. https://www.acme.com
          stage_password: "",
          src_dir: "", // where the next project has pages, components, etc folders
          options: {
            skip_config_overwrite: false, // for setups with custom config files, after initial setup of the env.zesty object, set to true
            model_ignore_list: [
              '6-xyz-xyz',
              '6-xyz-xyz' // an array of models ZUIDs to ignore when creating component files in views/zesty
            ]
          }

      }
  }
}
If trailingSlash needs to be false in your project, then the lib/api.js fetch call will need to modifed to append a trailing slash. In this scenario, webengine preview proxying your nextjs app will fail.
The starting tutorial comes with a couple packages and components
- MUI (mui.com)
- Material Icons
- views/tutorials (directory)
npm uninstall @mui/material @mui/styled-engine-sc styled-componentsnpm uninstall @mui/icons-materialFrom terminal change directory to project root.
rm -Rf views/tutorialsOpen pages/index.js delete the line import Tutorial from 'views/tutorial/ and the line <Tutorial/>