You have found the code base which powers the Zesty.io instance manager. While this code base can be run locally it is only recommended to do so for developing. If you would like to learn more about Zesty.io visit our documentation at zesty.org
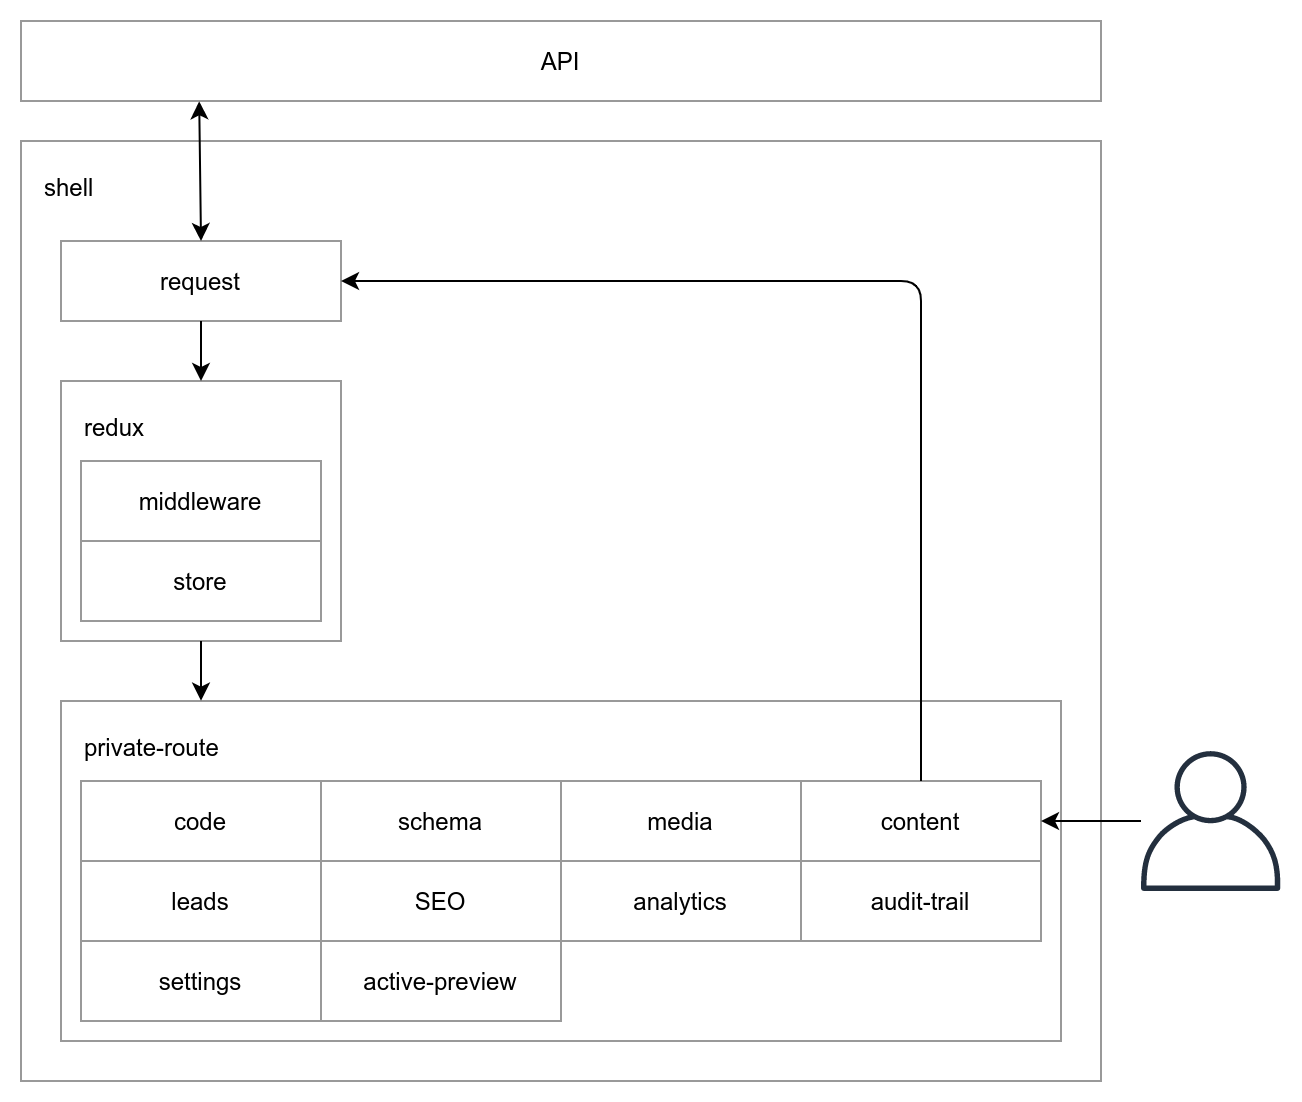
The manager-ui has been architected following the PRPL strategy described by Houssein Djirdeh at Google. Every sub application has it's own bundle build. Application bundles are then pre cached dynamically by the app shell based upon the users settings.
TL;DR: Install all dependencies at the project root
In order to avoid the confusion of sub-app bundles specificying different versions that are actually included with the vendor bundle all dependencies have been lifted to the repo root. By lifiting all dependencies to the top level package.json we have a single location to manage dependency versions.
This means all sub dependency declarations are resolved, per npm default behaviour, by traversing up the project until it finds tehe node_modules directory at the root.
Webpack is used as the bundler of choice. There is a single webpack config in the app shell which, using lazy routes, separates the sub-apps into individual bundles.
A redux store is used to manage state across all of the potential sub-apps. The shell setups a global store which is then shared to sub-apps that can dynamically inject reducers if needed.
- Node.js version 16 LTS
- Web browser: Chrome / Firefox / Edge / Safari (latest)
- Redux DevTools Extension - https://github.com/zalmoxisus/redux-devtools-extension
- Install Redux DevTools Extension
- Click on Redux DevTools icon in browser (or right click and open in new window)
- View sequence of Redux Actions and other features like state diffs and rewind.
Every instance has a Zesty Universal ID (ZUID) which uniquely identifies itself to the API. When running the instance manager on your host machine you will need to point the unique instance URL to your host machines localhost by editing your hosts file. This is necessary as network requests to remote resources will fail a Cross-Origin Resource Sharing (CORS) request otherwise. This will then route through your localhost hitting the Webpack dev server and then make network requests to remote services as the expected referrer.
NOTE: Running the instance manager locally still connects to remote PRODUCTION resources. Meaning any actions you take will be done against your live instance.
e.g. linux: /etc/hosts
windows: c:\windows\system32\drivers\etc\hosts
127.0.0.1 YOUR_UNIQUE_INSTANCE_ZUID.manager.zesty.io
- Install dependencies:
npm install - Start webpack:
npm run start - Load the app in your browser:
YOUR_UNIQUE_INSTANCE_ZUID.manager.zesty.io:8080
npm run start:stage
Functional UI tests are run with cypress.io
To run the tests on your machine you will need to create a cypress.env.json file at the root of the repository, add the following JSON and replace the email/password with valid credentials.
Terminal
npm run test:open
{
  "email": "EMAIL",
  "password": "PASSWORD"
}
Run Cypress
New terminal npm start
Open a second terminal npm run start:test
Pull Cypress Screenshots
npm run ci:pull:screenshots
Connect to Zesty Material Design Systems
npm link @zesty-io/material
In Material codebase make your edits
npm run build => npm pack
A .tgz file will be created copy the file path and install to Manager-Ui
EX: npm i ~/Code/material/zesty-io-material-0.0.3.tgz
Shortcut to see edits without having to build material app again
Go into node_modules/@zesty-io/material/es/theme/index.js make a change and hot reload will show new edit locally.
ToggleButtonGroup
We are adding exclusive prop to only allow one of the child values to be selected.
OnChange value: of the selected buttons. When exclusive is true this is a single value; when false an array of selected values. If no value is selected and exclusive is true the value is null; when false an empty array.
In some case when sending null this will break the togglebutton UI, thus the reasoning for adding toggleHandlers that checks null through the codebase.
To upload assets for your projects put them on the CDN, do not put them in the repository. Assets can be uploaded at https://console.cloud.google.com/storage/browser/assets.zesty.io?project=zesty-prod , upload to the respective folder that match your project name, for example, the SVGs and PNG that are being commited to manager-ui should be moved into this storage bucket under the manager folder, once they are uploaded they accessible from https://assets.zesty.io e.g. https://assets.zesty.io/website/assets/images/dxp_bottom_bg.svg