This is the iOS SDK of adjust™. You can read more about adjust™ at adjust.com.
If your app is an app which uses web views you would like to use adjust tracking from Javascript code, please consult our iOS web views SDK guide.
- Example apps
- Basic integration
- Additional features
- Troubleshooting
- Issues with delayed SDK initialisation
- I'm seeing "Adjust requires ARC" error
- I'm seeing "[UIDevice adjTrackingEnabled]: unrecognized selector sent to instance" error
- I'm seeing the "Session failed (Ignoring too frequent session.)" error
- I'm not seeing "Install tracked" in the logs
- I'm seeing "Unattributable SDK click ignored" message
- I'm seeing wrong revenue data in the adjust dashboard
- License
There are example apps inside the examples directory for iOS (Objective-C),
iOS (Swift), tvOS and Apple Watch. You can open any of these
Xcode projects to see an example of how the adjust SDK can be integrated.
We will describe the steps to integrate the adjust SDK into your iOS project. We are going to assume that you are using Xcode for your iOS development.
Download the latest adjust SDK version from our releases page. Extract the archive into a directory of your choice.
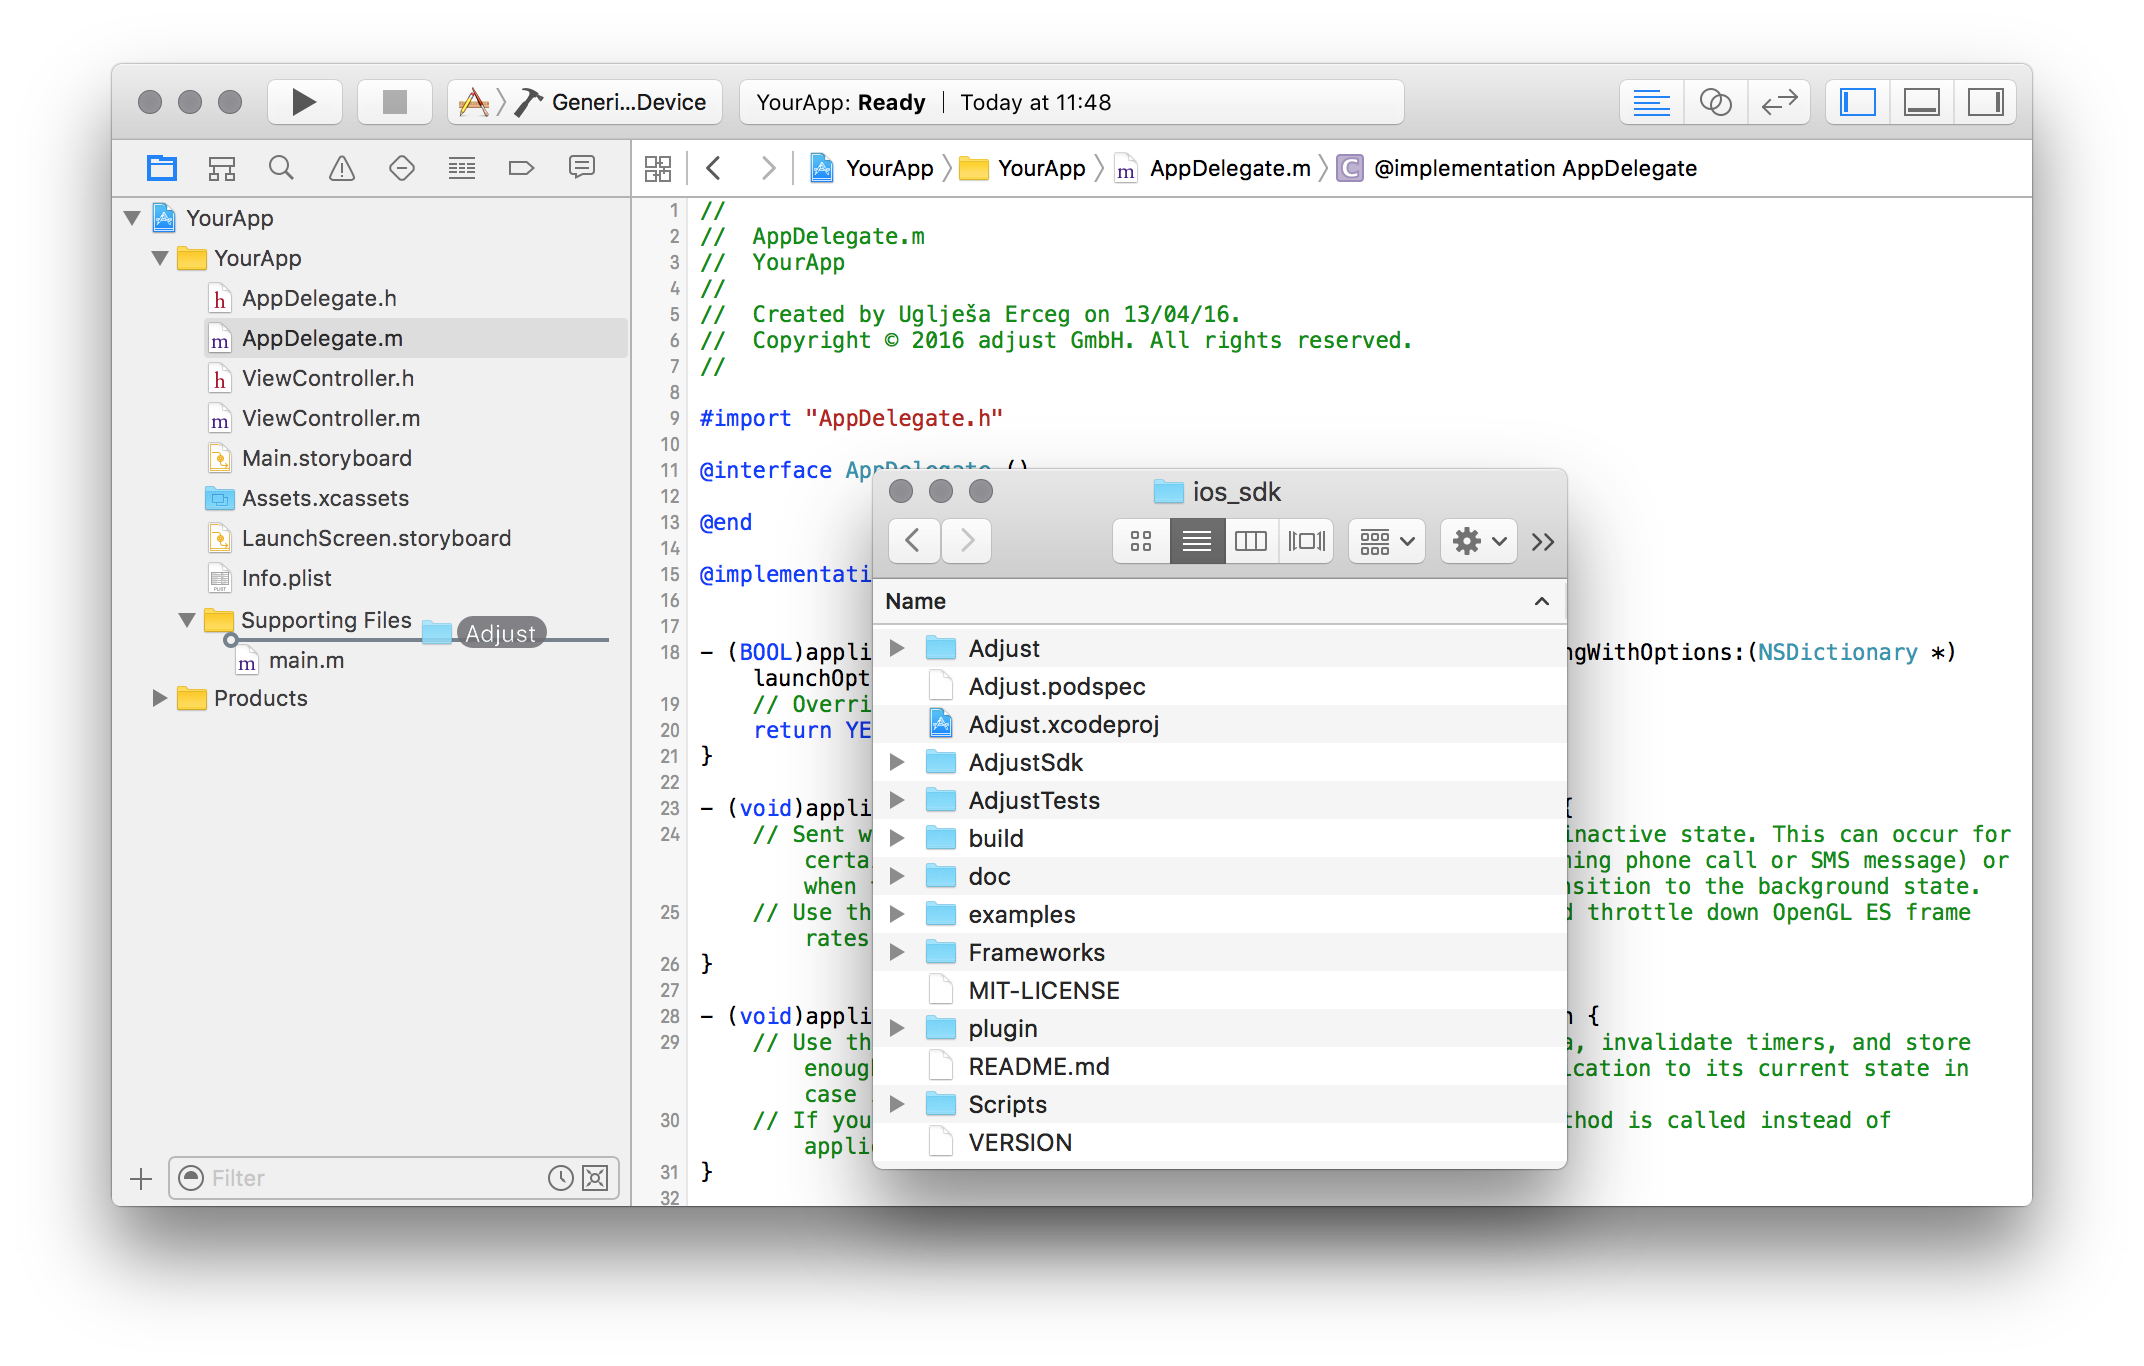
You can add the adjust SDK by adding all of it's source files direcly into your app. In Xcode's Project Navigator locate
the Supporting Files group (or any other group of your choice). From Finder, drag the Adjust subdirectory into Xcode's
Supporting Files group.
In the dialog Choose options for adding these files make sure to check the checkbox for Copy items if needed and select
the radio button to Create groups.

--
If you're using CocoaPods, you can add the following line to your Podfile and continue from
this step:
pod 'Adjust', '~> 4.10.3'or:
pod 'Adjust', :git => 'https://github.com/adjust/ios_sdk.git', :tag => 'v4.10.3'--
If you're using Carthage, you can add following line to your Cartfile and continue from
this step:
github "adjust/ios_sdk"--
You can also choose to integrate the adjust SDK by adding it to your project as a framework. On the releases page you can find the following archives:
AdjustSdkStatic.framework.zipAdjustSdkDynamic.framework.zipAdjustSdkTv.framework.zip
Since the release of iOS 8, Apple has introduced dynamic frameworks (also known as embedded frameworks). If your app is targeting iOS 8 or higher, you can use the adjust SDK dynamic framework. Choose which framework you want to use – static or dynamic – and add it to your project.
If you are having tvOS app, you can use the adjust SDK with it as well with usage of our tvOS framework which you can
extract from AdjustSdkTv.framework.zip archive.
If you have chosen one of these ways to integrate the adjust SDK, you may continue from this step. If you want to add the adjust SDK by adding its source files to your project, you can continue from this step.
Select your project in the Project Navigator. In the left hand side of the main view, select your target. In the tab
Build Phases, expand the group Link Binary with Libraries. On the bottom of that section click on the + button.
Select the AdSupport.framework and click the Add button. Unless you
are using tvOS, repeat the same steps to add the iAd.framework. Change the Status of both frameworks to Optional.

If you added the adjust SDK from the source, you should use the following import statement:
#import "Adjust.h"--
If you added the adjust SDK via a Pod repository, you should use one of the following import statements:
#import "Adjust.h"or
#import <Adjust/Adjust.h>--
If you added the adjust SDK as a static/dynamic framework or via Carthage, you should use the following import statement:
#import <AdjustSdk/Adjust.h>--
If you are are using the adjust SDK with your tvOS app, you should use the following import statement:
#import <AdjustSdkTv/Adjust.h>Next, we'll set up basic session tracking.
In the Project Navigator, open the source file of your application delegate. Add the import statement at the top of the
file, then add the following call to Adjust in the didFinishLaunching or didFinishLaunchingWithOptions method of your
app delegate:
#import "Adjust.h"
// or #import <Adjust/Adjust.h>
// or #import <AdjustSdk/Adjust.h>
// or #import <AdjustSdkTv/Adjust.h>

// ...

NSString *yourAppToken = @"{YourAppToken}";
NSString *environment = ADJEnvironmentSandbox;
ADJConfig *adjustConfig = [ADJConfig configWithAppToken:yourAppToken
                                            environment:environment];

[Adjust appDidLaunch:adjustConfig];
Note: Initialising the adjust SDK like this is very important. Otherwise, you may encounter different kinds of
issues as described in our troubleshooting section.
Replace {YourAppToken} with your app token. You can find this in your dashboard.
Depending on whether you build your app for testing or for production, you must set environment with one of these values:
NSString *environment = ADJEnvironmentSandbox;
NSString *environment = ADJEnvironmentProduction;
Important: This value should be set to ADJEnvironmentSandbox if and only if you or someone else is testing your app.
Make sure to set the environment to ADJEnvironmentProduction just before you publish the app. Set it back to
ADJEnvironmentSandbox when you start developing and testing it again.
We use this environment to distinguish between real traffic and test traffic from test devices. It is very important that you keep this value meaningful at all times! This is especially important if you are tracking revenue.
You can increase or decrease the amount of logs that you see during testing by calling setLogLevel: on your ADJConfig
instance with one of the following parameters:
[adjustConfig setLogLevel:ADJLogLevelVerbose];  // enable all logging
[adjustConfig setLogLevel:ADJLogLevelDebug];    // enable more logging
[adjustConfig setLogLevel:ADJLogLevelInfo];     // the default
[adjustConfig setLogLevel:ADJLogLevelWarn];     // disable info logging
[adjustConfig setLogLevel:ADJLogLevelError];    // disable warnings as well
[adjustConfig setLogLevel:ADJLogLevelAssert];   // disable errors as well
[adjustConfig setLogLevel:ADJLogLevelSuppress]; // disable all logging
If you don't want your app in production to display any logs coming from the adjust SDK, then you should select
ADJLogLevelSuppress and in addition to that, initialise ADJConfig object with another constructor where you should
enable suppress log level mode:
#import "Adjust.h"
// or #import <Adjust/Adjust.h>
// or #import <AdjustSdk/Adjust.h>
// or #import <AdjustSdkTv/Adjust.h>

// ...

NSString *yourAppToken = @"{YourAppToken}";
NSString *environment = ADJEnvironmentSandbox;
ADJConfig *adjustConfig = [ADJConfig configWithAppToken:yourAppToken
                                            environment:environment
                                   allowSupressLogLevel:YES];

[Adjust appDidLaunch:adjustConfig];
Build and run your app. If the build succeeds, you should carefully read the SDK logs in the console. After the app
launches for the first time, you should see the info log Install tracked.

Once you integrate the adjust SDK into your project, you can take advantage of the following features.
You can use adjust to track events. Lets say you want to track every tap on a particular button. You would create a new
event token in your dashboard, which has an associated event token - looking something like abc123. In your button's
buttonDown method you would then add the following lines to track the tap:
ADJEvent *event = [ADJEvent eventWithEventToken:@"abc123"];
[Adjust trackEvent:event];
When tapping the button you should now see Event tracked in the logs.
The event instance can be used to configure the event further before tracking it:
If your users can generate revenue by tapping on advertisements or making in-app purchases you can track those revenues with events. Lets say a tap is worth one Euro cent. You could then track the revenue event like this:
ADJEvent *event = [ADJEvent eventWithEventToken:@"abc123"];

[event setRevenue:0.01 currency:@"EUR"];

[Adjust trackEvent:event];
This can be combined with callback parameters of course.
When you set a currency token, adjust will automatically convert the incoming revenues into a reporting revenue of your choice. Read more about currency conversion here.
You can read more about revenue and event tracking in the [event tracking guide] (https://docs.adjust.com/en/event-tracking/#reference-tracking-purchases-and-revenues).
You can also pass in an optional transaction ID to avoid tracking duplicate revenues. The last ten transaction IDs are remembered and revenue events with duplicate transaction IDs are skipped. This is especially useful for in-app purchase tracking. See an example below.
If you want to track in-app purchases, please make sure to call trackEvent after finishTransaction in
paymentQueue:updatedTransaction only if the state changed to SKPaymentTransactionStatePurchased. That way you can avoid
tracking revenue that is not actually being generated.
- (void)paymentQueue:(SKPaymentQueue *)queue updatedTransactions:(NSArray *)transactions {
    for (SKPaymentTransaction *transaction in transactions) {
        switch (transaction.transactionState) {
            case SKPaymentTransactionStatePurchased:
                [self finishTransaction:transaction];

                ADJEvent *event = [ADJEvent eventWithEventToken:...];
                [event setRevenue:... currency:...];
                [event setTransactionId:transaction.transactionIdentifier]; // avoid duplicates
                [Adjust trackEvent:event];

                break;
            // more cases
        }
    }
}If you want to check the validity of In-App Purchases made in your app using Purchase Verification, adjust's server side receipt verification tool, then check out our iOS purchase SDK and read more about it here.
You can register a callback URL for your events in your dashboard. We will send a GET request to that URL whenever the
event is tracked. You can add callback parameters to that event by calling addCallbackParameter to the event before
tracking it. We will then append these parameters to your callback URL.
For example, suppose you have registered the URL http://www.mydomain.com/callback then track an event like this:
ADJEvent *event = [ADJEvent eventWithEventToken:@"abc123"];

[event addCallbackParameter:@"key" value:@"value"];
[event addCallbackParameter:@"foo" value:@"bar"];

[Adjust trackEvent:event];
In that case we would track the event and send a request to:
http://www.mydomain.com/callback?key=value&foo=bar
It should be mentioned that we support a variety of placeholders like {idfa} that can be used as parameter values. In the
resulting callback this placeholder would be replaced with the ID for Advertisers of the current device. Also note that we
don't store any of your custom parameters, but only append them to your callbacks, thus without a callback they will not be
saved nor sent to you.
You can read more about using URL callbacks, including a full list of available values, in our callbacks guide.
You can also add parameters to be transmitted to network partners, which have been activated in youradjust dashboard.
This works similarly to the callback parameters mentioned above, but can be added by calling the addPartnerParameter
method on your ADJEvent instance.
ADJEvent *event = [ADJEvent eventWithEventToken:@"abc123"];

[event addPartnerParameter:@"key" value:@"value"];
[event addPartnerParameter:@"foo" value:@"bar"];

[Adjust trackEvent:event];
You can read more about special partners and these integrations in our guide to special partners.
Some parameters are saved to be sent in every event and session of the adjust SDK. Once you have added any of these parameters, you don't need to add them every time, since they will be saved locally. If you add the same parameter twice, there will be no effect.
These session parameters can be called before the adjust SDK is launched to make sure they are sent even on install. If you need to send them with an install, but can only obtain the needed values after launch, it's possible to delay the first launch of the adjust SDK to allow this behaviour.
The same callback parameters that are registered for events can be also saved to be sent in every event or session of the adjust SDK.
The session callback parameters have a similar interface of the event callback parameters. Instead of adding the key and
it's value to an event, it's added through a call to Adjust method addSessionCallbackParameter:value::
[Adjust addSessionCallbackParameter:@"foo" value:@"bar"];The session callback parameters will be merged with the callback parameters added to an event. The callback parameters added to an event have precedence over the session callback parameters. Meaning that, when adding a callback parameter to an event with the same key to one added from the session, the value that prevails is the callback parameter added to the event.
It's possible to remove a specific session callback parameter by passing the desiring key to the method
removeSessionCallbackParameter.
[Adjust removeSessionCallbackParameter:@"foo"];If you wish to remove all key and values from the session callback parameters, you can reset it with the method
resetSessionCallbackParameters.
[Adjust resetSessionCallbackParameters];In the same way that there is session callback parameters that are sent every in event or session of the adjust SDK, there is also session partner parameters.
These will be transmitted to network partners, for the integrations that have been activated in your adjust dashboard.
The session partner parameters have a similar interface to the event partner parameters. Instead of adding the key and it's
value to an event, it's added through a call to Adjust method addSessionPartnerParameter:value::
[Adjust addSessionPartnerParameter:@"foo" value:@"bar"];The session partner parameters will be merged with the partner parameters added to an event. The partner parameters added to an event have precedence over the session partner parameters. Meaning that, when adding a partner parameter to an event with the same key to one added from the session, the value that prevails is the partner parameter added to the event.
It's possible to remove a specific session partner parameter by passing the desiring key to the method
removeSessionPartnerParameter.
[Adjust removeSessionPartnerParameter:@"foo"];If you wish to remove all key and values from the session partner parameters, you can reset it with the method
resetSessionPartnerParameters.
[Adjust resetSessionPartnerParameters];Delaying the start of the adjust SDK allows your app some time to obtain session parameters, such as unique identifiers, to be send on install.
Set the initial delay time in seconds with the method setDelayStart in the ADJConfig instance:
[adjustConfig setDelayStart:5.5];In this case this will make the adjust SDK not send the initial install session and any event created for 5.5 seconds.
After this time is expired or if you call [Adjust sendFirstPackages] in the meanwhile, every session parameter will be
added to the delayed install session and events and the adjust SDK will resume as usual.
The maximum delay start time of the adjust SDK is 10 seconds.
You can register a delegate callback to be notified of tracker attribution changes. Due to the different sources considered for attribution, this information can not be provided synchronously. Follow these steps to implement the optional delegate protocol in your app delegate:
Please make sure to consider our applicable attribution data policies.
-
Open
AppDelegate.hand add the import and theAdjustDelegatedeclaration.@interface AppDelegate : UIResponder <UIApplicationDelegate, AdjustDelegate>
-
Open
AppDelegate.mand add the following delegate callback function to your app delegate implementation.- (void)adjustAttributionChanged:(ADJAttribution *)attribution { } -
Set the delegate with your
ADJConfiginstance:[adjustConfig setDelegate:self];
As the delegate callback is configured using the ADJConfig instance, you should call setDelegate before calling
[Adjust appDidLaunch:adjustConfig].
The delegate function will be called after the SDK receives the final attribution data. Within the delegate function you
have access to the attribution parameter. Here is a quick summary of its properties:
NSString trackerTokenthe tracker token of the current install.NSString trackerNamethe tracker name of the current install.NSString networkthe network grouping level of the current install.NSString campaignthe campaign grouping level of the current install.NSString adgroupthe ad group grouping level of the current install.NSString creativethe creative grouping level of the current install.NSString clickLabelthe click label of the current install.
You can register a delegate callback to be notified of successful and failed tracked events and/or sessions. The same
optional protocol AdjustDelegate used for the attribution callback is used.
Follow the same steps and implement the following delegate callback function for successful tracked events:
- (void)adjustEventTrackingSucceeded:(ADJEventSuccess *)eventSuccessResponseData {
}
The following delegate callback function for failed tracked events:
- (void)adjustEventTrackingFailed:(ADJEventFailure *)eventFailureResponseData {
}
For successful tracked sessions:
- (void)adjustSessionTrackingSucceeded:(ADJSessionSuccess *)sessionSuccessResponseData {
}
And for failed tracked sessions:
- (void)adjustSessionTrackingFailed:(ADJSessionFailure *)sessionFailureResponseData {
}
The delegate functions will be called after the SDK tries to send a package to the server. Within the delegate callback you have access to a response data object specifically for the delegate callback. Here is a quick summary of the session response data properties:
NSString messagethe message from the server or the error logged by the SDK.NSString timeStamptimestamp from the server.NSString adida unique device identifier provided by adjust.NSDictionary jsonResponsethe JSON object with the response from the server.
Both event response data objects contain:
NSString eventTokenthe event token, if the package tracked was an event.
And both event and session failed objects also contain:
BOOL willRetryindicates that there will be an attempt to resend the package at a later time.
You can disable the adjust SDK from tracking any activities of the current device by calling setEnabled with parameter
NO. This setting is remembered between sessions, but it can only be activated after the first session.
[Adjust setEnabled:NO];You can put the adjust SDK in offline mode to suspend transmission to our servers while retaining tracked data to be sent later. While in offline mode, all information is saved in a file, so be careful not to trigger too many events while in offline mode.
You can activate offline mode by calling setOfflineMode with the parameter YES.
[Adjust setOfflineMode:YES];Conversely, you can deactivate offline mode by calling setOfflineMode with NO. When the adjust SDK is put back in
online mode, all saved information is sent to our servers with the correct time information.
Unlike disabling tracking, this setting is not remembered bettween sessions. This means that the SDK is in online mode whenever it is started, even if the app was terminated in offline mode.
If your app makes heavy use of event tracking, you might want to delay some HTTP requests in order to send them in one
batch every minute. You can enable event buffering with your ADJConfig instance:
[adjustConfig setEventBufferingEnabled:YES];If nothing is set, event buffering is disabled by default.
The default behaviour of the adjust SDK is to pause sending HTTP requests while the app is in the background. You can
change this in your AdjustConfig instance:
[adjustConfig setSendInBackground:YES];If nothing is set, sending in background is disabled by default.
Certain services (such as Google Analytics) require you to coordinate device and client IDs in order to prevent duplicate reporting.
To obtain the device identifier IDFA, call the function idfa:
NSString *idfa = [Adjust idfa];To send us the push notification token, add the following call to Adjust in the
didRegisterForRemoteNotificationsWithDeviceToken of your app delegate:
- (void)application:(UIApplication *)app didRegisterForRemoteNotificationsWithDeviceToken:(NSData *)deviceToken {
    [Adjust setDeviceToken:deviceToken];
}If you want to use the Adjust SDK to recognize users that found your app pre-installed on their device, follow these steps.
- Create a new tracker in your dashboard.
- Open your app delegate and add set the default tracker of your
ADJConfig:
ADJConfig *adjustConfig = [ADJConfig configWithAppToken:yourAppToken environment:environment];
[adjustConfig setDefaultTracker:@"{TrackerToken}"];
[Adjust appDidLaunch:adjustConfig];
Replace {TrackerToken} with the tracker token you created in step 2. Please note that the dashboard displays a tracker
URL (including http://app.adjust.com/). In your source code, you should specify only the six-character token and not
the entire URL.
-
Build and run your app. You should see a line like the following in XCode:
Default tracker: 'abc123'
If you are using the adjust tracker URL with an option to deep link into your app from the URL, there is the possibility to get info about the deep link URL and its content. Hitting the URL can happen when the user has your app already installed (standard deep linking scenario) or if they don't have the app on their device (deferred deep linking scenario). Both of these scenarios are supported by the adjust SDK and in both cases the deep link URL will be provided to you after you app has been started after hitting the tracker URL. In order to use this feature in your app, you need to set it up properly.
If your user already has the app installed and hits the tracker URL with deep link information in it, your application will be opened and the content of the deep link will be sent to your app so that you can parse it and decide what to do next. With introduction of iOS 9, Apple has changed the way how deep linking should be handled in the app. Depending on which scenario you want to use for your app (or if you want to use them both to support wide range of devices), you need to set up your app to handle one or both of the following scenarios.
Deep linking on iOS 8 and earlier devices is being done with usage of a custom URL scheme setting. You need to pick a
custom URL scheme name which your app will be in charge for opening. This scheme name will also be used in the adjust
tracker URL as part of the deep_link parameter. In order to set this in your app, open your Info.plist file and add new
URL types row to it. In there, as URL identifier write you app's bundle ID and under URL schemes add scheme name(s)
which you want your app to handle. In the example below, we have chosen that our app should handle the adjustExample scheme
name.

After this has been set up, your app will be opened after you click the adjust tracker URL with deep_link parameter
which contains the scheme name which you have chosen. After app is opened, openURL method of your AppDelegate class will
be triggered and the place where the content of the deep_link parameter from the tracker URL will be delivered. If you
want to access the content of the deep link, override this method.
- (BOOL)application:(UIApplication *)application openURL:(NSURL *)url
  sourceApplication:(NSString *)sourceApplication annotation:(id)annotation {
    // url object contains your deep link content

    // Apply your logic to determine the return value of this method
    return YES;
    // or
    // return NO;
}
With this setup, you have successfully set up deep linking handling for iOS devices with iOS 8 and earlier versions.
In order to set deep linking support for iOS 9 and later devices, you need to enable your app to handle Apple universal links. To find out more about universal links and how their setup looks like, you can check here.
Adjust is taking care of lots of things to do with universal links behind the scenes. But, in order to support universal links with the adjust, you need to perform small setup for universal links in the adjust dashboard. For more information on that should be done, please consult our official docs.
Once you have successfully enabled the universal links feature in the dashboard, you need to do this in your app as well:
After enabling Associated Domains for your app in Apple Developer Portal, you need to do the same thing in your app's
Xcode project. After enabling Assciated Domains, add the universal link which was generated for you in the adjust
dashboard in the Domains section by prefixing it with applinks: and make sure that you also remove the http(s) part of the
universal link.

After this has been set up, your app will be opened after you click the adjust tracker universal link. After app is
opened, continueUserActivity method of your AppDelegate class will be triggered and the place where the content of the
universal link URL will be delivered. If you want to access the content of the deep link, override this method.
- (BOOL)application:(UIApplication *)application continueUserActivity:(NSUserActivity *)userActivity
 restorationHandler:(void (^)(NSArray *restorableObjects))restorationHandler {
    if ([[userActivity activityType] isEqualToString:NSUserActivityTypeBrowsingWeb]) {
        NSURL url = [userActivity webpageURL];

        // url object contains your universal link content
    }

    // Apply your logic to determine the return value of this method
    return YES;
    // or
    // return NO;
}
With this setup, you have successfully set up deep linking handling for iOS devices with iOS 9 and later versions.
We provide a helper function that allows you to convert a universal link to an old style deep link URL, in case you had some custom logic in your code which was always expecting deep link info to arrive in old style custom URL scheme format. You can call this method with universal link and the custom URL scheme name which you would like to see your deep link prefixed with and we will generate the custom URL scheme deep link for you:
- (BOOL)application:(UIApplication *)application continueUserActivity:(NSUserActivity *)userActivity
 restorationHandler:(void (^)(NSArray *restorableObjects))restorationHandler {
    if ([[userActivity activityType] isEqualToString:NSUserActivityTypeBrowsingWeb]) {
        NSURL url = [userActivity webpageURL];

        NSURL *oldStyleDeeplink = [Adjust convertUniversalLink:url scheme:@"adjustExample"];
    }

    // Apply your logic to determine the return value of this method
    return YES;
    // or
    // return NO;
}You can register a delegate callback to be notified before a deferred deep link is opened and decide if the adjust SDK will
try to open it. The same optional protocol AdjustDelegate used for the attribution callback and
for event and session callbacks is used.
Follow the same steps and implement the following delegate callback function for deferred deep links:
- (void)adjustDeeplinkResponse:(NSURL *)deeplink {
    // deeplink object contains information about deferred deep link content

    // Apply your logic to determine whether the adjust SDK should try to open the deep link
    return YES;
    // or
    // return NO;
}
The callback function will be called after the SDK receives a deffered deep link from our server and before opening it. Within the callback function you have access to the deep link. The returned boolean value determines if the SDK will launch the deep link. You could, for example, not allow the SDK to open the deep link at the current moment, save it, and open it yourself later.
If this callback is not implemented, the adjust SDK will always try to open the deep link by default.
Adjust enables you to run re-engagement campaigns with usage of deep links. For more information on how to do that, please check our official docs.
If you are using this feature, in order for your user to be properly reattributed, you need to make one additional call to the adjust SDK in your app.
Once you have received deep link content information in your app, add a call to the appWillOpenUrl method. By making
this call, the adjust SDK will try to find if there is any new attribution info inside of the deep link and if any, it will
be sent to the adjust backend. If your user should be reattributed due to a click on the adjust tracker URL with deep link
content in it, you will see the attribution callback in your app being triggered with new
attribution info for this user.
The call to appWillOpenUrl should be done like this to support deep linking reattributions in all iOS versions:
- (BOOL)application:(UIApplication *)application continueUserActivity:(NSUserActivity *)userActivity
 restorationHandler:(void (^)(NSArray *restorableObjects))restorationHandler {
    if ([[userActivity activityType] isEqualToString:NSUserActivityTypeBrowsingWeb]) {
        NSURL url = [userActivity webpageURL];

        // url object contains your universal link content

        [Adjust appWillOpenUrl:url];
    }

    // Apply your logic to determine the return value of this method
    return YES;
    // or
    // return NO;
}
- (BOOL)application:(UIApplication *)application continueUserActivity:(NSUserActivity *)userActivity
restorationHandler:(void (^)(NSArray *restorableObjects))restorationHandler {
if ([[userActivity activityType] isEqualToString:NSUserActivityTypeBrowsingWeb]) {
NSURL url = [userActivity webpageURL];
[Adjust appWillOpenUrl:url];
}
// Apply your logic to determine the return value of this method
return YES;
// or
// return NO;
}As described in the basic setup step, we strongly advise you to initialise the adjust SDK in the
didFinishLaunching or didFinishLaunchingWithOptions method of your app delegate. It is imperative to initialise the
adjust SDK in as soon as possible so that you can use all the features of the SDK.
Deciding not to initialise the adjust SDK immediately can have all kinds of impacts on the tracking in your app: In order to perform any kind of tracking in your app, the adjust SDK must be initialised.
If you decide to perform any of these actions:
before initialising the SDK, they won't be performed.
If you want any of these actions to be tracked with the adjust SDK before its actual initialisation, you must build a
custom actions queueing mechanism inside your app. You need to queue all the actions you want our SDK to perform and
perform them once the SDK is initialised.
Offline mode state won't be changed, tracking enabled/disabled state won't be changed, deep link reattributions will not be
possible to happen, any of tracked events will be dropped.
Another thing which might be affected by delayed SDK initialisation is session tracking. The adjust SDK can't start to collect any session length info before it is actually initialised. This can affect your DAU numbers in the dashboard which might not be tracked properly.
As an example, let's assume this scenario: You are initialising the adjust SDK when some specific view or view controller is loaded and let's say that this is not the splash nor the first screen in your app, but user has to navigate to it from the home screen. If user downloads your app and opens it, the home screen will be displayed. At this moment, this user has made an install which should be tracked. However, the adjust SDK doesn't know anything about this, because the user needs to navigate to the screen mentioned previously where you decided to initialise the adjust SDK. Further, if the user decides that he/she doesn't like the app and uninstalls it right after seeing home screen, all the information mentioned above will never be tracked by our SDK, nor displayed in the dashboard.
For the events you want to track, queue them with some internal queueing mechanism and track them after SDK is initialised.
Tracking events before initialising SDK will cause the events to be dropped and permanently lost, so make sure you are
tracking them once SDK is initialised and enabled.
Offline mode is not the feature which is persisted between SDK initialisations, so it is set to false by default. If you
try to enable offline mode before initialising SDK, it will still be set to false when you eventually initialise the SDK.
Enabling/disabling tracking is the setting which is persisted between the SDK initialisations. If you try to toggle this value before initialising the SDK, toggle attempt will be ignored. Once initialised, SDK will be in the state (enabled or disabled) like before this toggle attempt.
As described above, when handling deep link reattributions, depending on deep linking
mechanism you are using (old style vs. universal links), you will obtain NSURL object after which you need to make
following call:
[Adjust appWillOpenUrl:url]If you make this call before the SDK has been initialised, information about the attribution information from the deep link
URL will be permanetly lost. If you want the adjust SDK to successfully reattribute your user, you would need to queue this
NSURL object information and trigger appWillOpenUrl method once the SDK has been initialised.
Session tracking is something what the adjust SDK performs automatically and is beyond reach of an app developer. For proper session tracking it is crucial to have the adjust SDK initialised as advised in this README. Not doing so can have unpredicted influences on proper session tracking and DAU numbers in the dashboard.
For example:
- A user opens but then deletes your app before the SDK was even inialised, causing the install and session to have never been tracked, thus never reported in the dashboard.
- If a user downloads and opens your app before midnight, and the adjust SDK gets initialised after midnight, all queued install and session data will be reported on wrong day.
- If a user didn't use your app on some day but opens it shortly after midnight and the SDK gets initialised after midnight, causing DAU to be reported on another day from the day of the app opening.
For all these reasons, please follow the instructions in this document and initialise the adjust SDK in the
didFinishLaunching or didFinishLaunchingWithOptions method of your app delegate.
If your build failed with the error Adjust requires ARC, it looks like your project is not using ARC. In that case
we recommend transitioning your project so that it does use ARC. If you don't want to use ARC, you have to
enable ARC for all source files of adjust in the target's Build Phases:
Expand the Compile Sources group, select all adjust files and change the Compiler Flags to -fobjc-arc (Select all and
press the Return key to change all at once).
This error can occur when you are adding the adjust SDK framework to your app. The adjust SDK contains categories among
it's source files and for this reason, if you have chosen this SDK integration approach, you need to add -ObjC flags to
Other Linker Flags in your Xcode project settings. Adding this flag will fix this error.
This error typically occurs when testing installs. Uninstalling and reinstalling the app is not enough to trigger a new install. The servers will determine that the SDK has lost its locally aggregated session data and ignore the erroneous message, given the information available on the servers about the device.
This behaviour can be cumbersome during tests, but is necessary in order to have the sandbox behaviour match production as much as possible.
You can reset the session data of the device in our servers. Check the error message in the logs:
Session failed (Ignoring too frequent session. Last session: YYYY-MM-DDTHH:mm:ss, this session: YYYY-MM-DDTHH:mm:ss, interval: XXs, min interval: 20m) (app_token: {yourAppToken}, adid: {adidValue})
http://app.adjust.com/forget_device?app_token={yourAppToken}&adid={adidValue}
http://app.adjust.com/forget_device?app_token={yourAppToken}&idfa={idfaValue}
When the device is forgotten, the link just returns Forgot device. If the device was already forgotten or the values were
incorrect, the link returns Device not found.
If you want to simulate the installation scenario of your app on your test device, it is not enough if you just re-run the app from the Xcode on your test device. Re-running the app from the Xcode doesn't cause app data to be wiped out and all internal files that our SDK is keeping inside your app will still be there, so upon re-run, our SDK will see those files and think of your app was already installed (and that SDK was already launched in it) but just opened for another time rather than being opened for the first time.
In order to run app the installation scenario, you need to do following:
- Uninstall app from your device (completely remove it)
- Forget your test device from the adjust backend like explained in the issue above
- Run your app from the Xcode on the test device and you will see log message "Install tracked"
You may notice this message while testing your app in sandbox envoronment. It is related to some changes Apple introduced
in iAd.framework version 3. With this, a user can be directed to your app from a click on iAd banner and this will cause
our SDK to send an sdk_click package to the adjust backend informing it about the content of the clicked URL. For some
reason, Apple decided that if the app was opened without clicking on iAd banner, they will artificially generate an iAd
banner URL click with some random values. Our SDK won't be able to distinguish if the iAd banner click was genuine or
artificially generated and will send an sdk_click package regardless to the adjust backend. If you have your log level
set to verbose level, you will see this sdk_click package looking something like this:
[Adjust]d: Added package 1 (click)
[Adjust]v: Path:      /sdk_click
[Adjust]v: ClientSdk: ios4.10.1
[Adjust]v: Parameters:
[Adjust]v:      app_token              {YourAppToken}
[Adjust]v:      created_at             2016-04-15T14:25:51.676Z+0200
[Adjust]v:      details                {"Version3.1":{"iad-lineitem-id":"1234567890","iad-org-name":"OrgName","iad-creative-name":"CreativeName","iad-click-date":"2016-04-15T12:25:51Z","iad-campaign-id":"1234567890","iad-attribution":"true","iad-lineitem-name":"LineName","iad-creative-id":"1234567890","iad-campaign-name":"CampaignName","iad-conversion-date":"2016-04-15T12:25:51Z"}}
[Adjust]v:      environment            sandbox
[Adjust]v:      idfa                   XXXXXXXX-XXXX-XXXX-XXXX-XXXXXXXXXXXX
[Adjust]v:      idfv                   YYYYYYYY-YYYY-YYYY-YYYY-YYYYYYYYYYYY
[Adjust]v:      needs_response_details 1
[Adjust]v:      source                 iad3
If for some reason this sdk_click would be accepted, it would mean that a user who has opened your app by clicking on
some other campaign URL or even as an organic user, will get attributed to this unexisting iAd source. This is the reason
why our backend ignores it and informs you with this message:
[Adjust]v: Response: {"message":"Unattributable SDK click ignored."}
[Adjust]i: Unattributable SDK click ignored.
So, this message doesn't indicate any issue with your SDK integration but it's simply informing you that our backend has
ignored this artificially created sdk_click which could have lead to your user being wrongly attributed/reattributed.
The adjust SDK tracks what you tell it to track. If you are attaching revenue to your event, the number you write as an amount is the only amount which will reach the adjust backend and be displayed in the dashboard. Our SDK does not manipulate your amount value, nor does our backend. So, if you see wrong amount being tracked, it's because our SDK was told to track that amount.
Usually, a user's code for tracking revenue event looks something like this:
// ...

- (double)someLogicForGettingRevenueAmount {
    // This method somehow handles how user determines
    // what's the revenue value which should be tracked.

    // It is maybe making some calculations to determine it.

    // Or maybe extracting the info from In-App purchase which
    // was successfully finished.

    // Or maybe returns some predefined double value.

    double amount; // double amount = some double value

    return amount;
}

// ...

- (void)someRandomMethodInTheApp {
    double amount = [self someLogicForGettingRevenueAmount];

    ADJEvent *event = [ADJEvent eventWithEventToken:@"abc123"];
    [event setRevenue:amount currency:@"EUR"];
    [Adjust trackEvent:event];
}
If you are seing any value in the dashboard other than what you expected to be tracked, please, check your logic for determining amount value.
The adjust SDK is licensed under the MIT License.
Copyright (c) 2012-2016 adjust GmbH, http://www.adjust.com
Permission is hereby granted, free of charge, to any person obtaining a copy of this software and associated documentation files (the "Software"), to deal in the Software without restriction, including without limitation the rights to use, copy, modify, merge, publish, distribute, sublicense, and/or sell copies of the Software, and to permit persons to whom the Software is furnished to do so, subject to the following conditions:
The above copyright notice and this permission notice shall be included in all copies or substantial portions of the Software.
THE SOFTWARE IS PROVIDED "AS IS", WITHOUT WARRANTY OF ANY KIND, EXPRESS OR IMPLIED, INCLUDING BUT NOT LIMITED TO THE WARRANTIES OF MERCHANTABILITY, FITNESS FOR A PARTICULAR PURPOSE AND NONINFRINGEMENT. IN NO EVENT SHALL THE AUTHORS OR COPYRIGHT HOLDERS BE LIABLE FOR ANY CLAIM, DAMAGES OR OTHER LIABILITY, WHETHER IN AN ACTION OF CONTRACT, TORT OR OTHERWISE, ARISING FROM, OUT OF OR IN CONNECTION WITH THE SOFTWARE OR THE USE OR OTHER DEALINGS IN THE SOFTWARE.