![]()
This repository contains scripts and configuration files for a basic Hyperledger Fabric network running on Kubernetes.
- Introduction
- Setup
- Development
- Network Topology
- Concepts of the Hyperledger Fabric Network
- Changelog
- Versions
- License
- Troubleshooting
For using our scripts, you need a unix system with additional installation of KinD (we use v0.8.1), kubectl (we recommend the latest stable release), faketime and unzip. If you are new to Kubernetes, we suggest the interactive tutorials provided by Kubernetes.
Deploy the network with these steps:
-
Create a local kubernetes cluster:
./overwriteKindCluster.sh -
Deploy the network:
./deploy.sh [-b <chaincode release/tag>] [-c <cluster mount>] [-t]The
-btag can be used to specify a chaincode tag or branch of hlf-chaincode (develop is default).Use
-tfor local testing with the scala API, providing certificates through the filesystem and registering an admin with a fixed password.The
-coption allows to specify the mount path for hyperledger. The default folder matches the configuration of the development cluster of the UC4 deployment. -
To delete the cluster, run
kind delete cluster, to remove all filessudo rm -rf /data/development/hyperledger/.
When developing, you might need to restart your network often. To reduce the restart time, you can use
./restart.sh [-b <chaincode branch or tag>] [-c <cluster mount>] [-t] [-d]
This script deploys two clusters to which the network is deployed alternating to reduce startup times. You can use -d
to delete the clusters. The other flags are identical to the deploy script
To test your application locally without deploying it to the cluster, deploy the network (and cluster) with the testing
flag -t. This has the following effects:
- We generate a connection profile at
/tmp/hyperledger/connection_profile_kubernetes_local.yamlthat can be used to access the network from outside the cluster on your machine. - We register a test admin with the fixed credentials for easier testing:
test-admin:test-admin-pw. - We provide all root certificates at
/tmp/hyperledger/. - We output the environment variables needed to connect the scala-api to the network e.g. for running tests. Just export
the last three lines of the script's output that look similar to:
or the line similar to
export UC4_KIND_NODE_IP=172.18.0.3 export UC4_CONNECTION_PROFILE=/tmp/hyperledger/connection_profile_kubernetes_local.yaml export UC4_TESTBASE_TARGET=PRODUCTION_NETWORKfor direct use in intellij's test suite.UC4_KIND_NODE_IP=172.18.0.3;UC4_CONNECTION_PROFILE=/tmp/hyperledger/connection_profile_kubernetes_local.yaml;UC4_TESTBASE_TARGET=PRODUCTION_NETWORK
The three root-level-scripts deploy, restart and overwriteKindCluster are the scripts that are executed by the
user. overwriteKindCluster handles the creation and deletion of a development cluster. deploy basically calls
the installCHaincode and startNetwork scripts to deploy the network. The restart script combines both for faster
develpment cycles.
Our project files are divided into three main directories: scripts, k8s and assets. The scripts folder contains all shell, the k8s folder all the kubernetes configuration files and the assets folder additional (mainly configuration) files.
This section explains how to setup the Kubernetes Dashboard, which can be handy for developing or using the hlf-network.
This is highly optional though, since the kubectl cli provides the same functionality.
Kubernetes provides a dashboard which
helps with debugging and controlling the cluster. To install the dasboard,
run kubectl apply -f https://raw.githubusercontent.com/kubernetes/dashboard/v2.0.0/aio/deploy/recommended.yaml.
Execute kubectl proxy to make the dashboard available
under http://localhost:8001/api/v1/namespaces/kubernetes-dashboard/services/https:kubernetes-dashboard:/proxy/.
To access the dashboard, you need to generate a Bearer Token. To do so, just run the follwing commands (reference) in your command line:
cat <<EOF | kubectl apply -f -
apiVersion: v1
kind: ServiceAccount
metadata:
  name: admin-user
  namespace: kubernetes-dashboard
EOF
cat <<EOF | kubectl apply -f -
apiVersion: rbac.authorization.k8s.io/v1
kind: ClusterRoleBinding
metadata:
  name: admin-user
roleRef:
  apiGroup: rbac.authorization.k8s.io
  kind: ClusterRole
  name: cluster-admin
subjects:
- kind: ServiceAccount
  name: admin-user
  namespace: kubernetes-dashboard
EOF
You can then
execute kubectl -n kubernetes-dashboard describe secret $(kubectl -n kubernetes-dashboard get secret | grep admin-user | awk '{print $1}') to see your freshly generated Bearer Token and log into the dashboard.
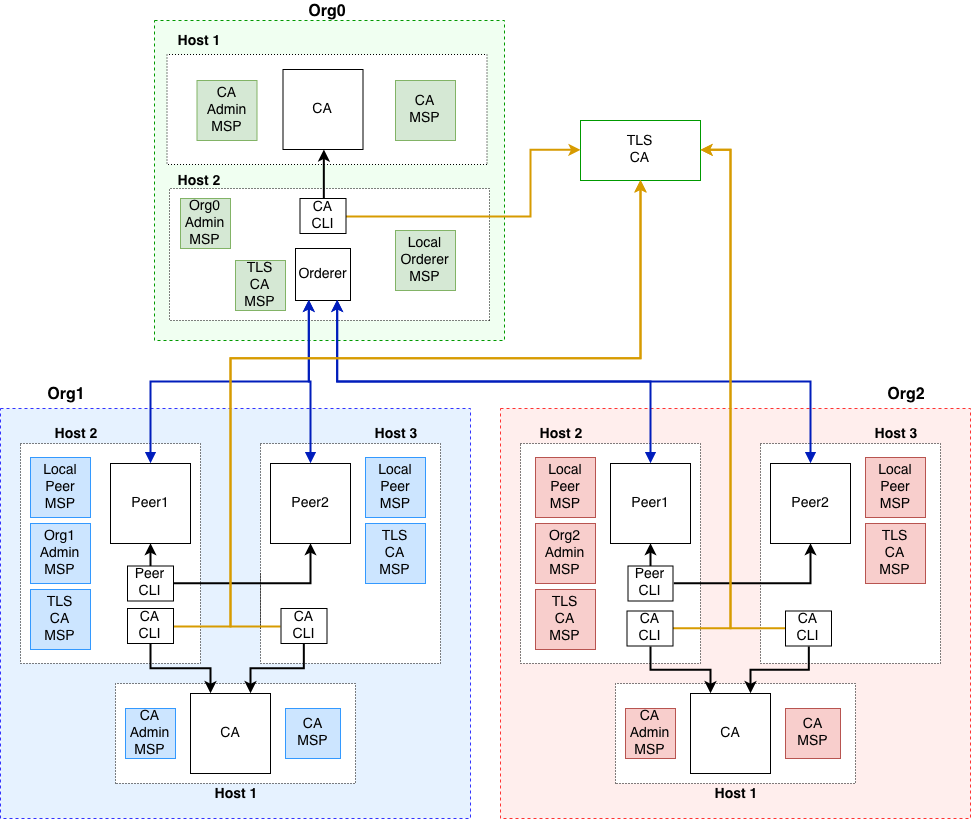
The initial network topology suggested by the operations guide implements the most interesting use cases of hyperledger fabric. For deploying multiple orderers, one would use the raft protocol since kafka is deprecated.
The network consists of three organizations, one providing the orderer service and two hosting two peers each
communicating on a shared channel. We deploy an external TLS CA which provides TLS certificates for all containers. We
freshly generate and distribute all certificates for this. The following figure visualizes the implemented network.
This might help you to understand what the deployment scripts do on a conceptional level. Therefore, we explain the steps of our deployment and introduce the implemented network entities.
We make use of TLS to ensure secure communication with our entities. Therefore, we provide a TLS-CA server that contains our TLS root certificate and provides TLS certificates to our network components. The TLS root certificate needs to be distributed via a secure channel (and added to the client's keystore) such that clients can verify their communication partner's TLS certicicate.
Each organization is set up by enrolling a CA admin and registering identities for their members, including their roles, i.e., peers, admins, users. Peers need to be enrolled by the CA admin of their organization before they are launched. Membership, roles and privileges within an organization are managed by an enrollment CA server, which issues certificates to members.
The Orderer is represented by an organization in the network. Its task is to order transactions and group them into a
block as well as being in charge of the consortium. The orderer's identity needs to be enrolled with a CA in order
to generate its local MSP.
The orderer requires a genesis block to launch itself. The genesis block provides configurations for a channel, which
are specified in the configtx file. This file also contains all information to generate the genesis block itself. More
information on the channel configuration file can be found in
the Hyperledger Fabric documentation
. The commands
/configtxgen -profile OrgsOrdererGenesis -outputBlock $HL_MOUNT/org0/orderer/genesis.block -channelID syschannel
and
./configtxgen -profile OrgsChannel -outputCreateChannelTx $HL_MOUNT/org0/orderer/channel.tx -channelID mychannel
generate the genesis.block and the channel.tx files. The channel.tx file will be used to create the channel.
CLI containers are required to administrate the network and enable communication with the peers. Therefore, we use one
CLI container for each organization that has the respective admin rights.
The CLI containers are started in the same host machine as peer1 for each organization. Using these CLIs, we can create
a channel and let peers join it.
This command generates the mychannel.block on peer1 which can be used by other peers in the network to join the channel:
channel create \
         -c mychannel \
         -f /tmp/hyperledger/org1/peer1/assets/channel.tx \
         -o orderer-org0:7050 \
         --outputBlock /tmp/hyperledger/org1/peer1/assets/mychannel.block \
         --tls \
         --cafile /tmp/hyperledger/org1/peer1/tls-msp/tlscacerts/tls-tls-ca-hlf-7052.pem
For joining the channel we use the command
peer channel join -b /tmp/hyperledger/org1/peer1/assets/mychannel.block
for the respective peers.
Chaincode in Hyperledger Fabric represents the smart contracts or business logic for an application. All our chaincode configurations and commands are based on the newest available releases, i.e., version 2.x, whose chaincode deployment concept differs a bit from the former fabric version 1.x. See this article as a reference to the differences between Fabric's chaincode container versions.
This new chaincode deployment concept is called chaincode lifecycle and it handles the complete management of
chaincode. The advantage of this new concept is that multiple endorsing peers can be involved in the decision on how a
chaincode is operated before its usage on the channel. The endorsement policy for this process is prescribed in the
configtx configuration file. The chaincode lifecycle includes the following deployment steps:
- Build the chaincode using gradle.
- The chaincode is packaged in the CLI container, which directly builds the chaincode container image.
- The chaincode is installed in this format on selected peers. (This installation process will take a few minutes since a java environment for the chaincode is downloaded and each peer builds its own chaincode docker image.)
- The instantiating process of version v1.4 is replaced by an approval given by the peers for their organization.
- After organizations have approved, the chaincode definition is committed to the channel.
After this chaincode deployment the chaincode containers are running, hence, the chaincode can be invoked and queried by
the peers. For the chaincode, we currently deploy one explicit container called dind (docker in docker) which allows
every peer to deploy the chaincode without having access rights to the docker daemon.
This guide serves as a starting point. If you are interested in more details, we recommend the following references which were particularly useful for us during development:
- Deploying a Production Network
- Fabric CA Operations Guide
- CA Deployment Steps
- Channel Configuration
- Chaincode Lifecycle
To get an overview of our developmental process, we tagged our releases and added a Changelog to our repository which reveals our different releases along with a respective description/ enumeration of our changes.
We use the release 2.2 for all hyperledger fabric components besides the CA server and client where the latest release is 1.4.
Our source code files are made available under the Apache License, Version 2.0 (Apache-2.0), located in the LICENSE file.
- The error
mount: /hyperledger: mount(2) system call failed: Connection timed out.arose when running ourstartNetwork.shscript and set up mounts for our Kubernetes cluster. Currently, we solve this issue by disabling any firewall running on our systems using the commandsudo ufw disable. This is just a workaround for testing, we hope to find a real fix in the near future. - To fix
add
================================================================================= Starting Docker in Docker in Kubernetes ================================================================================= deployment.apps/dind created service/dind created error: no matching resources foundsleep 10between creation and waiting for a pod. If this does not help, try reinstalling the current version of kubectl (https://kubernetes.io/docs/tasks/tools/install-kubectl/) - Have you tried turning it off and on again? 😉