master |

develop |

This is the source for door43.org website. Note that it does not include the files that show up at door43.org/u/ as those are created by the tX conversion app.
The http://door43.org site provides a front end view to all of the content in the Door43 ecosystem. The source content on http://git.door43.org is converted into HTML and uploaded to the correct location on http://door43.org.
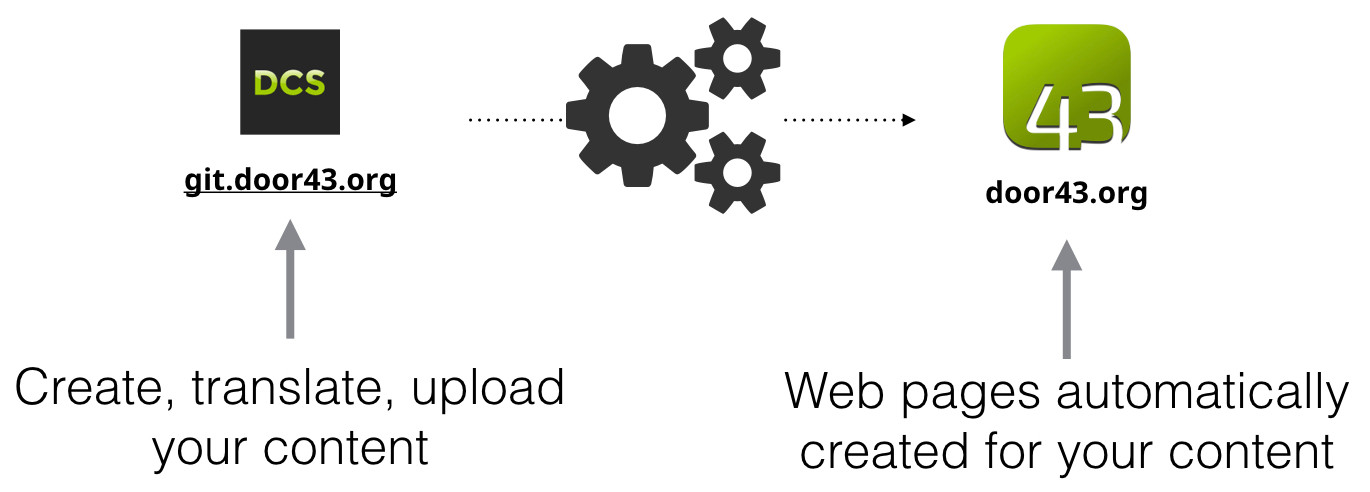
Whenever a source repository is updated, it notifies (via webhook) the conversion app to convert the content and publish it online. A repository like https://git.door43.org/Door43-Catalog/en_ulb will become a published web page at https://door43.org/u/Door43-Catalog/en_ulb/.
The pages outside of the /u/ location on the site are generated by Jekyll and provide localized navigation, Door43 project information, and curated content recommendations for each language.
We use the Zenhub plugin to manage this project with Boards and Burndown charts. We do one week Sprints following Scrum methodology. If you don't have the (free) Zenhub plugin you can still see the issue list and the milestones that we have created.
If you would like to submit an issue, please do so here. Be sure to follow the template that is provided on a new issue. You can also see the New Door43 Roadmap to get an idea of our overall priorities and potential timeline to implementation.
Easiest way to develop is using Docker:
docker compose up
will start a docker container that is mapped to port 8080 (http://localhost:8080) or whatever you set DOOR43_PORT to before starting docker compose
To setup a development environment for developing on this site, you need to run the following commands (after cloning this repo):
cd door43.org
bundle install
This will install the Ruby gems specified in Gemfile.
You may be asked for the sudo password to install to the system RubyGems on Linux.
If you do not have the bundle executable, then you'll need to run sudo gem install bundle or sudo apt install ruby-bundler first.
If you do not have /usr/lib/ruby/include/ruby.h on Linux, then you'll need to run sudo apt install ruby-dev first.
If you cannot install nokogirl due to requiring zlib, then you'll need to run sudo apt install zlib1g-dev.
bundle update
If you need s3cmd, then install it from http://s3tools.org/download. It's as easy as sudo pip install s3cmd, yum install s3cmd or sudo apt-get install s3cmd for Linux.
If you need npm, use sudo apt install npm for Linux.
You will also need to ensure that you have a configuration file for s3cmd available as s3cfg-prod at the root of the repo. Both the assets and s3cfg-prod locations are excluded from git in .gitignore.
There are two branches that are built and deployed to S3 by Travis CI:
developmaster
The develop branch may be seen online at http://dev-door43.org.s3-website-us-west-2.amazonaws.com.
The master branch is available at https://door43.org.
To create a new language landing page, add a directory for it under _data (like data/en), with the *.yml files localized for the new language. Also add a directory for it under pages (like pages/en) and add an index.md file to it. Update the links in the *.md files to include the new language code in the paths.
You may run make test, or make build, or make serve to test and review your changes locally. Once the cibuild.sh script passes successfully locally, deploy to test by following setup instructions in s3_test_push.sh and then run the script s3_test_push.sh. Your changes will then be uploaded to http://test-door43.org.s3-website-us-west-2.amazonaws.com
After Pre-production Testing you commit your changes and make a pull request against develop branch. After it has been merged Travis will automatically deploy to dev site for further testing before deploying to production. Your changes will then be uploaded to http://dev-door43.org.s3-website-us-west-2.amazonaws.com
If Travis CI has built and deployed the develop branch successfully, you create a pull request to merge it into the master branch. When this has been merged, Travis will automatically deploy yours changes to production. Your changes should be visible within 5 minutes on https://door43.org
Assets (binary things like images) are housed on cdn.door43.org/assets for this site. This assets folder is a Resilio Sync folder shared among the developers (ask if you need access).
Note: The first time you will have to Link your Resilio Sync folder into _site/assets/. Then run s3cmd --configure to setup s3cmd. Next copy and rename the cfg file to s3cfg-prod in project folder (e.g. cp ~/.s3cfg s3cfg-prod )
In order to synchronize the assets to the cdn S3 bucket you may now run make assets. This process will not remove assets from the /assets folder, only add or update existing files.
Note: we do not run these tests directly from InteliJ or Pycharm environments. They are launched from the command-line and debugging is done within Chrome using it's JavaScript Debugger with it's 'Developer Tools'.
- tests are js files in ./test/spec
- will also need to add new test spec files to ./test/SpecRunner.html
- to make sure we have dependencies do
npm install - to run the tests do
npm run-script test-phantom
*Note: if Karma tests fail, you can find help by looking at karma log file (karma.log).
- coverage reports are generated automatically when you run the previous step
Running Tests Locally using Karma - coverage reports will be in coverage folder - open coverage/PhantomJS*/lcov-report/index.html in browser to view.
Note: we do not run these tests directly from InteliJ or Pycharm environments. They are launched from the command-line and debugging is done within Chrome using it's JavaScript Debugger with it's 'Developer Tools'.
- to make sure we have dependencies do
npm install - to debug the tests do
./karma_start_debug.sh - in Chrome Browser open to
http://localhost:9876/#and then click on Debug - then open Chrome's "Developer Tools" (on current Chrome click on the three vertical dots in upper right then select More Tools/Developer Tools), set breakpoints (click Sources tab, js files are under base/test/spec) and then do refresh.
- when done debugging, do
./karma_stop.shto stop karma running