Authors: Victor Hill and Joshua Candelaria (special thanks to Professor Neftali Watkinson and Professor Kris Miller)
Welcome to CS010B! In this lab, we will be configuring and introducing the basics of Visual Studio Code, an IDE with many useful features from syntax highlighting to intelligent code completion. In this introductory module, you will learn:
- How to install and configure VSCode for C++ programming
- How to compile with g++, a C++ compiler
- Basic use of VSCode with SSH
IMPORTANT: Before we proceed, make sure that you have a CS account. If you don't have one/aren't sure if you have one, go to this link to set one up. The same site will help if you forgot your password and need to reset it.
An IDE, or an integrated development environment, is a piece of software that provides us with a multitude of different components in one user interface to maximize productivity. The most common features in an IDE are a code/text editor (usually with syntax highlighting), build automation (a compiler, version control like Git, or automated testing), and a debugger. While IDEs are not required (you have written and compiled code without one before), they provide the tools to create bigger projects, collaborate with others, and make development more convenient.
VSCode is an incredibly popular IDE (the most popular in the world, actually!), and for good reason. We chose it for this class because it is very lightweight and widely supports most langauges and features that are considered essential for development. It also has a large marketplace of extensions that make it easy to extend and personalize your version of VSCode. This doesn't mean that VSCode is the best IDE out there; we encourage you to get experience with other IDEs if you wish/if you are ever required to use a different one. Here are some general questions that you should ask yourself for finding an IDE that suits your needs:
- Does the IDE support the programming languages I am going to use? (Bonus: is it recommended by the development community as a good option for those languages)
- Is it mature and well supported?
- Does it support collaboration and a direct connection to a respository?
- Does it support other technology I will use for my project? (connecting to servers, alternative testing frameworks, etc.)
- Does it have code autocomplete?
- Does it work with my operating system?
- Do I have to pay a license for it?
- Can I customize it however I want?
What we will be doing now is using VSCode to connect to UCR servers. The UCR servers already have a fully configured workspace for you (a compiler, and a way to save your work across devices), so combined with the graphical interface of VSCode, you will have everything you need for this class. Of course, if you feel comfortable, feel free to use your own personal environment if you have one configured/are willing to learn how.
First, install the correct version of VSCode at this link for your operating system and processor. Once VSCode is installed, we need to install an extension called Remote-SSH. This extension will allow you to work on UCR's servers remotely, saving your progress across devices and allowing you to use the software already installed on the server (like the compiler). To do this, open VSCode and go to the extension tab on the left bar, and search for Remote-SSH. Make sure it is the extension that is published by Microsoft, verified with the blue check.

Now, we can SSH into UCR servers! To set up a connection to CS010B servers, follow these steps:
- Click the Remote-SSH symbol in the bottom left corner that looks like this:


Note: If you have a theme installed, it may be a different color!
-
Click "Connect to Host", then click "Add new SSH host", and type the following command. Note that your CS username is the same as your UCR NetID.
ssh [YOUR UCR NETID HERE]@cs010b.cs.ucr.edu
For example, the command would look something like ssh jbieb001@cs010b.cs.ucr.edu.
Note: If you are prompted to select the SSH configuration to edit, select the one that starts with
C:\Usersif you are on Windows, and if you are on Mac, pick the one that starts with/Users/, and if you are on Linux, select the one that starts with/home/
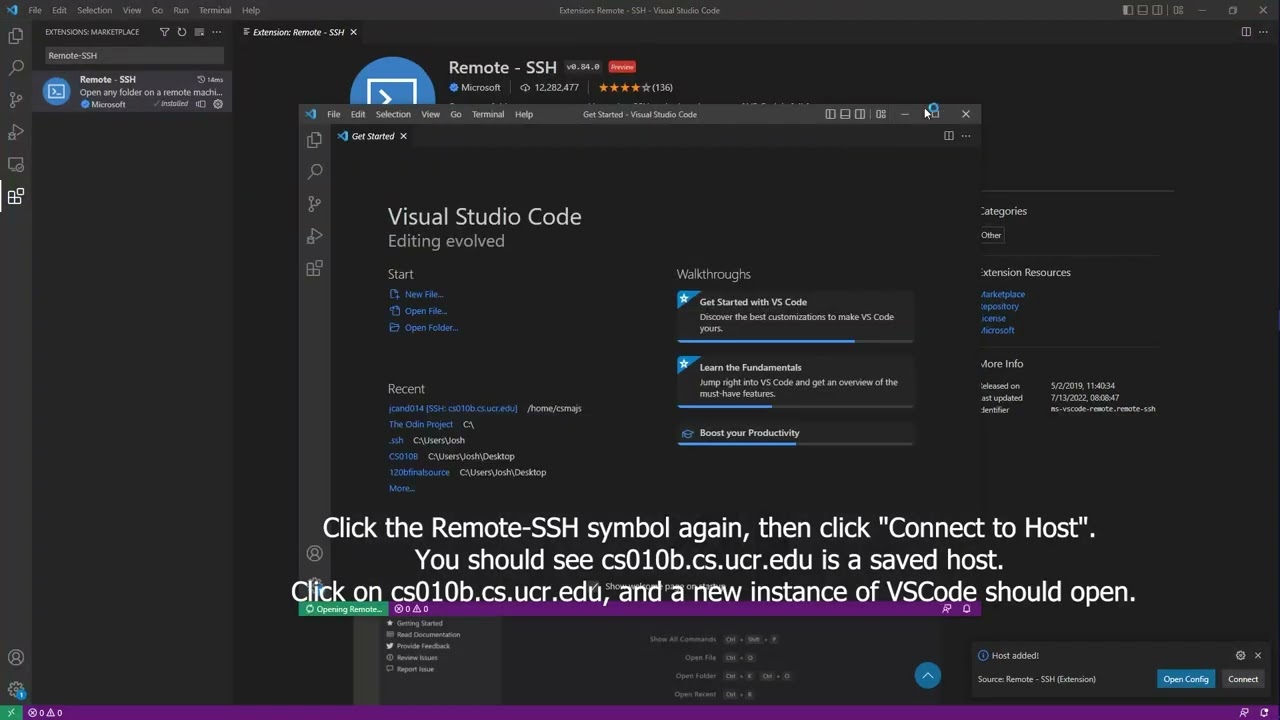
- Now you have saved the address as a known host. Click the Remote-SSH symbol again, then click "Connect to Host". You should see
cs010b.cs.ucr.eduis a saved host. Click oncs010b.cs.ucr.edu, and a new instance of VSCode should open. You will be prompted with "cs010b.cs.ucr.eduhas fingerprint" followed a very long string. Click Continue.
IMPORTANT NOTE: You may or may not be prompted to select the platform of the remote host
cs010b.cs.ucr.edu. If you are, select Linux, regardless of your operating system. This is because the UCR servers run on a Linux distribution.
- You will now be prompted to log in with your CS password (this may be different from your UCR password). Now that you're connected, go to the extensions marketplace and install the C++ extension. It should look like this:

Note: If you are having trouble logging in, go to this link to reset your CS password.
Now, you have a fully configured workspace on VSCode while connected to school servers!
In order to close the connection, click the bottom left corner (it should say SSH: cs010b.cs.ucr.edu). It should pull up the command palette, and to exit, press "Close remote connection". PLEASE DON'T FORGET TO DO THIS WHENEVER YOU ARE DONE! Closing out of VSCode without manually closing the connection doesn't log you out on the server, which consumes precious server resources.
If you are having trouble, click on the picture below for a video example:
Note: In order to make your life easier, turn on Auto Save by going to File > Auto Save, and toggle the setting on. A very common error is forgetting to save but compiling, and you get errors such as "undefined reference to
main()" due to the file not being saved.
Open a folder using Ctrl+O / Cmd+O, or by pressing the first icon on the tab on the left (called the explorer). When opening a folder for the first time, you will be asked if you trust the authors. Click "yes". This should default to your home directory/folder, which should have the path /home/csmajs/[your_ucr_netid] for students in CS related majors or /class/classes/[your_ucr_netid] for students who are taking CS 010B as a service course for their major. (you may be asked for your password again). This will be the directory that all your files will be in; think of it as your reserved space on the UCR server.
In order to demonstrate how to use VSCode with C++ so you can do your labs, we will write and compile a simple program. Create a new directory/folder called example by pressing the new folder button, and create a new file called main.cpp in the example directory.

In main.cpp, copy and paste the following code:
#include <iostream>
#include <string>
using namespace std;

int main()
{
    string input;
    cout << "What's your name?" << endl;
    getline(cin, input);
    cout << "Hello " << input << '!' << endl;
}
Now that you have your source code, let's compile it! Open up a terminal by using the shortcut Ctrl + ~. Now, type in and run the following command:
g++ example/main.cpp
Let's break down what this command is: g++ is the compiler that we use for C++ source code. example/main.cpp is simply the path of the target source code file we want to compile.
Note: The shell that we are using is called Bash. A useful feature of a lot of shells is that they support autocomplete. For example, you can type
g++ example/mand press the Tab key, and it will autocomplete the name toexample/main.cpp. This will be useful for when you have longer file names.
Now, if your program has no errors and compiles, there should be no input in your console, and just be awaiting your next input. If your program wasn't able to compile, you would see all your error messages here. You should see that there's a new file in your directory called a.out. This is your executable! In order to run it, type and run this following command.
./a.out
The ./ followed by the name of the exectuable is the way we run our compiled programs.
The terminal should now be running your executable, and waiting for your input.
By default, source files compiled by g++ are named a, but usually we want to give our programs recognizable names. To do this, we can use the compiler flag -o, which is a compiler flag that names the output executable. First, delete the a.out file. Then, run the following command:
g++ -o hello_world main.cpp
This will compile main.cpp into an executable called hello_world, and you can run it by running the command ./hello_world in your console.
Notice that when you want to open a folder, you are prompted to enter your password again. This essentially makes it so you have to input your password twice to log in, which gets very tedious. In this section, you can set up Remote-SSH to remember your password so you only have to input it once.
Instructions vary based on operating system:
Windows
In order to set up key based login with SSH, we will first have to install an SSH client.
- Go to the Start Menu and search for "Add an Optional Feature"
- Click "Add a feature"
- Search for OpenSSH Server and install

Now, we will generate something called a public/private key pair, which we will use to log into Remote-SSH.
- Open a Command Prompt by pressing (Windows Key + R) which opens the "Run" application, and then type in
cmdwhich opens the command prompt. - Run the following command:
ssh-keygen -t rsa -b 4096
The output should be the following:
Generating public/private rsa key pair.
Enter file in which to save the key [your path here]:
The name of the file can be whatever you want it to be. For the purposes of the tutorial, the name we will be using is mysshkey. If you use something else, substitute the name wherever we use mysshkey.
Now, you will be prompted with this:
Enter passphrase (empty for no passphrase):
Do not enter a passphrase. This will require you to enter your passphrase every time you want to log in, which defeats the purpose of automatically logging in with your public/private key pair. Press Enter twice to proceed without entering a passphrase.

Now, we need to navigate to our generated keys. Go to your user folder, which should be in the path C:\Users\[your windows username]. You should see two files named mysshkey (or whatever you named your keys). The one without a file extension is your private key, which you should never, ever share with ANYONE. The one with a file extension of .pub is your public key.
We need to save our public key on the server.
- Open the public key file
mysshkey.pubwith Notepad. Copy the contents. - SSH into UCR servers using the method outlined in "Part 1: Installation and Configuration" above.
- Make a new folder called
.ssh, and in there create a file calledauthorized_keys. Paste in the public key, and save the file. For this to work, these must be the exact names of the folder and the file.

Now, we need to configure our Remote-SSH extension to use the private key. This will allow us to automatically log in.
- Go back to the folder with the keys (reminder: it should be
C:\Users\[your windows username]). Select your private key file, which ismysshkey(no file extension). Copy the path using theCopy Pathbutton at the top of the file explorer. - Open a local instance of VSCode. Pull up the command palette (F1) and type in: "Remote-SSH: Open SSH Configuration File".
Pick the one that starts with C:\Users\[your windows username]. You should see something like:
Host cs010b.cs.ucr.edu
    HostName cs010b.cs.ucr.edu
    User [your_ucr_netid]
- Add the following line, so that your file looks like this:
Host cs010b.cs.ucr.edu
    HostName cs010b.cs.ucr.edu
    User [your_ucr_netid]
    IdentityFile "YOUR PRIVATE KEY PATH"
...where you paste your private key path. Make sure you remove the quotes! Save the file. If everything worked properly, then you will no longer be prompted for your password when you SSH using the device you set this up on.

MacOS/Linux (Debian-based)
We will generate something called a public/private key pair, which we will use to log into Remote-SSH.- Open a terminal, and run the following commands in this order:
cd .ssh
ssh-keygen -t rsa -b 4096
The output should be the following:
Generating public/private rsa key pair.
Enter file in which to save the key [your path here]:
The name of the file can be whatever you want it to be. For the purposes of the tutorial, the name we will be using is mysshkey. If you use something else, substitute the name wherever we use mysshkey.
Now, you will be prompted with this:
Enter passphrase (empty for no passphrase):
Do not enter a passphrase. This will require you to enter your passphrase every time you want to log in, which defeats the purpose of automatically logging in with your public/private key pair. Press Enter twice to proceed without entering a passphrase. Note that there is a tradeoff between security and convenience with this method, as anyone with access with your device will be able to log into UCR servers.
You should see two files in the .ssh directory named mysshkey (or whatever you named your keys). The one without a file extension is your private key, which you should never, ever share with ANYONE. The one with a file extension of .pub is your public key.
- Run the following command:
cat mysshkey.pub
Copy the (very long) output using Ctrl+Shift+C, or Cmd+V+C on Mac. This is your public key.
- SSH into UCR servers using the method outlined in "Part 1: Installation and Configuration" above.
- Make a new folder called
.ssh, and in there create a file calledauthorized_keys. Paste in the public key, and save the file. For this to work, these must be the exact names of the folder and the file.
- Open another terminal, and run the following commands in this order:
cd .ssh
echo -e '\tIdentityFile /home/~/.ssh/mysshkey' >> config
What the second command does is append a command to the end of your SSH config file that reads the private key, which authenticates you without the need for entering your password.
VSCode has many useful features that help increase your productivity. You will learn more about some of these features later (debugging, how to use your terminal, and other features when editing multiple files at once), but some of the editing features that will be useful to you right now are:
 |
 |
 |
|---|---|---|
| Alt + Left Click to add a cursor | Rename variables/functions easily and quickly | Go to definition/declaration of a variable/function |
 |
 |
|---|---|
| Highlight line by line with Ctrl + L or Cmd + L, then comment with Ctrl+/ or Cmd+/ | Move a line of code with Alt + Arrow Keys |
Another useful setting is in File > Auto Save, to prevent yourself from potentially losing progress.
To find even more useful commands, press F1 to bring up the Command Palette that allows you to search for whatever command you need. Here is a list of keybindings if you wish to get familiar with the many shortcuts in VSCode.
We encourage you to become more familiar and comfortable with your new development environment. Make it your own! Install a theme, use some fun extensions, and play around in C++. You can create your own keybinds and themes, and add your own extensions from the marketplace. Later in this course, we will go over some more useful features that you will be able to use in future courses and beyond.