This guide is auto translated to:
I only speak DE and EN, so please if you get in contact, do it in english! Moreover i wont update other languages than english. Use deepl.com to translate text if you have problems understanding it. The translation was made on the 1. August 2021
This guide will lead you throught all steps needed to adapt a watchface to fit xdrip. I'm not a nativ speaker, so feel free to suggest changes. This guide focus on adapting an existing watchface to our need. If you are creative and skilled enough to create your own watchface, this tutorial will help you with the technical adaptions to use it in xdrip.
Please remember this guide is only for GTR 2e! A lot of things are similiar for different watches especially the GTR 2 and GTS 2(e). If you using this guide to create watchfaces for different watches please send text snipets via issue to help this guide suite different watches aswell.
Main credit goes to Artem Kovalenko who made Amazfit GTR2, GTR2e, GTS2, GTS2e, GTR42, Bip, BIP S and GTR 47 possible! Moreover he helped me a lot to create my first own watchface.
Please support him here: https://www.patreon.com/xdrip_miband
You can read more about his projects regarding xdrip here: https://bigdigital.home.blog/
Moreover thanks to:
- SashaCX75 helped creating the watchfaceditor
- all watchface creator
Here we'll collect all xdrip optimized watchfaces: https://github.com/twinko/GTR2e-xdrip-watchface-collection . You can choose these to have a working example to tinker around. I recommend watchface 4- 13, because these watchfaces are very simple and doesnt require (a lot of) photoshop skills. Please ask WF specific questions over there!
If you created your own watchface please share it with others. We could collect them in one repo, feel free to contact me via issue.
I'll use the following tools. You will need all of them. All of the tools below are free for personal use.
- Windows OS
- WFE: AmazFit WatchFace editor 2 for Windows
- PS: Photoshop (Version CS2 is available for free) https://archive.fo/255q5#selection-1663.0-1663.29
- WF: A watchface. (next chapter)
- Download the whole repository, we will need some files later from the "Guide" folder. You can downlaod this repository by clicking on the green "code" button on the top of this page and choose "Download ZIP".
If you are not creating your own watchface, you can have a look for watchfaces here:
- https://github.com/twinko/GTR2e-xdrip-watchface-collection (wacthfaces already adapted to xdrip)
- https://amazfitwatchfaces.com/gtr/top?compatible=GTR_2 (huge watchface collection, will need xdrip adaption, as described in this guide)
Donwload the desired file. Please care about the watch the watchface was made for!
Something very important:
- The smaller the watchface the better. We'll come to this later but all pictures inlcuding the json file should'nt be bigger than 50kb.
- 50kb watchface size (raw pictures and the json) will result in a uploadtime of about 10 seconds and you dont want it to take longer, because of battery life and you dont want to wait until tomorrow to see your bloodsugar.
- That means less icons, less changing things (excluding numbers, and yes only numbers).
- Avoide watchfaces with gradients (when one color shifts to another).
- Remember we want to be able to easily read our Blood Glucose (BG), so we need to make some free space somewhere. I would calculate at least 1/3 of the watchface dedicated to all xdrip related information
- Download the whole folder of the latest version of the WFE (watchface editor), linked above.
- As soon as yo got forwarded to Dropbox, to download the WFE, you can find the "download" buttom in the top right, we need the whole folder!
- After clicking download choose "direct download". It will download a file like "AmazFit_Watchface_Editor_2_v5.1.zip".
- Extract the file
- Open (in my case) "AmazFit_Watchface_Editor_2"
- start "AmazFit_Watchface_Editor_2.exe"
- Buttom right, choose "Unpack compressed bin"
- Choose the watchface you downloaded earlier
- The unpacked watchface can be found here: ...\AmazFit_Watchface_Editor_2\Watch_face
- Now you need to get familiar with the WFE.
- I'll explane only the absolut basics. To learn more about the watchface editor and its possibilities, have a look here: https://amazfitwatchfaces.com/forum/viewtopic.php?f=14&t=1571 Direct link to english translation: https://translate.google.com/translate?hl=ru&sl=ru&tl=en&u=https%3A%2F%2Fowagner.ru%2Famazfitgtr%2Fwfcreator%2Fwatchfaces_creator_lesson%2F
- Go to the "Edit" tab and click throught the different options on the right side.
- Choose "Layer order" to define things like the date order (dd-mm-yy or mm-dd-yy).
Important hint: Our most important goal is to reduce size. As written above we want to get below 50kb raw png files (inlcuding .json) .
Best way to reduce size:
- less pictures
- less colors (makes smaller picture files)
- use system font (a setting in the edit tab of WFE) wherever it shows numbers.
- When you are done with your changes, save the watchface ("Edit" tab, bottom in the middel "save Json")
Things thet helped me a lot:
- picture 0001.png is always the background. Normally it's neccessary to adapt the background to fit a glucose graph and all the needed data. Use Photoshop for that or a different program
- have a look at the unpacked pictures, delete all the ones you dont need.
- You need to rename the files from 0001- xxxx You will have problems later if the files are not in a row. Its not possible to have one number in between missing. It should look like: 0001, 0002, ...... 0015.) You can use https://www.bulkrenameutility.co.uk/Download.php to bulk rename files.
- Go to the folder including the json and all needed files on your computer.
- Make a backup of th existing files and json
If your watchface has a plain color, edit it in the WFE. But you'll need to create a picture, where all the xdrip date is placed on, so create a colormatching image in PS and skip the following part, where i describe how to cut the picture.
-
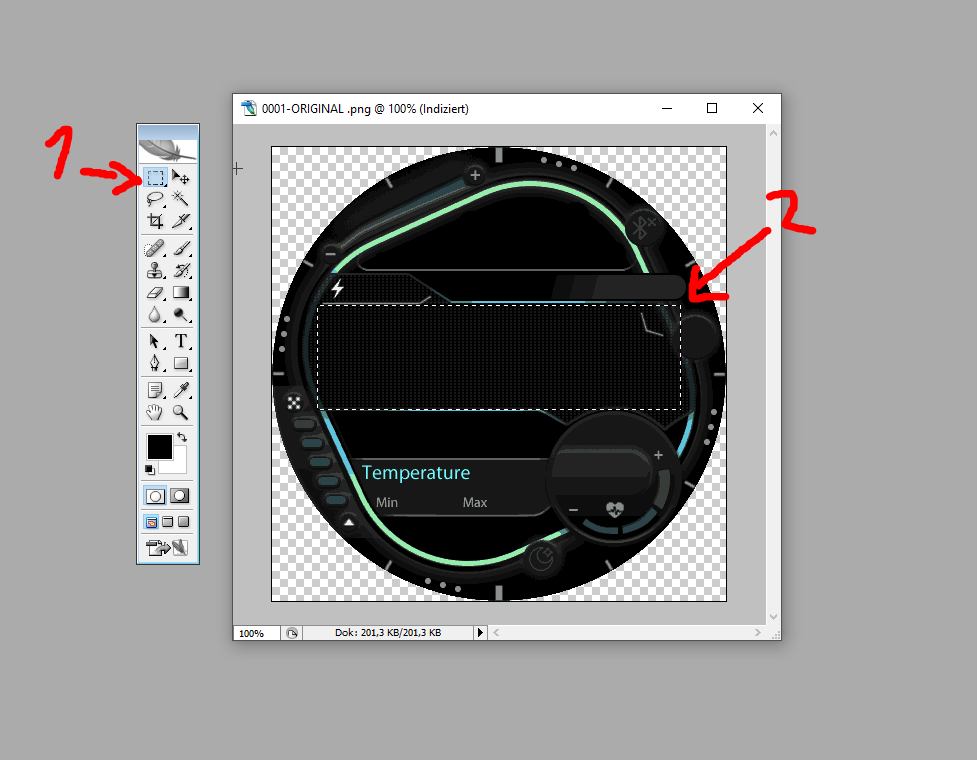
Open 0001.png (your background image) in PS
-
Go to Picture-->Mode and change it to RGB (already should be RGB).
-
Select the Rightangle-Tool by pressing "M" and choose the part where you want your xdrip data to be shown.
-
Rightclick inside and choose "Layer by cutting"
-
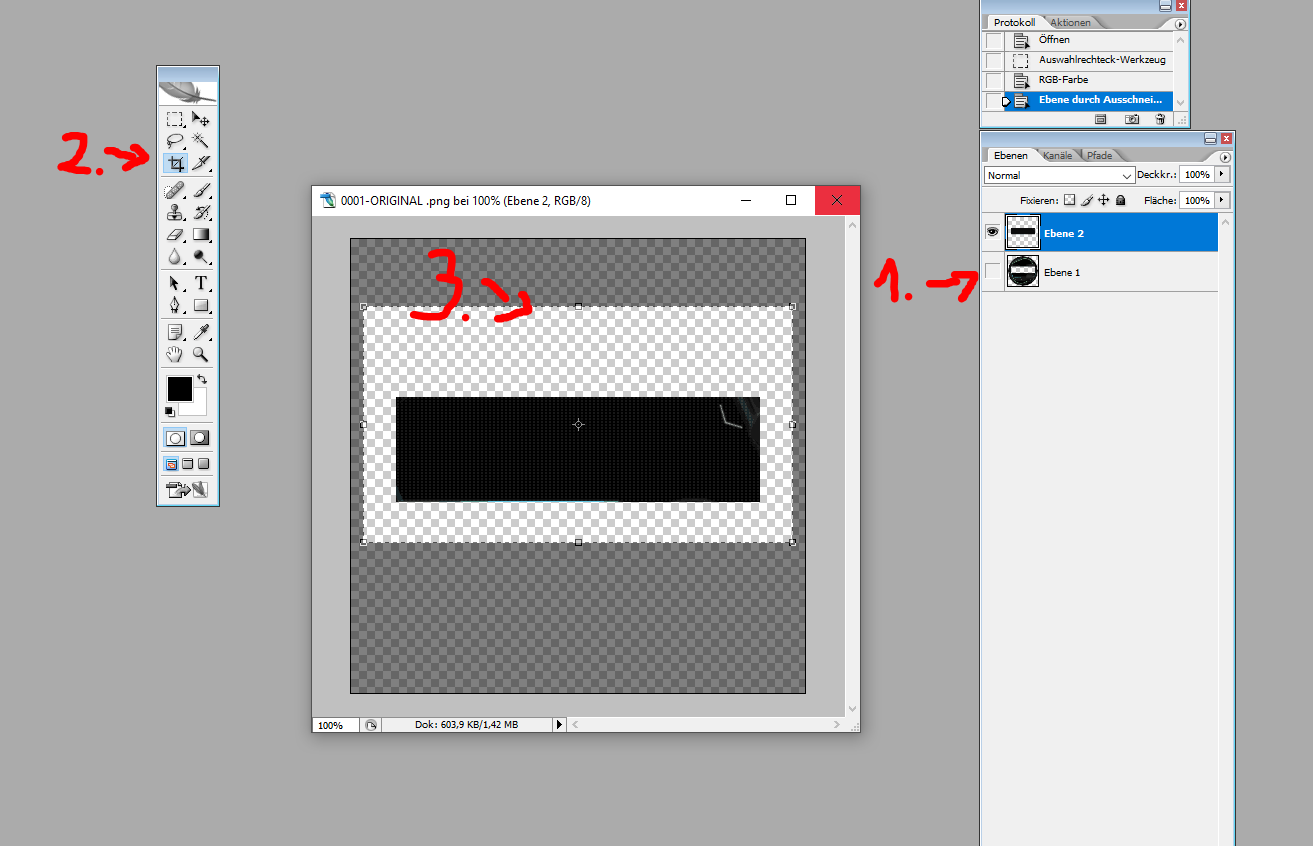
Now save the file as a PS-file (.psd)
-
Hide the rest of the picture by clicking the eye icon on the right side (Layers) on Layer 1
-
Press "c" to use the cutting tool
-
Cut the picture down to the size of the visual part of your watchface.
-
Press enter to confirm or the check in the top
-
Now save this as my_image.png
-
Open up the saved psd file and do the same thing to rest of the watchface (the part we hide in the first place. by now hiding the my_image.png-part), so that we have the background image, split in 2 files.
- Open every file, one after another with PS.
- Klick on Data--> Save for Web
- In the new Window you should choose the following on the right side:
- png-8
- You can tinker a little bit and delete specific colors, that will reduce the size of the image even more. You can see the new file size in the bottem right
- Files need to be png!
- If you encounter a weird border around your images:
- go picture, Mode and change it to "indexed colors" before saving it for web
- Save the file by overwriting (you made a backup earlier). I didnt found a way to do it to all files at once, let me know if you know how.
- Now open up WFE again, you should notice, that we have a cutout in the middel of our watchface. (if not save your cutout image as background picture, 0001.png)
- navigate to Edit--> Activity -->Fat-burning-->Icon
- Copy the folowing picture located here: ## GTR-2-WF-Xdrip-EN/Guide/0099.png it is only 1 pixel. We will replace it later with the my_image.png via code. But this saves us a lot of watchface size.
- Now you need to put it in top left corner of our cutout and save the json. To find the right coordinates, read "1.3.1 How find the right coordinates in PS" below.
What you should have so far in 1 folder:
- a json that you created with WFE
- all needed WF files, maximum reduced in size
- my_image.png, maximum reduced in size --> we are getting close to your final WF :)
Important: As mentiones before: The whole folder shouldnt be bigger than 50kb! If its bigger, you better go back some steps and get rid of some pictures or reduce the picture size even more!
- Navigate to ....\AmazFit_Watchface_Editor_2\Tools
- hold shift+rightclick in this folder
- Choose "Open Powershell Window here"
- To pack your json you only need to navigate to tools folder and execute command like this
main.exe --gtr2 47 --file config-file.jsonwhere config-file.json is written, the location to your json is needed.- i had some trouble with that and needed to add to whole path infront of the main.exe so it was something like this:
C:\Users\twinko\Desktop\AmazFit_Watchface_Editor_2\Tools\main.exe --gtr2 47 --file C:\Users\twinko\Desktop\AmazFit_Watchface_Editor_2\Watch_face\gtr2-g7en-colormix03-346659-994092c337\Small\WF_2_V01.json
- i had some trouble with that and needed to add to whole path infront of the main.exe so it was something like this:
- As a result, you should receive a unpacked bin file. This file will be used bye xdrip. Xdrip will inject the required resource into this file, compress it and sent it to the watch.
- rename the .bin to: my_watchface.bin
- Create a new folder, putting ina copy of the following files:
- the my_watchface.bin we created
- my_image.png
The config.json is defining, where on the my_image.png what xdrip data is shown and how. Its different to the json created by the WFE, don't mix them up!
The original config.json Artem created is linked here: https://github.com/twinko/GTR-2-WF-Xdrip-EN/blob/main/Guide/config.json You downloaded the repository earlier, get the file from the Guide folder!
General things to know:
- this config.json is only related to my_image.png
- so if we talk about coordinates (x and y) its based on the my_image.png and its total size, not the whole watchface
- read Artems post about alignment here: bigdigital/xDrip-miband#5 (comment)
- text_align: "right"
- you need to count the pixels starting from the right side
- so if it reads: x: 100 and text align is right, counting 100 pixel from the right side of the picture, thats where the element is placed
- Open my_image.png in PS
- press F8, a little info windows will show up
- If you move your mouse over the picture, you will see the X and Y numbers in that little window.
- open up the config.json with notepad
- You see litte cluster, which are pretty selfexplaining
- We only need to edit resource_to_replace, X, Y font_size perhaps bg_color of the graph and arrows
--> detailed explanation here: https://bigdigital.home.blog/2022/09/04/custom-watchface-config-json-data-structure/
- put in the number of the image we choose for Fat-burning-->Icon (if your first image is named 0001.png) reduce the number by one. The algorith starts counting with 0 and his 0 iem will be our 0001.png)
- as described in "How find the right coordinates in PS" you can find the right position to place your xdrip data.
Hint: The system font is "Segoe UI" so press "t" in PS to write text and put some defualt text in your my_image.png and look up the right coordinates. Remember x and y are the bottom left of the first letter/number. Do not save the my_image.png with the numbers you wrote down, this will be done later by Artems magic, we do this in PS to find out the right coordinates, noting else.
- Now change all coordinates to your needs.
- Attention: there are some values witch have the following line:
"text_align": "right",for these we have a different rule for the coodinates. Put in the Buttom right cordinate of the last letter/number.
- put in the same font size you choose in PS
- Colors are defined in HEX, Just use google to find the right color: https://www.google.com/search?client=firefox-b-d&q=color+picker
- If you want for example the background to be transparent use:
-
 "graph": {
  "bg_color": "#00000000",
- It is possible to use custom arrows. Only use that if you really need it, this will harm the uploadtime, if your arrows are bigger than the original ones.
- If you want to use it, change the following parmeter sind the third line from: "use_custom_arrows": false, to "use_custom_arrows": true,
- So it should look somtehing like this if we use the deault config.json
- upload arrows to xdrip/arrows folder . The files should be named like original files located under src\main\assets\miband_watchface_parts\arrows
DoubleDown.png
DoubleUp.png
Flat.png
FortyFiveDown.png
FortyFiveUp.png
SingleDown.png
SingleUp.png
- Save the config.json to the folder including the my_image.png and the my_watchface.bin (config.json not my_config.json!)
- We should have a folder now with the following files:
- config.json
- my_image.png
- my_watchface.bin
- insert these 3 files into the xdrip folder on your smartphone
- Needed xdrip folder is found here:
- Internal storage/xdrip or
- root/storage/emulated/0/xdrip
- Enable custom watchface in xdrip settings.
- Done!
Please open an issue here if you encounter problems. Please do your own research in advance, I'm also only a normal guy who does this in his freetime. https://github.com/twinko/GTR-2-WF-Xdrip-EN/issues
If you have suggestions on how to improve the guide or make it suitable for other watchfaces as well, please write an issue with advice or soe text snippets :)
I hope this guide was helpfull :)
I'll collect all GTR2e watchfaces here: https://github.com/twinko/GTR2e-xdrip-watchface-collection . Please ask WF specific questions over there!
If you created your own watchface or adapt one by yourself, please share it with others. We could collect them here in one repo, to make it easy for others! Feel free to contact me via issue.