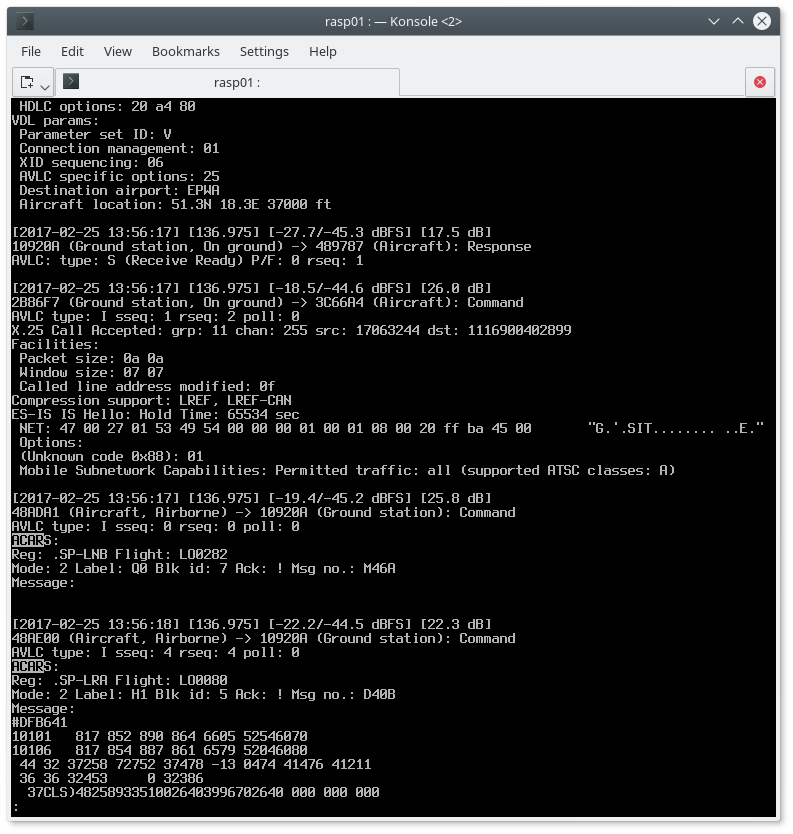
dumpvdl2 is a lightweight, standalone VDL Mode 2 message decoder and protocol analyzer.
- Runs under Linux (tested on: x86, x86-64, Raspberry Pi)
- Supports following SDR hardware:
- RTLSDR (via [rtl-sdr library] (http://osmocom.org/projects/sdr/wiki/rtl-sdr))
- Mirics SDR, eg. SDRPlay (via [libmirisdr-4] (https://github.com/f4exb/libmirisdr-4))
- reads prerecorded IQ data from file
- Decodes up to 8 VDL2 channels simultaneously
- Outputs messages to standard output or to a file (with optional daily or hourly file rotation)
- Outputs ACARS messages to PlanePlotter over UDP/IP socket
- Supports message filtering by type or direction (uplink, downlink)
- Outputs decoding statistics using Etsy StatsD protocol
- AVLC - supported
- ACARS over AVLC - supported
- ISO 8208 (X.25) control packets - supported
- ISO 8473 (CLNP) - partially supported (CLNP header is skipped over without decoding)
- ISO 9542 (ES-IS) - supported
- ISO 10747 (IDRP) - partially supported (decoding of some less important attributes is TODO)
- ICAO ULCS - not supported
- ICAO Applications (CM, CPDLC) - not supported
Note: the aim of this project is to support CPDLC (at least partially). However, CPDLC is not yet implemented in the FIR where I live, so I don't have any real data to work on. If you live in an area where CPDLC over VDL2 is utilized and you are able to collect it, please contact me (e-mail below).
Install necessary dependencies (unless you have them already). Example for Debian / Raspbian:
sudo apt-get install git gcc autoconf make cmake libusb-1.0-0-dev libtool
Install librtlsdr library (unless you have it already):
    cd
    git clone git://git.osmocom.org/rtl-sdr.git
    cd rtl-sdr/
    autoreconf -i
    ./configure
    make
    sudo make install
    sudo ldconfig
    sudo cp $HOME/rtl-sdr/rtl-sdr.rules /etc/udev/rules.d/rtl-sdr.rules
Install libmirisdr-4 library:
    cd
    git clone https://github.com/f4exb/libmirisdr-4.git
    cd libmirisdr-4
    ./build.sh
    cd build
    sudo make install
    sudo ldconfig
    sudo cp $HOME/libmirisdr-4/mirisdr.rules /etc/udev/rules.d/mirisdr.rules
Clone the dumpvdl2 repository:
    git clone https://github.com/szpajder/dumpvdl2.git
    cd dumpvdl2
If you only need RTLSDR support, it is enabled by default, so just type:
make
Mirics support has to be explicitly enabled, like this:
make WITH_MIRISDR=1
If you want Mirics only, you may disable RTLSDR support:
make WITH_MIRISDR=1 WITH_RTLSDR=0
Note: every time you decide to recompile with different WITH_* or USE_* options,
clean the old build first using make clean.
For available command line options, run:
./dumpvdl2 --help
Install statsd-c-client library from https://github.com/romanbsd/statsd-c-client:
    git clone https://github.com/romanbsd/statsd-c-client.git
    cd statsd-c-client
    make
    sudo make install
    sudo ldconfig
Compile dumpvdl2 as above, but add USE_STATSD=1:
make USE_STATSD=1
Simpliest case on RTLSDR dongle - uses RTL device with index 0, sets the tuner gain to 40 dB and tuning correction to 42 ppm, listens to the default VDL2 frequency of 136.975 MHz, outputs to standard output:
./dumpvdl2 --rtlsdr 0 --gain 40 --correction 42
If you want to listen to a different VDL2 channel, just give its frequency as a last parameter:
./dumpvdl2 --rtlsdr 0 --gain 40 --correction 42 136725000
dumpvdl2 can decode up to 8 VDL2 channels simultaneously. Just add them at the end:
./dumpvdl2 --rtlsdr 0 --gain 40 --correction 42 136725000 136975000 136875000
If your receiver has a large DC spike, you can set the center frequency a bit to the side of the desired channel frequency, like this:
./dumpvdl2 --rtlsdr 0 --gain 40 --correction 42 --centerfreq 136955000
Mirics is similar, however libmirisdr-4 library currently lacks support for configuring
correction in ppm. If your receiver needs a non-zero correction, you can pass the appropriate
value in Hertz, instead of ppm. Note: this value will be subtracted from the center
frequency, so if your receiver tunes a bit too low, the parameter value shall be negative:
./dumpvdl2 --mirisdr 0 --gain 100 --correction -2500
libmirisdr-4 supports two types of hardware: generic Mirics (0 - the default) and SDRPlay (1).
SDRPlay users should add --hw-type 1 option. It uses frequency plans optimized for SDRPlay
and reportedly gives better results than the default mode.
If you get error messages about lost samples on Raspberry Pi, try adding --usb-mode 1.
This switches USB transfer mode from isochronous to bulk, which is usually enough to rectify
this problem. If it does not help, it might be that your Pi is overloaded or not beefy enough
for the task.
-
Decoded messages are printed to standard output by default. You can direct them to a disk file instead:
./dumpvdl2 --output-file vdl2.log [other_options] -
If you want the file to be automatically rotated on top of every hour, add
--hourlyoption. The file name will be appended with_YYYYMMDDHHsuffix. -
If you prefer daily rotation,
--dailyoption does just that. The file name suffix will be_YYYYMMDDin this case. -
Add
--utcoption if you prefer UTC timestamps rather than local timezone in output and filenames.
dumpvdl2 can send ACARS messages to Planeplotter, which in turn can extract aircraft position
information from them and display blips on the map. First, configure your Planeplotter as follows:
-
Stop data processing (press 'Stop' button on the toolbar)
-
Go to Options / I/O Settings...
-
Tick 'UDP/IP Data from net'
-
Set 'UDP/IP local port' to some value (default is 9742)
-
Close the settings window by clicking OK and restart data processing
Supply dumpvdl2 with the address (or host name) and port where the Planeplotter is listening:
./dumpvdl2 --output-acars-pp 10.10.10.12:9742 [other_options]
That's all. Switch to 'Message view' in Planeplotter and look for incoming messages.
By default dumpvdl2 logs all decoded messages. You can use --msg-filter option to ignore
things you don't want to see. If you do not want messages sent by ground stations, run
the program like this:
./dumpvdl2 --msg-filter all,-uplink [other_options]
Or if you want to filter out empty ACARS messages, because they are boring, use this:
./dumpvdl2 --msg-filter all,-acars_nodata [other_options]
For full list of supported filtering options, run:
./dumpvdl2 --msg-filter help
Refer to FILTERING_EXAMPLES.md file for more examples and details.
The program does not calculate statistics by itself. Instead, it sends metric values (mostly counters) to the external collector using Etsy StatsD protocol. It's the collector's job to receive, aggregate, store and graph them. Some examples of software which can be used for this purpose:
-
Collectd is a statistics collection daemon which supports a lot of metric sources by using various plugins. It has a StatsD plugin which can receive statistics emitted by
dumpvdl2, aggregate them and write to various time-series databases like RRD, Graphite, MongoDB or TSDB. -
Graphite is a time-series database with powerful analytics and aggregation functions. Its graphing engine is quite basic, though.
-
Grafana is a sophisticated and elegant graphing solution supporting a variety of data sources.
Here is an example of some dumpvdl2 metrics being graphed by Grafana:
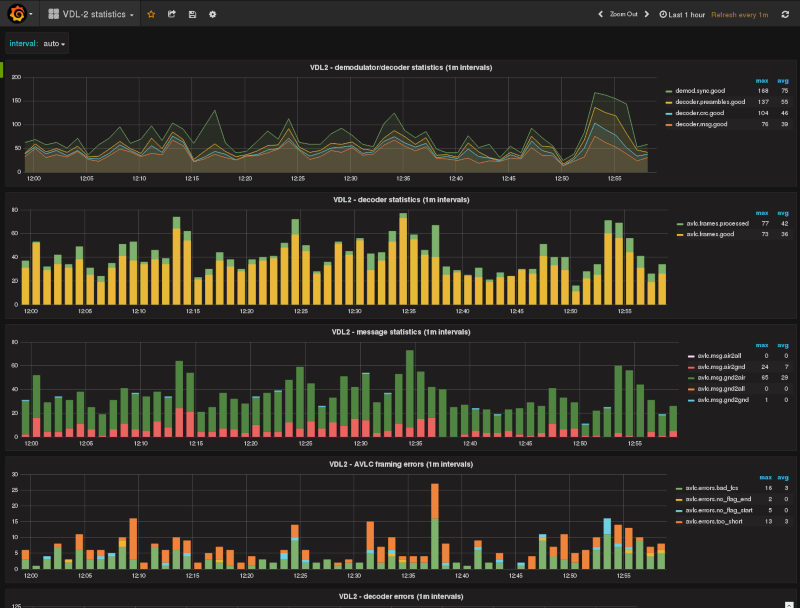
Metrics are quite handy when tuning the antenna installation or receiving parameters (like gain
or correction). Full list of currently supported counters can be found in statsd.c source file.
dumpvdl2 produces a separate set of counters for each configured VDL2 channel.
To enable statistics just give dumpvdl2 your StatsD collector's hostname (or IP address)
and UDP port number, for example:
./dumpvdl2 --statsd 10.10.10.15:1234 [other_options]
The syntax is:
dumpvdl2 --iq-file <file_name> [--sample-format <sample_format>] [--oversample <oversample_rate>]
  [--centerfreq <center_frequency>] [vdl_freq_1] [vdl_freq_2] [...]
The symbol rate for VDL2 is 10500 symbols/sec. dumpvdl2 internal processing rate is 10 samples
per symbol. Therefore the file must be recorded with sampling rate set to an integer multiple
of 105000. Specify the multiplier value with --oversample option. The default value is 10, which is
valid for files sampled as 1050000 samples/sec. For example, if you have recorded your file at
2100000 samples/sec, then use --oversample 20 (because 105000 * 20 = 2100000).
The program accepts raw data files without any header. Files produced by rtl_sdr and miri_sdr
programs are perfectly valid input files. Different radios produce samples in different formats,
though. The following sample formats are currently supported by dumpvdl2:
U8- unsigned 8-bit samples. This is the format produced byrtl_sdrutility.S16_LE- 16-bit signed, little endian. Produced bymiri_sdrutility (by default).
Use --sample-format option to set the format. The default format is U8.
The program assumes that the VDL2 channel is located at baseband (0 Hz), ie. the center frequency of your radio was set to the VDL2 channel frequency during recording. If this is not the case, you have to provide correct center frequency and channel frequency. For example, if your receiver was tuned to 136.955 MHz during recording and you want to decode the VDL2 channel located at 136.975 MHz, then use this:
dumpvdl2 --iq-file <file_name> --centerfreq 136955000 136975000
Putting it all together:
dumpvdl2 --iq-file iq.dat --sample-format S16_LE --oversample 13 --centerfreq 136955000 136975000 136725000
processes iq.dat file recorded at 1365000 samples/sec using 16-bit signed samples, with receiver
center frequency set to 136.955 MHz. VDL2 channels located at 136.975 and 136.725 MHz will be decoded.
VDL (VHF Data Link) Mode 2 is a communication protocol between aircraft and a network of ground stations. It has a higher capacity than ACARS and a lot more applications. More information can be found on Wikipedia or SigIdWiki.
Civil airlines - not all, but many. Military? Umm, no.
The most ubiquitous is 136.975 MHz (so called Common Signalling Channel). In some areas where
the capacity of a single channel is not enough, 136.725 or 136.875 is used as well. Because
they are closely spaced, dumpvdl2 can receive all of them simultaneously with a single RTLSDR
receiver.
If you are in EU or US, that's quite probable. Launch your favorite SDR Console (like SDRSharp or GQRX), tune 136.975 MHz and place your antenna outside (or near the window, at least). If you can see short bursts every now and then, it's there.
VDL2 runs on VHF airband, so if you already have a dedicated antenna for ACARS or airband voice, it will be perfect for VDL2. However VDL2 transmissions are not very powerful, so do not expect thousands of messages per hour, if your antenna is located indoors. If you have already played with ADS-B, you know, what to do - put the antenna outside and high with unobstructed sky view, use short and good quality feeder cable, shield your radio from external RF interference.
It basically comes down to three things:
-
set your tuner gain quite high. I get good results with 42 dB for RTLSDR and 100 dB for Mirics dongles. 75-85 dB is reported to work well on SDRPlay. However, it depends on the used antenna.
-
check SDR Console with the same gain setting - do you see data bursts clearly? (they are very short, like pops).
-
if your DC spike is very high, set the center frequency manually to dodge it (use
--centerfreqoption). -
RTL dongles are cheap - some of them have higher noise figure than others. If you have several dongles at hand, just try another one.
To verify that the signal strength is enough for the squelch to open, do the following:
-
Go to
dumpvdl2source directory -
Recompile with debug output enabled:
make clean make <your_make_options> DEBUG=1 -
Run the program as usual. It will display debugging info to standard error. Every second or so the current noise floor estimate will be printed:
process_samples(): noise_floor: 0.006000
process_samples(): noise_floor: 0.005624
process_samples(): noise_floor: 0.005478
- If you only see these lines and nothing else, it means there is no transmission on the configured channel - or there is, but it's not strong enough for the squelch to open. If you see a lot of other debug messages, that's good, they describe various stages of frame decoding and you can figure out, how it's doing and where it fails. However if the squelch opens all the time, several times a second and there are still no messages, it means your gain is probably set too high and the receiver front end is saturated. Reduce the gain a bit (like 1-2 dB) and see if it helps.
- initially, just don't set it manually, use the default of 136.975 MHz.
- oscillators in cheap receivers are not 100% accurate. It is usually necessary to introduce manual correction to get precise tuning. There is no one-size-fits-all correction value - it is receiver-specific. See next question.
Method 1: use rtl_test utility which comes with librtlsdr library. Run it with -p option and
observe the output:
    root@linux:~ # rtl_test -p
    Found 1 device(s):
      0:  Realtek, RTL2838UHIDIR, SN: 00000002

    Using device 0: Generic RTL2832U OEM
    Found Rafael Micro R820T tuner
    Supported gain values (29): 0.0 0.9 1.4 2.7 3.7 7.7 8.7 12.5 14.4 15.7 16.6 19.7 20.7 22.9 25.4 28.0 29.7 32.8 33.8 36.4 37.2 38.6 40.2 42.1 43.4 43.9 44.5 48.0 49.6
    [R82XX] PLL not locked!
    Sampling at 2048000 S/s.
    Reporting PPM error measurement every 10 seconds...
    Press ^C after a few minutes.
    Reading samples in async mode...
    real sample rate: 2048207 current PPM: 101 cumulative PPM: 101
    real sample rate: 2048159 current PPM: 78 cumulative PPM: 89
    real sample rate: 2048137 current PPM: 67 cumulative PPM: 81
    real sample rate: 2048184 current PPM: 90 cumulative PPM: 84
    real sample rate: 2048163 current PPM: 80 cumulative PPM: 83
    real sample rate: 2048165 current PPM: 81 cumulative PPM: 82
    real sample rate: 2048140 current PPM: 69 cumulative PPM: 81
    real sample rate: 2048178 current PPM: 87 cumulative PPM: 81
    real sample rate: 2048168 current PPM: 82 cumulative PPM: 81
    real sample rate: 2048117 current PPM: 57 cumulative PPM: 79
    real sample rate: 2048202 current PPM: 99 cumulative PPM: 81
    real sample rate: 2048173 current PPM: 85 cumulative PPM: 81
    real sample rate: 2048164 current PPM: 80 cumulative PPM: 81
    real sample rate: 2048135 current PPM: 66 cumulative PPM: 80
    real sample rate: 2048179 current PPM: 88 cumulative PPM: 80
    real sample rate: 2048170 current PPM: 83 cumulative PPM: 81
    real sample rate: 2048167 current PPM: 82 cumulative PPM: 81
    real sample rate: 2048155 current PPM: 76 cumulative PPM: 80
    real sample rate: 2048160 current PPM: 78 cumulative PPM: 80
    real sample rate: 2048159 current PPM: 78 cumulative PPM: 80
    real sample rate: 2048154 current PPM: 75 cumulative PPM: 80
    real sample rate: 2048155 current PPM: 76 cumulative PPM: 80
    real sample rate: 2048181 current PPM: 89 cumulative PPM: 80
After a couple of minutes the cumulative PPM value converges to a stable reading. This is the value for your dongle. However, some people reported that this method is not always 100% accurate, so it's good to double-check with method 2.
Method 2: use your favorite SDR console (like SDRSharp, HDSDR, GQRX, etc). Tune it to a frequency of some local narrowband transmitter which transmits constantly (or very often) and is driven by a good frequency reference. A good example is an ATIS or AWOS channel from a local airport. Zoom in on the channel peak and adjust the correction value in the receiver settings to bring the peak exactly to the tuned frequency. If it's a voice channel, judge it by your ear - aim for the lowest possible background noise. See this video tutorial for reference: Frequency calibration in SDRSharp.
[2017-02-26 19:18:00 GMT] [136.975] [-18.9/-43.9 dBFS] [25.0 dB]
From left to right:
-
date and time with timezone.
-
channel frequency on which the message has been received.
-
signal power level (averaged over transmitter ramp-up stage, ie. 3 symbol periods after squelch opening). Full scale is 0 dB.
-
noise floor power level. Full scale is 0 dB.
-
signal to noise ratio (ie. signal power level minus noise floor power level).
Maybe. However do not expect me to purchase all SDRs available on the market just to make
dumpvdl2 work with them. If your life absolutely depends on it, consider donating, or at least
lending me the hardware for some time for development and testing.
Alternatively, if you can write code, you may do the work by yourself and submit it as a pull request. Most of the program code is hardware-agnostic anyway. Adding new device type basically comes down to the following:
-
dumpvdl2.c,dumpvdl2.h- add new input type and necessary command line options. -
rtl.c,rtl.h- this is the code specific to the RTLSDR hardware. Make a copy and modify it to use the API of your SDR device. Or you can start off frommirics.candmirics.h, if you prefer. -
demod.c- if your SDR device uses a sample format other than 8-bit unsigned and 16-bit signed, it is necessary to write a routine which handles this format and converts the samples to signed float in the <-1;1> range. Refer toprocess_buf_uchar()andprocess_buf_short()routines for details. -
Makefile- add new WITH_DEVICE compile time option and your new source files, add necessaryLDLIBS, etc.
To be honest, I don't use Windows very often and I don't know the programming intricacies of this OS. However, if you feel like you could port the code and maintain the port later on, please do so. Pull requests welcome.
Copyright (c) 2017 Tomasz Lemiech szpajder@gmail.com
Contains code from the following software projects:
-
libfec, (c) 2006 by Phil Karn, KA9Q
-
acarsdec, (c) 2015 Thierry Leconte
-
librtlsdr-keenerd, (c) 2013-2014 by Kyle Keen
This program is free software: you can redistribute it and/or modify it under the terms of the GNU General Public License as published by the Free Software Foundation, either version 3 of the License, or (at your option) any later version.
This program is distributed in the hope that it will be useful, but WITHOUT ANY WARRANTY; without even the implied warranty of MERCHANTABILITY or FITNESS FOR A PARTICULAR PURPOSE. See the GNU General Public License for more details.
You should have received a copy of the GNU General Public License along with this program. If not, see http://www.gnu.org/licenses/.