- Latest update announcements
- 18 June 2020 update announcements
- 20 May 2020 update announcements
- 16 May 2020 update announcements
- 7 May 2020 update announcements
- 11 April 2020 update announcements
- 1 April 2020 update announcements
- 30 March 2020 update announcements
![]()
Ecobee Suite is a collection of applications and device drivers that serve to integrate Ecobee Thermostats with the SmartThings and Hubitat Elevation home automation platforms.
Offering more robust resiliency and availability than the standard Ecobee support provided by both platforms, this Ecobee Suite provides unprecedented access to the operation and settings of Ecobee 3, Ecobee 4, Ecobee Lite and even most EMS, Smart and Smart Si thermostats. And while it can be used alongside (most) other Ecobee solutions on both SmartThings and Hubitat, its comprehensive support of the Thermostat attributes, commands and APIs defined on both platforms makes it a drop-in replacement as well.
On the SmartThings Classic application, Ecobee Suite users are provided with a customized user interface that is largely true to the Ecobee 3 & 4 thermostat devices, affording users the ability to view and modify a more detailed operational status of the HVAC environment than any other Ecobee integration available.
On both platforms, the Ecobee Suite offers more than a dozen curated Helper applications that provide integration and automation without requiring any programming skills. And for those who DO want to write their own code, be it in the SmartThings or Hubitat IDE, or by utilizing WebCoRE and/or Rules Engine, the Ecobee Suite provides a comprehensive set of API's capable of monitoring, managing and changing most all of the Ecobee thermostats' capabilities.
![]()
- Overview
- Introduction
- Installation
- Features
- General Overview
- Thermostat and Sensor Device User Interfaces
- Ecobee Suite Manager
- ecobee Suite Contacts & Switches Helper
- ecobee Suite Quiet Time Helper
- ecobee Suite Mode(/Routine)/Switches/Program Helper
- ecobee Suite Smart Circulation Helper
- ecobee Suite Smart Humidity Helper New!
- ecobee Suite Smart Mode, Program & Setpoints Helper
- ecobee Suite Smart Room Helper
- ecobee Suite Smart Switches Helper
- ecobee Suite Smart Vents & Switches Helper
- ecobee Suite Smart Zones Helper
- ecobee Suite Thermal Comfort Helper
- ecobee Suite Working From Home Helper
- Troubleshooting
- License
- Integrating With Ecobee Suite Devices
![]()
This document describes the various features related to the Ecobee Suite of device drivers and supporting Helper applications for Ecobee thermostats and sensors.
The following components are part of the Suite:
-
Ecobee Suite Manager: This application provides a single interface for Ecobee Installation, Authorization, Device Setup (both Thermostats and Sensors), Behavioral Settings and even a Debug Dashboard. Additional features can be added over time as well thanks to built in support for child applications and device drivers, keeping everything nicely integrated into one app.
IMPORTANT: Ecobee Suite Manager is the "parent" application to the entire Ecobee Suite - users should not install any instances of the other applications or device drivers, neither on their mobile devices nor in the IDE.
-
ecobee Suite Contacts & Switches: Helper application that can automatically turn off your HVAC system based on the state of one or more contact sensors and/or switches. Optionally can initiate Quiet Mode for even more control over your HVAC equipment.
-
ecobee Suite Mode/(Routine)/Switches/Program: Helper application that lets you trigger settings changes on your Ecobee thermostats based on Location Modes, Switches and Routines (routines are not currently supported on Hubitat). This version also supports changing Location Mode or executing a Routine (ST-only) when the thermostat enters a new Program or Vacation. Additionally, specified switches can be turned on/off as part of the Actions. Switches support allows users to utilize switches (real or virtual) to trigger thermostat changes. Multiple instances of this application are supported for maximum flexibility.
-
ecobee Suite Quiet Time: Helper application that will turn off your selection of the fan, circulation, humidifier, dehumidifier and even the whole HVAC (if desired), whenever a specified switch (real or virtual) is turned on or off (selectable). Reverses the actions when the switch is reset.
-
ecobee Suite Smart Circulation: Helper application that adjusts hourly circulation time (fan on minimum minutes) trying to get (and keep) 2 or more rooms (temperature sensors, either Ecobee or SmartThings) to within a configurable temperature difference.
-
NEW! ecobee Suite Smart Humidity: Helper application that will dynamically adjust the target humidity for your thermostat based on the thermostat's low temperature forecasts. This helper offers far more configurable options to control the calculated setpoint than does the built-in "Frost Free" setting, with live preview of the humidity levels that will be applied over the coming days given the current configuration and forecast.
-
ecobee Suite Smart Mode, Programs & Setpoints: Helper application that will automatically change the thermostat(s) Mode (Auto, Cool, Heat, Off, etc.), Program, and/or Program Setpoints based on an external (outdoor) weather temperature and/or dew point.
-
ecobee Suite Smart Room: Helper application that automates the concept of a "Smart Room." Intended for rooms that are normally not used (doors, windows and automated vents closed), this app will Activate a "Smart Room" when the door is left open for a configurable period (default 5 minutes). Once active, the room's Ecobee Sensor is added to any of the user-selected thermostat Programs and (optionally) the automated vent (EcoNet or Keene) is opened. If the door is closed, after a configurable number of hours (default 12), it will deactivate the Smart Room, removing the Ecobee sensor from specified Programs and closing the vent. While active, opening a window will temporarily deactivate the room until the window is closed. If motion is detected while the door is closed, the automated deactivation will be canceled until the next time the door is closed (and no motion is detected. Requires: Ecobee thermostat(s) with Ecobee Temp/Occupancy Sensor and Door contact sensor. Optional: Window contact sensor(s), EcoNet or Keene smart vents.
- New in version 1.8.**: Smart Room can optionally pause/unpause the Smart Vents Helper for a given room, instead of merely opening/closing the vent(s).
-
ecobee Suite Smart Switch/Dimmer/Vent: Helper application that will turn on/off one or more switches, and/or set the level on one or more dimmers (also works for vents), all based on changes to the Operating State of one or more thermostats. Intended to turn on vent booster fans when HVAC is pushing air, and (optionally) turn them off when they return to idle state. Can also be used to control lights and dimmers; dimmer control can be used to operate vents (see also Smart Vents Helper, below).
-
ecobee Suite Smart Vents: Helper application that will open and close one or more SmartThings-controlled HVAC vents based on room temperature in relation to specified heating/cooling target setpoint, or the setpoint of the specified thermostat.
- New in version 1.8.**:
- can be configured to run only during specific Thermostat Modes (heat/cool/auto/off) and/or during specific programs
- a new 'adjustAlways' option instructs the Helper to automate vent levels at any time, not only when the HVAC is actively pushing air. This can be useful to stop HVAC heat for a room that is also heated by a fireplace, wood stove or a space heater.
- vent level can be individually configured for the "excluded" Modes, Programs and Fan Level. Level can be "on" or "off" (using the configured min/max levels), "percentage" (using a specified level), or "unchanged"
- can now automatically subscribe an ES Sensor to the selected programs that Smart Vents is configured for
- can be automatically paused/unpaused by Smart Room when it disables/enables a Smart Room
- Optimized Smart Recovery handling - Smart Vents not only recognizes when the ES Thermostat is in Smart Recovery, it also "looks ahead" to determine the next scheduled program and is setpoints; if configured to run during the next scheduled program, Smart Vents will adjust the vents until the target setpoint is met.
- Now supports the use of "virtual thermostats" to set the target temperature setpoints instead of using the ES thermostat.
- Now supports remote "HubConnect Ecovent" and "HubConnect Keene Home Smart Vent" devices (PM me for more information)
- New in version 1.8.**:
-
ecobee Suite Smart Zone: Helper application that attempts to synchronize fan on time between two zones. Intended for use on multi-zones HVAC systems; running the fan on all the zones simultaneously could help reduce electricity consumption vs. having each zone run the fan independently.
-
ecobee Suite Thermal Comfort: Helper application that will adjust the setpoints of your thermostat's programs (aka climates or schedules) based on the scientific concept of thermal comfort, which seeks to employ the most efficient heating/cooling targets based on your home's environment and your selected targets, clothing, and activity levels. (You can learn more about thermal comfort here (Google search link).
-
ecobee Suite Working From Home: Helper application that can be used to automatically override your thermostat's scheduled "Away" program based on one or more presence sensors.
-
Ecobee Thermostat: The device driver for the Ecobee Thermostat functions and attributes. Presents a much more detailed view of the thermostat/HVAC system status, including heat/cool stages, humidification & dehumidification status, fan circulation control, and active/inactive icons for many modes and states. Designed using icons representative of the Ecobee web and mobile apps. Also supports a broad suite of extended attributes and commands to allow WebCoRE, Rules Engine and native SmartThings SmartApps/Hubitat Apps to monitor and control the thermostat, allowing customization and integration within a users' Smart Home.
- New in version 1.8.**: Historically, the ES Thermostat would always display the effective target Humidity Setpoint value, which is basically the moving average setpoint over the past hour or so. With this release (and in support of the new Smart Humidity Helper), this has changed: when the humidifierMode is Manual (On) or Off, ES Thermostat now reports the actual setpoint setting. When the mode is Auto, the old moving average approach will continue to be applied (as per the Ecobee API documentation).
NOTE: An Ecobee Suite user pointed out to me the fact that the humidity setpoint displayed on the Ecobee Thermostat itself (in the System menu) is limited to setting and displaying even numbered-values only (at least when not in Auto mode). Rest assured that the ES Thermostat device itself is updating the setpoint properly, and the thermostat does in fact report bback (and act on) odd-number humidity setpoints. While I wish I could fix this, there's nothing that can be done by the API to address the misinformation.
-
Ecobee Sensor: This implements the Device Handler for the Ecobee Sensor attributes (temperature and motion/occupancy). Includes indicators for current thermostat Program, buttons that allow adding/removing the zone from specific Programs (aka Comfort Setting, aka Schedule, aka Climate) and indicators that appear when Smart Room is configured for the room. This is also used to expose the internal sensors on the Thermostat to allow the actual temperature values (instead of only the average) to also be available. This is critically important for some applications such as Smart Vents.
- New in version 1.8.**
- adds a new
updateSensorPrograms(add, remove)API command, allows you update a single sensors' participation in multiple different thermostat programs (e.g., Home, Away, Sleep, etc.) in a single, atomic call.
- adds a new
- adds several new attributes are now updated whenever certain data structures in the Ecobee API have been updated from the Ecobee Servers (e.g.,
programUpdated,scheduleUpdated,climatesUpdated, etc.). These allow ES Helpers (and custom user applications) to coordinate updates across devices. See the Smart Mode, Smart Rooms, Smart Vents, and thermal Thermal Comfort Helpers' code for examples of their use.
- New in version 1.8.**
Here are links to the working version of the repository being developed and maintained:
I maintain the original intent as was previously defined by the original author Sean Stryker:
The intent is to provide an Open Source integration for Ecobee thermostats that can be used by the Hubitat and SmartThings user communities free of charge and without fear of the device disappearing in the future. This will help ensure accessibility for all users and provide for an easy mechanism for the community to help maintain/drive the functionality.
Let me be clear: this is not a competition. I am not trying to replace or outdo any other version, and I personally have nothing against people making money off of their efforts. I have invested a lot of my time in this as Open Source so as to meet my own wants and desires, and I offer the result back to the community with no strings attached.
Please feel free to try any version you want, and pick the one that best fits your own use case and preference.
If you like this version and are so inclined, post a brief message of support on the SmartThings and/or Hubitat Community links above. And if you don't like it, or have any problems with the installation or operation of the suite, please also post on the links above. I strive for total transparency, and your use of this Suite does not require you to post positive reviews, nor are you prohibited in any way from posting negative reviews.
This work is fully Open Source, and available for use at no charge.
While not required, I do humbly accept donations. If you would like to make an optional donation, I will be most grateful. You can make donations to me on PayPal at https://paypal.me/BarryABurke
The most significant changes in the latest release include:
-
Updated User Interface On both platforms, the basic configuration structure has been revamped to be consistent across Helper applications, each with Sections for Naming, Configuration, Notifications and Operations.
On the Hubitat platform, Ecobee-themed headers and section bars (that look a lot like this document's formatting) augment the new structure, and most of the inputs have been arranged to reduce whitespace in the menus. And most helpers now update their status in a colored extension of the Helper Name, making it easy to see what's going on from the HE top-level Apps menu.
All Helpers now have the same 4 toggles at the bottom of their settings page, and all four default to Off:
- Minimize settings text - makes the settings dialogs less "chatty" by hiding most of the descriptive text
- Pause this Helper - temporarily pauses (unsubscribes from all events & unschedules all activities)
- Disable debug logging - stops all "debug" log output ("warn", "error" and "trace" cannot be disabled
- Disable info logging - stops all "info" log output
Also on Hubitat (only), each of the Applications now has a direct hot-link to the relevant section of this document, accessible via the Question Mark icon in the top-right corner of the application settings page (requires Hubitat version 2.1.9.* or later).
-
New inter-Helper coordination of Program (Schedule/Climate/Comfort Setting) Updates: Enables multiple Helper instances to safely update shared common data structures within Ecobee Suite Manager. Before this, if two different Helpers wanted to change the Setpoints of a Program (even different Programs) at the same time, the second one could overwrite changes made by the first one. This new coordination, which is based on the internal Reservations system, ensures that the second change is delayed until the first one has been fully received and effected by the Ecobee cloud and the Ecobee thermostat itself. With this release, Smart Mode, Smart Room, Smart Vents and Thermal Comfort all utilize this mechanism; more will be added as required.
-
New & Updated Helpers
-
New Smart Humidity Helper: Dynamically and continually adjusts the humidity setpoint of your humidifier-enabled HVAC according to the general guidelines for comfort, health and the thermal efficiency (heat & humidity loss rate) of your structure, relative to the ambient outdoor and indoor temperatures.
-
New Smart Room & Smart Vents Integration: When Smart Room activates a Room, it can now also unpause the specified Smart Vents Helper. Both Helpers can also enroll/unenroll associated Ecobee Suite Sensors in/from selected Ecobee Suite Thermostats' Programs.
-
-
New HubConnect Custom Drivers: With this release I am also providing a Custom Driver for users of the HubConnect solution for integrating multiple Hubs. These Custom Drivers allow you to have a single instance of the complete Ecobee Suite that also reflects the ES Thermostat(s) and ES Sensor(s) to other HubConnected hubs.
Note that these Custom Drivers present no user interface, and they cannot be used to run ES Helpers on other hubs. They do support, however, the entire command/API interface of the devices they mirror. Thanks to the power of HubConnect, all interactions with an ES Thermostat Custom Driver-based device will be effected directly against the "master" device, and changes will be reflected on every instance of that thermostat (including the native Ecobee webApps and mobile apps, as well as the native SmartThings DTH and Hubitat drivers for Ecobee).
The author extends a special thank you to the Hubitat staff for assistance in getting the code-based Ecobee authentication working, as the documented Hubitat OAuth path doesn't work for Ecobee. Read through the OAuth init code in Ecobee Suite Manager to learn the (clever) trick they helped me employ. Without this, I would have had to maintain two different versions of this code base.
Since all of this code runs locally on the Hubitat hub, its performance is different than in the SmartThings environment where all the code runs on Amazon's server farms around the world. This has several impacts on performance:
- Network traffic will typically take longer to get from Ecobee's cloud servers to your local hub than it takes across the cloud (from Ecobee's cloud servers to SmartThings' cloud servers)
- SmartThings' cloud servers provide both faster processors and more memory to run your workloads than does a single Hubitat hub.
- In SmartThings, most drivers and built-in apps will run on your SmartThings hubb, while all of your custom apps and drivers will be spread out across multiple SmartThings servers in their cloud.
That said, I have invested heavily in reducing the CPU and memory overhead of the entire Ecobee Suite, and Version 1.8.*]* is noticably faster in retrieving data from the Ecobee servers and deploying it to the various Helpers and device drivers. This effort, coupled with continuous improvement of the Hubitat environment itself, has helped make Ecobee Suite far more efficient.
Changes made over the past year have totally revamped how changes are recognized, processed and dispatched by Ecobee Suite Manager. One of the major improvements is the extensive reduction of writes to the backing store (atomicState & state variables). Reducing the writes benefits especially Hubitat, which runs entirely off of local Flash storage which tends to wear out the more times it is written to. Reducing atomicState writes everywhere possible, in particular, significantly speeds up processing and dispatching updates from the Ecobee servers to the SmartThings/Hubitat device(s).
One side-effect of the updated approach is that during the inital startup period update cycles will generally take longer, as the initial datapoints are saved for future changes comparisons. After this startup period (usually 10-20 minutes, dependent on the number of devices you have), things will stabilize and generally cycle times will shorten significantly. There will still be the occasional long cycle, but for the most part cycles are signficantly better on both platforms with the new logic.
![]()
While the installation process is different for SmartThings users and for Hubitat users, users of these platforms should be familiar with installing third-party code on their platform. The following documentation provides instructions for each platform separately:
Start here for SmartThings installation instructions
Start here for Hubitat installation instructions
It is highly recommended that you use the GitHub Integration that SmartThings offers with their IDE. This will make it much easier for you to keep up to date with changes over time. For the general steps needed for setting up GitHub IDE integration, please visit http://docs.smartthings.com/en/latest/tools-and-ide/github-integration.html and follow the steps for performing the setup.
Please proceed with the installation instructions below.
If you are running my Ecobee Suite version 1.4.*, you can simply install this version on top of your existing release, just like you would any minor release of 1.4.*. So, you too can Proceed with the installation instructions below.
At this point, releases prior to 1.4.** should just bite the bullet and remove the old code before proceeding.
It is extremely IMPORTANT that you follow these steps to remove your old implementation - failure to do so may require you to solicit assistance from SmartThings Support to completely remove the old support.
- From the SmartThings Classic app on your mobile device, open the old Ecobee (Connect) SmartApp and remove all of the Helper SmartApps, one by one, and then exit out of Ecobee (Connect)
- Re-enter Ecobee (Connect) and select each of your old Sensor devices one by one, then tap the "SmartApps" tab to verify that each Sensor is not used by any existing SmartApps. If they are, remove them from these SmartApps (you'll probably want to replace them with the "new" Sensor devices after you install the latest version)
- Back in the old Ecobee (Connect), go to Sensors page, and de-select ALL of the sensors listed there. Save/Done back out of Ecobee (Connect), and all of the Sensor devices should be deleted automatically. Don't worry if they're not, though...it doesn't always work, but you can still proceed...
- Select each of your old Thermostat devices, one by one, then tap the "SmartApps" tab, and verify that these also are not used by any SmartApps.
- Back into Ecobee (Connect), and this time select the Thermostats page, de-select ALL of the thermostats listed there, and exit back out of Ecobee (Connect).
- Finally, back into Ecobee (Connect) one last time, scroll down and go to the Remove this instance page, tap the big red Remove button and confirm.
At this point, you should have totally removed all the old support.
If any devices or SmartApps fail to remove after following the above steps, you can try to manually go into each device/SmartApp on your mobile and remove them from within the DTH and/or SmartApp itself. You can also try to manually delete them from within your IDE. If neither of these work, you'll probably have to email SmartThings Support.
Proceed with the installation instructions b
If you are not familiar with adding your own custom devices, then be sure to familiarize yourself with the SmartThings IDE before you begin the installation process.
You will also need to make sure that you have your Ecobee username and password handy. You should login to http://www.ecobee.com/ now to ensure you have your credentials.
Finally, please take care to note that the ECOBEE SUITE CAN ONLY BE INSTALLED USING THE SMARTTHINGS CLASSIC MOBILE APP. It's not hard to miss - there is simply no way to install using the new Samsung SmartThings Connect app.
If this is your first time installing this new Ecobee Suite (versions 1.3.* and later) first follow these steps to link your IDE with the new Ecobee Suite repository (note: this is a new repository, different from the one used for prior versions - everyone will be required to perform these steps once to get to the new version).
- Login to the IDE at ide.smartthings.com
- Click on My Locations at the top of the page
- Click on the name of the location that you want to install to
- Click on the
My Device Handlerstab - Click
Settings - Click
Add new repositoryand use the following parameters:- Owner:
SANdood - Name:
Ecobee-Suite(note that the hyphen is required) - Branch:
master
- Owner:
- Click
Save
Once the Ecobee Suite repository is connected to your IDE, use the GitHub integration to install the current version into your workspace. In the IDE:
- Click
Update from Repoand select theEcobee-Suiterepository we just added - Find and Select
ecobee-suite-sensor.groovyandecobee-suite-thermostat.groovy - Select
Publish(bottom right of screen near theCancelbutton) - Click
Execute Update- Note the response at the top of the
My Devices Handlerspage. It should be something like "Updated 0 devices and created 2 new devices, 2 published" - Verify that the two devices show up in the list and are marked with Status
Published(NOTE: You may have to reload theMy Device Handlersscreen for the devices to show up properly.)
- Note the response at the top of the
Once completed, you can delete any pre-1.4.** device handlers if they exist in your "My Devices." To do so, you can select the Edit Properties icon next to each device and select Delete.
Once you have both of the Ecobee Suite Device Handlers added and published in your IDE, it is time to add the Ecobee Suite SmartApps.
- Click on the
My SmartAppstab - Click
Update from Repoand select the**Ecobee-Suite**repository we added earlier - Select the check boxes next to
ecobee-suite-manager.groovy,ecobee-suite-open-contacts.groovy,ecobee-suite-quiet-time.groovy,ecobee-suite-routines.groovy,ecobee-suite-smart-circulation.groovy,ecobee-suite-smart-humidity.groovy,ecobee-suite-smart-mode.groovy,ecobee-suite-smart-room.groovy,ecobee-suite-smart-switches.groovy,ecobee-suite-smart-vents.groovy,ecobee-suite-smart-zones.groovy,ecobee-suite-thermal-comfort.groovy, andecobee-suite-working-from-home.groovy(all 13 SmartApps listed) - Select
Publish(bottom right of screen near theCancelbutton) - Click
Execute Update- Again, note the response at the top of the My SmartApps page. It should be something like "
Updated 0 and created 13 SmartApps, 13 published" - Verify that all 13 of the SmartApps show up in the list and are marked with Status
Published
- Again, note the response at the top of the My SmartApps page. It should be something like "
Finally, we must enable OAuth for the connector SmartApp as follows:
NOTE: This is the most commonly missed set of steps, but failing to enable OAuth will generate cryptic errors later when you try to use the SmartApp. So please don't skip these steps.
- Locate the
Ecobee Suite ManagerSmartApp from the list and Click on theEdit Propertiesbutton to the left of the SmartApp that we just added (looks like pencil on a paper) - Click on the
OAuthtab ( - Click
Enable OAuth in Smart App - Click
Update(bottom left of screen) - Verify that
Updated SmartAppappears at the top of the screen
That's it - you are now all set to skip down to install the Ecobee Suite from your mobile device.
REMINDER: The entire Ecobee Suite is installed using the Ecobee Suite Manager SmartApp. You should not attempt to install the individual devices or SmartApps directly - this will undoubtedly result in a failed installation, and you may require assistance from SmartThings support to recover if you don't follow these instructions.
Once completed, you can delete any OLD (pre-version 1.4.**) SmartApps if you prefer. To do so, you can select the Edit Properties icon next to each of the old SmartApps (the ones NOT in the "sandood" namespace) and select Delete.
For this method it is recommended that you have one browser window open on GitHub and another on the IDE. If you have used the GitHub installation method above, you can skip this section and proceed to completing the installation on your mobile device.
Follow these steps to install the Ecobee Sensor Device Handler:
- Login to the IDE at ide.smartthings.com
- [IDE] Click on
My Locationsat the top of the page - [IDE]Click on the name of the location that you want to install to
- [IDE]Click on the
My Device Handlerstab - [IDE] Click
New Device Type(top right corner) - [IDE] Click
From Code - [GitHub] Go to the raw source code for the Ecobee Sensor (click the hyperlink)
- [GitHub] Select all of the text in the window (use Ctrl-A if using Windows)
- [GitHub] Copy all of the selected text to the Clipboard (use Ctrl-C if using Windows)
- [IDE] Click inside the text box
- [IDE] Paste all of the previously copied text (use Ctrl-V if using Windows)
- [IDE] Click
Create - [IDE] Click
Save - [IDE] Click
Publish-->For Me
Follow these steps to install the Ecobee Thermostat Device Handler:
15. [IDE] Click on the My Device Handlers tab
16. [IDE] Click New Device Type (top right corner)
17. [IDE] Click From Code
18. [GitHub] Go to the raw source code for the Ecobee Thermostat *(click the hyperlink)
19. [GitHub] Select all of the text in the window (use Ctrl-A if using Windows)
20. [GitHub] Copy all of the selected text to the Clipboard (use Ctrl-C if using Windows)
21. [IDE] Click inside the text box
22. [IDE] Paste all of the previously copied text (use Ctrl-V if using Windows)
23. [IDE] Click Create
24. [IDE] Click Save
25. [IDE] Click Publish --> For Me
Once completed, you can delete the OLD device handlers if you prefer. To do so, you can select the Edit Properties icon next to each device and select Delete.
Again, it is recommended to have one browser window open on GitHub and another on the IDE.
Follow these steps to add the Ecobee Suite Manager SmartApp to your IDE:
- [IDE] Click on the
My SmartAppstab - [IDE] Click
New SmartApp(top right corner) - [IDE] Click
From Code - [GitHub] Go to the raw source code for the Ecobee Suite Manager SmartApp
- [GitHub] Select all of the text in the window (use Ctrl-A if using Windows)
- [GitHub] Copy all of the selected text to the Clipboard (use Ctrl-C if using Windows)
- [IDE] Click inside the text box
- [IDE] Paste all of the previously copied text (use Ctrl-V if using Windows)
- [IDE] Click
Create - [IDE] Click
Save - [IDE] Click
Publish-->For Me
Finally, we must enable oAuth for the connector SmartApp as follows:
NOTE: This is the most commonly missed set of steps, but failing to enable OAuth will generate cryptic errors later when you try to use the SmartApp. So please don't skip these steps.
- [IDE] Click on the
My SmartAppstab - [IDE] Verify that the SmartApp shows up in the list and is marked with Status
Published - [IDE] Click on the
Edit Propertiesbutton to the left of the SmartApp that we just added (looks like pencil on a paper) - [IDE] Click on the
oAuthtab - [IDE] Click
Enable oAuth in Smart App - [IDE] Click
Update(bottom left of screen) - [IDE] Verify that
Updated SmartAppappears at the top of the screen
Follow these steps to add the Helper SmartApps to your IDE, one at a time (links to Raw Source Code are provided below):
NOTE: It is mandatory that you add ALL of the available Helper SmartApps, or Ecobee Suite Manager will fail with an error.
20. [IDE] Click on the My SmartApps tab
21. [IDE] Click New SmartApp (top right corner)
22. [IDE] Click From Code
23. [GitHub] Go to the raw source code for each of the Helper SmartApps, one at a time (links provided below)
24. [GitHub] Select all of the text in the window (use Ctrl-A if using Windows)
25. [GitHub] Copy all of the selected text to the Clipboard (use Ctrl-C if using Windows)
26. [IDE] Click inside the text box
27. [IDE] Paste all of the previously copied text (use Ctrl-V if using Windows)
28. [IDE] Click Create
29. [IDE] Click Save
30. [IDE] Click Publish --> For Me (Optional)
31. [IDE] Click on the My SmartApps tab
32. [IDE] Verify that the SmartApp shows up in the list
Repeat the above steps (20-32) for the each of the available Helper SmartApps (click each link for the raw source code):
A. ecobee Suite Open Contacts
B. ecobee Suite Routines
C. ecobee Suite Routines
D. ecobee Suite Smart Circulation
E. ecobee Suite Smart Humidity
F. ecobee Suite Smart Mode
G. ecobee Suite Smart Room
H. ecobee Suite Smart Switches
I. ecobee Suite Smart Vents
J. ecobee Suite Smart Zones
K. ecobee Suite Thermal Comfort
L. ecobee Suite Working From Home
Once completed, you can delete the OLD SmartApps (the ones that appear under the SmartThings namespace) if you prefer. To do so, you can select the Edit Properties icon next to each of the old SmartApps (the ones NOT in the "sandood" namespace) and select Delete.
The final steps for installing the Ecobee Suite Device Handlers and SmartApps is completed entirely using the Ecobee Suite Manager SmartApp. The SmartApp will guide you through the basic installation and setup process. It includes the following aspects:
- Authentication with Ecobee to allow API Calls for your thermostat(s) (and connected sensors)
- Discovery, selection and creation of Thermostat devices
- Discovery, selection and creation of Remote Sensor devices (if there are any)
- Setup of optional features/parameters such as Smart Auto Temp Control, Polling Intervals, etc
- Installation and configuration of Helper SmartApps (as desired)
Follow these steps for the SmartApp on your mobile device:
- Open the SmartThings app and login to your Location
- Open the
Marketplacetab - Open the
SmartAppstab - Scroll down and select
My Apps(at the bottom of the list) - Scroll to open the
Ecobee Suite ManagerSmartApp. (NOTE: If you see "Ecobee (Connect)" in this list, you did not remove it from your IDE. This is not a problem - you can use both. Just remember that this new Ecobee Suite usesEcobee Suite Manager, and not the old version. - Select the Ecobee API Authorization page (as indicated on the screen) and then the ecobee Account Authorization page to enter your Ecobee Credentials
- Enter your Ecobee Email and Password, and then press the green LOG IN button
- On the next page, Click
Acceptto allow SmartThings to connect to your Ecobee account - You should receive a message indicating
Your ecobee Account is now connected to SmartThings! - Click
Done(orNextdepending on your device OS) - Click
Done(orNextdepending on your device OS) again to save the credentials and exit out of Ecobee Suite Manager You should receive a small green popup at the top stating "Ecobee Suite Manager is now installed and automating" - In the SmartThings mobile app, go to the
Automationscreen and select theSmartAppstab - Select the
Ecobee Suite ManagerSmartApp that you just installed - Select the Ecobee Thermostat devices you want to connect from your account
- Select the Ecobee Sensors you want to connect (if any) (NOTE: The options are dynamic and will change/appear based on other selections. For example, you won't see any Thermostats to select if your Ecobee account login failed; you won't see any sensors to choose until you select the thermostats they are connected to).
- You can also go into the
Preferencessection to set various preferences such asHold Type,Smart Auto Temperature,Polling Interval,Debug Level,Decimal Precision, and whether to create separate sensor objects for thermostats.] - - After making all selections, Click
Doneto save your preferences and exit the SmartApp
At this point, the SmartApp will automatically create all of the new devices, one for each thermostat and sensor. These will show up in your regular Things list within the app.
Using the default settings is fine, but some of the more advanced features will require you to change the default settings for Ecobee Suite. My recommended settings are:
- Hold Type: If not specified, this will default to the setting on the thermostat itself. Some of the helper SmartApps allow you to customize this for specific operations.
- Polling Interval: 1 minute if you are using Helper SmartApps to react to thermostat conditions (like changing to heating/cooling, or running a specific Program/Climate); otherwise 2-5 minutes might be sufficient.
- Decimal Precision: One of the reasons I created this in the first place is to get more precision out of the thermostat. If you set this to 1 decimal position, you'll understand better how the thermostat is reacting to your environment, and when "72°" is really "72.4°".
- Debug Level: I tend to run with this set to 2 because I've optimized this level to provide the most basic of operational status in the Live Logging monitor.
NOTE 1: It may take a few minutes for the new devices to show up in the list and for them to populate their displays. You should try refreshing the list if they are not there (pull down on the list). In extreme cases, you may have to restart the SmartThings app on your mobile device to update the list. You should only have to do this once.
NOTE 2: If you uninstall the SmartApp it will automatically remove all of the thermostats and sensors that it previously installed. This is necessary (and expected) as those devices are "children" of the SmartApp.
If you have enabled GitHub integration with the SmartThings IDE, then updates are a breeze. Otherwise the steps are a bit more manual but not too complicated.
The IDE provides visual cues to alert you that any device types or SmartApps have been updated in their upstream repositories. See the GitHub/IDE integration guide for more details on the different colors.
Once you have determined that an update is available, follow these steps:
- Login to the SmartThings IDE
- Go to either the
My Device HandlersorMy SmartAppstabs to see if there are updates (the color of the item will be purple) - Click the
Update from Repobutton (top right) - Select the
Ecobee-Suiterepository - Select ALL of items in the
Obsolete (updated in GitHub)column - Select
Publish(bottom right) - Click
Execute Update(bottom right)- You should receive a confirmation message such as this example:
Updated 1 and created 0 SmartApps, 1 published - (Optional, but HIGHLY Recommended) Rerun the
Ecobee Suite ManagerSmartApp. This seems to alleviate any residual issues that may occur due to the update
- You should receive a confirmation message such as this example:
You should now be running on the updated code. Be sure that you check for both updates of the SmartApp and the Device Type. Updating one but not the other could cause compatibility problems.
To update manually, you will need to "cut & paste" the raw code from GitHub into the SmartThings IDE, Save and Publish the code. I will leave it to the reader to work through the full individual steps, but the links to the code are the same as those that were used during the initial install process.
Note that there are THIRTEEN SmartApps and TWO Device Handlers in this suite. For proper operation, you will need to copy/paste ALL 15 of these files into your IDE, even if you aren't going to use them all. At a minimum, you should also publish the Ecobee Suite Manager SmartApp and the two Device Handlers.
Installing the Ecobee Suite code on Hubitat is much like the SmartThings manual installation, except that Hubitat offers an "Import" function to assist with the process of loading the source code from the GitHub repository..
Hubitat users should already be familiar with installing third-party drivers and applications from within the Hubitat Console. If not, the following instructions will provide step-by-step instructions to guide you through the process.
The entire install process is performed from within the Hubitat Console, and you'll want to have this document in one browser window/tab while you use the Hubitat console in another.
If you have been running the pre-release Beta code of Ecobee Suite on your Hubitat platform, the URL for the file imports will change, from the universal-dev branch to the master branch of the GitHub repository. The updated links are provided below.
The process for importing the files is the same for the Ecobee Suite Drivers and the Applications, using the appropriate <> Drivers Code and <> Apps Code menus (respectfully). Note that in total there are 14 files that you will need to install, and ALL of them must be installed in the order described below for the Ecobee Suite to install, initialize and operate properly.
Open the Hubitat Console in your browser of choice, and then:
- Click on <> Apps Code in the left menu to open the Apps Code page
- Click on the + New App button at the top right of the page
- From the "New App" edit page, click on the Import button at the top of the page
- Copy the Ecobee Suite Manager link and paste it into the "Import Code from Website" overlay
- Click the Import button on the overlay
- Click the Save button in the editor page to complete the installation of the Ecobee Suite Manager app
- Repeat steps 1-6 again, using each of the following links to install the rest of the Suite's applications
A.ecobee Suite Open Contacts
B.ecobee Suite Quiet Time
C.ecobee Suite Routines
D.ecobee Suite Smart Circulation
E.ecobee Suite Smart Humidity
F.ecobee Suite Smart Mode
G.ecobee Suite Smart Room
H.ecobee Suite Smart Switches
I.ecobee Suite Smart Vents
J.ecobee Suite Smart Zones
K.ecobee Suite Thermal Comfort
L.ecobee Suite Working From Home
This completes the applications code loading portion of the Ecobee Suite installation process.
Open the Hubitat Console in your browser of choice, and then:
- Click on <> Drivers Code in the left menu to open the Drivers Code page
- Click on the + New Driver button at the top right of the page
- From the "New Driver" edit page, click on the Import button at the top of the page
- Copy the Ecobee Suite Sensor link and paste it into the "Import Code from Website" overlay
- Click the Import button on the overlay
- Click the Save button in the editor page to complete the installation of the Ecobee Suite Sensor driver
- Repeat steps 1-6 again, using the Ecobee Suite Thermostat link, this time.
This completes the drivers code loading portion of the Ecobee Suite installation process.
Finally, we must enable OAuth for Ecobee Suite Manager as follows:
NOTE: This is the most commonly missed set of steps, but failing to enable OAuth will generate cryptic errors later when you try to use the Suite. So please don't skip these steps.
Once again, from the Hubitat Console (in your browser):
- Click on <> Apps Code in the left-hand menu
- Click the entry for Ecobee Suite Manager
- On the edit page, click on the OAuth button at the top of the page
- Click on the Enable OAuth in App button in the overlay
- Click on the Update button at the bottom of the overlay, then click on the Close button
- Finally, click on the Save button at the top of the edit page
This completes the process of enabling OAuth for the Ecobee Suite installation. Now we can create and configure the Ecobee Suite for your thermostats and sensors.
The final steps for installing the Ecobee Suite are completed entirely using the Ecobee Suite Manager App from the Hubitat console. The App will guide you through the basic installation and setup process. It includes the following aspects:
- Authentication with Ecobee to allow API Calls for your thermostat(s) (and connected sensors)
- Discovery, selection and creation of Thermostat devices
- Discovery, selection and creation of Remote Sensor devices (if there are any)
- Setup of optional features/parameters such as Smart Auto Temp Control, Polling Intervals, etc
- Installation and configuration of Helper SmartApps (as desired)
Follow these steps to create and configure Ecobee Suite Manager from the Hubitat Console in your browser:
- Click on Apps in the left-hand menu
- Click on the Add User App button at the top-right of the Apps page
- Click on the Ecobee Suite Manager entry in the "Install New User App" overlay
- Select the Ecobee API Authorization page and then the Ecobee Account Authorization page to enter your Ecobee Credentials (this will open in a new browser window on your desktop)
- Enter your Ecobee account's Email and Password, and then press the green LOG IN button
- On the next page, Click
Acceptto allow Hubitat to connect to your Ecobee account - You should receive a message indicating
Your ecobee Account is now connected to Hubitat! - Manually close the browser window
- Click
Doneat the bottom of the page - Click
Doneagain to save the credentials and exit out of Ecobee Suite Manager
You should now be back at the "Apps" page, with a new entry for "Ecobee Suite Manager Online" (the word Online should be green). From here, we go back into Ecobee Suite Manager to complete the inatllation and configuration:
- Click on the
Ecobee Suite ManagerApp that you just installed. Once loaded, you should see several new submenus, including the ones for "Thermostats" and "Sensors" - Click on the Thermostats submenu
- Select the Ecobee Thermostat devices you want to connect from your account
- Click the Done button to save your selected thermostats and close the Thermostats sub menu
- If your Ecobee thermostat has any sensors that you want to include, click on the "Sensors" submenu, select the Sensors, and click Done to save the sensors.
Note that the Ecobee Suite Manager menu options are dynamic and will change/appear based on other selections. E.g., you won't see any Thermostats to select if your Ecobee account login failed; you won't see any Sensors to choose until you select the thermostats they are connected to)
- You can also go into the
Preferencessection to set various preferences such asHold Type,Smart Auto Temperature,Polling Interval,Debug Level,Decimal Precision, and whether to create separate sensor objects for thermostats.] - After making all your desired selections, Click
Doneto save your preferences and exit the App
At this point, Ecobee Suite Manager will automatically create all of the new devices, one for each thermostat and sensor. These will show up in your regular Devices list within the Hubitat Console.
Using the default settings is fine, but some of the more advanced features will require you to change the default settings for Ecobee Suite. My recommended settings are:
- Hold Type: If not specified, this will default to the setting on the thermostat itself. Some of the helper SmartApps allow you to customize this for specific operations.
- Polling Interval: 1 minute if you are using Helper SmartApps to react to thermostat conditions (like changing to heating/cooling, or running a specific Program/Climate); otherwise 2-5 minutes might be sufficient.
- Decimal Precision: One of the reasons I created this in the first place is to get more precision out of the thermostat. If you set this to 1 decimal position, you'll understand better how the thermostat is reacting to your environment, and when "72°" is really "72.4°".
- Debug Level: I tend to run with this set to 2 because I've optimized this level to provide the most basic of operational status in the Live Logging monitor.
NOTE 1: It may take 5-10 minutes (longer if you use the default Polling Interval) for the new devices to show up in the Drivers list and for them to populate their attributes and states.
NOTE 2: If you uninstall the Ecobee Suite Manager app it will automatically remove all of the thermostats and sensors that it previously installed. This is necessary (and expected) as those devices are "children" of the App.
Congratulations! You have completed the installation of the Ecobee Suite into your Hubitat environment.
![]()
This collection of applications and device drivers has been designed for simple installation, flexibile configuration options and easy operation. It is also extensible through the use of child Helper applications that can easily be added to the configuration. And it fully implements the related SmartThings Capabilities and Hubitat Capabilities.
Key Highlights include:
- Open Source Implementation! Free as in beer AND speech. No donations or purchase needed to use (but if you insist, see donations.
- Single installation application,
Ecobee Suite Managerused for installing both Thermostats and Sensors. No need for multiple apps just for installation! In fact, theEcobee Suite Managerapplication is the only interface you will use to access all available functions, including those provided by child Helper applications. - On SmartThings (only, at this point) you get a sophisticated User Interface that uses custom Ecobee icons throughout the design to provide a more polished look and feel.
- Display of current weather with support for separate day and night icons (just like on the front of your Ecobee thermostat)!
- Robust watchdog handling to minimize Ecobee connectivity issues, and now also includes an API Status Tile to quickly identify if there is an ongoing problem. On Hubitat, the connection status is displayed next to "Ecobee Suite Manager" entry in the apps list. No more guessing if you are still connected or not.
- Included Helper application (
ecobee Suite Routines) for automating thermostat settings based on Location Mode changes, and/or automating SmartThings Modes/Routines based on Ecobee Thermostat Program changes (including Vacations). - Additional Smart Helper Apps to automate circulation time, dynamically adjust setpoints for Thermal Comfort, coordinate fan-on time between multiple zones, automate a "Smart Room," and much, much more.
- Full support for both Fahrenheit and Celsius
On SmartThings, the primary user interface on a day-to-day basis will be two different types of Device Handlers that are shown on the Things list under My Home in the mobile app.
- The main MultiAttributeTile tile now reflects additional information
- Background colors match Ecobee3 thermostat colors for Idle (magenta), Heat (orange) & Cool (blue), and Fan Only (green) and Offline (red) are added
- Displays (Smart Recovery) when heating/cooling in advance of a Program change
- Displays the setpoint temperature that will initiate a heat/cool demand while idle, and the actual target temp while heating/cooling.
- On iOS, the call-for-heat temperature will be indicated by "Heating at XX.X°" in the large tile (while idle), and the target temperature (while heating) "Heating to YY.Y°". Same for Cool and Auto modes
- Android mistakenly says "Heating at XX.X" for both modes; bug reports have been filed to get this corrected (again).
- All temperatures can be configured to display in 0, 1 or 2 decimal positions (with appropriate rounding)
- Most icons are dynamic and in full color
- New Operating State icons reflect current stage for multi-stage Heat or Cool, plus humidification/dehumidification (if configured)
- Hold: Program icons are now "filled" when in a Hold event so you can recognize the Hold at a glance
- Buttons that are inactive due to the current state/mode/program are greyed out
- Display-only buttons do not invoke any actions
- Dynamic "Resume" button
- Normally displays as Resume (Program) button, to override a current Hold: event
- While thermostat is in a Vacation event, the button becomes 'Cancel" to allow the cancelation of the Vacation
- Hold/Vacation Status display
- Displays when current Hold or Vacation ends
- If the thermostat loses its connection to the Ecobee Cloud, displays the time that the last valid update was received
- Default Hold handling
- In addition to Permanent and Temporary holds, now supports hourly holds: 2 hours, 4 hours or Custom Hours.
- The default hold type can be configured in Ecobee Suite Manager or for each individual thermostat in Thermostat Preferences.
- Also supports using the thermostat's preference setting (askMe is not currently supported)
- New Refresh actions
- If pressed once, will only request the latest updates from the Ecobee Cloud
- If pressed a second time within a few seconds of the first press completing, will force a full update from the Ecobee Cloud
- A new multiAttributeTile replaces the old presentation, with motion displayed at the bottom left corner
- Now displays the parent thermostat current Program within each Sensor device
- New mini-icons indicate which of the 3 default programs (Home, Away, Sleep) the sensor is included in
- The sensor can be added or removed from a Program by tapping these mini icons
- Includes 4 new blank mini-tiles that are utilized by the new Smart Room Helper App
- Messages sent to the Device notification log (found under the Recently tab of a Device) are now optimized, most with associated colored icons (icons display on SmartThings only)
- All current Attributes and Capabilities of Thermostat devices are supported
- Most Ecobee Settings Object variables are are now available as Attributes of a Thermostat (so things like WebCoRE can see and use them). See the list of Attributes later in this document for a complete listing. You can view the current value of any Attribute using the
<device>.currentValue('attribute-name')API of the thermostat devices, and you can change most of these attributes using the<device>.setEcobeeSetting('attribute-name', 'value')API call. - Supports the latest updated Thermostat Attributes released by SmartThings on July 7, 2017, including the recently added
scheduleAttribute andsetSchedule('name')Command, which are equivalents to the nativecurrentProgram/setThermostatProgram()interfaces. - Offers several extensions to the standard Attributes and API Commands defined by the thermostat-related capabilities (these are described in annotated lists later in this document. These include new API commands to:
- Add a sensor to a Program
- Delete/Remove a sensor from a Program
- Delete the current Vacation
- Change the minimum fan on time for both the current running Program and current Vacation event
- Change the setpoints of a Program (aka climate or schedule)
- Change and view the value of most Ecobee Settings parameters
- Designed to do only lightweight polls of the Ecobee Cloud before requesting updates
- If updates are available, then only requests those updated objects, and only for the thermostats with updates
- From the updated Ecobee objects, only the data that has changed is sent to the individual devices
- As a result of the above, it is possible to run with polling Frequency less than the recommended 3 minutes (as low as 1 minute)
The stock Ecobee support on both SmartThings and Hubitat does not handle Ecobee server connection issues very well. These implementations will often drop the connection altogether at the slightest issue. Users are often required to manually re-authenticate in order to bring their thermostats back on-line
Beginning with 1.3.0, this Ecobee Suite will silently retry connection timeouts without sending any notifications (it will report warnings in Live Logging). Usually such timeouts are transient, and the side effect is only a delayed update. For lengthy outages, the code should automatically reconnect once the Ecobee Servers come back on line.
Thus, if you receive a notification that you need to re-authorize, you probably really do need to reauthorize.
Ecobee devices natively support a concept of "stacked" holds - each hold operation can be stacked on top of a prior hold, such that Resuming the current hold merely "pops the stack" to the prior hold. This is a very difficult concept to manage across multiple interfaces, because it is difficult to depict what the result of a "Resume" operation will be at any given point in time.
The Ecobee Suite implementation avoids the complexity by supporting only a single depth of Hold: events - whenever you execute a Resume you reset the thermostat to run the currently scheduled Program.
For users of Michael Struck's most awesome Ask Alexa integration for SmartThings http://thingsthataresmart.wiki/index.php?title=Ask_Alexa
- you can now configure your Ecobee Alerts and Reminders to be sent to Ask Alexa Message Queues.
- This is enabled in a new Ask Alexa preferences page in Ecobee Suite Manager where you can specify the target Message Queue(s).
- You can also specify an expiration time for Alerts so that they are removed from Ask Alexa after a specified period of time.
NOTE 1: You will not be able to configure Ask Alexa support until you have fully installed Ask Alexa AND created at least 1 custom Message Queue, as the Primary Queue has been deprecated.
NOTE 2: The current implementation does not support acknowledging of messages directly via the Ecobee Suite Manager application, but when the Alert/Reminder is acknowledged (on the thermostat or in the Ecobee application/web site) they are also removed from the Ask Alexa Message Queue.
The user interface for the Ecobee Suite Thermostat and Sensor devices has been pretty constant since version 1.5.**
| Ecobee Thermostat v1.5+.** | Ecobee Thermostat Device v1.5+.** w/Annotation |
|---|---|
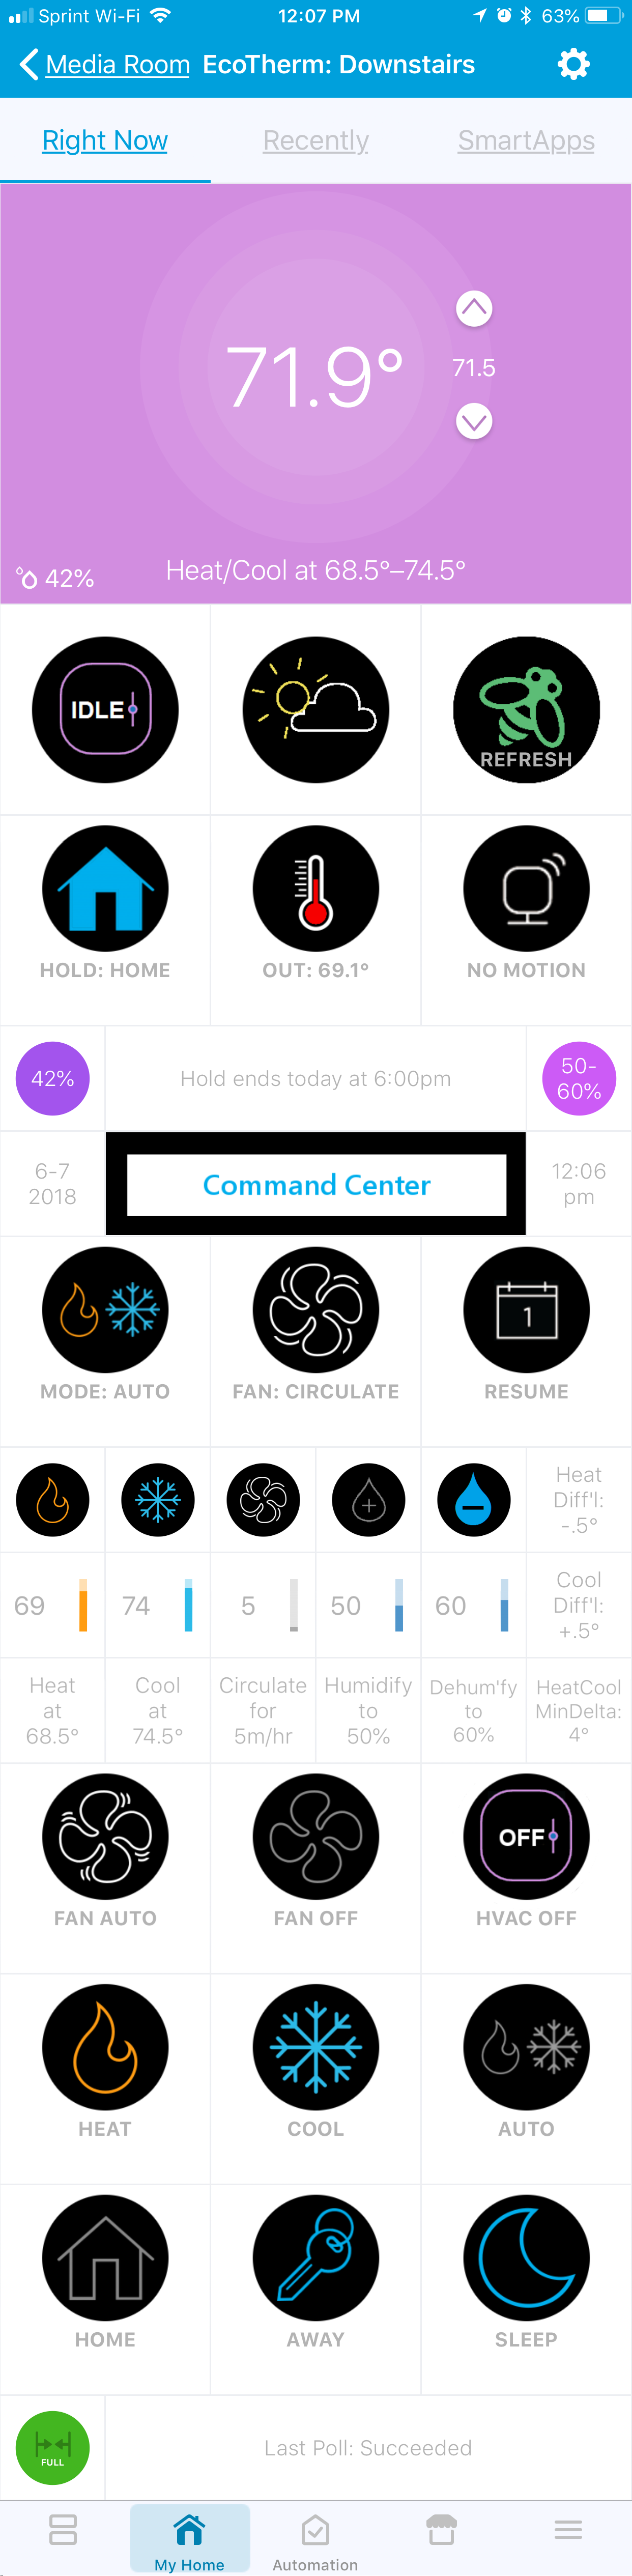 |
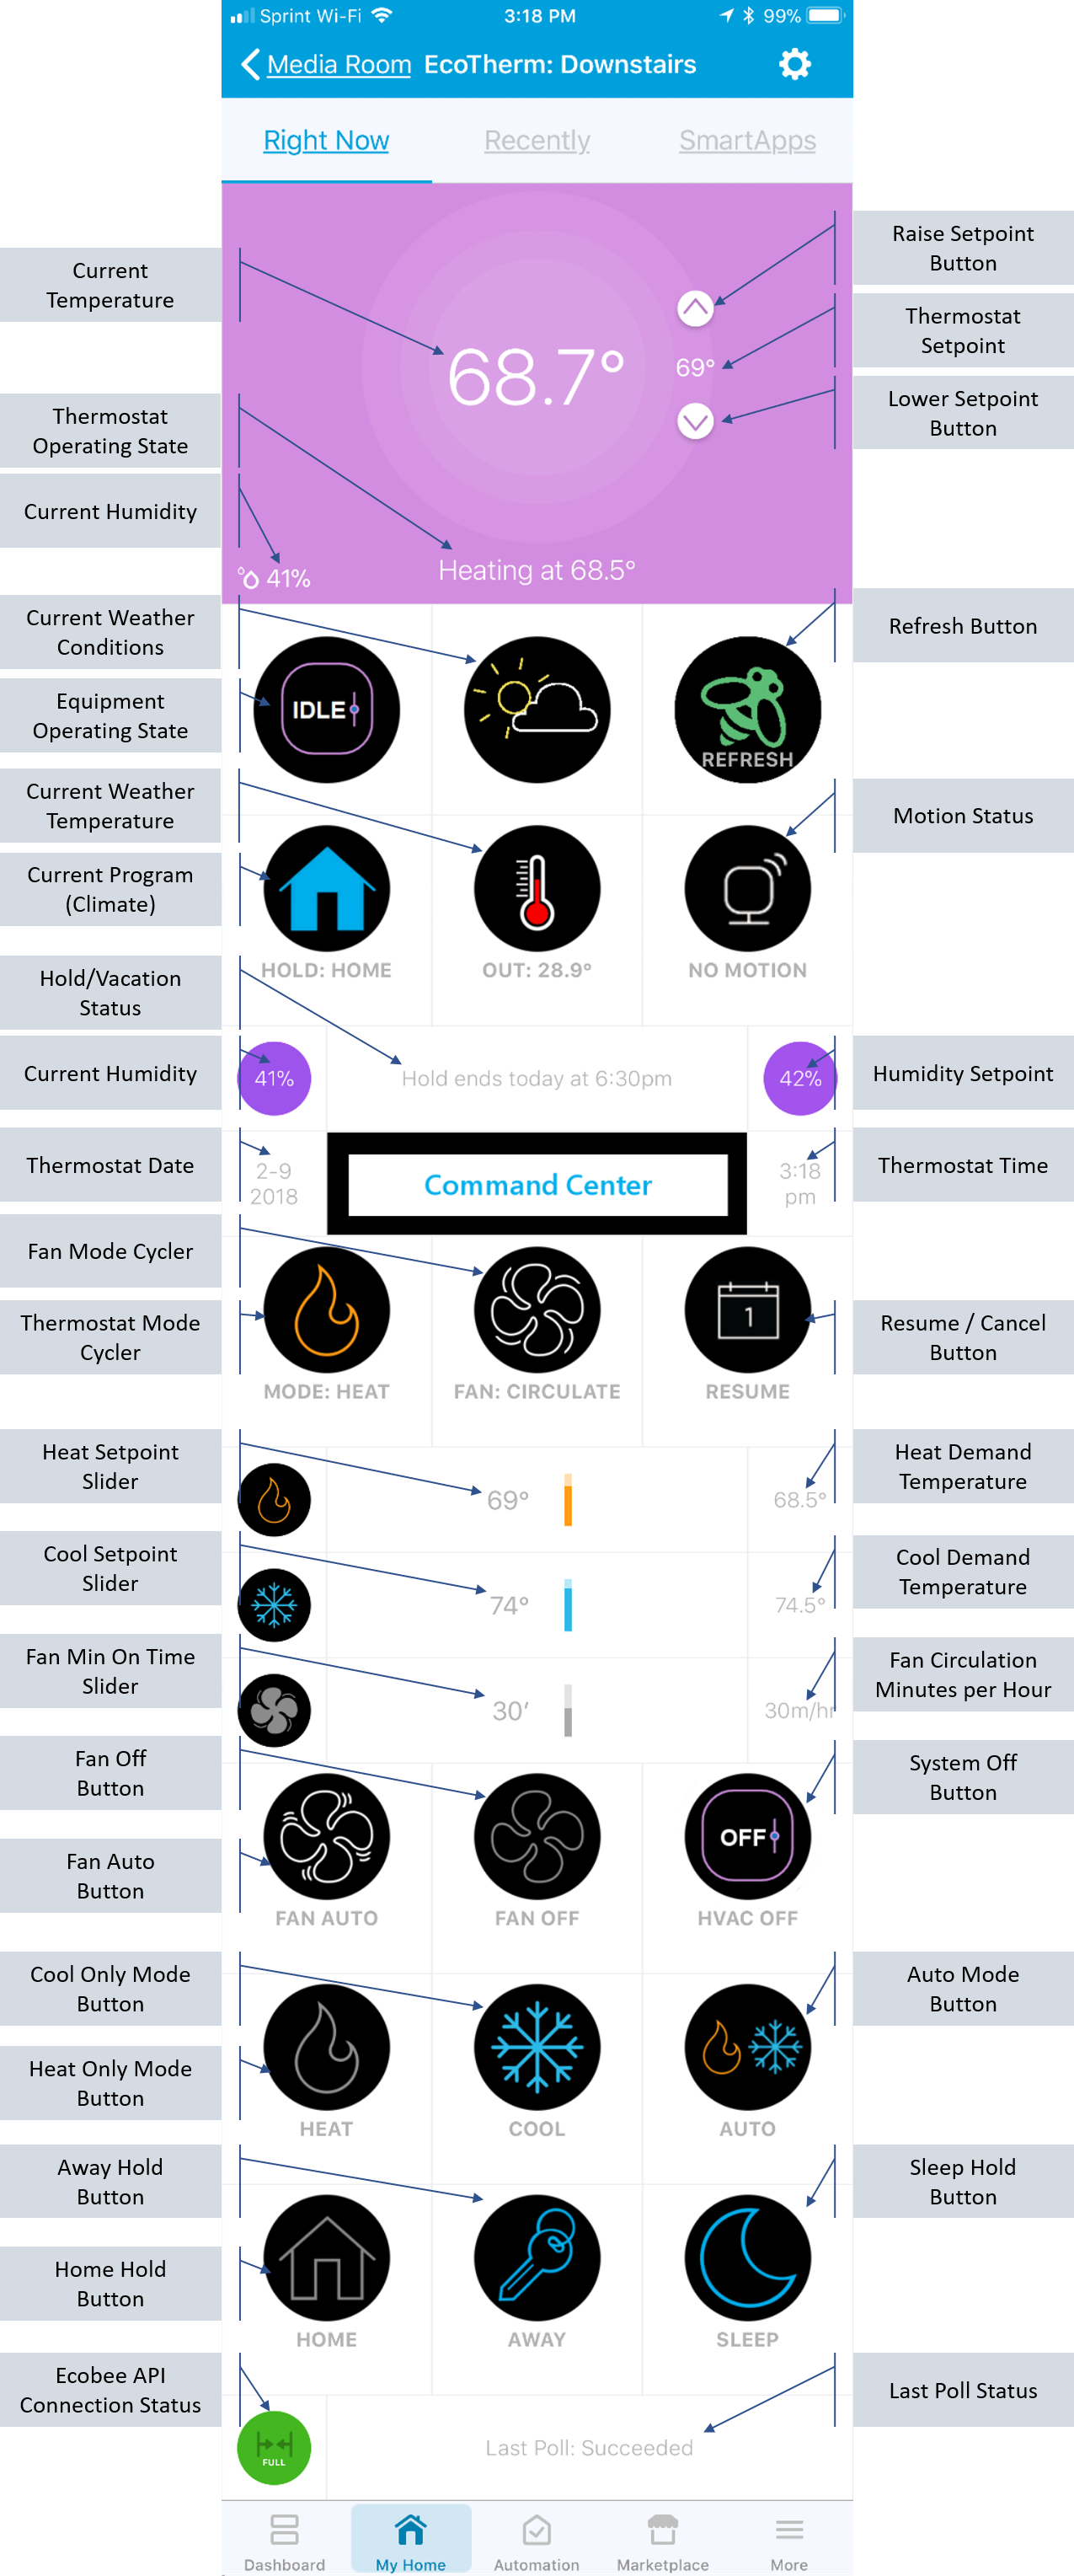 |
| Ecobee Sensor Device | |
|---|---|
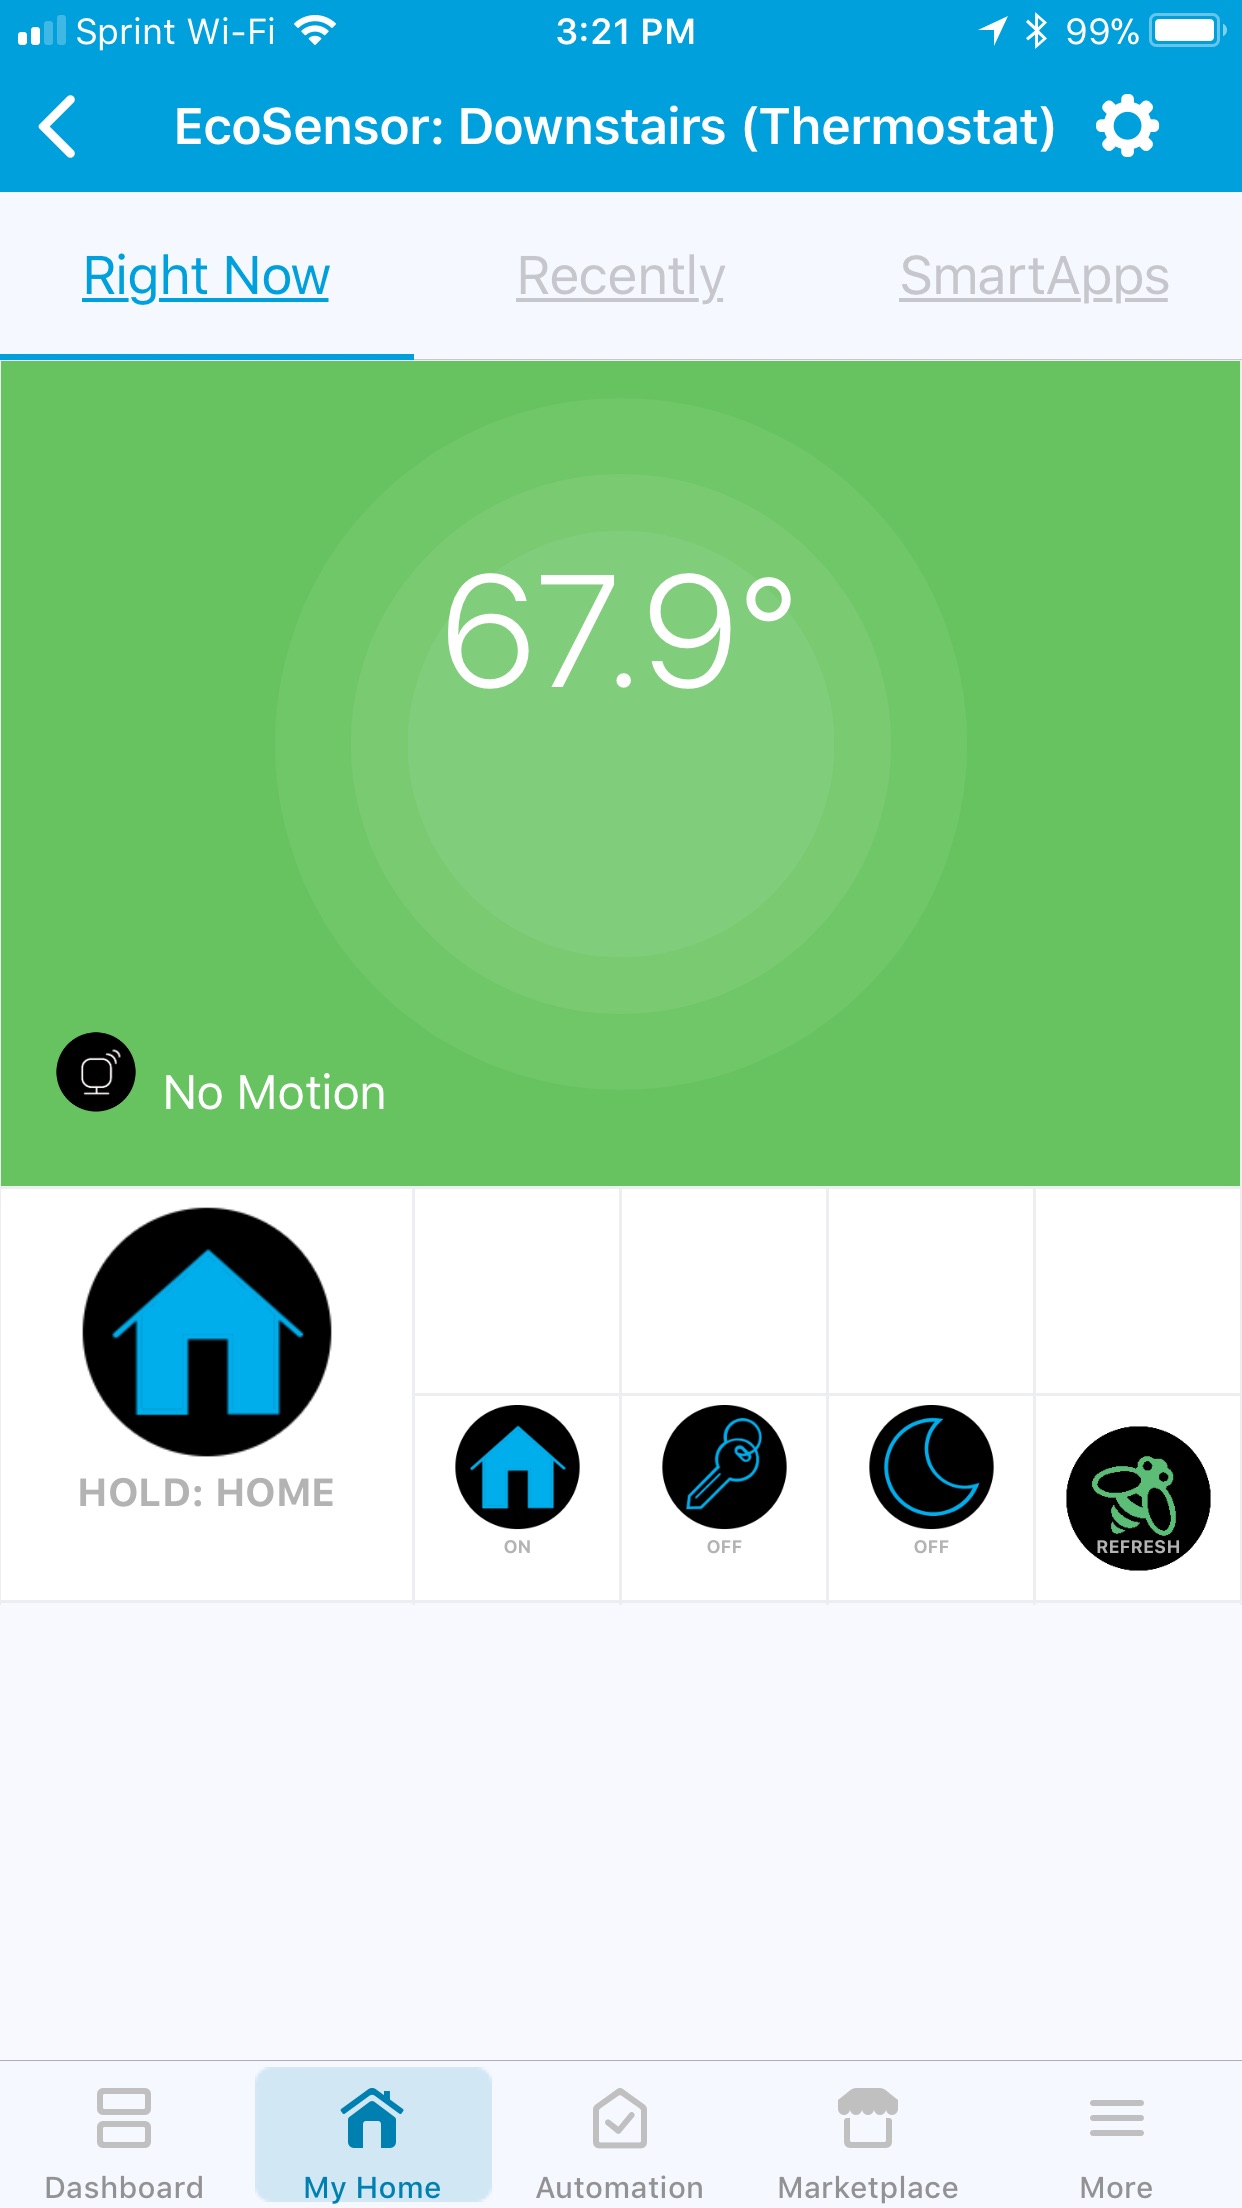 |
- Button Executes labeled action/state when pressed (unless grey)|
- Cycler Displays current state, toggles to next state when pressed|
- Slider Opens SmartThings Slider control (limited to whole numbers only)|
- Current Temperature Decimal value of current Temperature display on Thermostat (note: may be an average of the associated sensors)
- Up / Down Setpoint buttons will be slow to respond, but will not actually change the setpoint until 5 seconds after last button pressed (configurable delay in Ecobee Suite (Control) Preferences). Operates in 1° increments in Fahrenheit, and 0.5° increments in Celsius
- Thermostat Operating State describes the current activity, or the temperature at which a demand for heat/cool will be made (heating/cooling/fan only/idle/pending heat/pending cool)
- Refresh Button Tap once to request a changes-only poll to the Ecobee API, tap again immeditately after the "Bee" icon reappears to force a poll of all the Ecobee API
- Equipment Operating State more detailed state of operations, including heat/cool stages, humidifier/dehumidifier, Smart Recovery, emergency/aux heat, etc.
- Hold/Vacation Status displays when current hold or vacation is scheduled to end. Occaisionally reports other status of interest
- Thermostat Date & Time date and time as of the last completed poll of the Ecobee API
- Command Center Most every tile below this is active, unless the tile is greyed out. Tiles are greyed if the action is not currently allowed because of some state (e.g., cannot change the Program when the thermostat is in Vacation mode).
The Ecobee Suite Manager application provides a single interface for accessing installation, updates, Child Helpers and even debugging tools. The interface uses dynamic pages to guide the user through the installation process in order simplify the steps as much as possible.
The SmartApp provides the following capabilities:
- Perform Ecobee API Authorization (OAuth)
- Select Thermostats from account to use (dynamic list, so any future Thermostats can easily be added at a later date)
- Select Sensors to use (dynamic list, will only show sensors associated with the previously selected Thermostats)
- Access Child SmartApps (such as
ecobee Suite Routines) - Set various Preferences:
- Set default Hold Type ("Until Next Program", "Until I Change", "2 Hours", "4 Hours", "Specified Hours" and "Thermostat Default")
- Allow changes to temperature setpoint via arrows when in auto mode ("Smart Auto Temperature Adjust")
- Polling Interval
- Debugging Level
- Adjustable Decimal precision for displaying temperatures
- Include Thermostats as a separate Ecobee Sensor (useful in order to expose the true temperature reading and not just the average temperature shown on the thermostat, e.g. for Smart Vent input)
- Delay timer value after pressing setpoint arrows (to allow multiple arror presses before calling the Ecobee APIs)
- Set Ask Alexa Message Queue integration preferences
- Debug Dashboard (if Debug Level is set to 5)
The ecobee Suite Open Contacts Helper can detect when one (or more) contact sensors (such as doors and windows) are left open or a configurable amount of time and can automatically turn off the HVAC and/or send a notification when it is detected.
This Helper also supports switches/dimmers/vents, with configurable selection of whether contact open or close, switch on or off will turn off the HVAC. This enhancement allows (for example) automatically turning off the HVAC when the attic fan is running.
Beginning with Ecobee Suite release 1.5.*, this Helper now also integrates with the new Quiet Time Helper SmartApp - instead of turning off the HVAC, this Helper can turn on/off the Virtual Switch that a Quiet Time Helper instance uses as its trigger. Quiet Time offers additional flexibility over the actions taken on the HVAC system (see documentation below).
- Change one or multiple thermostats
- Trigger based on one or multiple contact sensors and/or switches
- Configurable delay timers (for trigger and reset)
- Configurable actions: Notify Only, HVAC Only or Both
- Support for SMS for notifications (SmartThings only)
- Supports "Notification Devices" on both platforms
- Integrates with the Quiet Time Helper (via Virtual Switch)
- Temporarily Disable app without having to delete and recreate!
The ecobee Suite Quiet Time Helper allows you to automatically turn off or change some or all of the following HVAC system settings, based on the (configurable) off/on state of a specific (real or virtual) Switch:
- Turn Off HVAC altogether
- Change the HVAC Mode (auto, cool, heat)
- Turn off the HVAC Fan
- Adjust the heating/cooling setpoints
- Turn off the HVAC's humidifier
- Turn off the HVAC's dehumidifier
When the aforementioned Quiet Time switch state changes back to (on/off), some or all of the above changes are reverted.
While Quiet Time can be triggered by any Switch device, it is perhaps most useful to trigger it using a Virtual Switch.
- SmartThings now provides a standard
Virtual Device Creatorin the SmartApps Marketplace, int the "+ More" section. So you simply need to install and run this to create a Virtual Switch (I suggest naming itQuiet Time). - Hubitat natively supports virtual switches; simply create them using the Devices menu.
Once you have your virtual switch, simply configure this Helper to invoke Quiet Time actions when the virtual switch is turned on, and you're all set. Then add turning on this Virtual Switch to your Watch TV routine, or as an action for your SmartThings/Hubitat-integrated Harmony remote.
If you have Alexa (or Google Home), you even say "Alexa, turn on Quiet Time" and smile when your HVAC shifts into peaceful existence!
N.B., The use case for this new Helper came from a user whose HVAC system is rather noisy when the humidifier runs - enough so that it was hard to hear the TV on "movie night." He asked for the ability to automatically turn off the humidifier when the TV was turned on; from that was born the notion of this new Quiet Time Helper (and the ability to control the humidifier/dehumidifier). I'm sure there are several other use cases that can leverage Quiet Time.
The ecobee Suite Routines Helper provides the ability to change the running Program (Comfort Setting) when the Location Mode is changed, when a Switch (real or virtual) is turned on/off, or when a SmartThings (only) Routine is run. It can also be initiated by a Program (Schedule/Climate) change on an Ecobee thermostat.
- Change one or multiple thermostats
- Trigger based on SmartThings Location Mode Change or SmartThings Routine Execution
- Choose any (including custom) Ecobee Programs to switch to. Or can even choose to Resume Program instead
- Change the Fan Mode (Optional)
- Set the Fan Minimum Runtime (Optional)
- Disable a Vacation hold (Optional)
- Trigger based on Program Change on one or more thermostats
- Change the Location Mode or execute a Routine when the thermostat Program Changes - including Vacations!
- Temporarily Disable app without having to delete and recreate!
The Ecobee Suite Smart Ciculation Helper SmartApp will adjust fan mininum on time of an Ecobee thermostat as it tries to get two or more temperature sensors to converge.
Beginning with Ecobee Suite release 1.5.*, Smart Circulation can be configured to disable circulation altogether (sets fanMinOnTime to 0) when the specified (Quiet Time) (real or virtual) Switch is turned off/on. If you want Quiet Time to really stop everything, then you need to enable this feature, otherwise Smart Circulation will override Quiet Time by setting the minimum on time to a non-zero number.
Features:
- Monitor/synchronize two or more temperature sensors (Ecobee or any SmartThings temperature sensor)
- Configurable maximum/target temperature delta
- Configurable minimum fan minutes on per hour
- Configurable maximum fan minutes on per hour
- Configurable minutes +/- per adjustment
- Configurable adjustment frequency (in minutes)
- Option to override fan minutes per hour during Vacation hold
- Enable during specific Location Modes or when thermostat is in specific Program
- Temporarily Disable app without having to delete and recreate!
The Ecobee Suite Smart Humidity Helper will adjust the humidity setpoint of your Ecobee Thermostat based on outdoor temperature, indoor temperature , and the thermal efficiency (rate of heat/humidity loss) of your structure.
To configure Smart Humidity, select an ES Thermosta and specify your desired minimum and maximimum humidity level.
Then you will estimate the number of days it takes your structure to shed excess humidity. This number defines the range of the strategy you select next. Generally, a larger number of days is required when your house is extremely well sealed; smaller values are used for older homes and homes with less efficient windows.
Next, elect one of the 3 provided Smart Humidity strategies:
- Actual low temperature of last day in the range
- Average low temperature of the entire range
- Lowest low temperature of the entire range <-- recommended strategy
Finally, select an efficiency factor. This factor effectively adds or reduces the calculated target Humidity Setpoint by a number of percentage points.
Configuration Advice The "ideal" indoor humidity is widely-accepted to fall within the 40-50% range. However, as the outside temperature drops, the probability that indoor humidity will condense on windows, metal doors, and exposed attic surfaces increases. Condensation is bad because it can promote and support the growth of mold and mildew in hidden areas of your home.
The ideal configuration for each home will be different, but generally you are trying to hold the humidity in the 40-50% range at all outdoor temperatures, without condensation. If you see condensation on a particularly cold day, you want to adjust things to reduce the target humidity when it is very cold. I recommend that you ONLY adjust the efficiency factor at first.
Features:
- Enable during specific Location Modes, thermostat Modes, or when thermostat is running specific Programs
- Adjustable "humidity retention" duration (days)
- Choose from 3 different setpoint calculation strategies
- Thermal efficiency factor to fine-tune humidity setpoint targets
- Live-updated table in setup shows calculated setpoints for today and the next 4 days
- Pause the Helper without having to delete and recreate!
This Helper was added at user request, by a user who was continually frustrated by the "Frost Free" setting on the thermostat.
This Helper will automatically change Ecobee Thermostats' Mode based on external temperature and/or dewpoint changes. Generally, the intention is to run Cool or Heat only modes when the outside temperatures might otherwise cause cycling between Heat/Cool if "Auto" were selected. Can also be used to turn the HVAC off when outdoor temperatures warrant leaving the windows open. Version 1.7.12 adds ability to change the Program/Climate/Schedule as well.
- Choose from only the Modes that are configured on the thermostat (Auto, Aux_Heat, Cool, Heat, Off)
- Choose from 4 possible temperature sources:
- Zip Code (SmartThings-only - uses your Hub's location or a manually specified Zip Code) - uses SmartThings embedded support for The Weather Channel
- Any Hubitat or SmartThings Temperature Sensor
- The Ecobee-supplied outdoor Weather Temperature (note, this is notoriously bad data for most people, unless you live within a couple of miles of the weather sources Ecobee uses)
- A Hubitat/SmartThings-supported weather station including the author's MeteoWeather driver for the MeteoBridge/WeatherBridge weather gateway.
- Optionally change the thermostat program/schedule/climate when changing modes
- Optionally delivers Notifications whenever the thermostat(s) mode is changed
- Use a single instance (below, above and between temperatures), or create multiple instances
Many thanks to @JustinL for the original idea, the starting code base, and beta testing for this new Smart Mode Helper.
The ecobee Suite Smart Room Helper will automate a normally unused room, Activating it one or more of the Doors associated with the Smart Room are left open for a configurable number of minutes, and Deactivating it when all the Doors are closed for a configurable number of hours.
- Ecobee thermostat with Sensor support
- Ecobee Sensor in the room
- One or more Doors, each with a contact sensor
- Hubitat/SmartThings-controlled vent running stock device drivers
- EcoNet Vent
- Keene Smart Vent
- Any other 'generic" vent device (operating like a dimmer)
- One or more Windows with contact sensor(s)
- Specify one or more Ecobee Sensors that are in the Smart Room
- Configure which of the 3 default ecobee Thermostat Programs (Home, Away, Sleep) the Sensor should be added to when Activated
- Configure which of these Programs it should be added to when Deactivated
- Specify one or more Door contact sensors to monitor
- Configurable number of minutes a Door being open will Activate the Smart Room
- Configurable number of hours all Doors being closed will Deactivate the Smart Room
- Optionally specify one or more Window contact sensors to monitor
- If open while room is Activated, temporarily Deactivate the room
- Optionally specify additional motion sensors within the Smart Room
- If motion is detected while a Smart Room is Activated and all the Doors are closed and the Deactivate monitor is disabled (monitor will be re-enabled the next time the door closes)
- Optionally controls specified SmartThings-controlled vents
- Open vent(s) when Smart Room is activated, and close them when Deactivated
- Supports EcoNet and Keene vents using SmartThings stock DTH only
- Optionally configure a minimum vent closed level (to protect over-pressure HVAC situation)
- Optionally notify on Activations via Push, using Contact List or default Push
- Temporarily Disable app without having to delete and recreate!
ecobee Suite Smart Switches Helper enables activating switches or dimmers based upon the Operating State of a thermostat. This is useful to control a vent airflow booster, an attic fan, a ceiling fan, and the like.
NOTE: the response time of this Helper is dependent upon the Polling Frequency set for Ecobee Suite Manager. If your Polling Frequency is 3 (for example), it can take as long as 6 minutes AFTER your HVAC starts heating/cooling before this app realizes that the HVAC has been turned on. Thus, it is best that you use this Helper with a Polling Frequency of 1 minute.
ecobee Suite Smart Vents automates one or more vents to reach/maintain a target temperature that you specify or from a specified thermostat. It uses one or more temperature devices, and opens/closes vents based upon current temperature, target temperature and thermostat operating state.
- Version 1.7.06 adds the option to turn on/off a switch when trying to meet the setpoint, useful for turning on a fan or a vent blower.
- Version 1.8.00 additions & enhancements
- The ability to select specific ES Thermostat programs when the Helper should adjust the vent(s). It can also automatically enroll/unenroll an Ecobee Sensor into the selected ES Thermostats' programs.
ecobee Suite Smart Zones Provides functionality to allow one or more "slave" zones to leverage the operating state of a "master" zone. This is designed for multi-zoned HVAC systems with only a single air handler. In this configuration, running only 1 zone (e.g., to cool) can cause the other zone's temperature to increase a few 10ths of a degree. This Helper seeks to address that by turning on the Slave zones' fan, thereby allowing some of the cooled (or heated) air into the slave zone.
- Slaves can be configured to turn on the fan any time the Master thermostat is running 'fan only'.
- Slaves can be configured to leech (share) the heat/cool when the Master is heating and/or cooling. Specifically,
- If the Master is cooling and the Slave zone's current temperature is higher than the 'Cool To' setpoint but lower than the 'Cool At' setpoint, the Slave's fan will be turned on.
- When the Master returns to 'idle' or 'fan only', the Slave(s) will turn off their fans (return them to 'auto').
- The Slave will also turn off its fan once the Slave thermostat's temperature reaches the 'Cool To' setpoint.
In most cases, the Slave will properly reset any program Holds that are in effect when it starts 'leeching'.
This Helper dynamically adjusts the heating and/or cooling setpoints of Ecobee Suite Thermostats based on the concept of Thermal Comfort (see https://en.wikipedia.org/wiki/Thermal_comfort).
Using the Predicted Mean Vote (PMV) algorithm, Thermal Comfort setpoints will changed based entirely on the ambient indoor relative humidity and your selected activity and clothing levels. You may want to create different instances for different seasons and/or activities.
The Helper's dynamic configuration calculator within settings enables you to see the resultant setpoints based upon your PMV inputs in real time.
ecobee Suite Working From Home is designed to override the thermostat's Program/Climate/Schedule changes if someone is still at home. It can be configured to check at a specific time on specific days of the week (e.g., shortly after the scheduled weekday program change on the thermostat), or it can check whenever the Thermostat Program changes to "Away."
![]()
The most common error conditions are related to Ecobee Server outages, which have increased in frequency significantly starting in late 2018 and continuing into 2019.
It is important to understand that the Ecobee Suite code is today extremely resilient and tolerant of these Ecobee Server outages. Generally, you need to do NOTHING when they occur - the code will attempt to reconnect repeatedly until it is successful because the servers came back on-line. During such an outage, you will see repeated timeout warnings in the Live Logging for Ecobee Suite Manager. On the SmartThings Classic app, you will also notice that the very bottom row shows a warning, as does the Apps list on the Hubitat Console. If you see these, you need only wait until the systems recover.
The only time you should have to re-authenticate to recover from an outage is if the outage lasts so long that the Ecobee Servers invalidate your authentication. This usually doesn't happen, even for outages several hours long. You will know that you need to re-authenticate when one of these events occur:
- you see a temperature of 451° on a red background of an Ecobee Suite Thermostat or Server device (SmartThings Classic app only)
- the thermostat status line for the Ecobee Thermostat device in the SmartThings Classic app shows "failed" or "offline",
- If you see the word "Offline" (in red) next to the name of your "Ecobee Suite Manager" on the Apps page in Hubitat
If this occurs, simply open Ecobee Suite Manager and select the Ecobee API Authorization submenu to log in again - and yes, do this even though it might say that you are already connected. If the Ecobee servers are in fact back on-line, everything should start working again within the next few minutes.
For other issues:
| Symptom | Possible Solution |
|---|---|
| The devices are not showing up in the Things tab after installation | It can take several minutes for things to show up properly. If you don't want to wait then simply kill the SmartThings app and reload it. |
| Receive error similar to "error java.lang.NullPointerException: Cannot get property 'authorities' on null object" | This indicates that you have not turned on OAuth for Ecobee Suite Manager. Please review the installation instructions and complete the OAuth steps. |
| "You are not authorized to perform the requested operation." | This indicates that you have not turned on OAuth for Ecobee Suite Manager. Please review the installation instructions and complete the OAuth steps. |
| Irregular behavior after an update to the application and/or thermostat code | It is possible that after updating the codebase you may experience strange behavior, including possible app crashes. This seems to be a general issue with updates on SmartThings, but there have been complaints from the Hubitat community as well. Try the following steps: 1) Re-run the Ecobee Suite Manager application to re-initialize the devices 2) If that does not solve the problem, you may have to remove and re-install the entire Ecobee Suite (boo!!!). |
physicalgraph.exception.ConflictException: Device still in use. Remove from any SmartApps or Dashboards, then try again @line -1 (doCall) |
The initial installation failed for some reason, and it was unable to delete the temporary devices it creates. Try removing everything that you can again, and then go to the on-line IDE. There, list your devices, and delete ANY that have “Ecobee-Suite” (or any form of that text) in their device ID. Then rerun Ecobee Suite Manager from the SmartApps Marketplace. |
The Ecobee Suite Manager application allows the end user to configure the Debug Level they wish to use (ranging from 1-5). The higher the level the more debug information is fed into Live Logging on the Hubitat/SmartThings IDE.
Also, if a user chooses Debug Level 5, then a new Debug Dashboard will appear within ES Manager. This dashboard gives direct access to various state information of the app as well as a few helper functions that can be used to manaually trigger actions that are normally timer based.
The Live Logging feature on the Hubitat/SmartThings IDE is an essential tool in the debugging process of any issues that may be encountered.
To access the Live Logging feature, follow these steps:
- Go the SmartThings IDE (https://graph.api.smartthings.com/) and log in, or go to the the Hubitat Console
- On SmartThings, click
Live Loggingat the top of the page - For Hubitat, select Logs from the left menu
- On SmartThings, click
The SmartThings IDE also provides helpful insights related to the current state of any SmartApp running on the system. To access this information, follow the follwing steps:
- Go the SmartThings IDE (https://graph.api.smartthings.com/) and log in
- Click
My Locations(select your location if you have more than one) - Scroll down and click
List SmartApps - Find the
Ecobee Suite ManagerSmartApp and click the link
On Hubitat, you can get the same information for any App. Simply select the App from the Apps page, and then click on the Gear icon at the top-left of the page.
- README.md (this file): https://github.com/SANdood/Ecobee-Suite/blob/master/README.md
- SmartThings IDE: https://graph.api.smartthings.com
All issues or feature requests should be submitted to the latest release thread on the SmartThings or Hubitat Community. For the major release version 1.7.**, please use the platform-appropriate thread: on SmartThings or Hubitat
If you have complaints, please email them to me directly at either storageanarchy@gmail.com or to @storageanarchy on the SmartThings and/or Hubitat Communities.
![]()
The Ecobee Suite is licensed under the Apache License, Version 2.0 (the "License"); you may not use this Suite except in compliance with the License. You may obtain a copy of the License at: http://www.apache.org/licenses/LICENSE-2.0
Unless required by applicable law or agreed to in writing, software distributed under the License is distributed on an "AS IS" BASIS, WITHOUT WARRANTIES OR CONDITIONS OF ANY KIND, either express or implied. See the License for the specific language governing permissions and limitations under the License.
![]()
The Ecobee Suite's thermostat devices can be leveraged by other custom applications, by the Hubitat Rule Manager, and by WebCoRE automations in a variety of ways. The provided Ecobee Thermostat DTH implements the following SmartThings capability sets completely (click each capability for the SmartThings Developer Documentation describing each capability):
- Actuator
- Health Check
- Motion Sensor
- Refresh
- Relative Humidity Measurement
- Sensor
- Temperature Measurement
- Thermostat
- Thermostat Cooling Setpoint
- Thermostat Fan Mode
- Thermostat Heating Setpoint
- Thermostat Mode
- Thermostat Operating State
- Thermostat Setpoint
It is thus possible to subscribe to state changes associated with these capabilities, and to send commands to the devices using the standard command sets these capabilities define.
Because the currently defined Capabilities do not fully expose ALL of the native capabilities of Ecobee thermostats, several additional attributes (states) and commands have been added.
Follows is the complete list of attributes (states) that the DTH maintains and exposes. You can find more information on the ES and EC attributes in the Ecobee API documentation
(Src: ES=Ecobee Setting, EC=Ecobee Configuration, int=Ecobee Suite internal-use)
| Attribute | Sample Value | Data Type | Read Only | Src | Description |
|---|---|---|---|---|---|
| alertsUpdated | 2020-02-13 07:32:52 | number | yes | int | thermostat time of last update to alerts |
| apiConnected | full | string | yes | int | Status of Ecobee Server accessibility. One of 'full', 'warn', 'lost' |
| autoAway | false | string | no | ES | If true, switch to away when no motion detected |
| autoHeatCool FeatureEnabled |
true | string | no | ES | Enable "Auto" mode |
| autoMode | true | string | yes | int | Short-name status of autoHeatCoolFeatureEnabled |
| auxHeatMode | false | string | yes | int | True if currently using auxHeat |
| auxMaxOutdoor Temp |
70.0 | number | no | ES | Max temp that auxHeat will be called for |
| auxOutdoor TempAlert |
50.0 | number | no | ES | Send alert if auxHeat being used above this temp |
| auxOutdoor TempAlertNotify |
false | string | no | ES | Send auxOutdoorTempAlerts to the user |
| auxOutdoor TempAlert NotifyTechnician |
false | string | no | ES | Send auxOutdoorTempAlerts to the Technician |
| auxRuntimeAlert | 10800 | number | no | ES | Send alert if auxHeat runs longer than this number of seconds |
| auxRuntimeAlert Notify |
false | string | no | ES | Send auxRuntimeAlerts to user |
| auxRuntimeAlert NotifyTechnician |
false | string | no | ES | Send auxRuntimeAlerts to technician |
| backlightOffDuring Sleep |
true | string | no | ES | Turn backlight off when running the Sleep program |
| backlightOffTime | 10 | number | no | ES | Turn off the backlight after this many seconds |
| backlightOnIntensity | 10 | number | no | ES | Sets backlight intensity (0-10) |
| backlightSleep Intensity |
4 | number | no | ES | Sets backlight intensity during Sleep program (0-10 |
| brand | ecobee | string | yes | EC | Thermostat's brand (see also modelNumber) |
| checkInterval | 960 | number | yes | int | Health Check Interval |
| climatesList | [Home, Away, Sleep] | JSON_ OBJECT |
yes | ES | List of supported climates (programs) USAGE: List theClimates = stat.currentValue( 'climatesList' )[1..-2].tokenize(', ') |
| climatesUpdated | 2020-02-13 07:32:52 | number | yes | int | thermostat time of last update toprogram.climates |
| coldTempAlert | 53.0 | number | no | ES | Alert when thermostat reads internal temperature below this |
| coldTempAlert Enabled |
true | string | no | ES | Send coldTempAlerts to user |
| compressor Protection MinTemp |
40.0 | number | no | ES | Minimum outside temp to run the A/C compressor |
| compressor Protection MinTime |
300 | number | no | ES | Minimum rest time after compressor is shut off |
| condensationAvoid | false | string | no | ES | |
| coolAtSetpoint | 78.5 | number | yes | int | Actual temperature above which a demand for Cool will be made |
| coolDifferential | 0.5 | number | yes | int | Temperature adder to coolingSetpoint to calculate coolAtSetpoint |
| coolMaxTemp | 120.0 | number | yes | ES | Maximum temp that the thermostat hardware will accept for a cooling setpoint |
| coolMinTemp | -10.0 | number | yes | ES | Minimum temp that the thermostat hardware will accept for a cooling setpoint |
| coolMode | true | string | yes | int | Whether or not this thermostat is controlling a cooling unit |
| coolRange | (65..92) | string | yes | int | Range of temps allowed for coolingSetpoint - use coolRangeHigh and coolRangeLow to change this |
| coolRangeHigh | 92.0 | number | no | ES | Maximum allowed coolingSetpoint as configured by user |
| coolRangeLow | 65.0 | number | no | ES | Minimum allowed coolingSetpoint as configured by user |
| coolStages | 1 | number | yes | ES | Number of cooling stages the HVAC supports |
| coolingLockout | false | string | no | ES | Allow demand for cool if outside temp is below compressorProtectionMinTemp |
| coolingSetpoint | 78.0 | number | no | ES | Actual cooling setpoint |
| coolingSetpoint Display |
78.0 | number | yes | int | Internally generated setpoint display value |
| coolingSetpointMax | 92.0 | number | yes | int | Another name for coolRangeHigh (thanks to SmartThings we have at least 4 different representations of these values) |
| coolingSetpointMin | 65.0 | number | yes | int | Another name for coolRangeLow |
| coolingSetpoint Range |
[65, 92] | vector3 | yes | int | Yet ANOTHER name for the cooling range |
| coolingSetpointTile | 78.0 | number | yes | int | Internal representation of the cooling setpoint for painting certain tiles |
| currentProgram | Away | string | yes | int | Currently running Program/Climate/Schedule. See programsList for the list of Programs this thermostat supports. Use setThermostatProgram() or setSchedule() to change programs |
| currentProgramId | away | string | yes | ES | Thermostat's actual internal name for currentProgram |
| currentProgram Name |
Away | string | yes | int | Name of the current program; may be in form of "Hold: Away" or "Hold: Temp" |
| debugEventFrom Parent |
XXX | string | yes | int | Last debug message sent by Ecobee Suite Manager to this thermostat |
| debugLevel | 2 | number | no | int | Display debug message at this level or lower. Accepted range (1-5). Use Ecobee Suite Manager/Preferences to change |
| decimalPrecision | 1 | number | no | int | Display this # of digits to right of decimal. Use Ecobee Suite Manager/Preferences to change |
| dehumidifierLevel | 60 | number | no | ES | Relative Humidity target % for Dehumidifier |
| dehumidifierMode | off | string | no | ES | Operating mode of the Dehumidifier (off, auto, on) |
| dehumidifyOvercool Offset |
2.0 | number | no | ES | Degrees lower than coolingSetpoint that the thermostat can use the A/C for dehumidification |
| dehumidifyWhen Heating |
false | string | no | ES | Whether the dehumidifier can run during demand for heating |
| dehumidifyWithAC | true | string | no | ES | Whether the thermostat is allowed to place a demand for cooling to reduce the humidity |
| dehumiditySetpoint | 60 | number | no | int | Same as dehumidifierLevel |
| disableAlertsOnIdt | false | string | no | ES | Disables showing alerts on the Thermostat device |
| disableHeatPump Alerts |
false | string | no | ES | Disables alerts related to the heat pump |
| disablePreCooling | false | string | no | ES | Disables Smart pre-cooling |
| disablePreHeating | false | string | no | ES | Disables Smart pre-heating |
| drAccept | always | string | no | ES | Whether Demand Response requests are accepted by this thermostat (always, askMe, customerSelect, defaultAccept, defaultDecline, never) |
| ecobeeConnected | true | string | yes | int | Whether or not Ecobee Suite Manager is able to communicate with the thermostat |
| eiLocation | null | string | no | ES | A note about the physical location where the SMART or EMS Equipment Interface module is located. |
| electricityBill CycleMonths |
1 | number | no | ES | Self-explanatory |
| electricityBill StartMonth |
1 | number | no | ES | Self-explanatory |
| electricityBilling DayOfMonth |
1 | number | no | ES | Self-explanatory |
| enableElectricity BillAlert |
false | string | no | ES | Whether electricityBillAllerts are enabled |
| enableProjected ElectricityBillAlert |
false | string | no | ES | Whether projected...Alerts are enabled |
| equipmentOperating State |
idle | string | yes | int | List of equipment that is currently running (heating/cooling with stages,heat pump,humidifying,dehumidifying,fan only,auxHeat,idle,...) |
| equipmentStatus | idle | string | yes | int | Equipment status (idle, off, offline, ...) |
| fanControlRequired | true | string | no | ES | Whether thermostat or HVAC is controlling the fan |
| fanMinOnTime | 20 | number | no | ES | Minimum number of minutes per hour the fan should run (sum of heat/cool + fan only runtime) |
| features | Home, HomeKit | string | yes | ES | List of features this thermostat supports |
| followMeComfort | false | string | no | ES | Whether thermostat should use remote sensors to adjust setpoints based on occupancy/presence/motion |
| groupName | XXX | string | no | ES | The name of the the group this thermostat belongs to, if any |
| groupRef | XXX | string | no | ES | The unique reference to the group this thermostat belongs to, if any |
| groupSetting | XXX | string | no | ES | The setting value for the group this thermostat belongs to, if any |
| hasBoiler | false | string | yes | ES | Self-explanatory |
| hasDehumidifier | true | string | yes | ES | Self-explanatory |
| hasElectric | false | string | yes | ES | Self-explanatory |
| hasErv | false | string | yes | ES | Self-explanatory |
| hasForcedAir | true | string | yes | ES | Self-explanatory |
| hasHeatPump | false | string | yes | ES | Self-explanatory |
| hasHrv | false | string | yes | ES | Self-explanatory |
| hasHumidifier | true | string | yes | ES | Self-explanatory |
| hasUVFilter | true | string | yes | ES | Self-explanatory |
| heatAtSetpoint | 59.5 | number | yes | int | Actual temperature below which a demand for Heat will be made |
| heatCoolMinDelta | 4.0 | number | no | ES | Minimum number of degrees allowed between Heating and Cooling setpoints |
| heatDifferential | 0.5 | number | no | ES | Temperature subtracted from heatingSetpoint to calculate heatAtSetpoint |
| heatMaxTemp | 120.0 | number | yes | ES | Maximum temp that the thermostat hardware will accept for a heating setpoint |
| heatMinTemp | 45.0 | number | yes | ES | Minimum temp that the thermostat hardware will accept for a heating setpoint |
| heatMode | true | string | no | ES | Whether this thermostat is controlling an HVAC that can provide heat |
| heatPump GroundWater |
false | string | yes | ES | Whether this heat pump uses underground water, or is air-cooled |
| heatPump ReversalOnCool |
true | string | no | ES | Whether the thermostat should reverse the heat pump's coolant direction when cooling |
| heatRange | (45..78) | string | yes | int | Range of temps allowed for heatingSetpoint - use heatRangeHigh and heatRangeLow to change this |
| heatRangeHigh | 78.0 | number | no | ES | Maximum configured heatingSetpoint allowed |
| heatRangeLow | 45.0 | number | no | ES | Minimum configured heatingSetpoint allowed |
| heatStages | 2 | number | yes | ES | Number of stages the heating component of the HVAC system supports |
| heatingSetpoint | 60.0 | number | no | ES | Actual heating setpoint |
| heatingSetpoint Display |
60.0 | number | yes | int | Internal display representation of the heatingSetpoint |
| heatingSetpointMax | 78.0 | number | yes | int | Same as heatRangeHigh |
| heatingSetpointMin | 45.0 | number | yes | int | Same as heatRangeLow |
| heatingSetpoint Range |
[45, 78] | vector3 | yes | int | Yet another way to present the heatingSetpoint range (thanks, SmartThings, for not making up your mind) |
| heatingSetpointTile | 60.0 | number | yes | int | Internal representation of heating setpoint for a tile's display |
| holdAction | nextPeriod | string | no | int | The default end time setting the thermostat applies to a temperature or program hold (useEndTime4hour, useEndTime2hour, nextPeriod, indefinite, |
| holdEndDate | 2020-02-19 18:30:00 | string | yes | int | Date & time that the current hold will end (in thermostat time format) |
| holdEndsAt | 6:30pm | string | yes | int | timeToday() the current hold ends |
| holdStatus | Hold ends at 6:30pm | string | yes | int | String displayed in the SmartThings UI to show when the current hold will end |
| hotTempAlert | 87.0 | number | no | ES | Temperature above which a Hot Temp alert will be generated |
| hotTempAlert Enabled |
true | string | no | ES | Whether hotTempAlerts are sent |
| humidifierMode | auto | string | no | ES | One of (auto, manual, off) |
| humidity | 36 | number | no | ES | Current Relative Humidity reading at the thermostat |
| humidityAlertNotify | true | string | no | ES | Should humidity alerts be sent to the user |
| humidityAlert NotifyTechnician |
false | string | no | ES | Should humidity alerts be sent to the technician |
| humidityHighAlert | 80 | number | no | ES | Alert if inside relative humidity is above this % |
| humidityLowAlert | -1 | number | no | ES | Alert if inside relative humidity is below this % |
| humiditySetpoint | 50 | number | no | ES | Current humidify-to setpoint |
| humiditySetpoint Display |
50 | number | yes | int | Internal display value of the humidity setpoint |
| identifier | XXX | string | yes | ES | Serial number of this thermostat |
| installerCode Required |
false | string | no | ES | Whether the installer code is required to make changes to this thermostat |
| isRegistered | true | string | yes | ES | Whether the user registered this thermostat |
| isRentalProperty | false | string | no | ES | Whether the property is a rental property (restricts some changes) |
| isVentilator TimerOn |
false | string | no | ES | Whether the ventilator timer is on (default=false). If set to true the ventilatorOffDateTime is set to now() + 20 minutes. If set to false the ventilatorOffDateTime is set to it's default value. |
| lastHoldType | indefinite | string | yes | int | The last holdType that was requested of Ecobee Suite for this thermostat |
| lastModified | date-str | string | yes | int | Date & time of the last update received from the Ecobee servers |
| lastOpState | heating | string | yes | int | Last operating state for this thermostat (updated when thermostatOperatingState changes to idle or off). |
| lastPoll | Succeeded | string | yes | int | Status of the last poll of the Ecobee Servers |
| lastServiceDate | date-str | string | no | ES | Date of the last HVAC service |
| locale | en | string | no | ES | Current locale (only 'english' is currently supported) |
| maxSetBack | 10.0 | number | no | ES | Max setback that a demandResponse can execute |
| maxSetForward | 8.0 | number | no | ES | Max setforward that a demandResponse can execute |
| mobile | iOS | string | yes | int | Use Ecobee Suite Manager/Preferences to change |
| modelNumber | athenaSmart | string | yes | EC | Model number (string) for this thermostat |
| monthlyElectricity BillLimit |
0 | number | no | ES | Self-explanatory |
| monthsBetween Service |
6 | number | no | ES | Self-explanatory |
| motion | inactive | string | yes | int | Whether motion has been detected |
| name | Downstairs | string | yes | EC | Thermostat name (configured at the thermostat only) |
| programsList | ["Home", "Sleep", "Awake", "Away"] | string | yes | int | JSON-formatted list of Programs/Climates/Schedules supported on this thermostat - auto generated. USAGE: List thePrograms = new JsonSlurper().parseText( stat.currentValue( 'programsList' )) |
| programUpdated | 2020-02-13 07:32:52 | number | yes | int | thermostat time of last update to thermostat.program |
| quickSave SetBack |
4.0 | number | no | ES | The setpoint setback offset, in degrees, configured for a quick save event |
| quickSave SetForward |
4.0 | number | no | ES | The setpoint setforward offset, in degrees, configured for a quick save event |
| randomStart DelayCool |
0 | number | no | ES | if non-zero, the max minutes a cooling random start can use |
| randomStart DelayHeat |
0 | number | no | ES | If non-zero, the max minutes a heating random start can use |
| remindMeDate | 2019-07-08 | string | no | ES | Date to send an alert reminder (HVAC service, filters, etc.) |
| schedText | forever | string | yes | int | Internal text for how long the current hold is scheduled for |
| schedule | Away | JSON_ OBJECT |
yes | int | Same as currentProgram - use setThermostatProgram() or setSchedule() to change. Note that when in a Hold, the schedule string will be in this form: Hold: Away until 2020-02-19 18:30:00 |
| scheduled Program |
Away | string | yes | int | The program that is scheduled to be running now (may be different than currentProgram |
| scheduled ProgramId |
away | string | yes | int | Internal ID of the scheduled program |
| scheduled Program Name |
Away | string | yes | int | The proper name of the scheduled program |
| serviceRemindMe | true | string | no | ES | Whether the thermostat should remind you of upcoming service |
| serviceRemind Technician |
false | string | no | ES | Whether the technician should be notified of service |
| smartCirculation | false | string | no | ES | If enabled, thermostat should operate like Smart Circulation. Unfortunately, at this time it does nothing |
| soundAlertVolume | 0 | number | no | ES | (Deprecated) Volume for alerts |
| soundTickVolume | 0 | number | no | ES | (Deprecated) Volume for ticks |
| stage1Cooling DifferentialTemp |
0.5 | number | no | ES | The difference between current temperature and set-point that will trigger stage 2 cooling. |
| stage1Cooling DissipationTime |
31 | number | no | ES | Seconds after a cooling cycle that the fan will run for to extract any cooling left in the system. '31' means "auto" |
| stage1Heating DifferentialTemp |
0.5 | number | no | ES | The difference between current temperature and set-point that will trigger stage 2 heating. |
| stage1Heating DissipationTime |
31 | number | no | ES | The time after a heating cycle that the fan will run for to extract any heating left in the system. '31' means "auto" |
| statHoldAction | nextPeriod | string | yes | int | Same as holdAction |
| supported Thermostat FanModes |
[on, auto, circulate, off] | JSON_ OBJECT |
yes | int | Self-explanatory. USAGE: List theFanModes = stat.currentValue( 'supportedThermostatFanModes' )[1..-2].tokenize(', ') |
| supported Thermostat Modes |
[off, auto, cool, heat] | JSON_ OBJECT |
yes | int | Self-explanatory. USAGE: List theModes = stat.currentValue( 'supportedThermostatModes' )[1..-2].tokenize(', ') |
| supported VentModes |
[off] | JSON_ OBJECT |
yes | int | Self-explanatory. USAGE: List theModes = stat.currentValue( 'supportedVentModes' )[1..-2].tokenize(', ') |
| tempAlertNotify | true | string | no | ES | Send temperature alerts to user |
| tempAlertNotify Technician |
false | string | no | ES | Send temperature alerts to techinician |
| tempCorrection | -1.0 | number | no | ES | Degrees added/subtracted to thermostat temp readings |
| temperature | 72.9 | number | yes | ES | Current temperature |
| temperatureDisplay | 72.9° | string | yes | int | Display value of current temperature |
| temperatureScale | F | string | yes | int | Temperature scale in use |
| thermostatFanMode | auto | string | yes | ES | Current fan mode. Must be one of supportedThermostatFanModes |
| thermostatFanMode Display |
circulate | string | yes | int | Current fan mode display ("circulate" when fanMinOnTime != 0) |
| thermostatHold | hold | string | yes | int | If not null, type of hold (hold, vacation, temp) |
| thermostatMode | heat | string | no | ES | Current thermostat mode. Must be one of supportedThermostatModes |
| thermostatOperating State |
idle | string | yes | int | One of (heating,cooling,fan only, idle,heat pending, cool pending) |
| thermostatOperating StateDisplay |
idle | string | yes | int | Display value of thermostatOperatingState |
| thermostatRev | XXX | string | yes | ES | Hardware revision of this thermostat |
| thermostatSetpoint | 60.0 | number | yes | int | Yet another way SmartThings once requested that setpoints be displayed |
| thermostatStatus | Resume Program succeeded | string | yes | int | Most recent text for the thermostat device's status display |
| thermostatTime | date-str | string | yes | ES | Time from the thermostat for the most recent update |
| timeOfDay | day | string | yes | int | "day" or "night" |
| userAccessCode | null | string | yes | ES | Current user Access Code (clear text) |
| userAccessSetting | 0 | number | yes | ES | Integer representation of the user access settings |
| vent | off | string | yes | int | Equivalent of ventMode |
| ventMode | off | string | no | ES | See supportedVentModes |
| ventilator Dehumidify |
true | string | no | ES | Whether to use the ventilator to dehumidify |
| ventilator FreeCooling |
true | string | no | ES | Whether to use the ventilator to help with cooling |
| ventilator MinFreeOnTime |
20 | number | no | ES | Minimum minutes per hour to run the ventilator |
| ventilator MinOnTimeAway |
0 | number | no | ES | Minimum minutes when in Away program |
| ventilator MinOnTimeHome |
20 | number | no | ES | Minimum minutes when in Home program |
| ventilator OffDateTime |
null | string | no | ES | date & time the timed ventilation will stop (see isVentilatorTimerOn) |
| ventilatorType | none | string | yes | ES | One of (none, ventilator, hrv, erv) |
| weatherDewpoint | 47.4 | number | yes | ES | Self-explanatory |
| weatherHumidity | 68 | number | yes | ES | Self-explanatory |
| weatherPressure | 29.83 | number | yes | ES | Self-explanatory |
| weatherSymbol | 0 | number | yes | ES | Index of the icon for the current weather conditions |
| weatherTemperature | 57.9 | number | yes | ES | Self-explanatory |
| weatherTemp LowForecast |
20.3,9.2,4, 22.9,21.1 | string | yes | int | Forecast low temperatures for today and the next 4 days (in °F) - used by Smart Humidity |
| wifiOfflineAlert | false | string | yes | ES | True if Ecobee servers have lost connection to the thermostat device (usually means a wifi or internet outage at your location) |
In addition to the above, there are several internal-use-only attributes that should not be used in any manner by end-users or programmers. These include: tstatDate, tstatTime, setAway, setSleep, setHome, resumeProgram, setModeOff, setModeAuto, setModeHeat, setFanOff, and setModeCool.
The complete set of *Thermostat DTH commands that can be called programmatically follows:
| Command | Action | Comments |
|---|---|---|
| asleep() | setThermostatProgram( 'Sleep' ) | Must be one of programsList |
| auto() | setThermostatMode( 'auto' ) | Must be one of supportedThermostatModes |
| auxHeatOnly() | setThermostatMode( 'auxHeatOnly' ) | Turns on auxHeat (heat pump only) |
| awake() | setThermostatProgram( 'Awake' ) | Not all Ecobee thermostats have the program by default - you may need to create it manually |
| away() | setThermostatProgram( 'Away' ) | |
| Internal use only | ||
| cancelVacation() | Cancels the currently-active vacation hold | |
| cool() | setThermostatMode( 'cool' ) | |
| deleteVacation(vacationName) | Cancels the specified vacation by name | |
| doRefresh() | Repaint the SmartThings-based UI data | |
| emergency() | setThermostatMode( 'auxHeatOnly' ) | |
| emergencyHeat() | setThermostatMode( 'auxHeatOnly' ) | |
| fanAuto() | setThermostatFanMode( 'auto' ) | |
| fanCirculate() | setThermostatFanMode( 'circulate' ) | |
| fanOff() | setThermostatFanMode( 'off' ) | |
| fanOn() | setThermostatFanMode( 'on' ) | |
| forceRefresh() | Force refresh ALL thermostat data from the Ecobee Cloud | |
| INTERNAL USE ONLY | ||
| heat() | setThermostatMode( 'heat' ) | |
| home() | setThermostatProgram( 'Home' ) | |
| lowerSetpoint() | Lowers the thermostatSetpoint by 1°F or 0.5°C each call |
|
| INTERNAL USE ONLY | ||
| night() | setThermostatProgram( 'Sleep' ) | |
| INTERNAL USE ONLY | ||
| off() | setThermostatMode( 'off' ) | |
| INTERNAL USE ONLY | ||
| present() | setThermostatProgram( 'Home' ) | For Nest compatibility |
| raiseSetpoint() | Raises the thermostatSetpoint by 1°F or 0.5°C |
|
| refresh() | Repaint the SmartThings-based UI data | |
| resumeProgram() | Cancels all Holds and returns to the regularly scheduled program | |
| setCoolingSetpoint(setpoint) | There is a 2+ second delay before the setpoint is changed | |
| INTERNAL USE ONLY | ||
| setDehumidifierMode(mode) | Mode must be one of supportedDehumidifierModes |
|
| setDehumiditySetpoint(setpoint) | 35-100 - lower values have special meaning (trial and error) | |
| setEcobeeSetting(name, value) | ||
| setFanMinOnTime(minutes) | ||
| INTERNAL USE ONLY | ||
| setHeatingSetpoint(setpoint) | There us a 2+ second delay before the setpoint is changed | |
| INTERNAL USE ONLY | ||
| setHumidifierMode(mode) | Mode must be one of supportedHumidifierModes |
|
| setHumiditySetpoint(setpoint) | 35-100 - lower value have special meaning '(trial and error) | |
| setProgramSetpoints(program, heatSetpoint, coolSetpoint) | ||
| setSchedule(program) | Program must be one of programsList |
|
| setThermostatFanMode(mode) | Mode must be one of supportedThermostatFanModes |
|
| setThermostatMode(mode) | Mode must be one of supportedThermostatModes |
|
| setThermostatProgram(program) | Program must be one of programsList |
|
| setVacationFanMinOnTime(minutes) | ||
| wakeup() | setThermostatProgram( 'Wakeup' ) | Not all Ecobee thermostats have the program by default - you may need to create it manually |
Here is the comprehensive list of API commands available for Ecobee Sensor Devices. Notice that all of the add/delete/remove commands ultimately call updateSensorPrograms() which will atomically update all of the Programs this ES Sensor is enrolled and not-enrolled with a single call.
| Command | Action | Comments |
|---|---|---|
| addSensorToAway(), addSensorToHome(), addSensorToSleep() |
updateSensorPrograms(["Away"], []) |
Adds (enrolls) this sensor the to referenced Program on its parent thermostat |
| addSensorToProgram(String program) | updateSensorPrograms(["${program}"], []) |
Adds (enrolls) this sensor to the specified program |
| addSensorToPrograms(List programs) | updateSensorPrograms(programs, []) |
Adds (enrolls) this sensor to the specified List of programs |
| deleteSensorFromAway(), deleteSensorFromHome(), deleteSensorFromSleep() |
updateSensorPrograms([], ["Home"]) |
Deletes (unenrolls) this sensor from the referenced Program |
| deleteSensorFromProgram (String program) | updateSensorPrograms([],["${program}"]) |
Deletes (unenrolls) this sensor from the specified program |
| deleteSensorFromPrograms (List programs) | updateSensorPrograms([], programs) |
Deletes (unenrolls) this sensor from the specified List of programs |
| disableSmartRoom() | Disables the Smart Room status for this Sensor ("room") | |
| doRefresh() | ||
| enableSmartRoom() | Enables the Smart Room status for this Sensor ("room") | |
| removeSensorFromAway(), removeSensorFromHome(), removeSensorFromSleep() |
updateSensorPrograms([], ["Home"]) |
Deletes (unenrolls) this sensor from the referenced program |
| removeSensorFromProgram (String program) | updateSensorPrograms([],["${program}"]) |
Removes (unenrolls) this sensor from the specified program |
| removeSensorFromPrograms (List programs) | updateSensorPrograms([],programs) |
Removes (unenrolls) this sensor from the specified List of programs |
| updateSensorPrograms(List addPrograms, List deletePrograms) | The ultimate workhorse for changing Sensor enrollment in Thermostat Programs |
- home() - change to the "Home" program
- present() - change to the "Home" program (for compatibility with Nest smart thermostats)
- asleep() - change to the "Sleep" program
- night() - change to the "Sleep" program
- away() - change to the "Away" program
- wakeup() - change to the "Wakeup" program
- awake() - change to the "Awake" program
- resumeProgram() - return to the regularly scheduled program
Calling any of the above will initiate a Hold for the requested program for the currently specified duration (Permanent, Until I Change, 2 Hours, 4 Hours, etc.). If the duration is Until I Change (temporary) and the requested program is the same as the current program, resumeProgram is effected instead to return to the scheduled program.
N.B. "schedule" is a synonymn for "programs". SmartThings has defined schedule/setSchedule is the API mechanism to change programs on a thermostst. Note that setSchedule() is a front-end for the existing setThermostatProgram() and resumeProgram() command entry points, as documented above.
Follows is documentation on the implementation within Ecobee Suite:
The choice by SmartThings to define the argument to setSchedule() has allowed me to implement an incredibly flexible way to utilize this command to change the current program. The single argument passed can be a String (e.g., "Home"), or a List (e.g., ["Away", "nextTransition']) or a Map (e.g., [name: "Sleep", holdType: "holdHours", holdHours: 6]).
- Only the first argument (
name) is required, and it must be one of the supported Program/Climate names for the target thermostat - or - the word "Resume". By default, the supported names are (Home, Away, Sleep, Resume), but will include any other Programs/Schedules/Climates that you have defined on the thermostat(s) - The second argument (
holdType) is optional, and must be one of "nextTransition" (temporary hold), "indefinite" (a permanent hold), or "holdHours" (hold for a specified number of hours, obviously). - With "holdHours" the third argument (
holdHours) is the number of hours you want the hold to last.
These arguments can be passed programmatically as their respective data types (String, List, or Map). But to make this implementation even more powerful, it allows you to pass a String that looks like JSON, but isn't necessarily pure JSON. In this manner, virtually ANY programming interface/language can be used to change the currently running program/schedule. For example:
| String Argument | Translates to |
|---|---|
| "Home" | [name: "Home"] |
| "[Home]" | [name: "Home"] |
| "Home,nextTransition" | [name: "Home", holdType: "nextTransition"] |
| "name:Home,holdType:holdHours,holdHours:6" | [name: "Home", holdType: "holdHours", holdHours: 6] |
| "name,Home,holdType,holdHours,holdHours,6" | [name: "Home", holdType: "holdHours", holdHours: 6] |
As the second example implies, the argument String can be wrapped in one or more pairs of brackets ("[...]") or even braces ("{...}").
This design provides ultimate flexibility for programmers and end users alike, and allows Hubitat+HubConnect users of the reflected Ecobee Suite Thermostat device to pass simple strings without sacrificing functionality.
Since HubConnect doesn't reflect ALL of the attributes provided by the Ecobee Suite Thermostat device, I have chosen to somewhat overload the meaning of the schedule attribute. Under normal operation, it will merely report the current Program Name (Home, Away, Sleep...). But during a Hold event (or an Auto Home/Away event), the content will expand to be more descriptive, as in Hold Home until 6:30pm or Hold Away forever. SmartThings users get this additional information from the currentProgramName and statusMsg attributes which are displayed in the SmartThings Classic UI.
- off() - turns off the thermostat/HVAC. Note, however, if the Fan Minimum On Time is not zero when this is called, the HVAC will turn off, but the fan will remain in circulate mode. Thus, to turn the HVAC completely off, you should first call fanOff(), then off()
- auto() - puts HVAC into Auto mode, where either Heating or Cooling can be supplied, based upon the internal temperature and the heat/cool setpoint values
- cool() - puts HVAC into Cooling (only) mode
- heat() - puts HVAC into Heating (only) mode
- emergencyHeat() - for HVAC systems supporting auxiliary heat (usually heat-pump systems), turns on auxiliary heating
- emergency() - ditto emergencyHeat
- auxHeatOnly() - ditto emergencyHeat
- fanOff() - turns the fan completely off. If Fan Minimum On Time is non-zero, it will be reset to zero
- fanAuto() - sets the fan to operate "on-demand" whenever heating or cooling
- fanCirculate() - same as fanAuto, except the Fan Minimum On Time is non-zero
- fanOn() - runs the fan continuously
The following command entry points require multiple arguments, and so are most optimally utilized by SmartApps that can construct the required arguments, including WebCoRE (link-to-example-here). If you want to try using them, I suggest you review the DTH code directly to understand the required argument structure.
- setCoolingSetpoint - change the cooling setpoint (will create a Temperature Hold); specify temperature in F or C, based on how you have configured the Ecobee Suite and Thermostat (both should agree)
- setHeatingSetpoint - ditto, but for heating setpoint
- setThermostatProgram - use to change to custom Programs/Climates other than the ones defined above
- setFanMinOnTime - used to set a custom number of minutes for the Fan Minimum On Time circulation mode
- setVacationFanMinOnTime - ditto, but for a vacation
- setHumidifierMode - set humidification mode
- setHumiditySetpoint - set humidification target (cannot change if humidifierMode == 'auto')
- setDehumidifierMode - ditto for dehumidification
- setDehumiditySetpoint - ditto for dehumidification
- scheduleVacation - define a vacation programmatically
- deleteVacation - delete a previously defined vacation
- cancelVacation - cancel the currently active vacation (if any)
Version 1.8.00 introduced several new "Updated" attributes. These are thermostat date/time stamps of when the associated internal data structures where most recently updated, see [Ecobee API Objects Documentation](https://www.ecobee.com/home/developer/api/documentation/v1/objects/Thermostat.shtml for more information)
These are provided as a means of knowing when complex thermostat operations have completed the round trip from the calling application, to the Ecobee servers, and then into the data returned by the Ecobee API. They are currently used by several of the ES Helpers that update the complex program.climates data structure. Combined with the Reservations system to enable synchronization across applications that modify Climates.
For example, changing a Programs heating/cooling setpoints requires changes to internal data structures that are otherwise opaque - there is no event generated once the call is complete. Applications wishing to change these setpoints may choose to subscribe to changes to the thermostat's climatesUpdated attribute to confirm that the most recent changes have been reflected in the API.
ES Thermostat devices support the following ***Updated timestamps/events:
- alertsUpdated - Alerts and notifications from the thermostat
- audioUpdated - Audio settings (including Alexa settings for Alexa-supported devices)
- climatesUpdated - Climate/Program thermostat settings (sepoints, sensors, etc.)
- curClimRefUpdated - Current Climate Reference id (NOTE: this marks when the Id of the scheduled program changed, not necessarily the actual running program - see also eventsUpdated)
- equipUpdated - Equipment Status (fan, heat stages, cool stages, humidifier, etc.)
- extendRTUpdated - Extended Runtime Status (effective humidity/dehumidity setpoints when D-/humidifier is in Auto mode)
- eventsUpdated - Events Status reflect when Holds or Vacations override the currently scheduled Program
- programUpdated - Program Status reflects when any of curClimRefUpdated, climatesUpdated, or - scheduleUpdated change
- runtimeUpdated - Runtime Status reflects when things like temperature, humidity and such change
- scheduleUpdated - "Schedule" in this case refers to the actual schedule of programs for the thermostat.
NOTE: Currently Ecobee Suite does not provide a means to access, edit or change the actual schedules; this attribute is included in Version 1.8.00 to support future ES enhancements - sensorsUpdated - Sensors Status is updated whenever the temperature or humidity reading changes for any of the thermostat's Ecobee Sensors
- settingsUpdated - Settings Status shows when the last configuration change was made
- weatherUpdated - Weather Status is the last time the weather report data changed for this thermostat
In most cases, the use case will warrant using only the Thermostat's ***Updated attributes, so as to be aware of changes being made by any of the underlying ES Sensors. However, you may also watch ES Sensor attributes the following subset of ES Sensor ***Updated events:
- climatesUpdated
- curClimRefUpdated
- eventsUpdated
- programUpdated
- scheduleUpdated
See the source code for these Helpers to see how they use ***Updates and Reservations to protect against overwriting each other's updates (should the apps ever need to change these at the same time):
Version 1.6.00 introduced a new internal use only Reservations System to the Suite. While this may one day be opened to external SmartApps or WeBCoRE pistons, for now it is a closed system.
To satisfy your curiosity:
The design intent is to enable certain types of coordination between the various Helper SmartApps. For example, if the Smart Mode helper decides to turn off the HVAC system (setting the thermostatMode to 'off'), then we probably don't want the Switches & Contacts helper turning the HVAC back on.
To accomplish this, Smart Mode will create a 'modeOff' reservation with each configured thermostat, signifying that it has interest in keeping the HVAC system turned off. Should the Contacts & Switches Helper also decide that the HVAC system should be turned off, it too takes out a' 'modeOff' reservation.
Given multiple such 'modeOff' reservations, neither Helper will turn the HVAC back on until ALL of the reservations are removed.
Operationally, reservations work much like semaphores. A process wishing to turn off the HVAC should (in pseudo-code): 1. makeReservation(stat.Id, app.Id, 'modeOff') 2. stat.off()
And when it wants to turn the HVAC back on:
- if ((reservationCount - myReservation) == 0) // No reservations except my own
- stat.auto()
- cancelReservation(stat.id, app.id, 'modeOff')
This order is important, because the entire SmartThings world is asynchronous. You want to be sure to grab the reservation before you turn off the device, and then you want to wait until you have turned the device back on AFTER you turn it on.
[Note: the revised implementation of Reservations in v1.6.10 and later uses atomicState variables to hold the reservations, explicitly to minimize race conditions. That said, I'm sure that they can still occur.]
The Reservation System implements the following commands/entry points:
- void makeReservation(stat.id, child.id, type) Makes a new reservation of
typefor the calling SmartApp (childId). If the caller already has a reservation, a new one is not created, and no error is flagged. - void cancelReservation(stat.id, child.id, type) Cancels/deletes a reservation for the
client.Idof the specifiedtype. If no reservation exists of thistype`` forchild.id`, it is silently ignored. - Boolean haveReservation(stat.id, child.id, type) check to see if app.id holds a reservation
- Boolean anyReservations(stat.id, type) check to see if there are ANY reservations for
type - Integer countReservations((stat.id, type) Returns the number of current reservations of
type - List getReservations(stat.id, type) returns a list of the
child.ids(akaapp.Ids) - List getGuestList(stat.id, type) returns a list of the NAMES for each
Where:
stat.idis the Ecobee Thermostat ID number (getDeviceId(device.deviceNetworkId))child.Idis the SmartThings application ID (app.Id)typeis any arbitrary identity for the class/type of reservation. Used by the code so far aremodeOff,fanOff,circOff,vacaCircOff, andprogramChanged.
In cooperation with power companies in some countries (including the USA), Ecobee thermostats can be requested to perform energy-saving demandResponse actions by the power companies (usually only if you register/subscribe to the program, often with a cash incentive). This version of Ecobee Suite adds support for recognizing, reporting and displaying (on SmartThings Classic) these demandResponse activities.
These activities can take many forms, and so far I have only added support for the ones that I have experienced recently. First, there is a "pre-cool" request sent by the power company, usually to drop the coolingSetpoint (or increase the heatingSetpoint) between 3-5°F for 1.5 hours prior to sending the reduced power request. This latter demandRequest event will raise the current coolingSetpoint (or lower the heatingSetpoint by 4-5°F for a period of time (typ. 3-5 hours). These two events are reported slightly differently so that you can tell the difference:
-
Precool will be denoted as the attribute
currentProgramNamebeing set to "Hold: Eco Prep". On SmartThings Classic, the program icon will change to the green half-leaf icon that also appears on the thermostat itself; -
The
demandResponseevent itself will be denoted ascurrentProgramNamebeing simply "Hold: Eco"; the SmartThings Classic program icon will be the green flower icon that appears on the thermostat; -
In both cases, the following attributes are also updated to reflect the DR event:
-
currentProgramwill be set to "Eco" if the event is optional (i.e., you can cancel it), or as "Eco!" (with an exclamation point) if it is a mandatory event that cannot be overridden -
thermostatHoldwill be set to "demandResponse" -
holdEndsAtwill describe the time the hold will end, as in "today at 6:30pm" (time is local thermostat time) -
holdStatuswill describe the event as "Demand Response Event ends today at 6:30pm"
-
-
Additionally, a new command entry point has been created,
cancelDemandResponse(). This command will cancel the current event IFF it is not a mandatory DR event. The "Resume/Cancel" button on the SmartThings Classic thermostat device will also change to enable cancelling the DR event.
It is important to understand that DR events CAN be overridden by another user-generated hold, but the end time of such a hold will be forced by Ecobee to match the end-time of the DR event. DR events are also created on top of any current hold, and the existing hold will be returned to after the DR event completes, or if it is cancelled. Also, you can turn off the HVAC altogether while a DR event is running, but it will not be automatically turned back on when the event finishes.
Developers should note that if they call resumeProgram() instead of cancelDemandResponse(), both the DR event AND any prior-existing Hold will be cancelled, and the regularly scheduled program will run. Also, it is not possible for end-users to create their own DR events (but you can create a Hold or a program that does the equivalent).
Hopefully the above provides enough info for WebCoRE users and Groovy programmers can interact with these DR events. If not, let me know.
This feature was added at user request. One person asked to be able to automatically cancel such events if they are at home; another wanted to take other energy-savings actions during a DR event (which often are scheduled when power rates are at their daily highest).
Finally, note that this is my first implementation - their undoubtedly will arise situations that I don't handle properly. If you find one, please let me know so I can increase the robustness of the implementation.