![]()
![]()

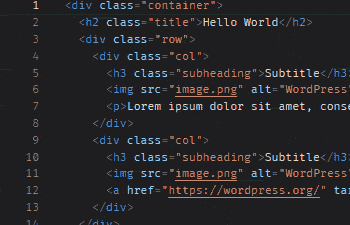
Custom HTML Block Extension extends Custom HTML block to evolve into the advanced code editor.
There are 50 different color themes to choose from, and you can select the one that best suits your taste.

Emmet allows you to type shortcuts that are then expanded into full pieces of code. Type less, saving both keystrokes.
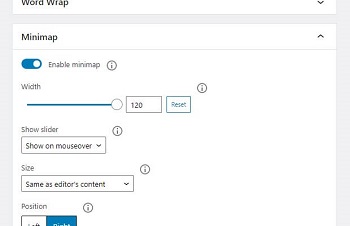
You can change all kinds of settings to create your ideal editor in advanced mode.
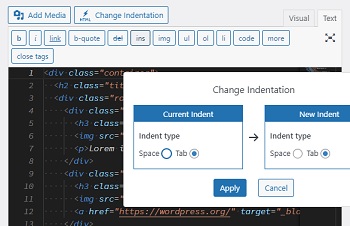
Supports the classic editor, the theme/plugin editor, import/export editor settings, and change indentation.
You can use your own favorite fonts in addition to the default fonts.
Place the font files in the public directory of the server where WordPress is installed.
It is recommended to create fonts folder directly under the theme and place the fonts there.
Like this:
html
└── wp-content
    └── themes
        └── twentytwentyone
            └── fonts
                ├── FantasqueSansMono-Bold.woff2
                ├── FantasqueSansMono-BoldItalic.woff2
                ├── FantasqueSansMono-Italic.woff2
                ├── FantasqueSansMono-Bold.woff2
└── FantasqueSansMono-Regular.woff2Create a CSS file in order to load the placed fonts.
It is recommend to place the CSS file in css folder directly under the theme, just as you did when you placed the font files.
Like this:
html
├── wp-content
│   └── themes
│       └── twentytwentyone
│           └── fonts
│               ├── FantasqueSansMono-Bold.woff2
│               ├── FantasqueSansMono-BoldItalic.woff2
│               ├── FantasqueSansMono-Italic.woff2
│               ├── FantasqueSansMono-Bold.woff2
│               └── FantasqueSansMono-Regular.woff2
└── css
└── cheb-fonts.cssDefine the fonts using @font-face in the CSS file you placed.
In the url of the src property, enter the relative path to the font you placed in STEP 1.
Like this:
@font-face {
	font-family: "Fantasque Sans Mono";
	src: url(../fonts/FantasqueSansMono-Regular.woff2) format("woff2");
	font-weight: 300;
}
@font-face {
	font-family: "Fantasque Sans Mono";
	src: url(../fonts/FantasqueSansMono-Regular.woff2) format("woff2");
	font-weight: 700;
}
@font-face {
	font-family: "Fantasque Sans Mono Italic";
	src: url(../fonts/FantasqueSansMono-Italic.woff2) format("woff2");
	font-weight: 300;
}
@font-face {
	font-family: "Fantasque Sans Mono Italic";
	src: url(../fonts/FantasqueSansMono-BoldItalic.woff2) format("woff2");
	font-weight: 700;
}
Note: This plugin does not support font-style: italic . So name the font-family as a dedicated italic font if you want to use the italic fonts. You do not need to specify font-style: italic instead.
Use chbe_additional_font_families filter hook to define a custom font to load.
Fonts are defined individually in each array.
Put the following in functions.php of your active theme.
function my_chbe_additional_font_families( $font_families ) {
	$font_families = array(
		// Normal Font
		array(
			'label'      => 'Fantasque Sans Mono',
			'name'       => 'Fantasque Sans Mono',
			'stylesheet' => get_template_directory_uri() . '/css/chbe-fonts.css',
			'weight'     => array( 300, 700 ),
		),
		// Italic Font
		array(
			'label'      => 'Fantasque Sans Mono (Italic)',
			'name'       => 'Fantasque Sans Mono Italic',
			'stylesheet' => get_template_directory_uri() . '/css/chbe-fonts.css',
			'weight'     => array( 300, 700 ),
		),
	);
	return $font_families;
}
add_filter( 'chbe_additional_font_families', 'my_chbe_additional_font_families' );| Name | Type | Description |
|---|---|---|
| label | string | The label that appears in the font family pull-down in the plugin settings screen. |
| name | string | Enter the value of the font-family property that you defined in the CSS file in STEP3. |
| stylesheet | string | Describe the URL of the CSS file you placed in STEP2. We recommend using get_template_directory_uri function if you've placed the CSS file in the theme folder, |
| weight | array | Write font weight variations according to the fonts defined in the CSS file. It is recommended to use numeric values 100 to 900 instead of weight names. |
Make sure that the custom font is displayed in the font family pull-down of the settings page. And the font is applied to the preview area when you select it.
npm install
npm run build- License: MIT License
- Source: https://github.com/microsoft/monaco-editor
- License: MIT License
- Source: https://github.com/teodosii/react-notifications-component
- License: MIT License
- Source: https://github.com/troy351/emmet-monaco-es
- License: MIT License
- Source: https://github.com/brijeshb42/monaco-themes
- License: Apache-2.0 License
- Source: https://github.com/typekit/webfontloader
- License: OFL-1.1 License
- Source: https://github.com/tonsky/FiraCode
- License: OFL-1.1 License
- Source: https://github.com/adobe-fonts/source-code-pro
- License: OFL-1.1 License
- Source: https://ubuntu.com/legal/font-licence
- License: OFL License
- Source: https://www.marksimonson.com/fonts/view/anonymous-pro