This is the OPERANDI project's repository. The Readme file is still a draft and under construction. The file may be slightly outdated. Will be updated after integrating the OCR-D WebApi.
OPERANDI is one of the implementation projects funded by the DFG initiative OCR-D. The main goal of OCR-D is the conceptual and technical preparation of the full-text transformation of the 16th to 18th-century prints published in the German language area. The task of automatic full-text recognition is broken down into individual process steps, which can be reproduced in the open-source OCR-D software. This makes it possible to create optimal workflows for the prints to be processed, and thus generate scientifically usable full texts.
The goal of OPERANDI is to develop and build an OCR-D-based implementation package for mass full-text capture with improved throughput while improving the quality of the results. At the same time, the goal is that the implementation package can also be used by other projects and institutions with comparable requirements. Two scenarios were identified during the pilot. In the first scenario, OCR generation is to take place for works that have already been digitized, resulting in mass full-text capture. In the second scenario, OCR generation for new works to be digitized will take place as part of the digitization process.
Different resources such as workspaces, workflows, and workflow jobs are stored in the database under
unique resource IDs: workspace_id, workflow_id,
and workflow_job_id, respectively. That ID is used for faster accessing/searching for the resources and their
metadata. The resource ID is also useful as a persistent identifier since the path of the resource itself may change
over time.
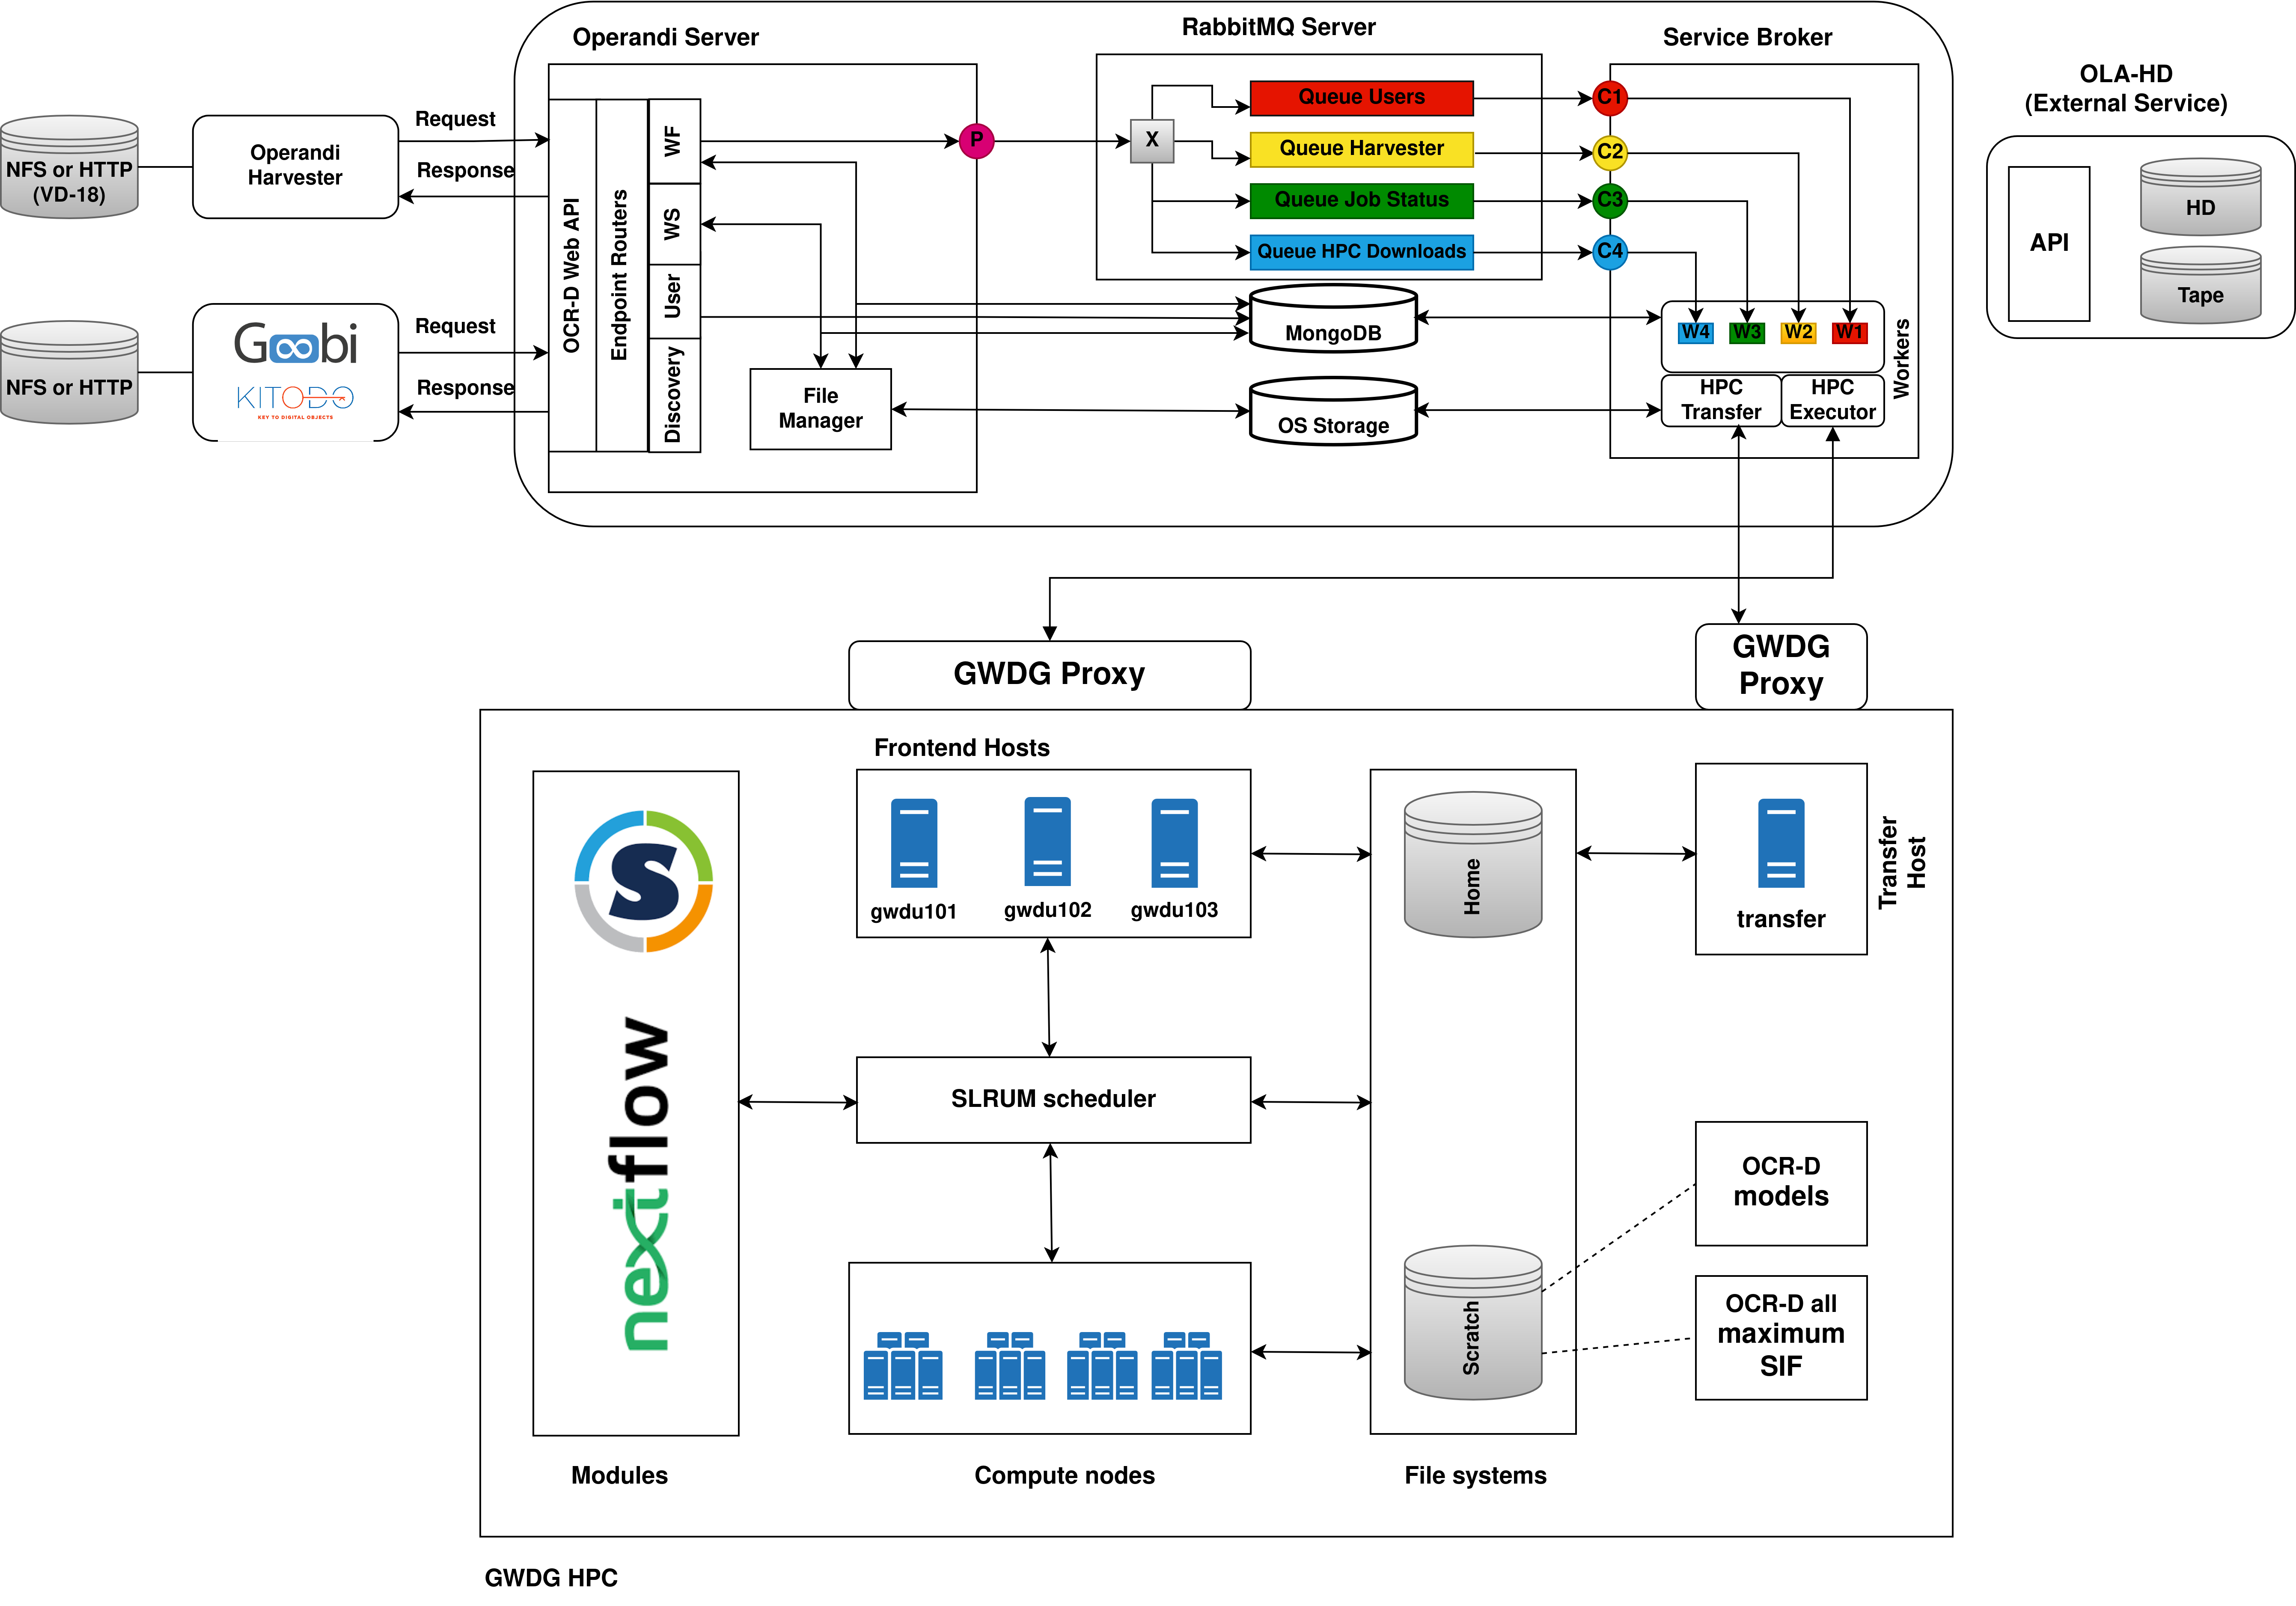
The message exchange broker (server) between Operandi Server and Operandi Broker. The Operandi Server is the
publisher and the workers of the Operandi Broker are the consumers. Depending on the coming request to the Operandi
Server, the server forwards the requests to one of the 3 queues. On the other side, the Operandi Broker creates workers
to consume messages from the queues to process them. Currently, there are 3 message queues available:
- for user workflow job requests (currently, there is no prioritization among users based on their type)
- for harvester workflow job requests
- for job status checks
Provides various endpoints that can be used to obtain information about different resources.
Using the endpoints the users can create, delete, get, or update resources.
The provided endpoints are respecting the proposed
OCR-D Web API endpoints.
The processing endpoint is not utilized since Operandi concentrates mainly on running entire OCR-D workflows instead
of single steps. However, the user could still create a workflow that has a single OCR-D processor step and execute it.
Resource types
Users- used to store user related metadata. The unique identifier is the e-mail address of each user.Workspaces- each workspace must contain a METS file, has at least 1 file group, and some images belonging to that file group. The input/output type of workspaces when interacting with the server is in the OCRD-ZIP format used by our OCR-D community.Workflows- each workflow is a Nextflow script. The input/output type of the workflows when interacting with the server is the Nextflow scripting language.Workflow Jobs- a combination of aWorkspaceand aWorkflowresource. The specified Workflow resource is executed on the specified Workspace resource. Each workflow job resource contains metadata about the execution of the workflow such as logs of each step and reports with resource (CPU, RAM, etc.) usage. Each workflow job status can be queried to get the job's current state.
Endpoint interactions
The Operandi Server is responsible for accepting requests related to users, workspaces, workflows, and
workflow job resources. In case of a workflow job request, the server pushes the request to one of the RabbitMQ
queues for further delegation to the HPC environment.
A user (i.e., client) would usually send requests in the following order:
- The user registers using the endpoint and contacts the Operandi team to get their account verified and approved. Once the account is approved, the user can access and use all other Operandi endpoints.
- The user uploads a workspace of images in the OCRD-ZIP and receives a
unique
workspace_idas a response. - The user uploads a Nextflow script and receives a unique
workflow_idas a response. - The user starts a workflow job by specifying which workflow (i.e.,
workflow_id) should be executed on which workspace (i.e.,workspace_id). The user should also mention which file group of images should be used as an entry point to the workflow. The default file group isDEFAULT. The response is a uniqueworkflow_job_id. - The user polls the workflow job status using the
workflow_job_id(till it fails or succeeds). - The user downloads the workspace results as an OCRD-ZIP using the
workspace_id. - The user downloads the workflow job execution metadata as a zip using the
workflow_job_id.
The mediator between the Operandi Server and the HPC environment. The Operandi Broker is
responsible for the creation and management of workers. A separate worker is created for each of the RabbitMQ queues.
Then each worker configures a connection and starts listening for messages coming from their respective queue.
There are 2 types of workers.
Type 1
Workers for creating a slurm workspaces, transferring the workspace to the HPC environment, and triggering a slurm
job on the transferred slurm workspace. (W1 and W2 on the architecture diagram). When a Type 1 worker consumes
a message from the queue the following happens:
- A slurm workspace zip containing a batch script, an ocrd workspace, and a Nextflow workflow is created.
The workspace and workflow are identified again based on their
workspace_idandworkflow_id, respectively. The batch script contains instructions to be submitted to the HPC slurm scheduler. Some of #SBATCH directives are dynamically passed by the worker. - The slurm workspace is transferred to the HPC environment
- A slurm job is started inside the HPC environment with the batch script.
- The worker is not blocking till the workflow job finishes execution.
Type 2
Workers for checking slurm job statuses in the HPC environment and transferring the results back from the HPC
environment. (W3 on the architecture diagram). When a Type 2 worker consumes a message from the queue the
following happens:
- Checks the slurm job state of the workflow job (these two are different things)
- If there is a state change, changes the state of the workflow job in the database
- If the state is
successpulls the results from the HPC.
The introduction of Type 2 worker was required to avoid the blocking of the Type 1 worker till a slurm job finishes. Simple approach with a timeout for the Type 1 worker was not reliable enough since a slurm job duration may take up to 48 hours and still be successful.
The harvesting module which automatizes the data processing in the following order:
- Uploads a workspace (either mets URL or ocrd workspace zip) - receives a
workspace_id - uploading a workflow (Nextflow script) - receives a
workflow_id. Of course, this step can be skipped if the workflow to be used is already available on the Operandi Server and can be referenced with someworkflow_id - starting a workflow job - receives a
workflow_job_id - polling the workflow job status by using the
workflow_job_id - downloading the workspace output results (ocrd-zip) using the
workspace_id - downloading the workflow job output results (zip) using the
workflow_job_id
File systems - there are different file systems available in the GWDG HPC (check
here),
but Operandi uses only two: home and scratch1. Currently, the home directory is not utilized and is planned to be
used for backing up failed executions that require manual investigation.
Uploading to HPC
- to the user
homedirectory first and then moved to thescratch1file system. This step is needed when the transfer happens through the globally accessible transfer host of GWDG. - to the
scratch1. This is the more efficient approach since that file system has higher transfer rates and no additional transfer happens through the userhomedirectory. However, the transfer host for thescratch1file system is only accessible from GÖNET, i.e., an additional proxy jump is required to connect to the GÖNET first.
Uploading with SCP:
scp -rp LOCAL_FILE_PATH USER@transfer.gwdg.de:HPC_FILE_PATHUploading with RSYNC:
rsync -avvH LOCAL_FILE_PATH USER@transfer-scc.gwdg.de:HPC_FILE_PATHDownloading from HPC
- from the user
home- again just through the globally accessible transfer host. - From the
scratch1- an additional proxy jump through GÖNET is required.
Downloading with SCP:
scp -rp USER@transfer.gwdg.de:HPC_FILE_PATH LOCAL_FILE_PATHDownloading with RSYNC:
rsync -avvH USER@transfer-scc.gwdg.de:HPC_FILE_PATH LOCAL_FILE_PATH The transfer in Operandi happens directly to and from the scratch1 file system. For that purpose, a proxy jump
through login.gwdg.de is utilized. The authentication used on the proxy happens with the same key pair used for the
HPC cluster. So, no additional key pair is required. In order to boost the transfer rates further, all files that
belong to a single slurm workspace are uploaded and downloaded as a single zip file.
- Docker Engine - check the official documentation here.
2. GWDG account and HPC access
In order to use the HPC environment, a GWDG account with GWDG HPC access is required. That account will be used as an Operandi admin account inside the HPC environment when you deploy your own instance. The admin user account is important because all data that is processed inside the HPC are either stored under the home directory or the scratch directory linked to that specific admin account.
Follow these steps:
3. Convert OCR-D all maximum software
This is the ocr-d all docker image of the OCR-D processors. Since running docker containers is not allowed inside the
HPC due to security concerns, a singularity container wrapper is required. To do so, the ocrd_all:maximum docker image
shall be first converted to a Singularity Image Format (SIF). Fortunately, there is already a ready to use batch script
inside the Operandi repository - check
here.
Follow the steps:
- Connect to the HPC
- Copy the script to your home directory (in HPC)
- Execute it with SLURM -
sbatch /path/to/the/script. That will return a slurm job id and trigger a SLURM job which converts the docker image to SIF. - The job status can then be queried with
sacct -j slurm_job_id(replace with the correct id). - Wait till the job finishes. The job duration varies in the range of 30-60 minutes.
As a result, a SIF file will be created. The full path will be: /scratch1/users/${USER}/ocrd_all_maximum_image.sif,
where ${USER} is the admin account created in the previous step.
4. Download OCR-D processor models
Some OCR-D processors require trained models - check here for more details. To make sure that each processor inside a Nextflow workflow description is fully functional, all models should be already available.
Again, there is a ready to use batch script that does that - check here. As in the previous step execute the batch script and wait for the slurm job to finish.
As a result, all models will be downloaded and available in path: /scratch1/users/${USER}/ocrd_models,
where ${USER} is the admin account.
1. RabbitMQ definitions file
Used to configure users, virtual hosts, message queues, and more. It is suggested to create a single admin account to
be used for authentication purposes. Check an example definitions file for Operandi
here. That definition creates a user
account operandi_user with password operandi_password, creates two virtual hosts / (default/root) and test.
Sets permissions for operandi_user to access both virtual hosts. It also creates several queues per virtual host.
The exchanges and bindings are left empty because they are defined programmatically, check
here. For more details regarding
the definitions check the official RabbitMQ documentation here.
Warning: Do not use the already exposed credentials for your production environment. Make sure to create your own definitions file and set the correct path as an environment variable (coming next).
2. Environment variables
The Operandi repository contains several environment files (.env, docker.env, tests/.env) that can be used after modifying the relevant fields.
For a working environment simply replace the variables below:
OPERANDI_HPC_USERNAME=GWDG_USER
OPERANDI_HPC_SSH_KEYPATH=PATH_TO_HPC_SSH_KEY
The HPC username is your GWDG account and the ssh key is the key produced in the Prerequisites section above.
Warning: For the production environment make sure to properly configure all environment variables related to the credentials!
After adapting the docker.env file, simply run:
docker compose -f ./docker-compose_image_based.yml --env-file docker.env up -dThere are 2 identical docker compose files. The one used in the command above downloads the prebuilt remote docker
images of the Operandi Server and Operandi Broker. The other one, docker-compose.ymp, builds docker images from the
source code.
Check if modules are running:
By default, the MongoDB is listening on port 27018 and the RabbitMQ server is listening on ports 5672, 15672, and 25672. The Operandi Server is listening on port 80. Check by either:
docker psCONTAINER ID IMAGE COMMAND CREATED STATUS PORTS NAMES
694fa8b9961d ghcr.io/subugoe/operandi-server:main "operandi-server sta…" 15 seconds ago Up 11 seconds 0.0.0.0:80->8000/tcp, :::80->8000/tcp operandi-server
73159ad43f96 ghcr.io/subugoe/operandi-broker:main "operandi-broker sta…" 15 seconds ago Up 11 seconds operandi-broker
8fe666ecd451 rabbitmq:3.12-management "docker-entrypoint.s…" 15 seconds ago Up 14 seconds (healthy) 4369/tcp, 5671/tcp, 0.0.0.0:5672->5672/tcp, :::5672->5672/tcp, 15671/tcp, 0.0.0.0:15672->15672/tcp, :::15672->15672/tcp, 15691-15692/tcp, 0.0.0.0:25672->25672/tcp, :::25672->25672/tcp operandi-rabbitmq
2bcdae9b19b9 mongo "docker-entrypoint.s…" 15 seconds ago Up 14 seconds (healthy) 0.0.0.0:27017->27017/tcp, :::27017->27017/tcp operandi-mongodb
or
sudo lsof -i -P -n | grep LISTENdocker-pr 19979 root 4u IPv4 203595 0t0 TCP *:27017 (LISTEN)
docker-pr 19986 root 4u IPv6 199569 0t0 TCP *:27017 (LISTEN)
docker-pr 19999 root 4u IPv4 210212 0t0 TCP *:25672 (LISTEN)
docker-pr 20005 root 4u IPv6 214698 0t0 TCP *:25672 (LISTEN)
docker-pr 20017 root 4u IPv4 206766 0t0 TCP *:15672 (LISTEN)
docker-pr 20023 root 4u IPv6 216148 0t0 TCP *:15672 (LISTEN)
docker-pr 20036 root 4u IPv4 202653 0t0 TCP *:5672 (LISTEN)
docker-pr 20042 root 4u IPv6 210254 0t0 TCP *:5672 (LISTEN)
docker-pr 20582 root 4u IPv4 220165 0t0 TCP *:80 (LISTEN)
docker-pr 20589 root 4u IPv6 219177 0t0 TCP *:80 (LISTEN)
If either the Operandi Server or Operandi Broker fails to run, you may want to try running them locally.
Install Operandi from source
- Install dependencies:
sudo apt-get update &&
sudo apt-get install -y make &&
sudo make deps-ubuntu
- Create a virtual Python environment and activate it:
python3 -m venv $HOME/venv-operandi &&
source $HOME/venv-operandi/bin/activate
- Install Operandi modules
make install-dev
Deploy modules
- Stop and remove previously deployed docker modules:
docker compose -f ./docker-compose_image_based.yml --env-file docker.env down --remove-orphans
- Start MongoDB:
docker compose -f ./docker-compose.yml --env-file .env up -d operandi-mongodb
- Start RabbitMQ Server
docker compose -f ./docker-compose.yml --env-file .env up -d operandi-rabbitmq
- Start Operandi Server
make start-server-native
- Start Operandi Broker
make start-broker-native
Pay attention that in the docker calls above the .env file is used. Since the server and broker are not deployed with
docker compose they are not part of the network created by the docker compose. Thus, the address of the MongoDB and
RabbitMQ is just the localhost and not the docker network.
Check the interactive API documentation of the Operandi server once there is a running server instance (http://localhost/docs). Operandi implements the Web API from OCR-D and extends it.
This section provides solutions for potential problems that may arise.
1. Authentication errors using SSH .
A potential reason for that error could be that your private key was not added to the SSH Agent.
Solution:
eval `ssh-agent -s` &&
ssh-add /path/to/your_key
The first command activates the SSH Agent (in case it is not active).
The second command adds the private key to the SSH Agent. The given path for the private key is the path inside the development VM. Make sure to provide the correct path for your local installation.
The submit_workflow_job.sh is submitted to the SLURM scheduler through the front-end node of the HPC by the worker of
the Service Broker module. The SLURM scheduler then starts the workflow job, i.e., the submitted Nextflow script with
the number of resources and conditions specified in the request. The user/harvester currently can specify only the CPUs
and RAM to be used with each workflow.
The SLURM executor of Nextflow then manages the allocation of separate jobs for each Nextflow process by talking to the SLURM scheduler of HPC and requesting resources specified inside the Nextflow workflow file. The upper limit for a resource is the resource allocated when executing the Nextflow script.
Using the GPU resource is possible when running the job inside the GPU partition (according to the
GWDG documentation, this may be different for other HPC environments). So inside the batch script, the partition
parameter should be replaced and the GPU unit specified with format name:cores:
#SBATCH --partition gpu
#SBATCH -G gtx1080:6
or just allocating 6 cores of any available GPU: #SBATCH -G 6.
Overall, it is very hard to estimate the required computational resources for each OCR-D processor step in the Nextflow workflow for efficient computations. To provide more flexible configurations, it is required to either produce the batch scripts dynamically or pass arguments to the batch scripts dynamically. Operandi implements the second option. There is already a base scratch script which receives some arguments when executed.
The errorStrategy and maxErrors directives inside the process block could help with the dynamic allocation of
resources when a process fails due to lack of enough resources (i.e. memory). Consider the simple example below:
process binarization {
  memory { 2.GB * task.attempt }
  errorStrategy { task.exitStatus in 137..140 ? 'retry' : 'terminate' }
  maxRetries 3

  script:
  """
  call the ocr-d processor here
  """
}