![]()


ESPGeiger is an open-source project that makes it easy to create your own IOT connected Geiger counter, to monitor radiation levels in your environment. It can collect, calculate, and report radiation levels from a range of Geiger counters with pulse and serial outputs. ESPGeiger supports the GC10/GC10next and MightyOhm counters, with additional support possible. The firmware is written to be installed onto the common esp8266 and esp32 boards.
- 😃 Easy to install and configure - contribute to monitoring!
- ✅ Compatible with all generic Geiger counters with Pulse output and a range of serial based - GC10, GC10next, MightyOhm
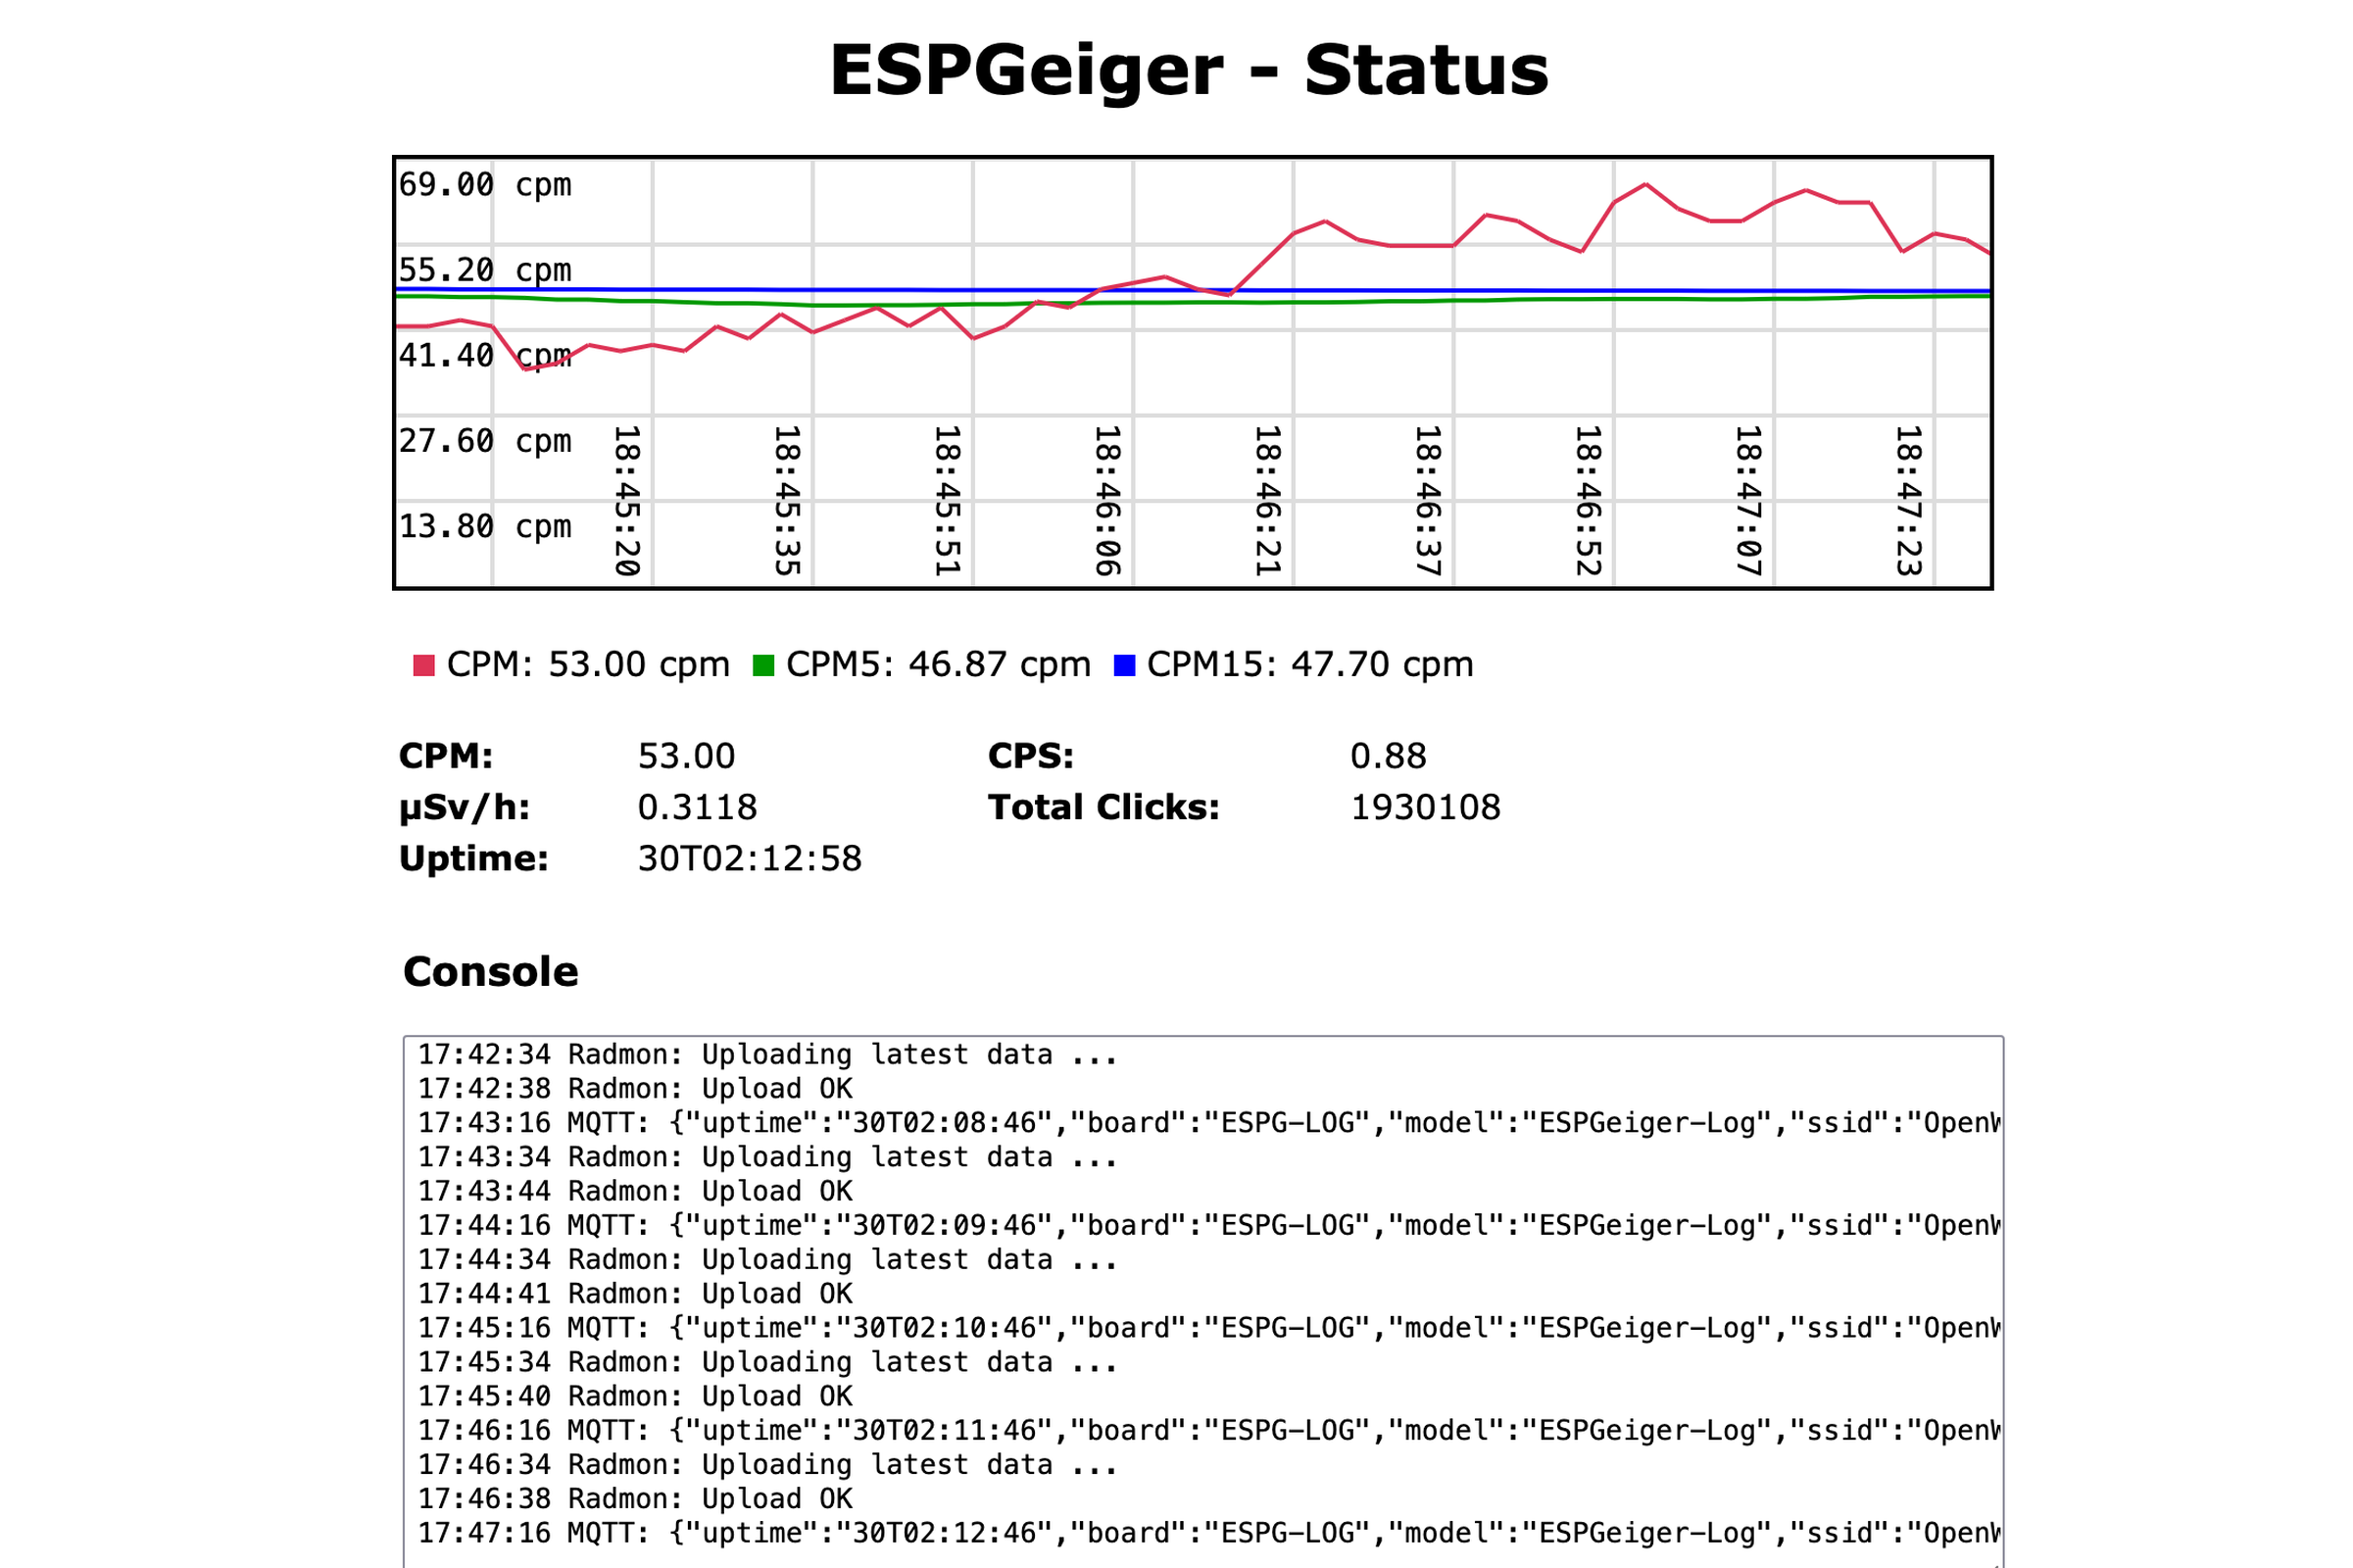
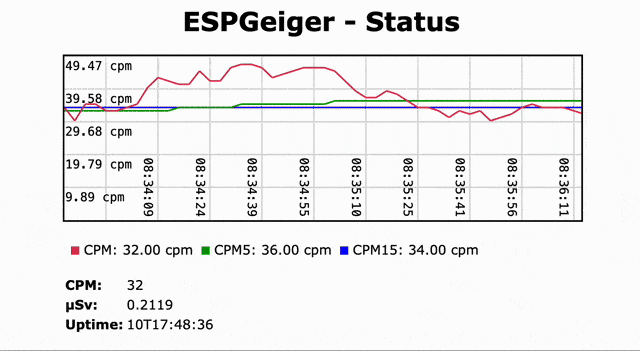
- 📈 Built in webserver with graphing
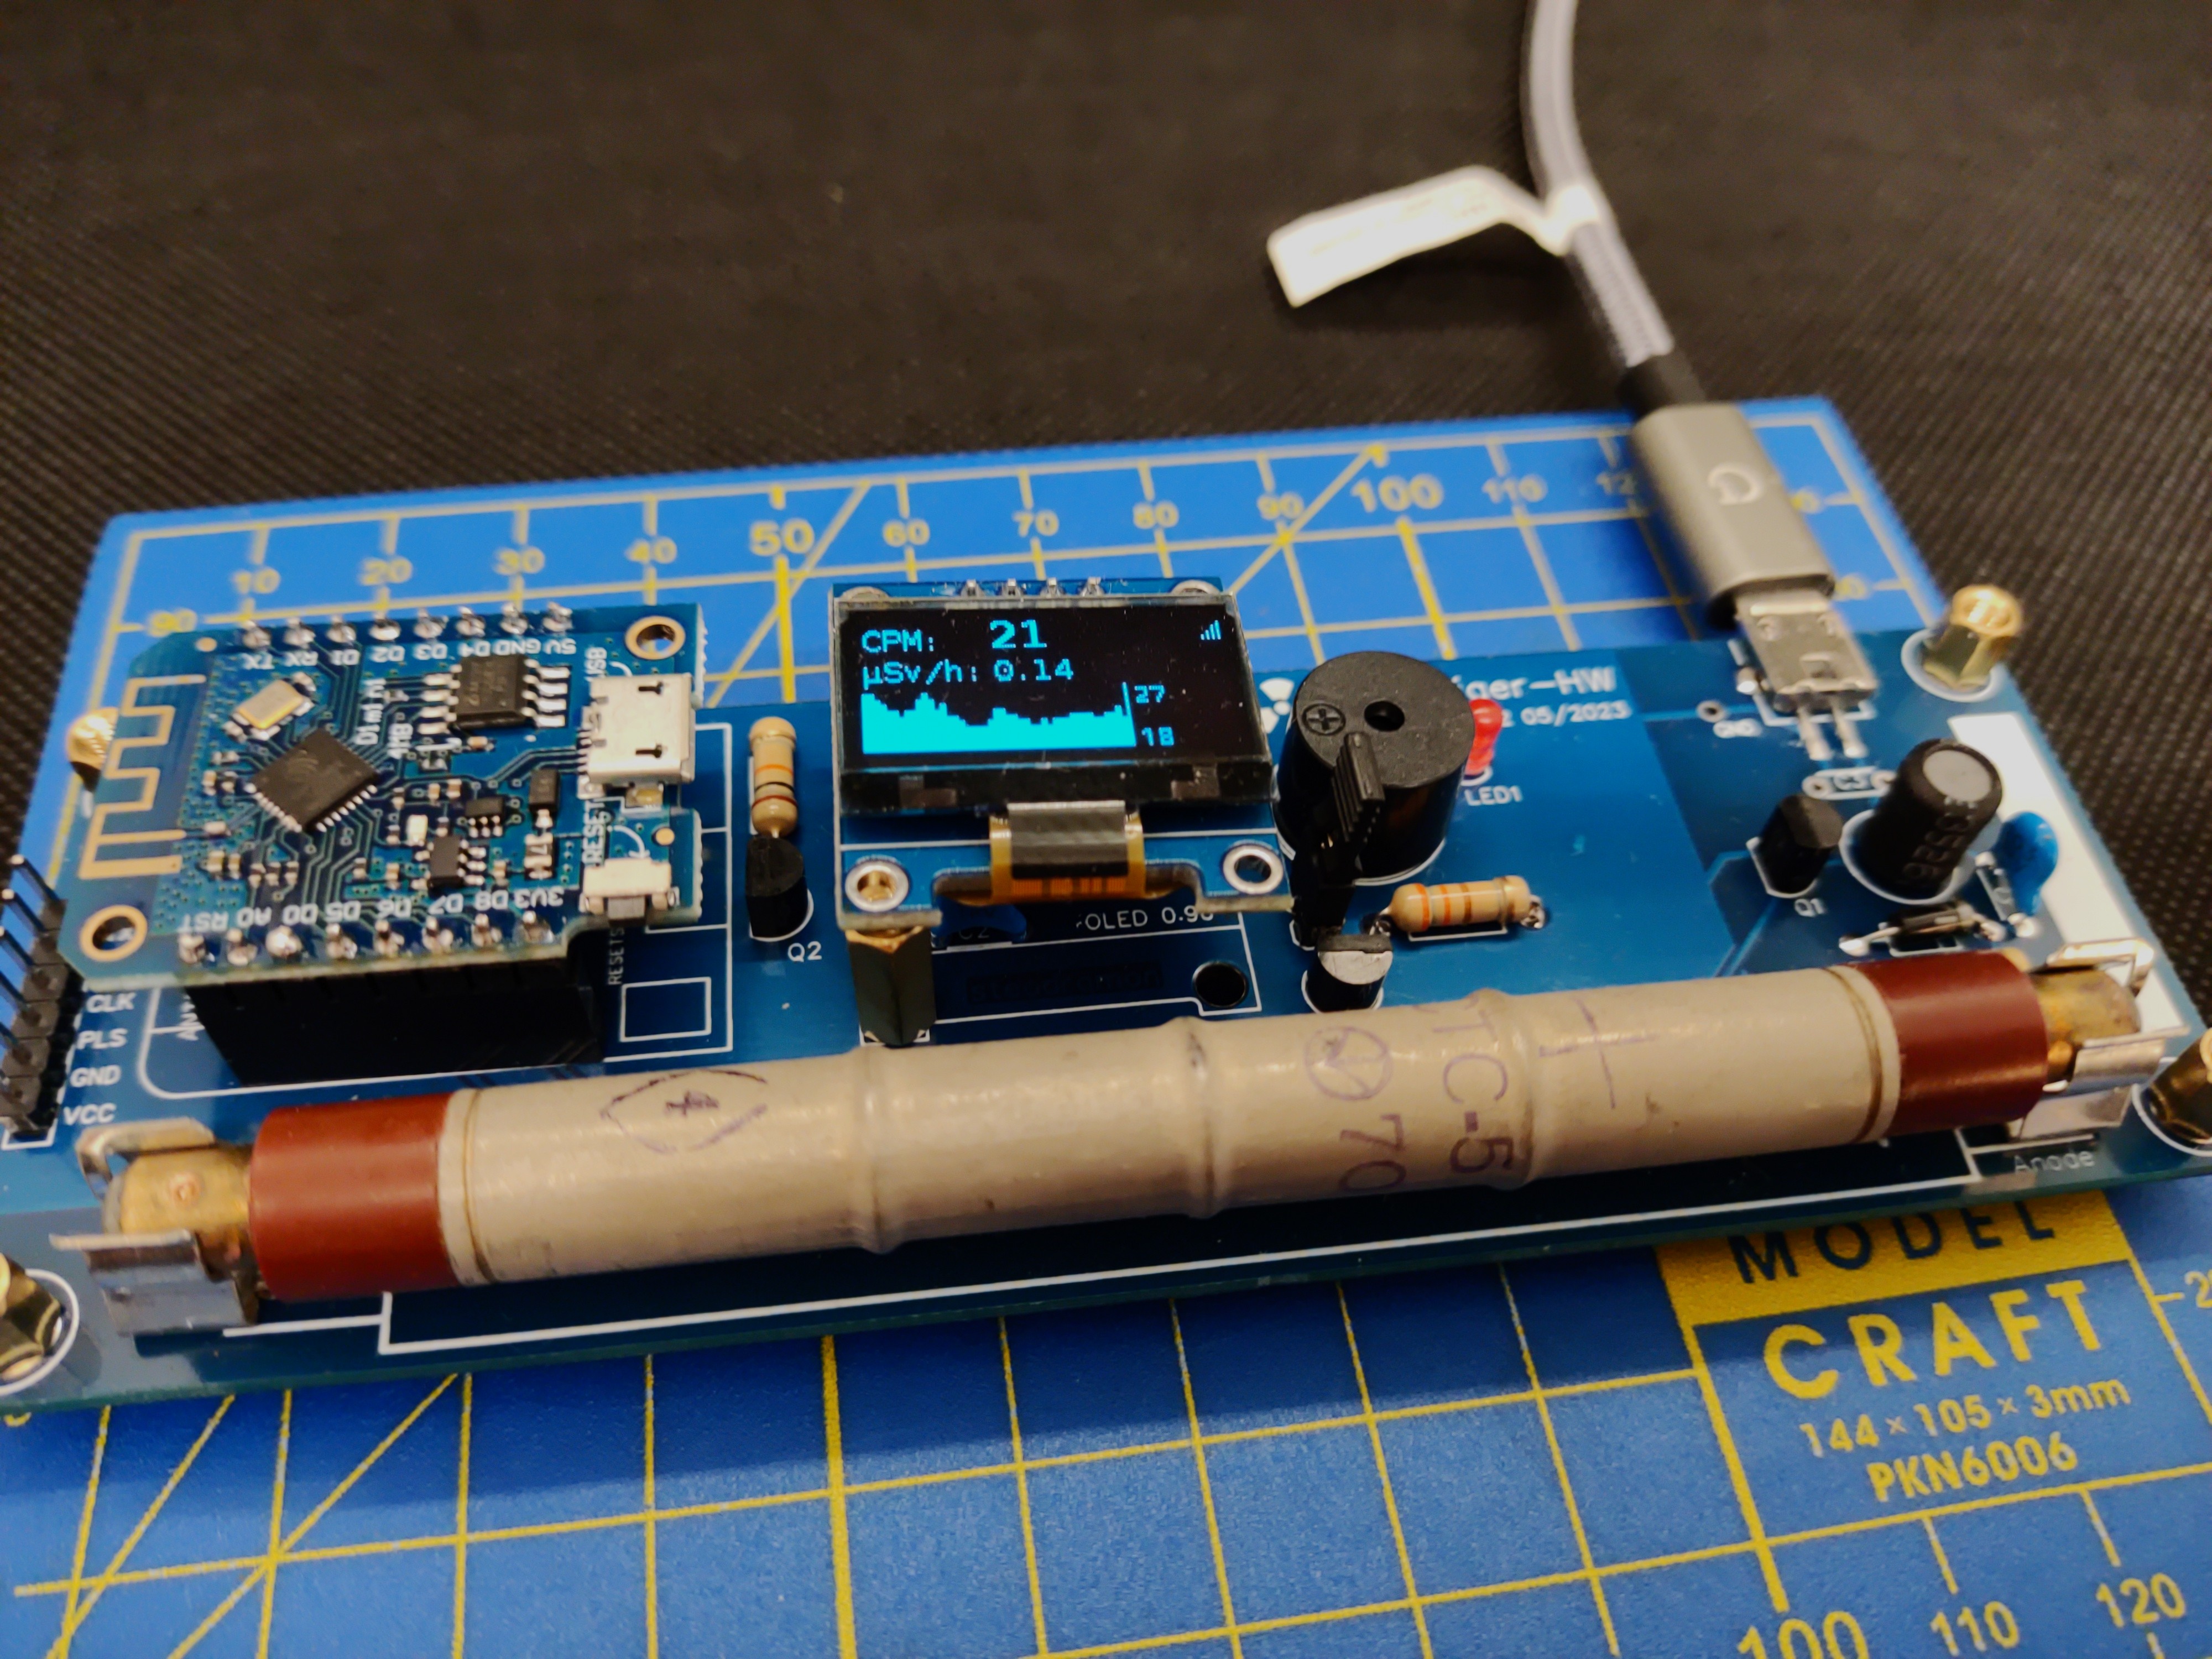
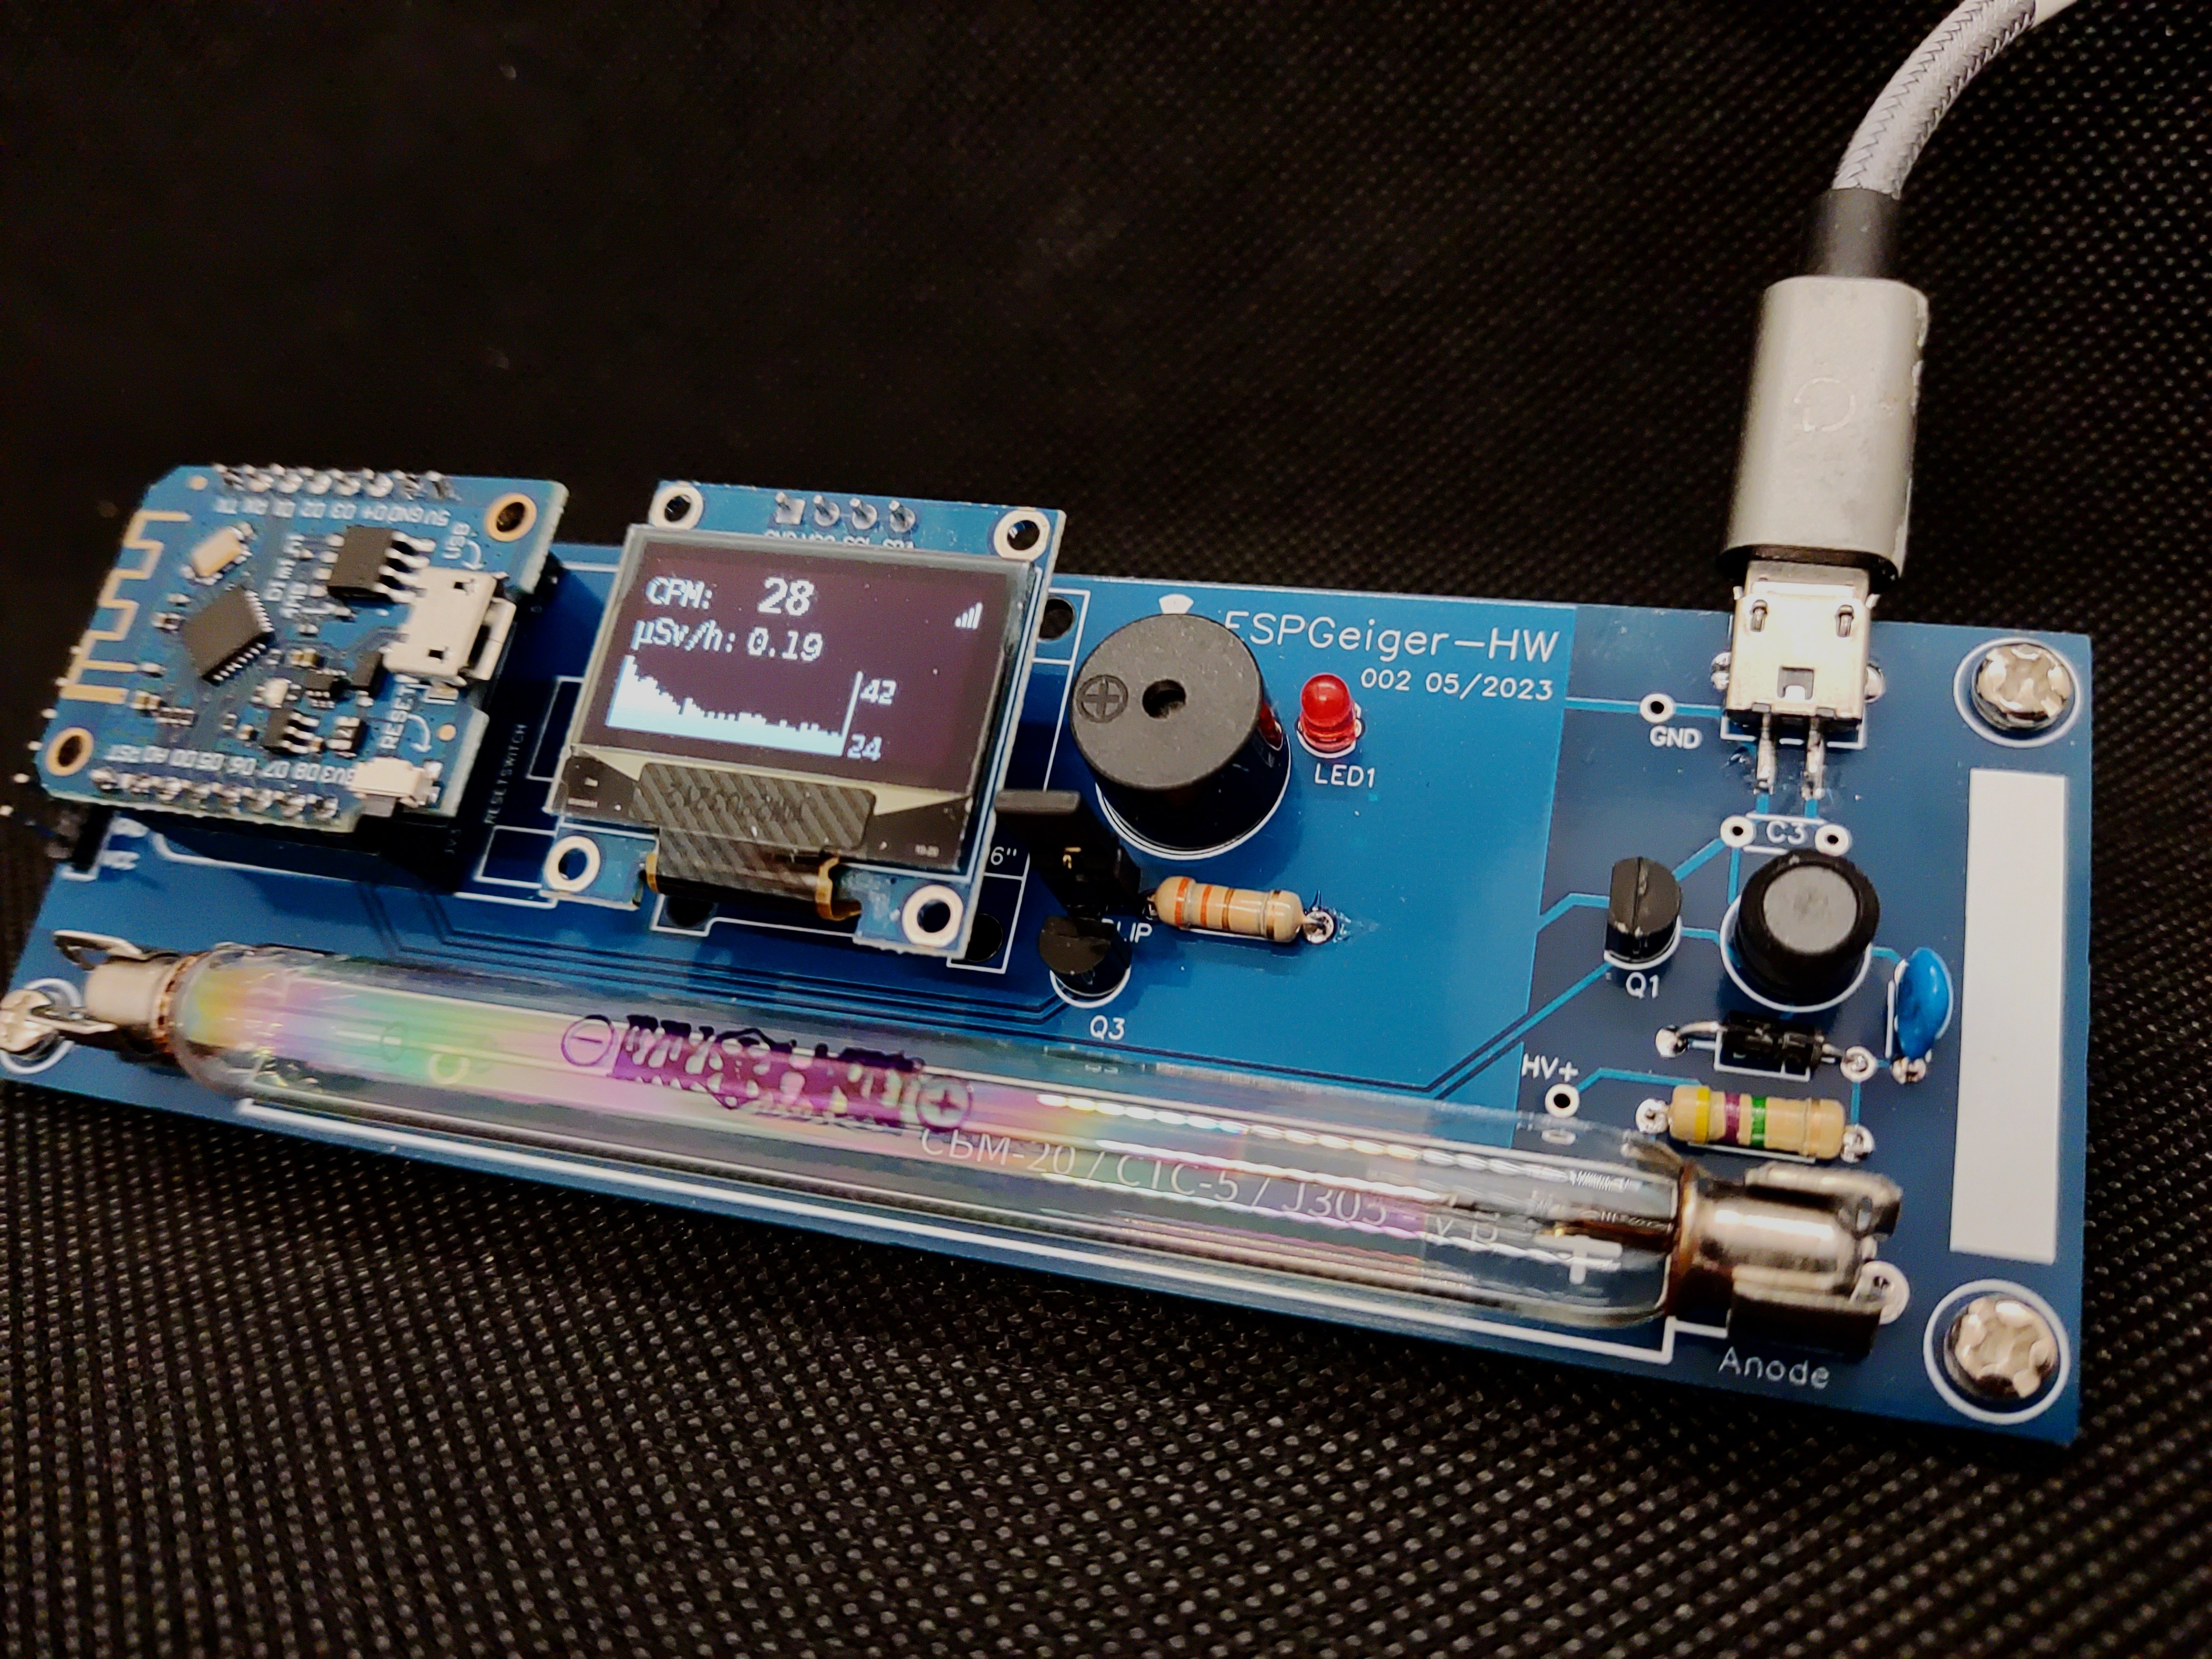
- 🖥️ SSD1306 Display support
- 🔴 Live CPM and μSv/h readings
- 🔢 Smoothed and averaged values over 1, 5 and 15 minutes
- 🎛️ Configurable filtering/debounce and noise control
- 📟 Accurate counting via interrupt and non-blocking functions (accuracy tested up to 100k CPM), with optional hardware counter (ESP32 only - PCNT)
- ⏲️ No dead time due to waiting for 3rd party services
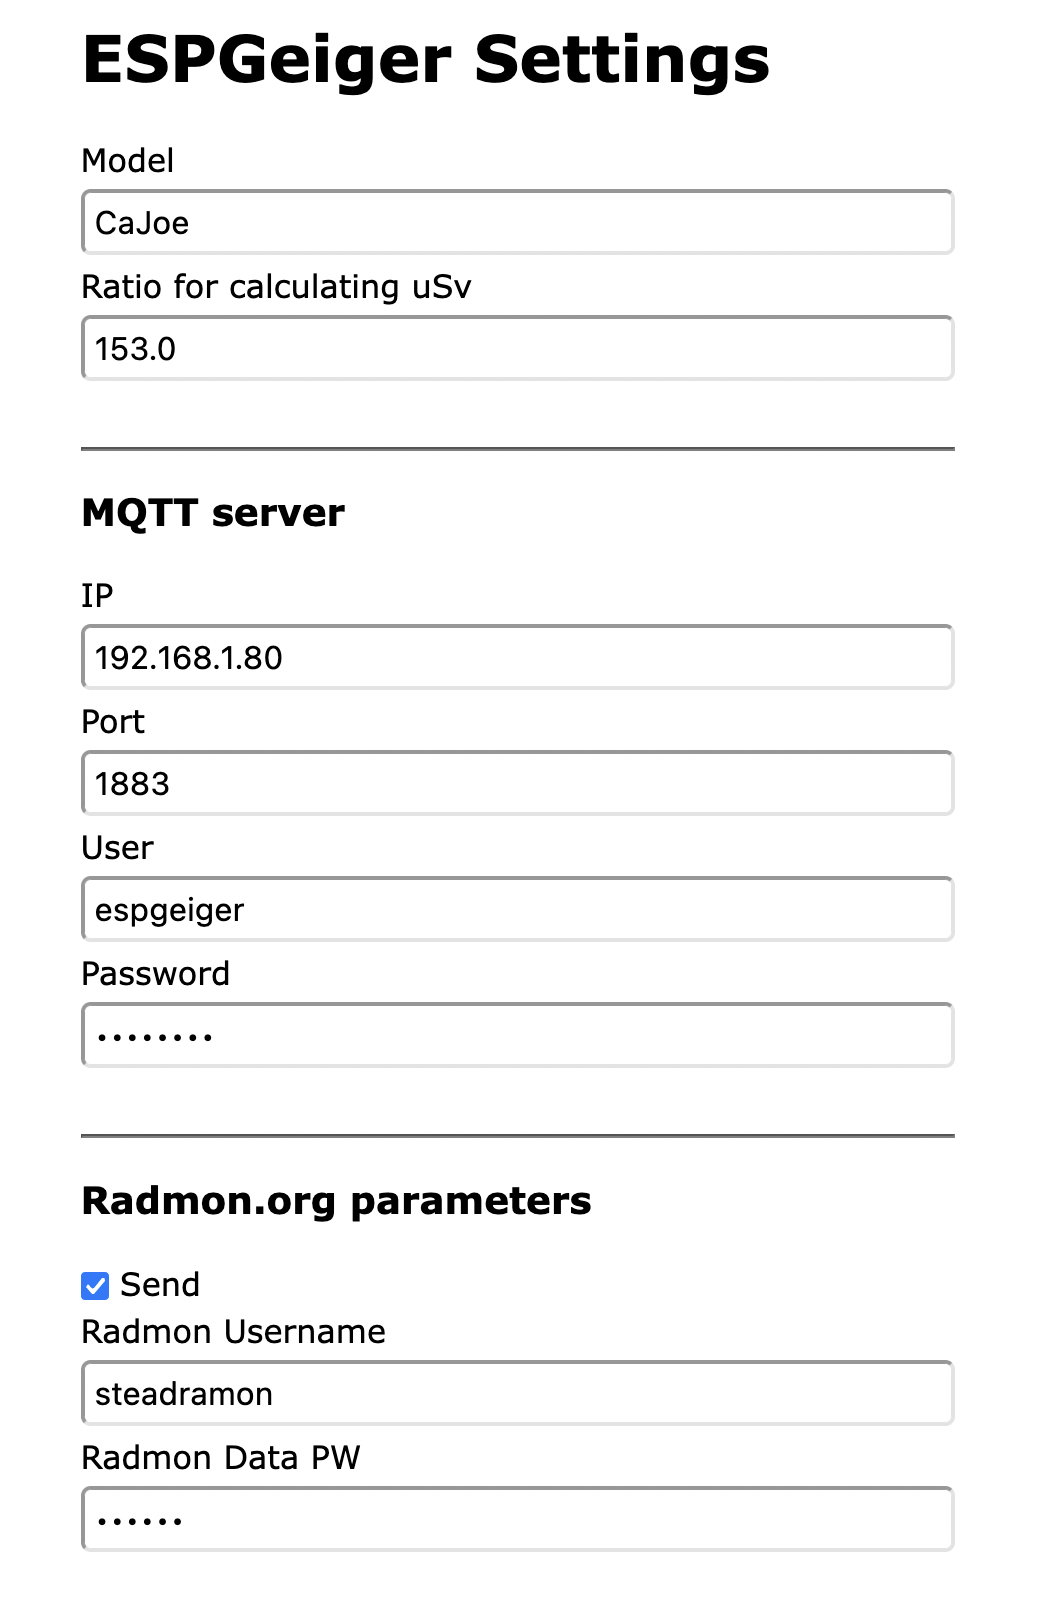
- 🌐 Upload and share statistics to services online and locally via MQTT and Home Assistant automatic discovery
- 💾 Save your data locally to a Fat16/32 SDCard over SPI
- 💡 Colourful and intuitive feedback using a WS2812X NeoPixel
- 🚧 Test builds for emulating pulse and serial based counters
Please visit (https://docs.espgeiger.com/) for the latest documentation.
Note: Documentation is currently being populated
On your Chrome or Edge browser, visit our web installer here: https://install.espgeiger.com/
Select an image - the images are in the format <esp_device>_<geiger_device>
There are builds for both ESP32 and ESP8266 boards, both with builds for:
- Generic Pulse Counters (
pulse) - GC10 (
gc10) - GC10next (
gc10next) - MightyOhm (
mightyohm)
For example, if you have an esp8266 and a generic pulse counter, use esp8266_pulse-firmware.v0.1.2.bin - an ESP32 with a GC10 - esp32_gc10-firmware.v0.1.2.bin
All build files have an OLED option if you are using a SSD1306 OLED display.
There are additional builds with special features:
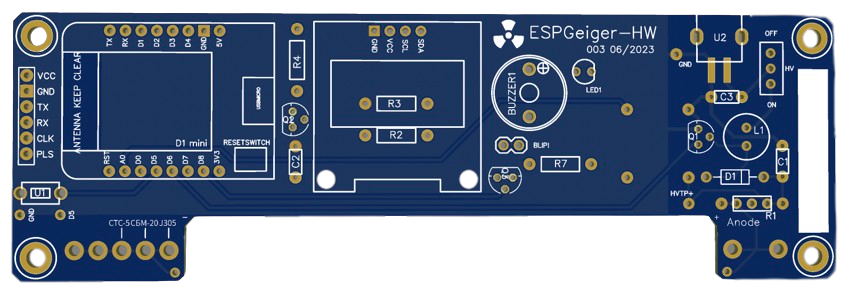
espgeigerhw- build for the ESPGeiger HW geiger counterminpulse- this is a build without any 3rd party output other than web configno_pcnt- disables PCNT (hardware) counting for ESP32 devicescajoe_iotgm- build for the CaJoe IOT GM with ESP32 on board
Use a tool such as esptool.py or Tasmotizer to flash the firmware to your ESP device.
The project should build automatically with Platformio - it can be built with the Arduino IDE but will require you to satify the requirements by installing the libraries.
The environments.ini file defines some pre-built environments and examples of how the build can be configured. You can pick a combination of target board (esp32/esp8266) and geiger type (pulse/serial/GC10 etc)
- Open the PlatformIO IDE and open the ESPGeiger project.
- Edit the
platformio.inifile to changedefault_envsto match the environment you want to build. - Click on the
Buildbutton in the PlatformIO IDE. - The PlatformIO IDE will build the project.
- Once the project is built, you can upload it to your microcontroller.
- To upload the project to your microcontroller, click on the
Uploadbutton in the PlatformIO IDE. - The PlatformIO IDE will upload the project to your microcontroller.
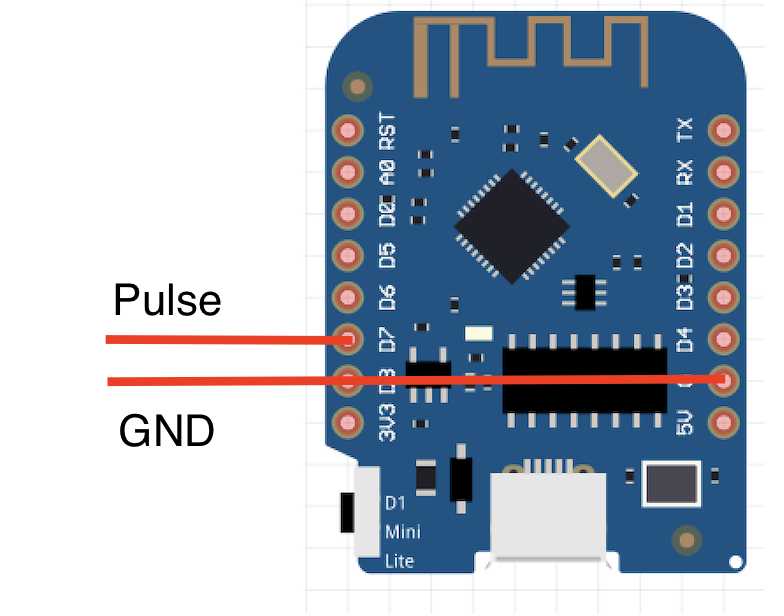
By default GEIGER_RXPIN is set to GPIO13. This is the pin you need to connect the Geiger pulse output to. Don't forget to connect ground as well!
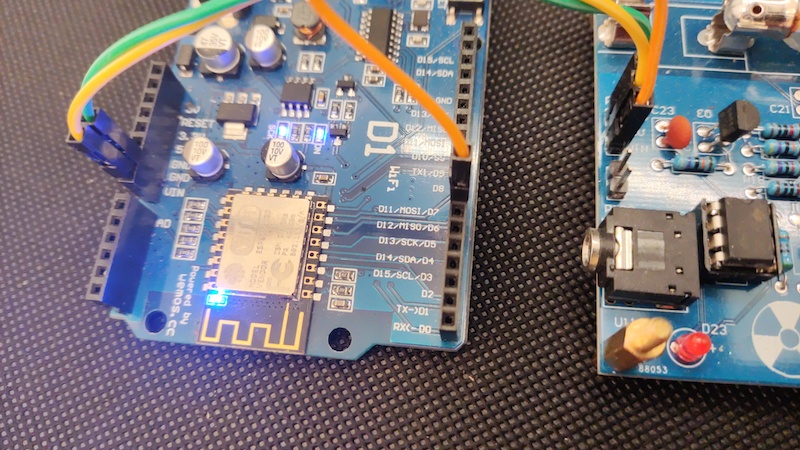
By default GEIGER_RXPIN is set to GPIO13. This is the pin on the ESP you need to connect the Geiger counter serial TX pin to. Don't forget to have a common ground, as well!
The GEIGER_TXPIN is not currently in use for communication to the Geiger Counter.
Currently ESPGeiger-HW is in development testing, watch this space!
Note: Publishing to public sites is disabled whilst ESPGeiger is in test mode.
By default GEIGER_RXPIN is set to GPIO13. By default GEIGER_TXPIN is set to GPIO12.
In either Test Pulse or Test Serial modes you can connect GEIGER_RXPIN and GEIGER_TXPIN together with a jumper wire, to emulate a Geiger counter from ESPGeiger itself.
- Once installed, connect to the built-in Wifi on the ESP to set up your access point. The SSID will look like ESPGeiger-<alpha-num>
- When you connect a window show pop up asking for Wifi Configuration, if not browse to http://192.168.4.1/
- Select the SSID and insert the password for the network you'd like to connect to.
- Once connected to the network you can browse to the ESPGeiger IP address directly or enter
http://<name of the device>.localinto your browser, for example http://ESPGeiger-83e6a4.local - You can now configure MQTT etc from the Setup page and view the current status from Status
Upgrading can be done through the web interface. Please be careful to select the right firmware for your build.
Note: ESP32 users please download the firmware version - merged firmwares are for fresh installs.
The project is compatible with Generic Pulse-based geiger counters and the GC10next serial based counters.
- DIY GeigerKit
- NetIO GC10
- RHElectronics
- GeigerHV
- GGreg20
- MightyOhm Kit
- DiY-GDC
- CAJOE (and other clones) RadiationD-v1.1
Simply connect the pulse output to GPIO13
Currently the serial integration is untested against some units until I can gain access to a device.
Other Serial based should in theory be supportable with small changes to the codebase.
If you own or can offer a device below for testing and support, please get in touch!
- GC10 (original)
- MightyOhm
- GMC-320
- GGreg20
- MQTT
- Home Assistant (Autodiscovery)
- ThingSpeak
- Radmon.org
- gmcmap.com
Automatically output every minute:
ESPGeiger-129e0c/tele/lwt Online
ESPGeiger-129e0c/tele/status {"uptime":"2T01:45:10","board":"ESP32","model":"GC10next","free_mem":191552,"ssid":"Wifi","ip":"192.168.1.123","rssi":-24}
ESPGeiger-129e0c/stat/CPM 26.00
ESPGeiger-129e0c/stat/uSv 0.10
ESPGeiger-129e0c/stat/CPM5 25.00
ESPGeiger-129e0c/stat/CPM15 25.00
...
ESPGeiger-129e0c/tele/lwt Offline
https://www.home-assistant.io/integrations/mqtt/#mqtt-discovery

- ESPGeiger API
- Async Webserver/MQTT
- Configurable alarms
Contributions are welcomed, please feel free to raise a Pull Request for this. I am a new Arduino/C coder, so please feel free to suggest improvements to the code here to make it better for everyone!
Thanks for supporting libraries goes to:
- https://github.com/tzapu/WiFiManager
- https://github.com/khoih-prog/AsyncHTTPRequest_Generic
- https://github.com/gmag11/ESPNtpClient
- https://github.com/MattFryer/Smoothed
- https://github.com/knolleary/pubsubclient/
- https://github.com/bblanchon/ArduinoJson
And inspiration: