ANYSec is a Nokia technology that provides low-latency and line-rate native encryption for any transport (IP, MPLS, segment routing, Ethernet or VLAN), on any service, at any time and for any load conditions without impacting performance.
This lab is an ANYSec demo using Nokia SROS FP5 vSIMs running at CLAB. It combines ANYSec with MACSec and ilustrates ANYSec slicing for distinct services with multi-instance SR-ISIS and FLEX-Algo.
It also provides a visualization dashboard using a Telemetry stack with gNMIc, Prometheus and Grafana. For tests it was added an automation panel using Flask/Python and gNMIc to start/stop traffic, enable/disable links and enable/disable ANYSec.
ANYSec is a Nokia network encryption solution available with the new FP5 models in SROS 23.10R1. It is low-latency line-rate encryption, scalable, flexible and ensures a quantum-safe network encryption solution for the industry. It is a simple concept, based on MACSec standards as the foundation and introduces the flexibility to offset the authentication and encription to allow L2, L2.5 and L3 encryption.
To deploy this lab you need a server with Docker and CLAB and Internet connectivity. You also need SROS 23.10R1+ Image and a valid License file.
The SROS vSIM image file used is 23.10R2, and is available under Nokia's internal registry. If you don't have access to it, then you must get the SROS image and manually import it to CLAB following the instructions at VRNETLAB.
The steps are:
# Clone vrnetlab
git clone https://github.com/hellt/vrnetlab && cd vrnetlab

# Download qcow2 vSIM image from Nokia Support Portal (https://customer.nokia.com/support/s) or get one from your Nokia contacts.

# Change name to “sros-vm-<VERSION>.qcow2”   ### must start with "sros-vm-"

# Upload it to ‘vrnetlab/sros’ directory (e.g. /home/vrnetlab/sros)

# Run ‘make docker-image’ to start the build process

# Verify existing docker images

docker images | grep -E "srlinux|vr-sros"
Note: After import the image, edit the yml file with the correct location.
# replace this
      image: registry.srlinux.dev/pub/vr-sros:23.10.R2
# with this:
image: vrnetlab/vr-sros:23.10.R2SROS vSIMs require a valid license. You need to get a valid license from Nokia and place it in the "/r23_license.key" file.
# Copy/paste the license to the "r23_license.key" file
cd sros-anysec-macsec-lab/
vi r23_license.key
# press "i" key for insert mode => paste the license => ctl+x to save and exit To deploy this lab, you must clone it to your server with "git clone".
# change to your working directory
cd /home/user/
# Clone the lab to your server
git clone https://github.com/srl-labs/sros-anysec-macsec-lab.gitThe physical setup is ilustrated below:

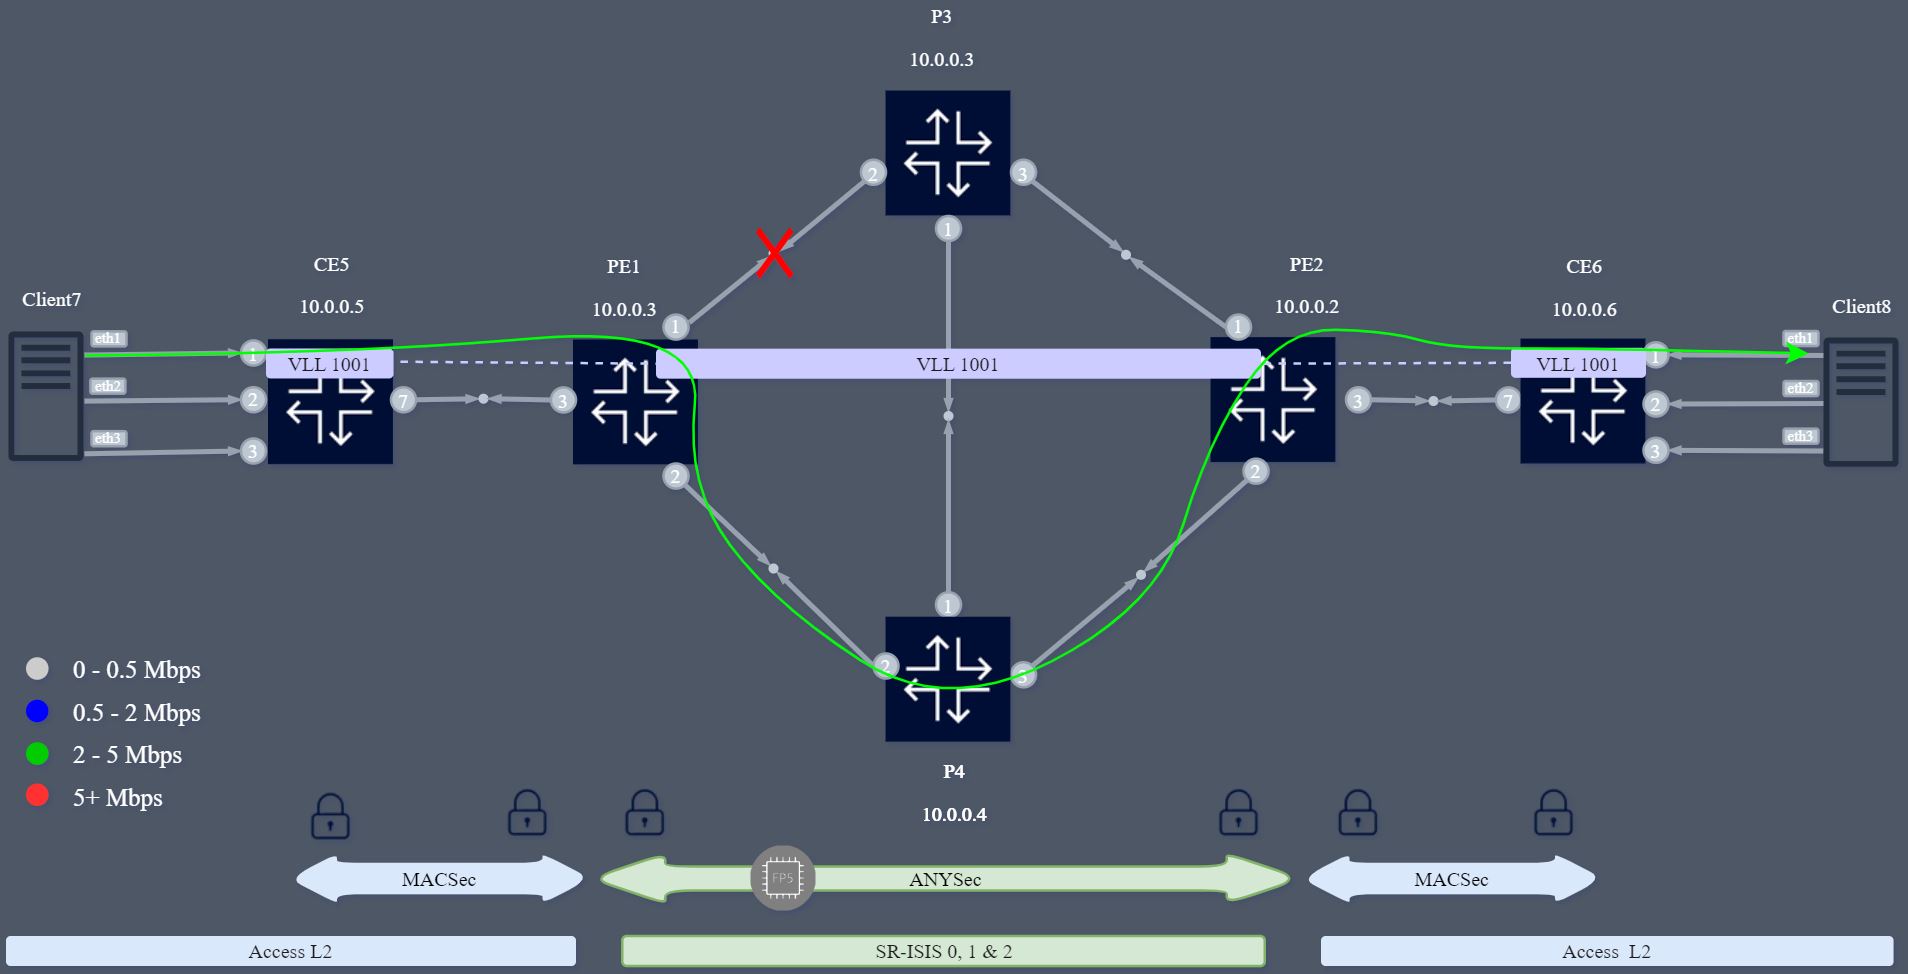
The setup contains six SROS FP5 & FP4 routers with 23.10R2 and 2 linux hosts. The network contains 2 P routers, 2 PEs running ANYSec and MACSec, 2 CEs with MACSec, and 2 Linux Clients with 3 interfaces for 3 distinct services. Only the PEs have ANYSec configured. The models are:
-
P Routers
- SR-1 FP4
-
PE Routers with ANYSec and MACSec
- sr-1x-48d FP5
-
CE Routers with MACSec
- sr-1x-48d FP5
Note 1: Clients are Linux hosts using Network-MultiTool
Note 2 : Client7 is also running Flask and hosting the automation Tool
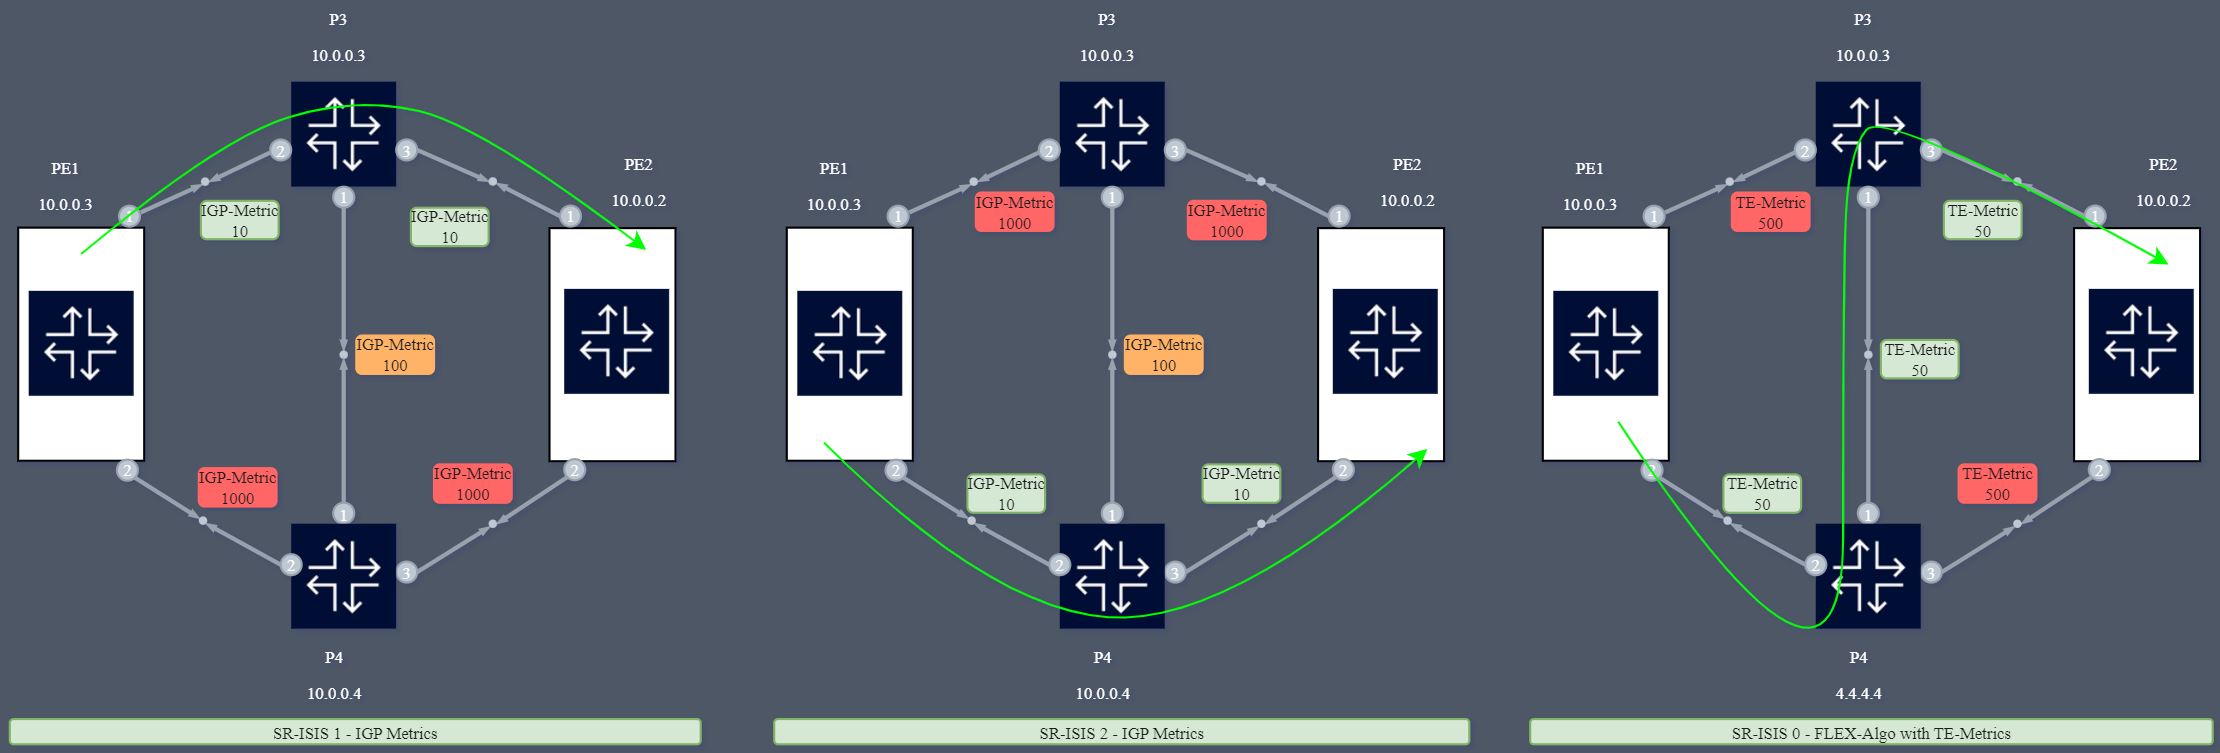
There are 3 distinct services, each using its own Segment-Routing topology. The logical setup with the services is the following:

The setup has:
- ANYSec between PE1 and PE2
- MACSec between PEs and CEs
- ISIS instances 0, 1 and 2 with SR-ISIS and Flex-Algo
- iBGP (P3 and P4 as RR)
- Services: VLL 1001, VPLS 1002 and VPRN 1003
ANYSec slicing is possible within 20.10R1 with 2 options:
- Multi-Instance SR IGP instance
- Flex-Algo
To demonstrate both options, 3 ISIS instance are configured:
- ISIS 0 – Flex-Algo with TE-Metrics (other constraints are possible)
- ISIS 1- IGP metrics to prefer TOP LINK
- ISIS 2 – IGP metrics to prefer BOTTOM LINK
There are 3 distinct services, each mapped to a distinct slice:
- VLL 1001 – ISIS 1 => TOP LINK
- VPLS 1002 – ISIS 2 => BOTTOM LINK
- VPRN 1003 – ISIS 0 => Flex-Algo
• Note: Each of the 3 client interfaces is mapped to a distinct service. Its possible to start iPerf or ICMP on every interface to test the distinct topologies.
The 3 SR-ISIS topologies are illustrated bellow:
Use the comand below to deploy the lab:
• Note: If you imported the SROS image to docker then first edit the yml file with the correct image location as explained above.
# deploy a lab
cd sros-anysec-macsec-lab/
clab deploy --topo anysec-macsec.ymlOnce the lab is deployed, the different SROS nodes can be accessed via SSH through their management IP address, given in the summary displayed after the execution of the deploy command. It is also possible to reach those nodes directly via their hostname, defined in the topology file.
# List the containers
clab inspect -a
# reach a SROS node via SSH
ssh admin@pe1
# reach Linux clients via docker
docker exec -it client7 bashThis lab was enhanced with Streaming Telemetry by adding gNIMc, Prometheus and Grafana.
For details please refer to SR Linux/SROS Streaming Telemetry Lab.
It also includes Automation for the tests using gNMIC invoked through python from Flask webserver. There are 3 main set of tests:
-
Start/Stop ICMP traffic for each service.
-
Disable/enable the top link (between PE1 and P3) or the bottom link (between PE1 and P4) to see ANYSec packets flowing through the other link.
-
Disable/enable ANYSec for each of the 3 services to see packets being sent in clear or encrypted on demand.
The following stack of software solutions has been chosen for this lab:
| Role | Software | Port | Link | Credentials |
|---|---|---|---|---|
| Telemetry collector | gnmic | 57400 | ||
| Time-Series DB | prometheus | 9090 | http://localhost:9090/graph | |
| Visualization | grafana | 3000 | http://localhost:3000 | admin/admin |
| Automation | flask | 35000 | http://localhost:35000/ |
The following picture picture ilustrates the Telemetry and Automation stack:

If you are accessing from a remote host, then replace localhost by the CLAB Server IP address
- Grafana: http://localhost:3000. Built-in user credentials:
admin/admin - Prometheus: http://localhost:9090/graph
- Flask Automation Page: http://localhost:35000/
Verify that you're able to access all nodes (Routers and clients) and the platforms (Grafana, Prometheus and Flask Demo Page).
Start a Tcpdump/wireshark capture as explained bellow and start traffic between Client7 and Client8 using Flask Control Panel.
You may shut the link between PE1 and P3 and see that ANYSec SR-ISIS traffic uses the bottom link.
You may also disable ANYSec to view packets in clear.
For details about packet capture & Wireshark at containerlab refer to CLAB Packet capture & Wireshark.
You may found a pcap file with ANYSec packets in the files above in this project. You may perform your own capture as explained below.
Follows an example on how to list the interfaces (links) of a given container and perform a packet capture:
# list the containers running in the server
clab inspect -a
# list the interfaces (links) of a given container
ip netns exec pe1 ip link
# Start a capture and display packets in the session
ip netns exec pe1 tcpdump -nni eth1
# Start a capture and store the packets in the file
ip netns exec pe1 tcpdump -nni eth1 -w capture_file.pcapBesides displaying the packets to the session or store in a file, its possible to open them directly on Wireshark using a remote SSH connection.
Follows examples of the SSH comand from a Linux Shell or Windows Comand Prompt:
Syntax:
ssh $containerlab_host_address "ip netns exec $lab_node_name tcpdump -U -nni $if_name -w -" | $wireshark_path -k -i -
Linux example:
ssh root@10.82.182.179 "ip netns exec pe1 tcpdump -U -nni eth1 -w -" | /mnt/c/Program\ Files/Wireshark/wireshark.exe -k -i -
Windows example:
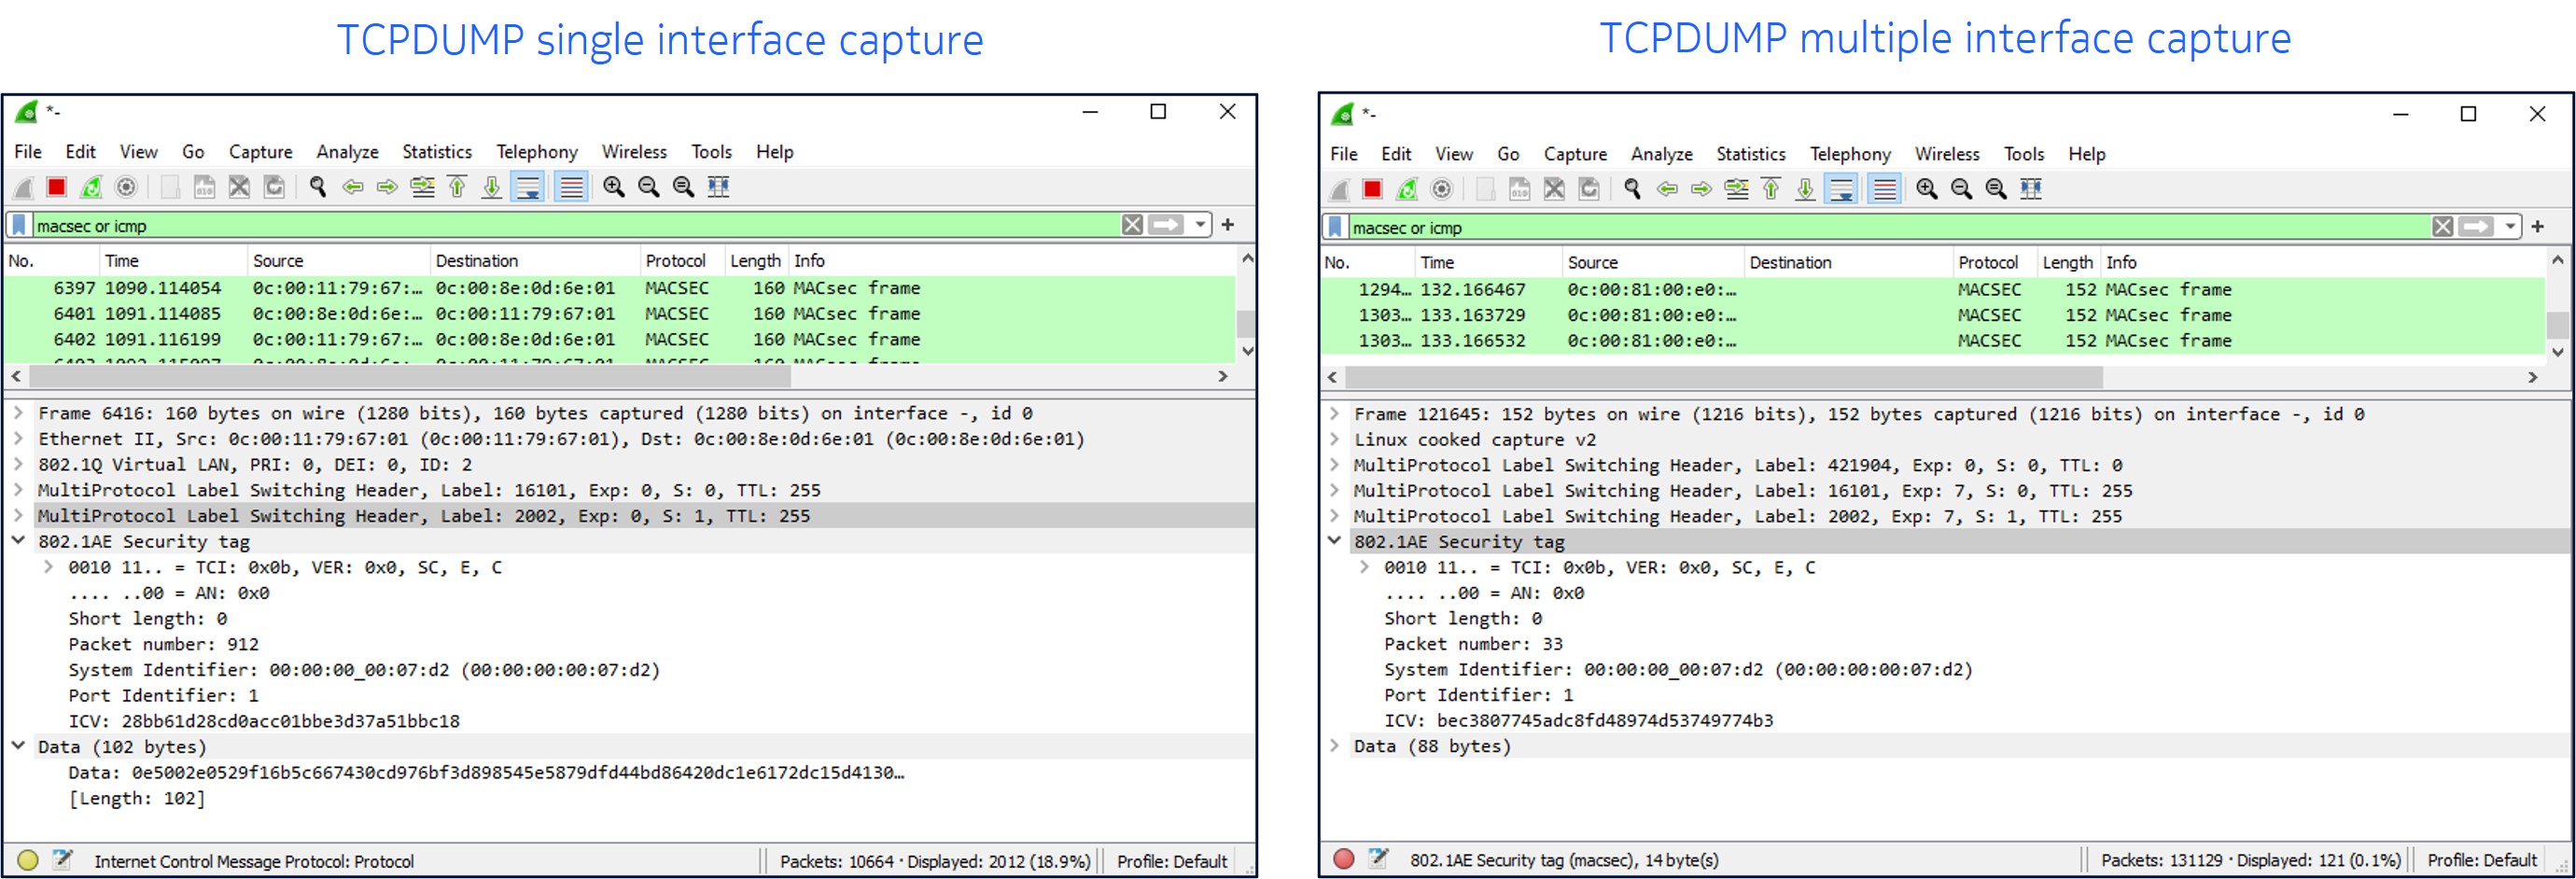
ssh root@10.82.182.179 "ip netns exec pe1 tcpdump -U -nni eth1 -w -" | "c:\Program Files\Wireshark\Wireshark.exe" -k -i -Wireshark does not have native support for decoding ANYSec MACSec (802.1AE) headers. You'll be able to see the MPLS and ANYSec labels, but the MACSec header will not be decoded.
Nokia has an internal version with a protocol dissector for ANYSec MACSec / 802.1a headers. This is the output comparison between the public wireshark and the Nokia's version:

Note: With the public Wireshark, the ANYSec header not decoded but you still be able to validate ANYSec looking into the ANYSec label.
The ANYSec introduces the MACSec Header and the Encryption SID (ES) label between the SR-ISIS transport and VPRN service labels. The VPRN service label is encrypted. The picture below provides an example of the ANYSec label stack between PE1 and PE2.

To start and view the ANYSec captured packets you may use EdgeShark. Refer to CLAB and EdgeShark integration for details.
TCPDUMP on a single interface shows label stack correctly (Ethernet+VLAN+MPLS+ANYSec) TCPDUMP on a multiple interfaces (any for all) shows a distinct stack: Linux cooked capture v2 + additional MPLS Label (instead of Ethernet + VLAN)
Tshark is similar to TCPDump but allows to define only the interfaces to capture and does not change the header stack. The drawback is it has to be installed in the CLAB Server (ussually not installed by default as TCPDump).
Install Tshark at CLAB Server/hypervisor (Ubuntu):
sudo apt install tshark
tshark --version
tshark -D
From your Windows laptop prompt execute Tshark an pipe the output to Wireshark:
### Example! Replace IP and windows path
ssh root@<IP> "ip netns exec <CONTAINER> tshark -l -i <IF1> [-i <IF2>] [-i <IFN>] -w -" | "<WIRESHARK PATH>" -k -i -
ssh root@10.82.182.179 "ip netns exec pe1 tshark -l -i eth3 -i eth1 -i eth2 -w -" | "c:\Program Files\Wireshark\Wireshark.exe" -k -i -Use the following commands under PE1 or PE2 to retrieve outputs from ANYSec operation:
show macsec connectivity-association "CA_Test_MACSec" detail
show anysec tunnel-encryption detail
show router 1003 route-table 10.0.0.2/32 extensive
show router tunnel-table detail
show router mpls-labels summary
show router "1003" route-table
show router bgp routes 10.0.0.2/32 vpn-ipv4 hunt The tests bellow can be executed in multiple ways: flask demo page, gnmic scripts or node CLI.
Upon shut/no shut verify ANYSec is still working but using a new SR-ISIS tunnel
show router 1003 route-table
show router 1003 route-table 10.0.0.2/32 extensive
show router 1003 route-table 10.0.0.2/32 extensive
show router bgp routes 10.0.0.2/32 vpn-ipv4 hunt
Note: Use the VPRN service for this test. Wireshark correctly decodes ICMP for VPRN but not for L2 Services. You can still use VLL and VPLS and see packet in clear but ICMP Header will not be decoded.
Upon Disable ANYSec verify ping is still working but unecripted. Re-enable ANYSec and verify traffic is encrypted again.

The Demo Video shows the Grafana Dashboard, the Automation Panel to execute and observe different tasks in the network as well as monitoring traffic with Edgeshark.

ANYSec is an amazing technology, flexible and scalable, capable of E2E low-latency and line-rate transport encryption. ANYSec can be combined with other technologies such as MACSec or IPSec. It allows slicing and per service encryption.
Does ANYSec work with CLAB vSIMs? Yes for functional tests, but obviously not for performance/latency. CLAB and vSIMs can be used to test and validate the configurations. Setup is fully functional with ANYSec stats increase and packets are encrypted as seen in the TCPDUMP capture.
More to come in the upcoming releases!