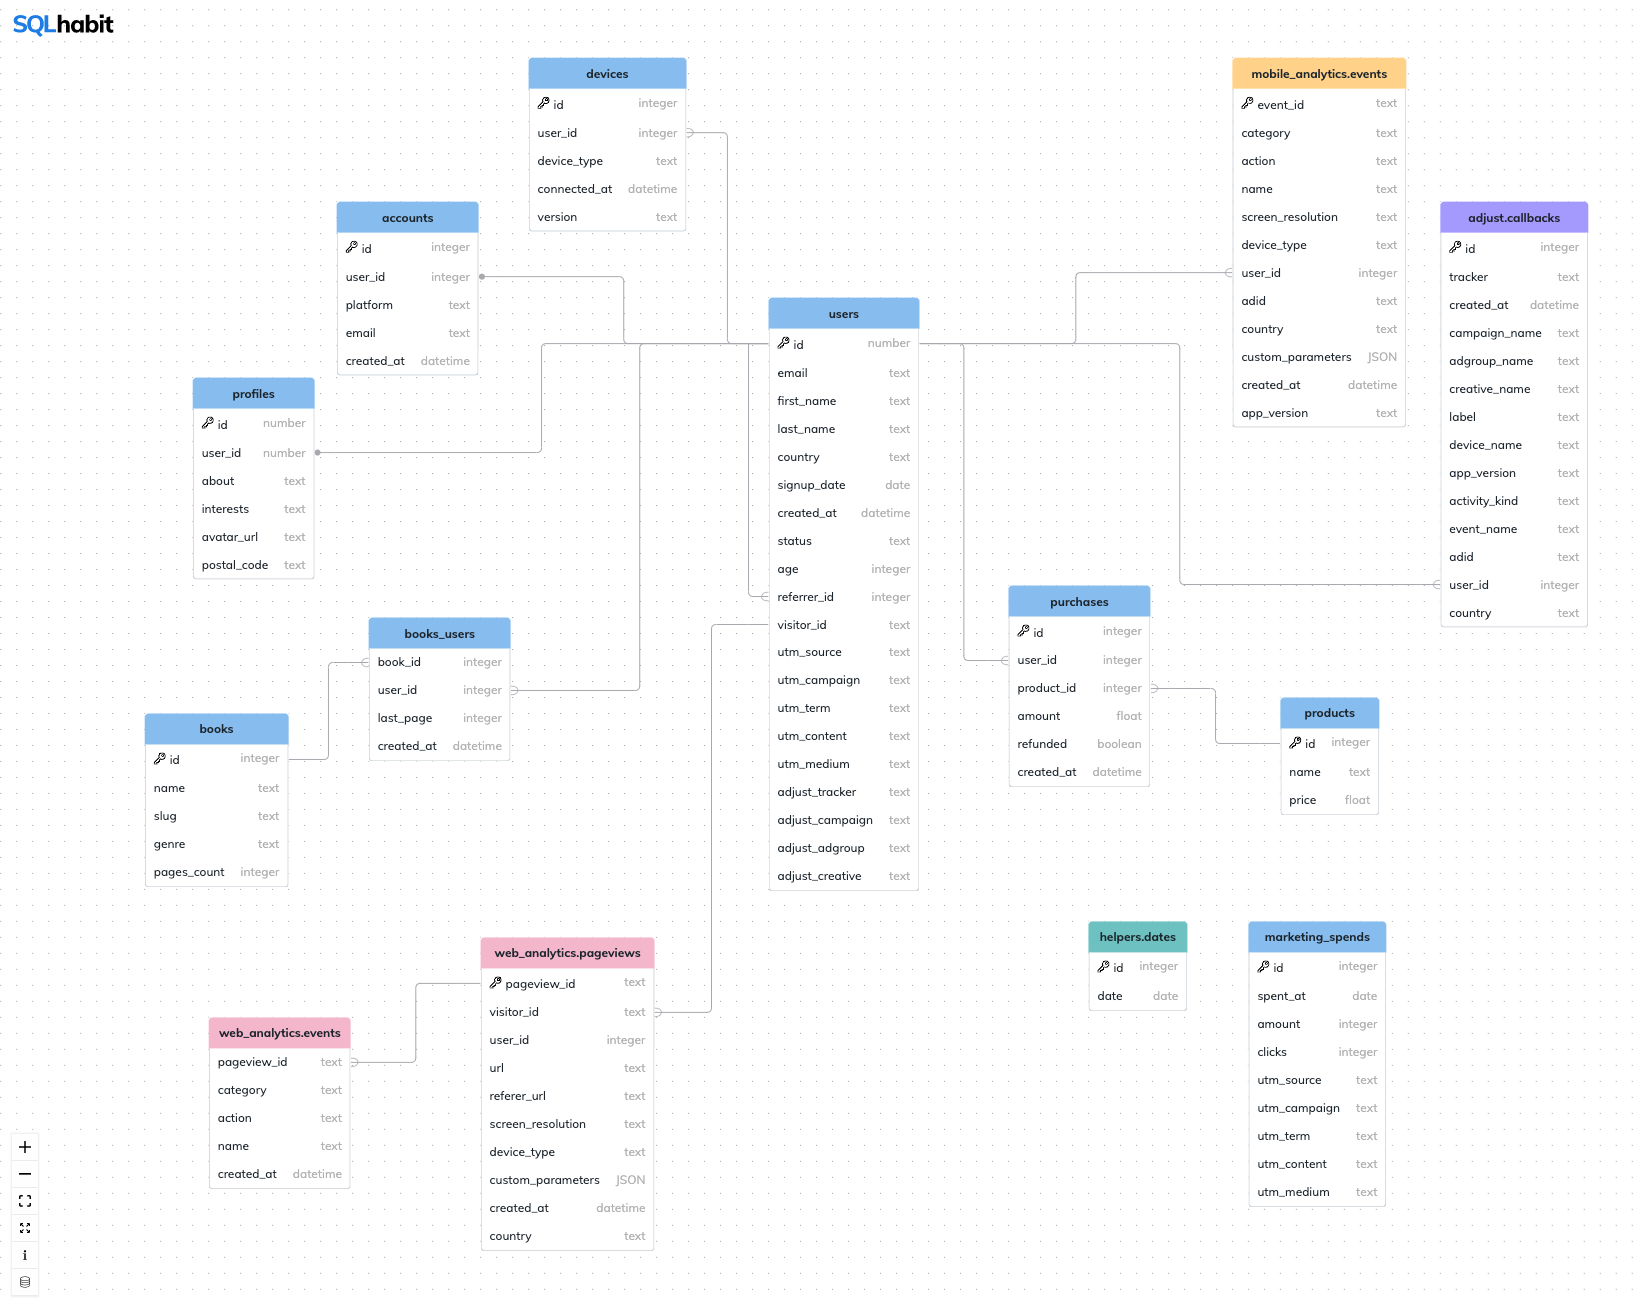


A relational database schema visualizer built with React and ReactFlow.
Originally built for the SQL Habit course, it's available for everyone. Enjoy ❤️
🔍 How to visualize your schema | 🔬 How it works | 🤝 Contributing
💨 Easy to start: you can import your schema(s) in 1.5 minutes.
🏁 Easy to finish: you only need to configure edges and table positions.
🔧 Customizable: add table/column descriptions and schema colors.
🚀 Make it yours: you get the whole React app, so you can change everything.
Schema Visualizer can visualize multiple schemas – each schema will have its own URL.
A schema configuration lives in its own folder and contains a bunch of simple JSON files.
Here's how you can import your schema:
Clone the repo:
git clone https://github.com/sqlhabit/sql_schema_visualizer.git

cd sql_schema_visualizer
Install dependencies:
npm install💡 You might need to install nvm as well to make sure you're not using an old Node version.
By default, Schema Visualizer contains SQL Habit's dataset schemas. Let's delete all before we import new schemas:
npm run resetA schema config consists of tables, edges, table positions and schema colors.
Good news is that we can import tables using an SQL query. 🚀
Pick a query for your database type and save the output to a CSV file like my_schema.csv. Put it to the root folder (next to the schema.csv.template file).
SELECT
  t.table_schema,
  t.table_name,
  c.column_name,
  c.data_type,
  c.ordinal_position
FROM information_schema.tables t
LEFT JOIN information_schema.columns c
  ON t.table_schema = c.table_schema
    AND t.table_name = c.table_name
WHERE
  t.table_schema NOT IN ('information_schema', 'pg_catalog')
  AND t.table_name NOT IN ('schema_migrations', 'ar_internal_metadata')
ORDER BY 1, 2, 5SELECT
c.table_schema,
c.table_name,
c.column_name,
c.data_type,
c.ordinal_position
FROM information_schema.columns c
LEFT JOIN information_schema.views v
ON v.table_schema = c.table_schema
AND v.table_name = c.table_name
WHERE
c.table_schema NOT IN ('sys','information_schema', 'mysql', 'performance_schema')
AND c.table_name NOT IN ('schema_migrations', 'ar_internal_metadata')SELECT
'public' as table_schema,
so.name as table_name,
sc.name as column_name,
sc.type as data_type,
sc.colid as ordinal_position
FROM syscolumns sc
INNER JOIN sysobjects so
ON sc.id = so.id
WHERE so.type = 'U'Now we can import tables. The argument of the npm run import command is your CSV file name:
npm run import my_schemaYou should see table JSON files added to the src/config/databases/my_schema/tables folder.
Let's spin up a dev server and see our tables in the browser:
npm run startTo show a 🔑 icon next to the column name, add the key param to a column definition. Here's an example from the users table:
{
  "name": "id",
  "key": true,
  "description": "Unique identifier of a user.",
  "type": "number"
}Define edges in the src/config/edges.json file:
Here's an example for has one relation:
{
  "source": "users",
  "sourceKey": "id",
  "target": "profiles",
  "targetKey": "user_id",
  "relation": "hasOne"
}
and has many relation:
{
  "source": "users",
  "sourceKey": "id",
  "target": "purchases",
  "targetKey": "user_id",
  "relation": "hasMany"
}You can set custom header colors for tables that belongs to the same schema in the schemaColors.json file. Here's an example:
{
  "DEFAULT": "#91C4F2",
  "public": "#BEB8EB",
  "adjust": "#AFA2FF",
  "helpers": "#75C9C8",
  "web_analytics": "#F6BDD1",
  "mobile_analytics": "#FFD791"
}Table positions are defined in the tablePositions.json file:
{
"adjust.callbacks": {
  "x": 864,
  "y": -192
},
"helpers.dates": {
  "x": 512,
  "y": 528
},
"mobile_analytics.events": {
  "x": 656,
  "y": -336
}
After you import a schema, every table will have a default position set in the tablePositions.json file.
There's no need to update them manually. Instead:
- Open Schema Visualizer http://localhost:3000.
- Drag table nodes around to find a perfect arrangement.
- CTRL + P. It copies node positions JSON to your clipboard.
- Paste (CMD + V) JSON with positions to the
tablePositions.jsonfile of your schema. - PROFIT 🍻
Table and column descriptions are visible if you press CMD key and hover over a table or column name.
Add custom copy to the "description" keys in table config files. Here's an example:
{
  "name": "users",
  "description": "This table contains all user records of Bindle.",
  "columns": [
    {
      "name": "id",
      "key": true,
      "description": "Unique identifier of a user.",
      "type": "number"
    }
  ]
}Once you're finished with config file, build the project and upload the files from the /build folder to your hosting of choice:
npm buildI highly recommend https://surge.sh/. It'll take you ~2 minutes to deploy your schema online:
npm install --global surge.cd buildsurge- PROFIT 🍻
You're more than welcome to contribute. In fact, I'm really looking forward to it! 🚀
Just make sure to check out the contribution guidelines. 🙏
Schema Visualizer is built with ReactFlow.
Every table is a ReactFlow Custom Node with custom Markers (those SVG icons with dot and fork).
Here's a ReactFlow sandbox example of Custom Nodes.
It all starts with plain JSON config files. There're 4 of them:
Later they're translated into Nodes and Edges digestible by ReactFlow.
ReactFlow draws SVG edges between custom Table Nodes.
Those edges start and end in ReactFlow Handle's. Every table column row has 2 handles – left and right. 💡 A handle could be either source (for an outgoing edge) or a target (for an incoming edge). Handles are configured based on the edges config.
As you can see, edges are dynamically change handles and orientation depending on relative node positions. That way it's less config to maintain, here're helper functions that take care of that.
Here's the entry file to the ReactFlow app.
Have fun exploring the app, it was a pleasure to build! If you have a question – open a new issue. 🍻
You'll need to install dependencies and start a dev server:
npm install

npm start
You'll find the running visualizer at http://localhost:3000.
Tests are written with the React Testing Library. Run all of them via
npm testSchema Visualizer is a project of Anatoli of SQL Habit. Hi from Berlin! 👋 🍻
Anatoli Makarevich • Twitter • Github
SQL Schema Visualizer is MIT licensed.