NOTE:
⚠️ This WDC-based solution is sunset in lieu of Splunk's officially supported solution of Splunk ODBC drive https://splunkbase.splunk.com/app/1606
Documentation for ODBC Driver can be found here: https://docs.splunk.com/Documentation/ODBC/latest/UseODBC/AboutSplunkODBCDriver
A web data connector for Tableau to help you connect with Splunk data.
- Splunk Tableau Web Data Connector
- Table of Contents
- Try it ↙
- Building the Splunk Tableau Data Connector
- Usage
- Troubleshooting
- Ensure that the query you run on the WDC, runs without errors on your Splunk instance. If the query fails on Splunk, Tableau will appear to be running a never ending query and not error out.
- If you think paging is returning limited events, Increase the response events to more than 500000 events.
- Run the WDC via Simulator and enable Browser console
- Initialise Tableau Desktop in Debug Mode (slower)
- Verify SSL validity
- WDC Deployment to Tableau Server: Whitelisting
- Appendix
- Enable CORS Connections on Splunk
- Enable Valid SSL Certificate on Splunk Management Port (8089)
- Known Issues in Tableau and Workaround
- What to do if Tableau does not support special character in field name? ⤵︎
- If you are in a situation where Tableau parses boolean, date, float, int values differently and/or if you observe unreliable results than what you see in Splunk. ⤵︎
- What if Splunk Search is too long and not working? Tableau's Internet Explorer like WDC Window Supports maximum ~2K characters in as Connector Url length. ⤵︎
- References
- Version Supported
- Contributors
- EOF 🏁
- An online version of the Tableau Web Data Connector for Splunk can be found here: 📡 Splunk WDC Home
- WDC Simulator
-
Splunk search head management port (8089) must be exposed to the internet for the connector to retrieve data.
-
Use ngrok to temporarily expose Internal Splunk Instance via command
$ ngrok tcp sh.internal.example.com:8089. Learn more about ngrok at https://ngrok.com -
Deploy solution internally: for circumstances where Search Head CAN NOT be exposed to the Internet, this solution can be deployed within the internal network where both Tableau and Splunk can access the WDC Connector.
Tableau has a wonderful tutorial that covers how to create Web Data Connectors (WDC). Instead of building your own to use with Splunk the Forward Deployed Software Engineering (FDSE) at Splunk has created the Splunk Tableau WDC which you can immediately use.
Tableau has a prerequisite to define a dataset's "schema" before it will accept it. So instead of having to manually add a schema to the underlying WDC's JavaScript every possible Splunk search (SPL), the Splunk Tableau WDC has the additional functionality to:
-
Determine the schema for any resulting Splunk search's result set AND
-
Provide you a properly formatted URL to use with the Splunk Tableau WDC that contains both your search and required schema.
-
The Splunk Tableau WDC will require network accessibility to the Splunk Search Head (Management Port: 8089)
-
The WDC needs to run on a dedicated web server
Choose one of the following options for deploying the Splunk Tableau WDC.
a. Download and Install Docker 🐳
b. In Terminal (Console)
- Verify that the docker is installed:
docker -v - Pull docker image locally:
docker pull teamfdse/splunk-tableau-wdc - Run docker image 📦:
docker run -t -i -p 80:80 teamfdse/splunk-tableau-wdc:latest
c. Ensure you can connect to http://localhost/src/splunkConnector.html with a browser.
Note: Though
localhostis the host in this example, when Docker deploys the image the URL/IP Address will be assigned to that instance.
Data Flow:
Splunk (Port: 8089) <--> Docker Proxy (Web Port) <--> Tableau Server/Desktop
a. Install Source Files on Web Server
- Download the Github repo: https://github.com/splunk/splunk-tableau-wdc.git
- Move the contents of the directory
splunk-tableau-wdc/src/to the configured directory on web server. - Ensure that you can connect to
http://localhost/splunkConnector.html?proxy=disabledwith a browser with the appropriate URL and required URI Path
b. Prepare the Splunk Search Head
- Enable Cross-Origin Resource Sharing (CORS) Appendix A
- Splunk Management port 8089 enables SSL by default and encouraged for use. If enabled a valid SSL Certificate must be employed before deploying your connector. Appendix B
- If you want to use token based authentication, please consult the following. To set the token to not expire, you can leave the expiration box in the Splunk UI blank.
Data Flow:
Splunk (Port: 8089) <--> Tableau Server/Desktop
Though data flows directly from Splunk to Tableau, note that Tableau Server/Desktop should be able to accesss hosted WDC Connector in order to invoke the connectivity
-
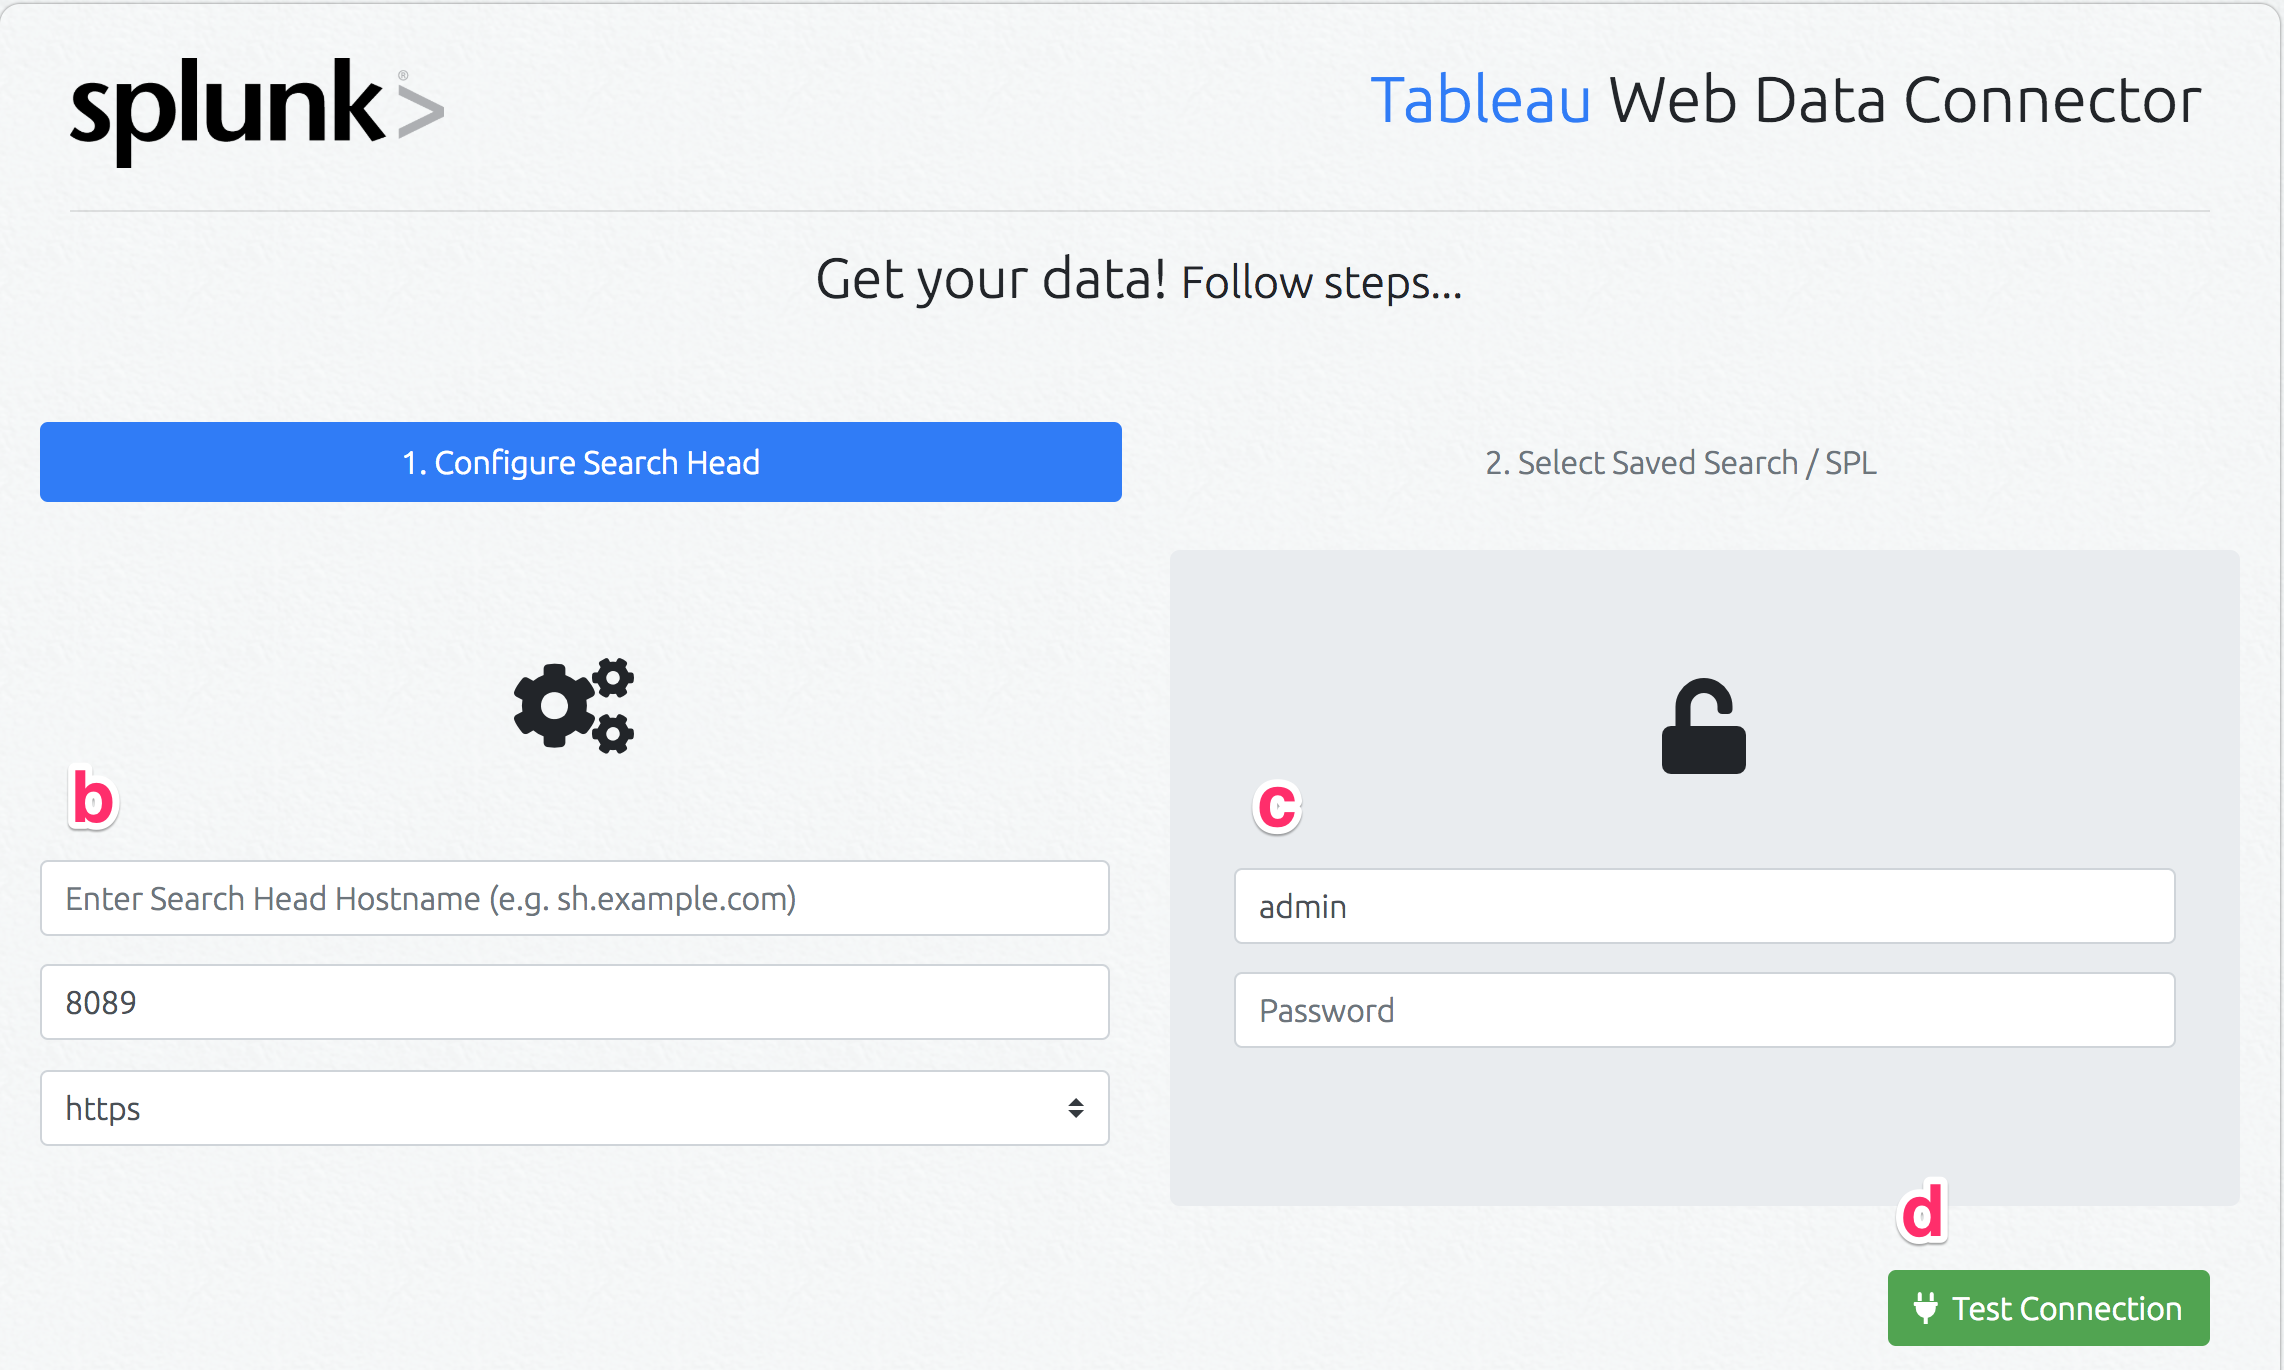
Configure Splunk Search Head Connection
a. Open the Splunk Tableau Web Data Connector (
splunkConnector.html) in your web browser.b. Enter the following Splunk instance search head details: hostname, management port (if different than default of 8089) and protocol (if different than SSL enabled
https).c. Either enter the Splunk username and password, or the authentication token generated from the Splunk UI.
d. Press "Test Connection"
-
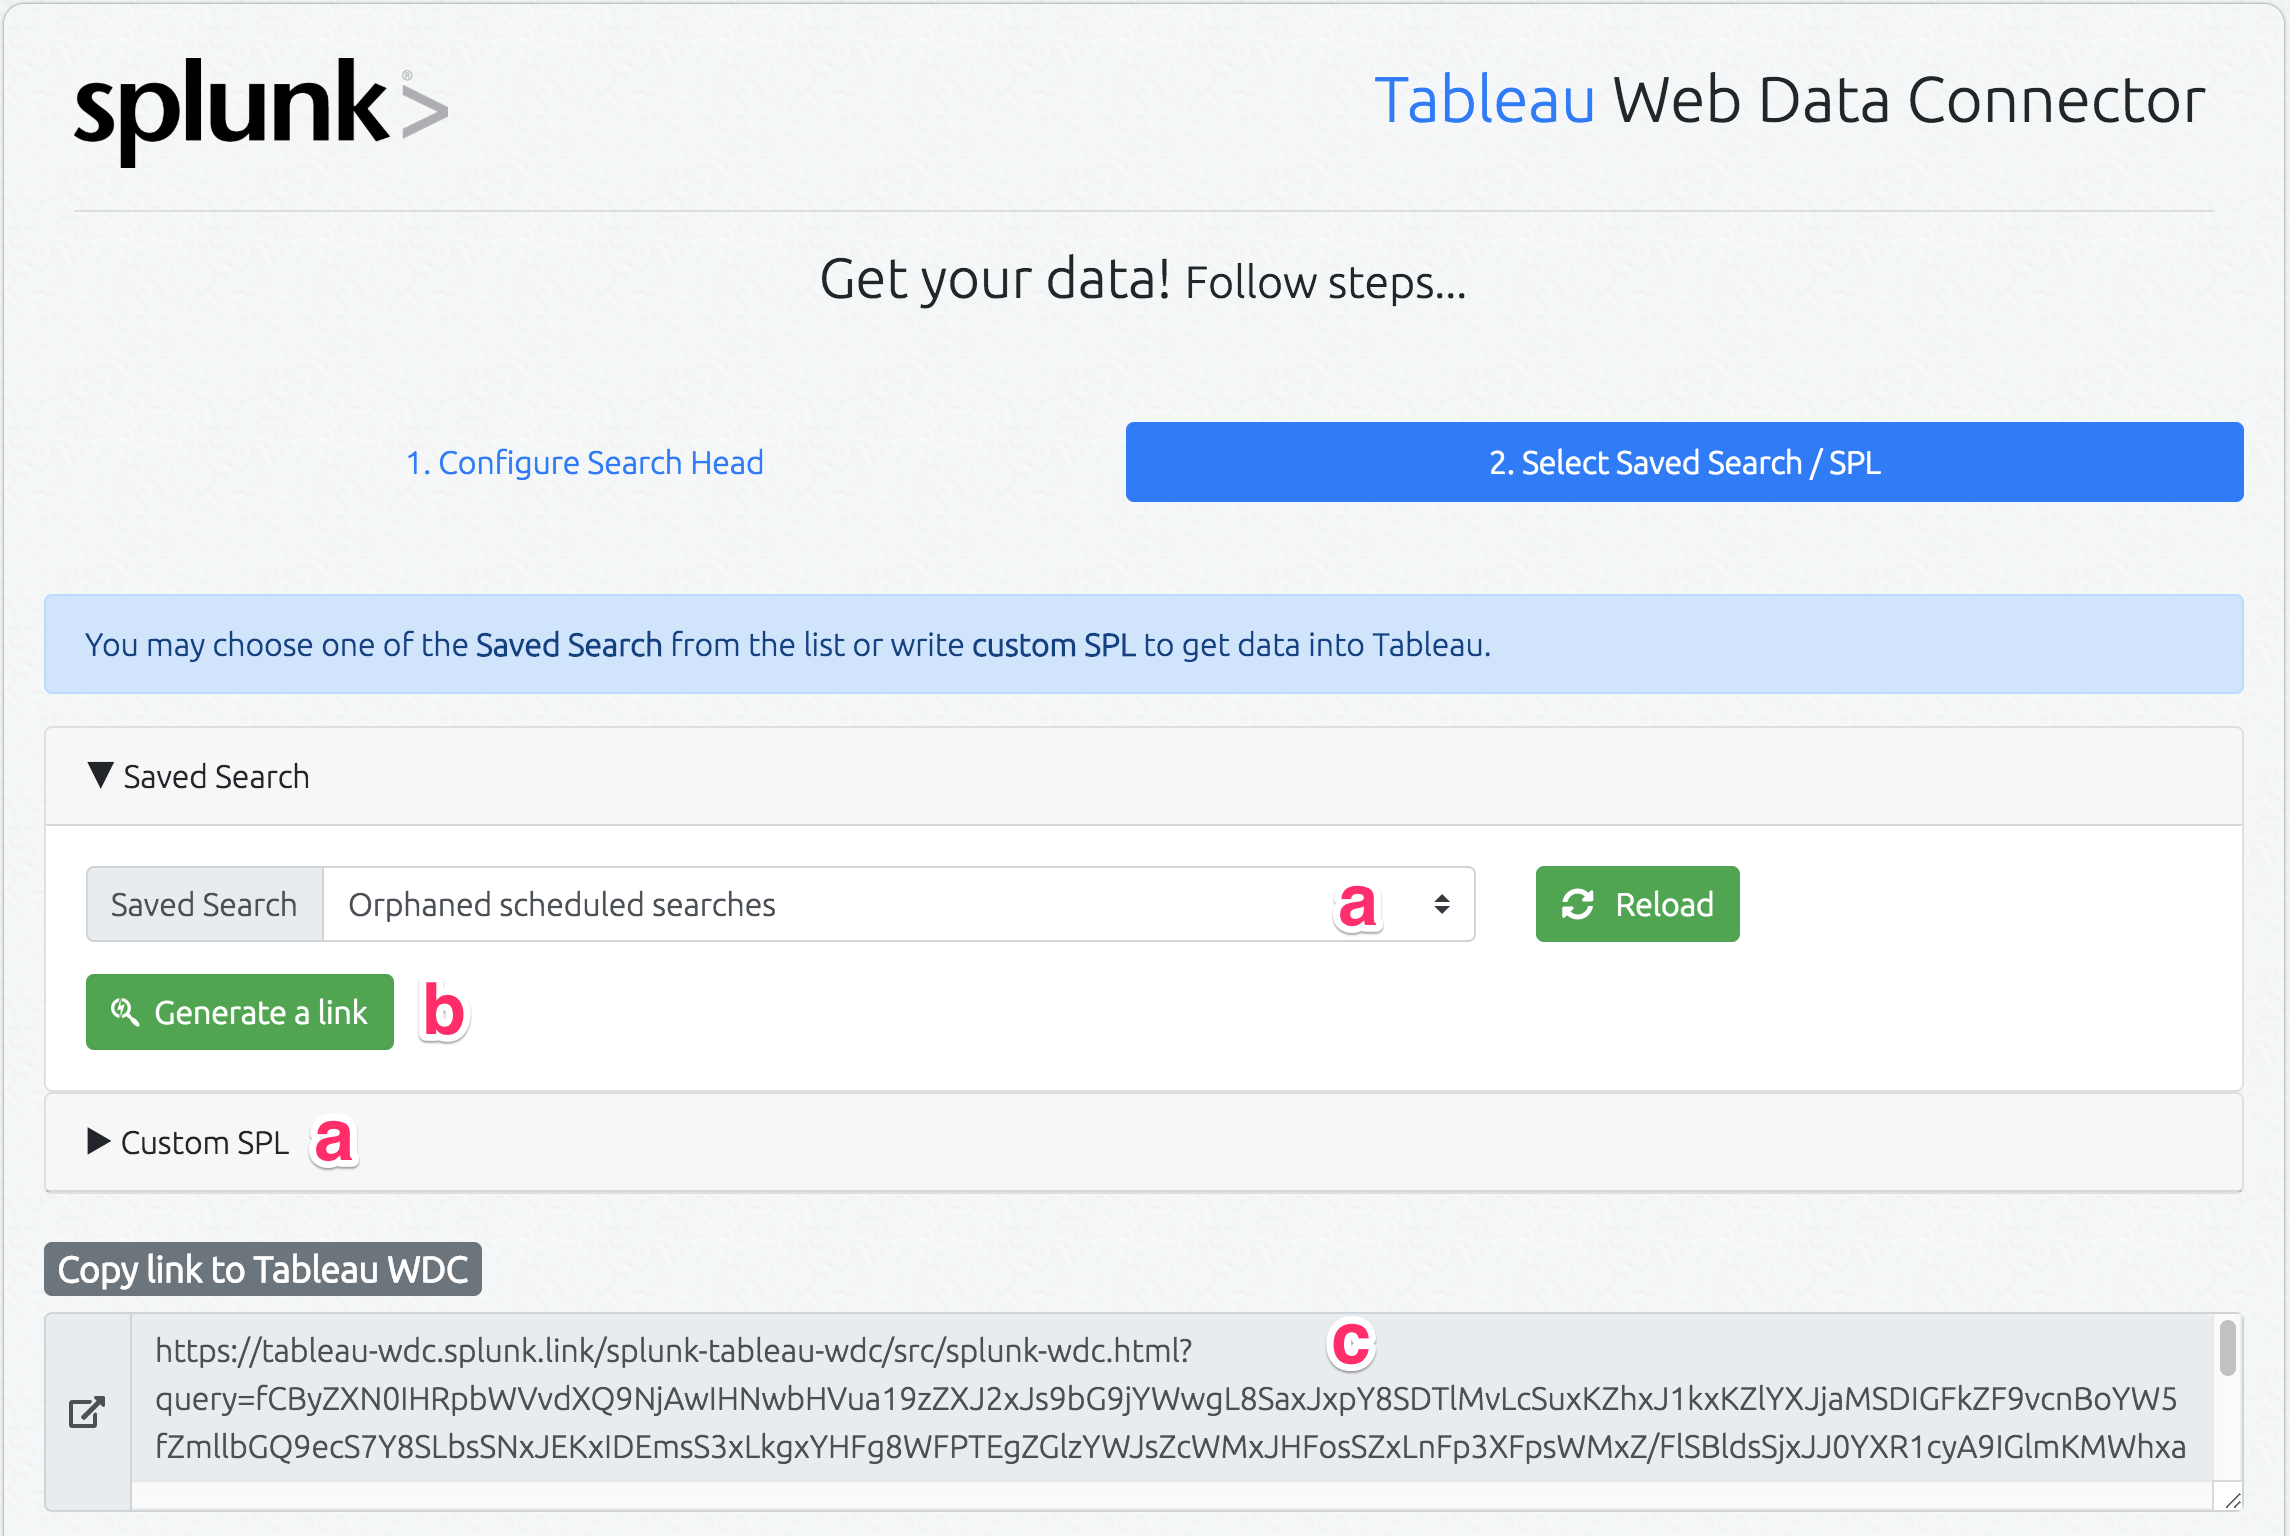
Generate a URL Link to Use With Splunk Tableau WDC from within Tableau
a. Select a Saved Search from the "Saved Search" dropdown OR enter a custom search inside "Custom SPL"
b. Click "Generate Link"
c. Click inside the "Copy Link to Tableau WDC" and copy the URL. Copied link will be used in next step.
-
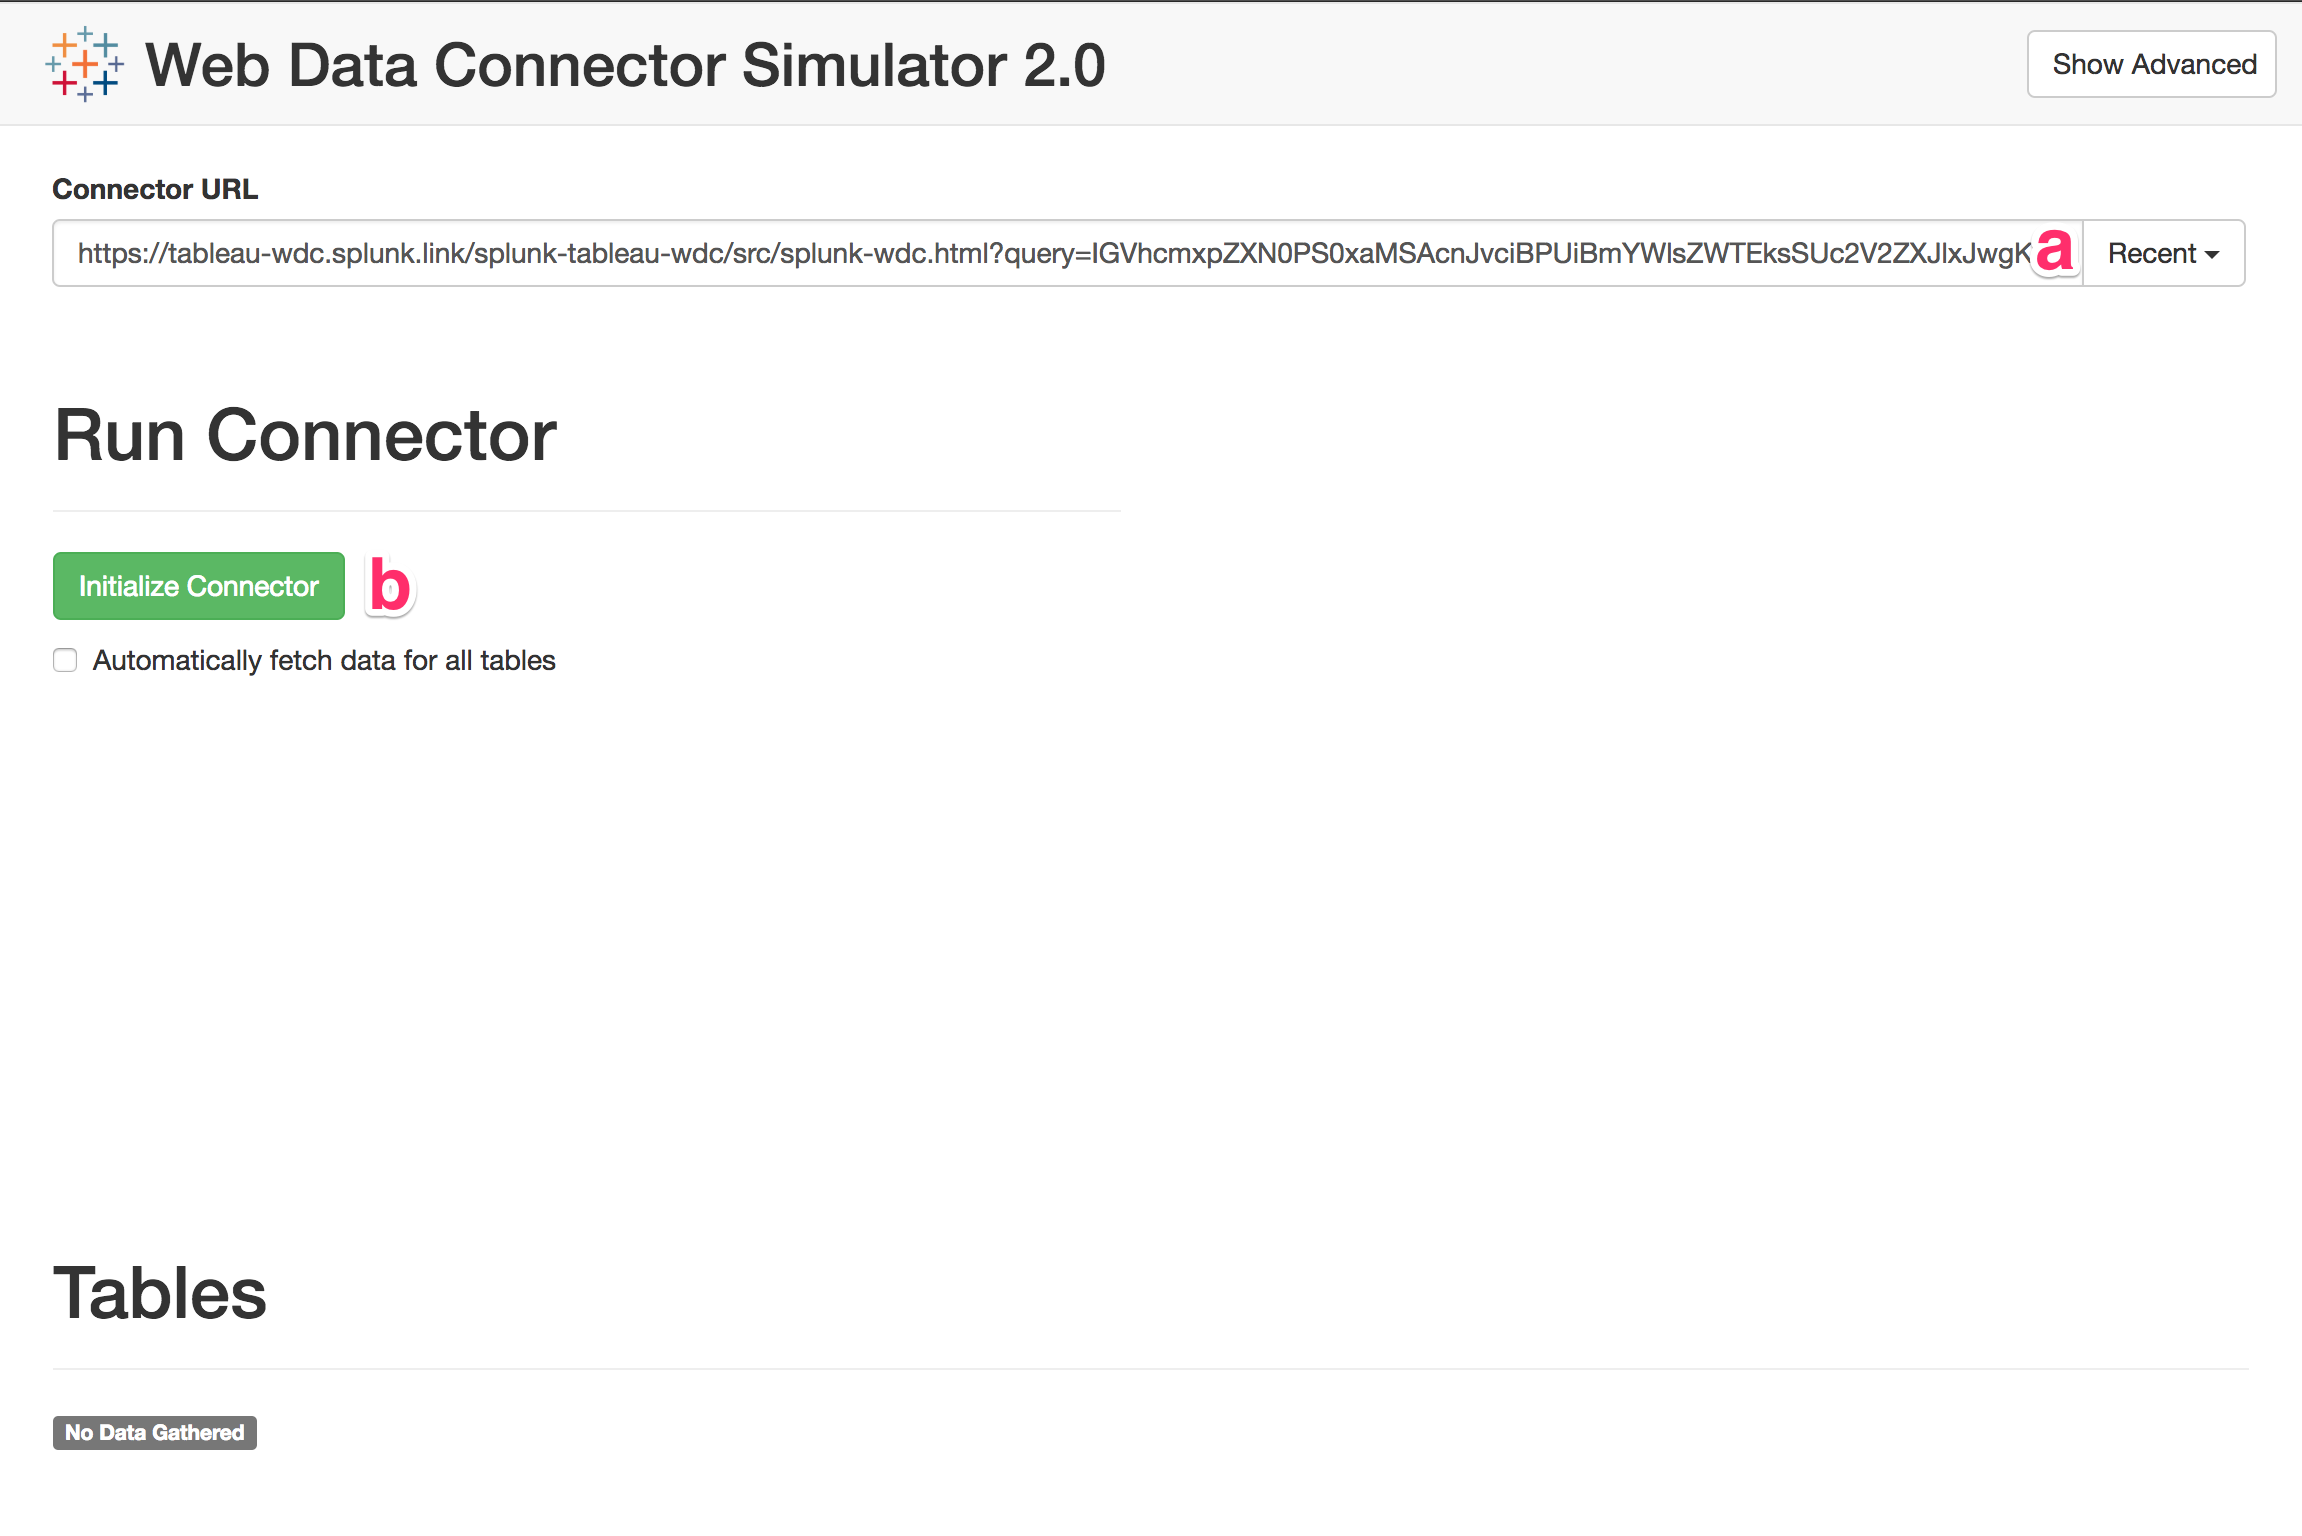
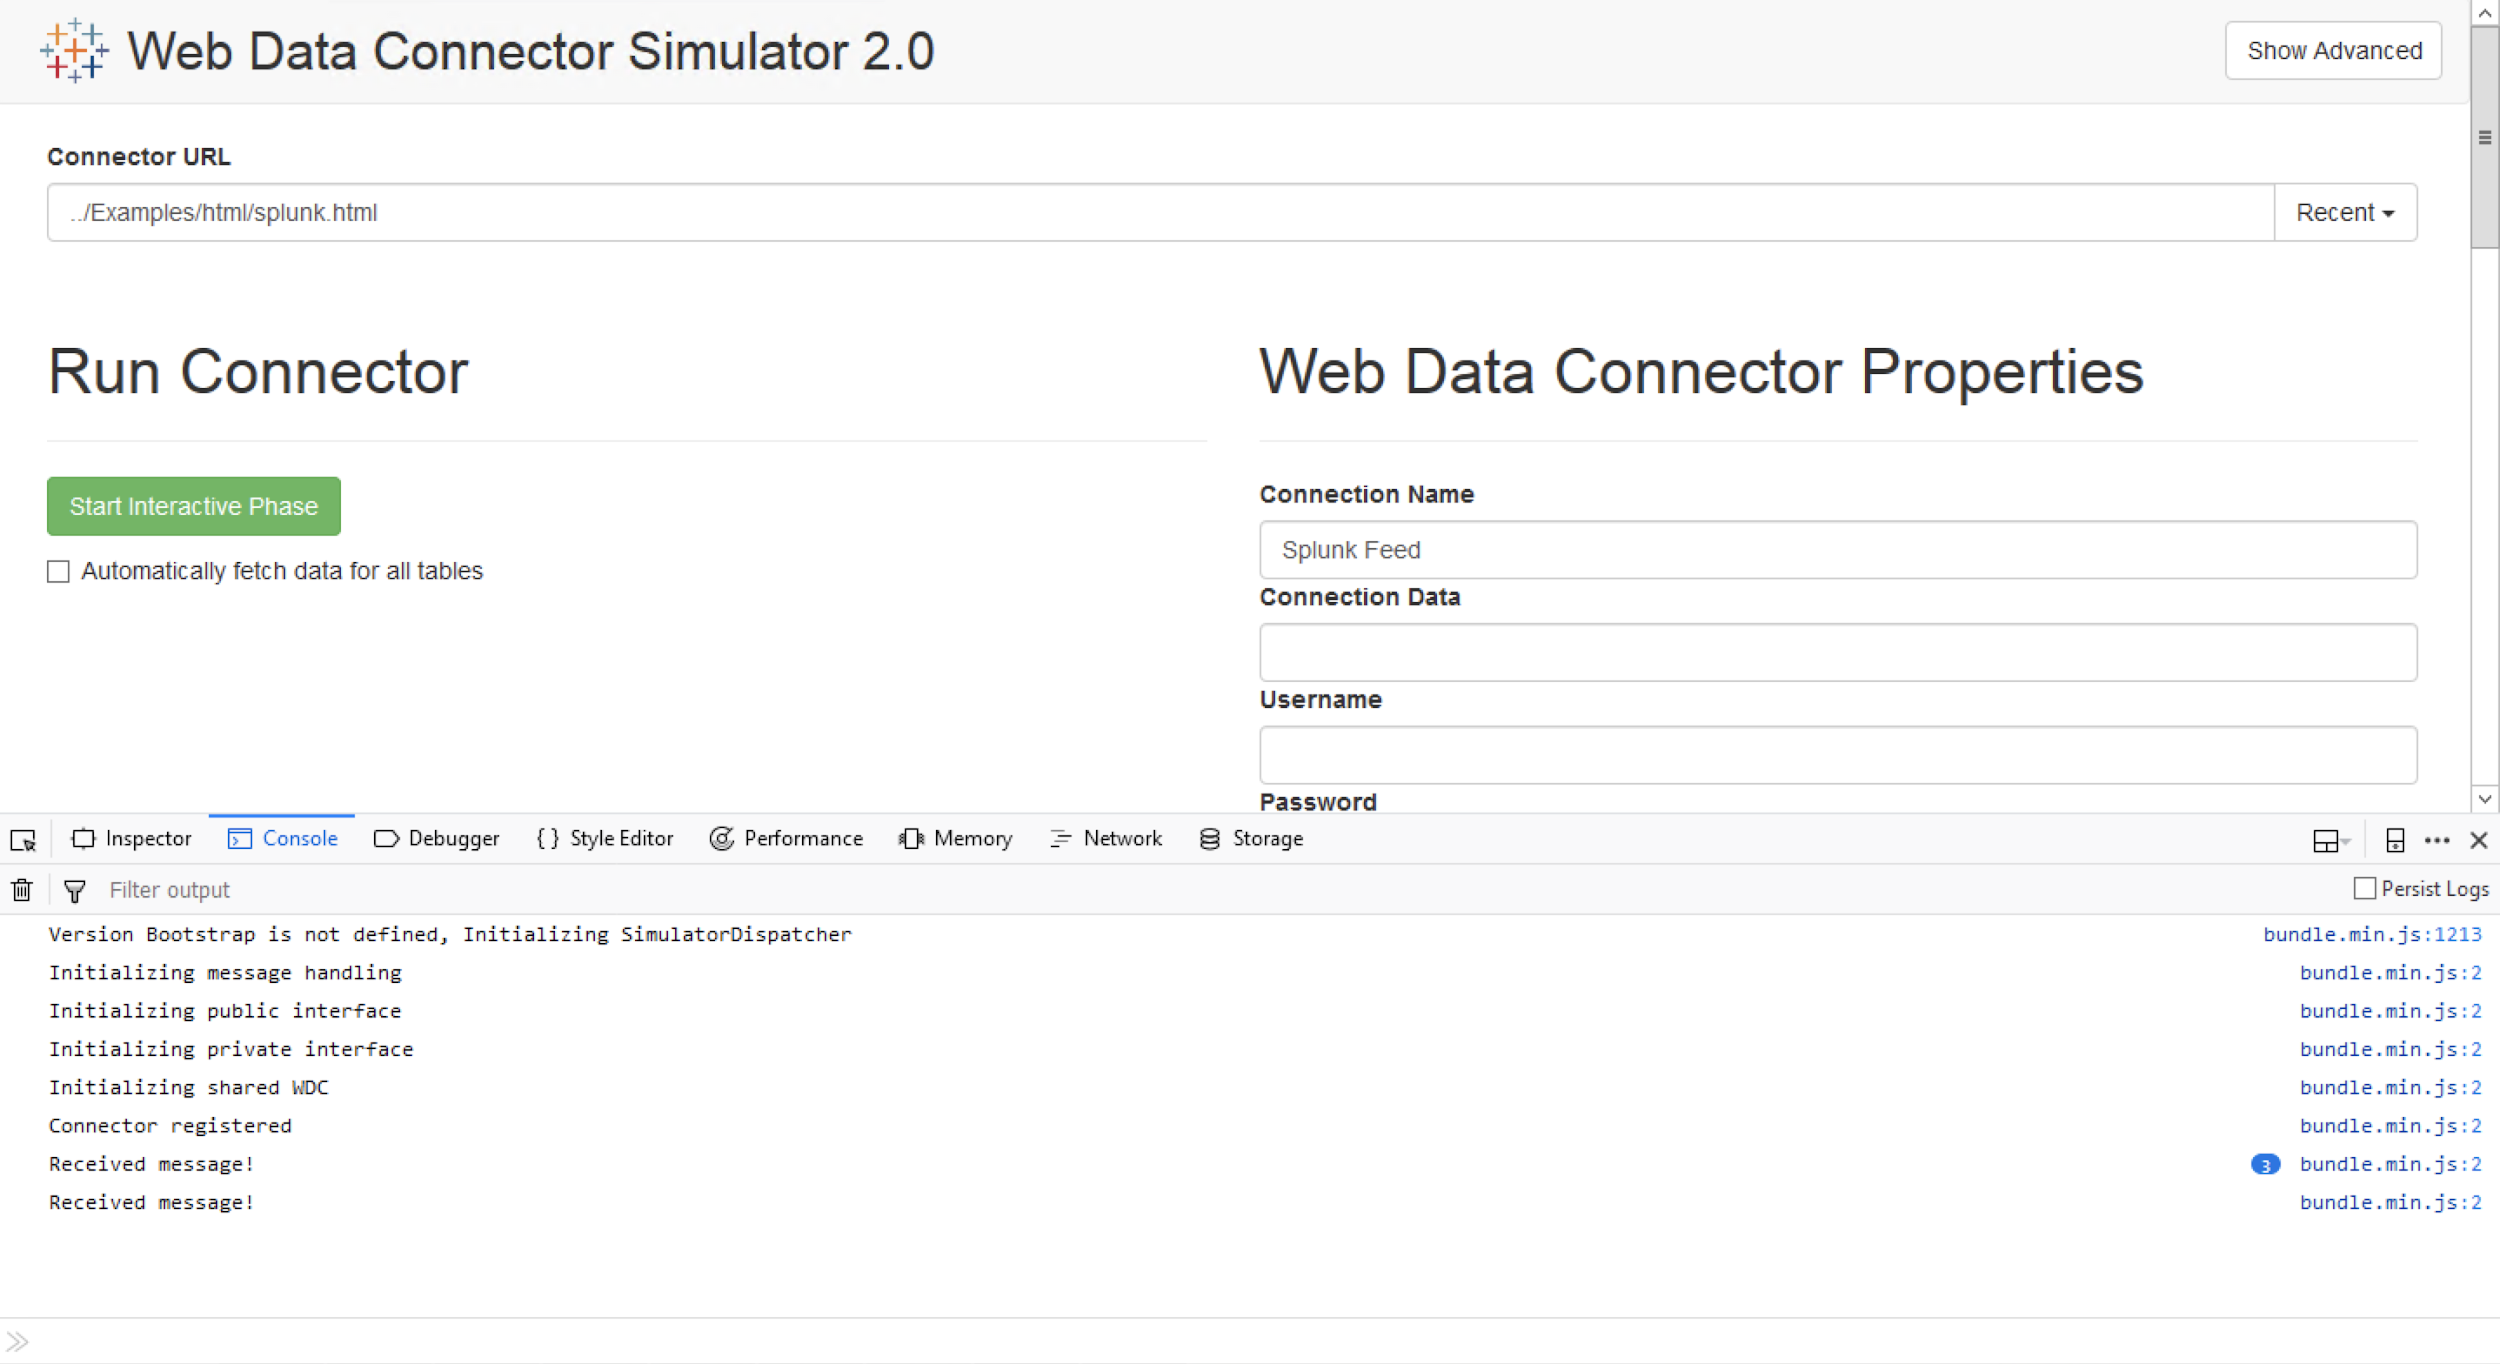
Test Generated URL Inside Tableau Simulator (Optional)
Note: You’ll need the URL from "Copy link to Tableau WDC" from previous step.
You can install your own instance of Tableau Simulator OR test with FDSE's instance using the following steps:
a. Paste the URL from the previous step
b. Press the "Initialize Connector" button.
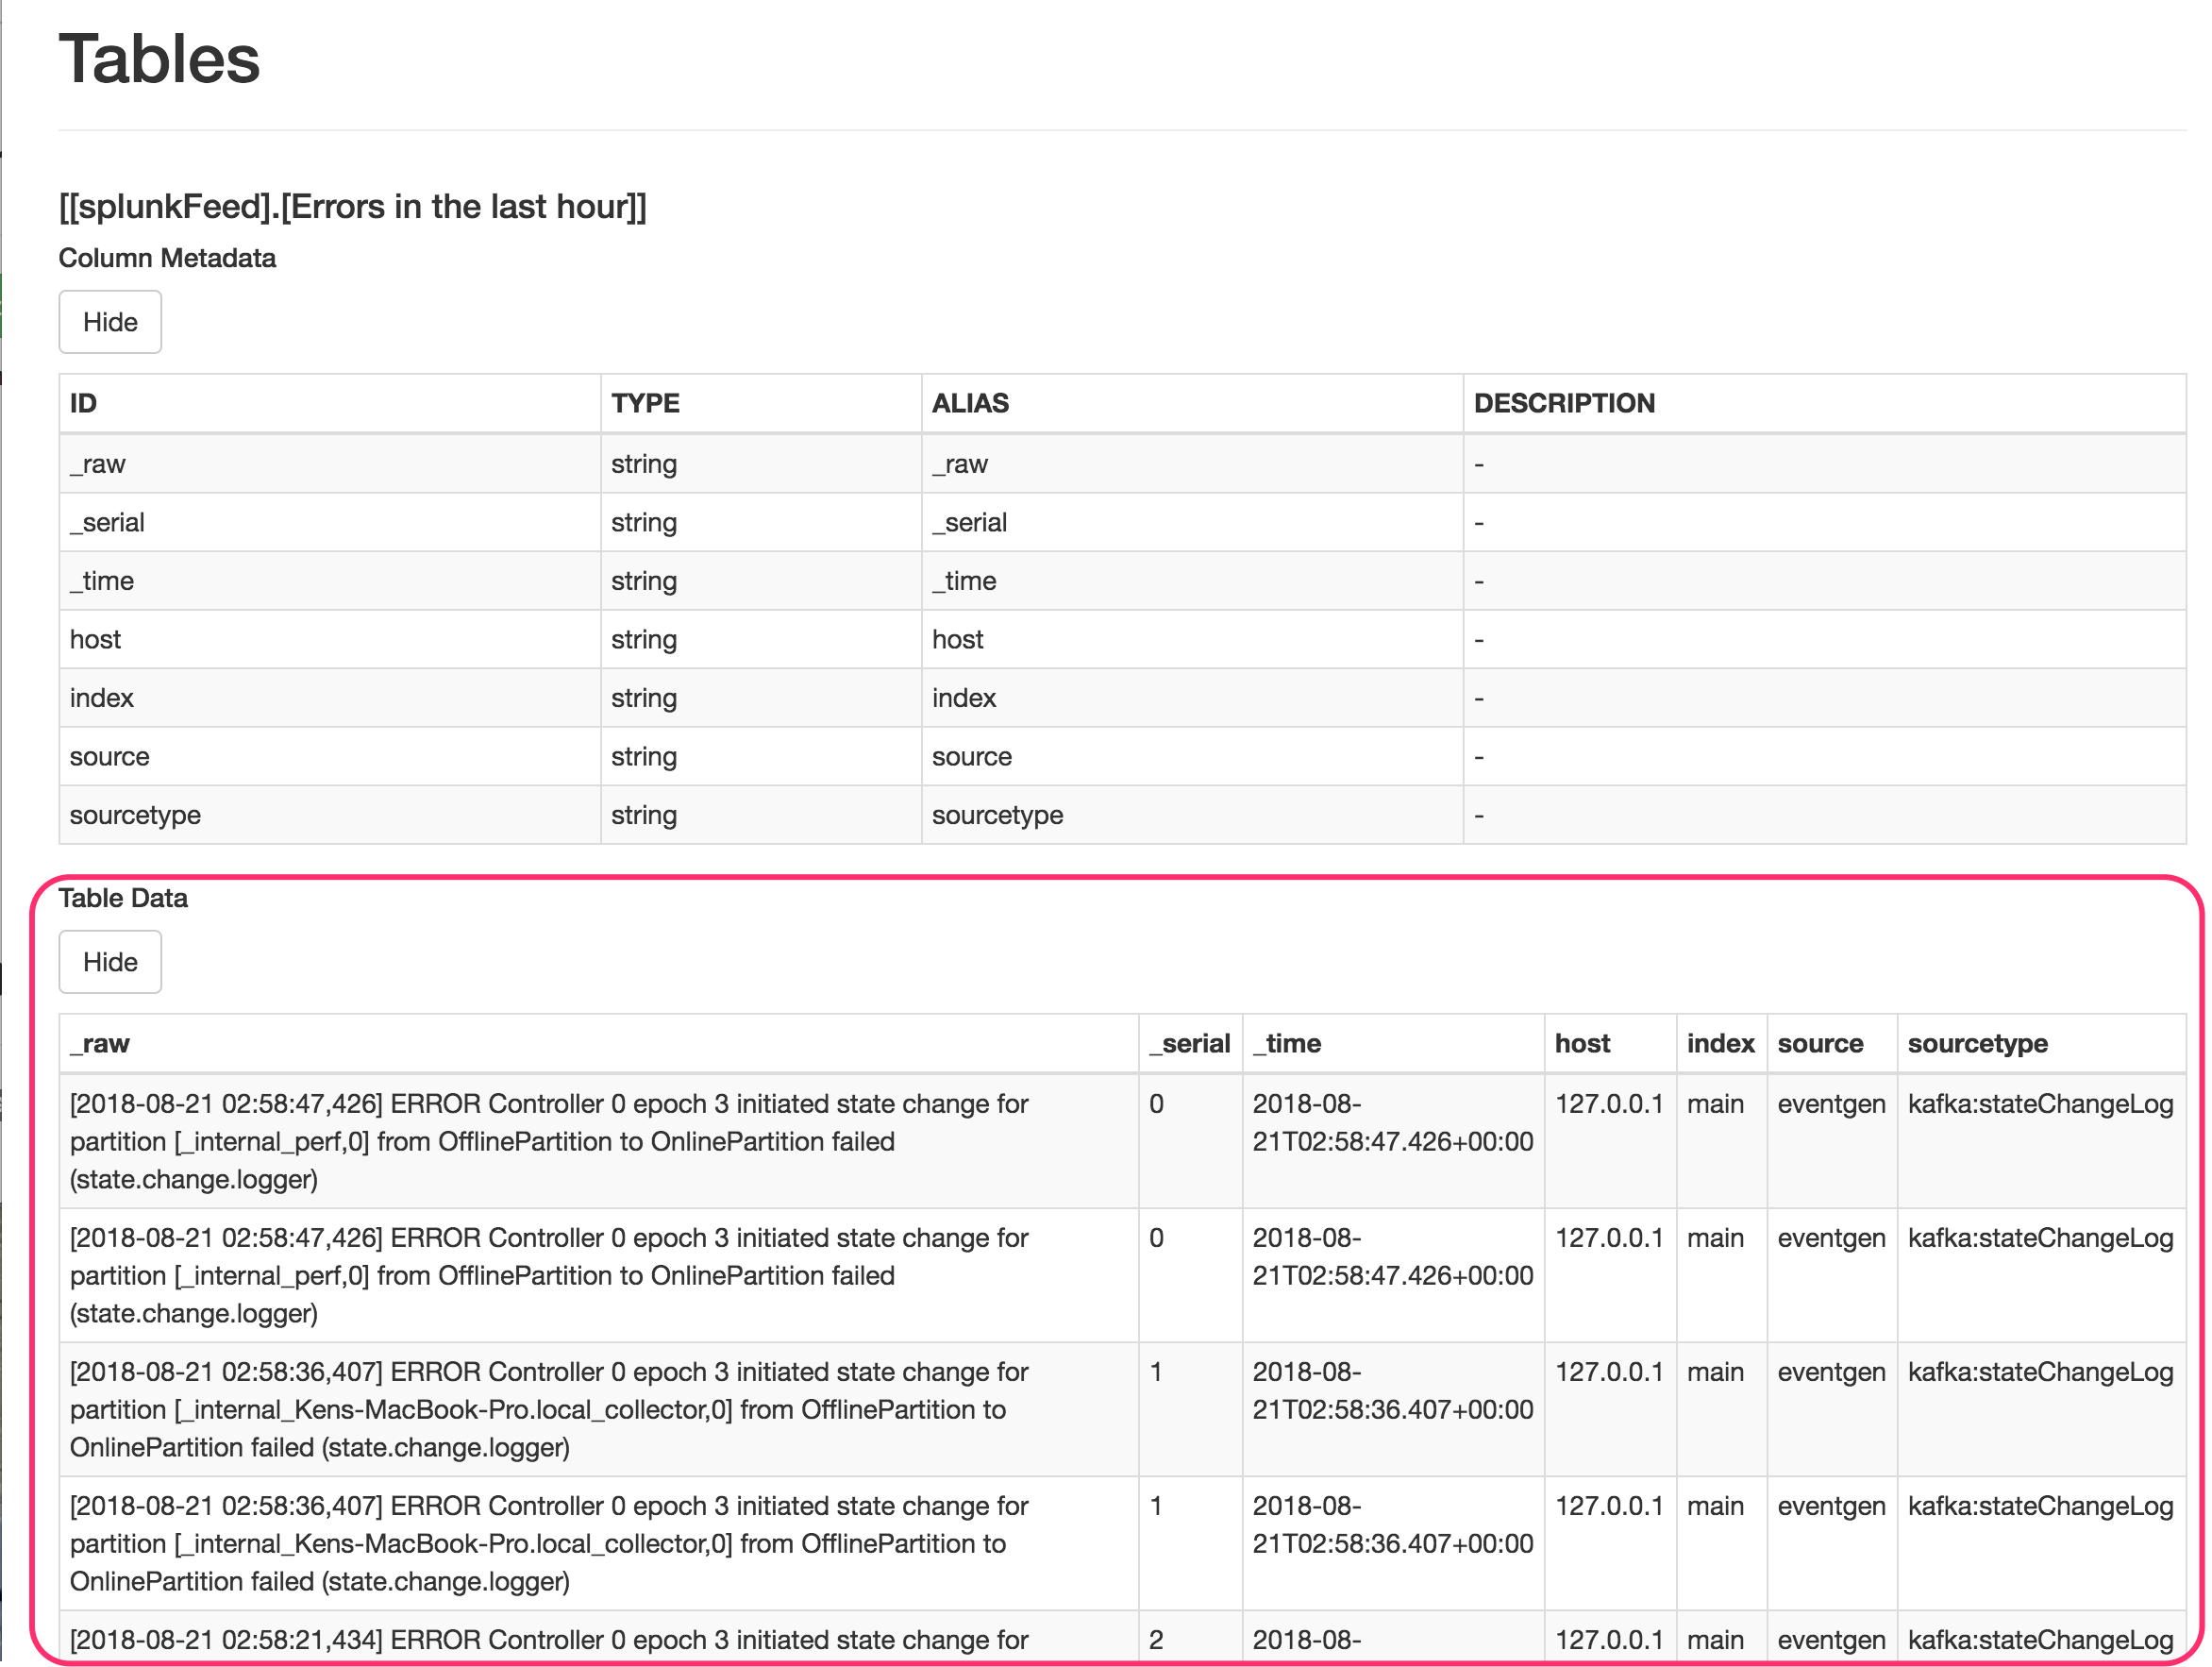
c. In the pop-up window will appear press the "Get Splunk Data!" button
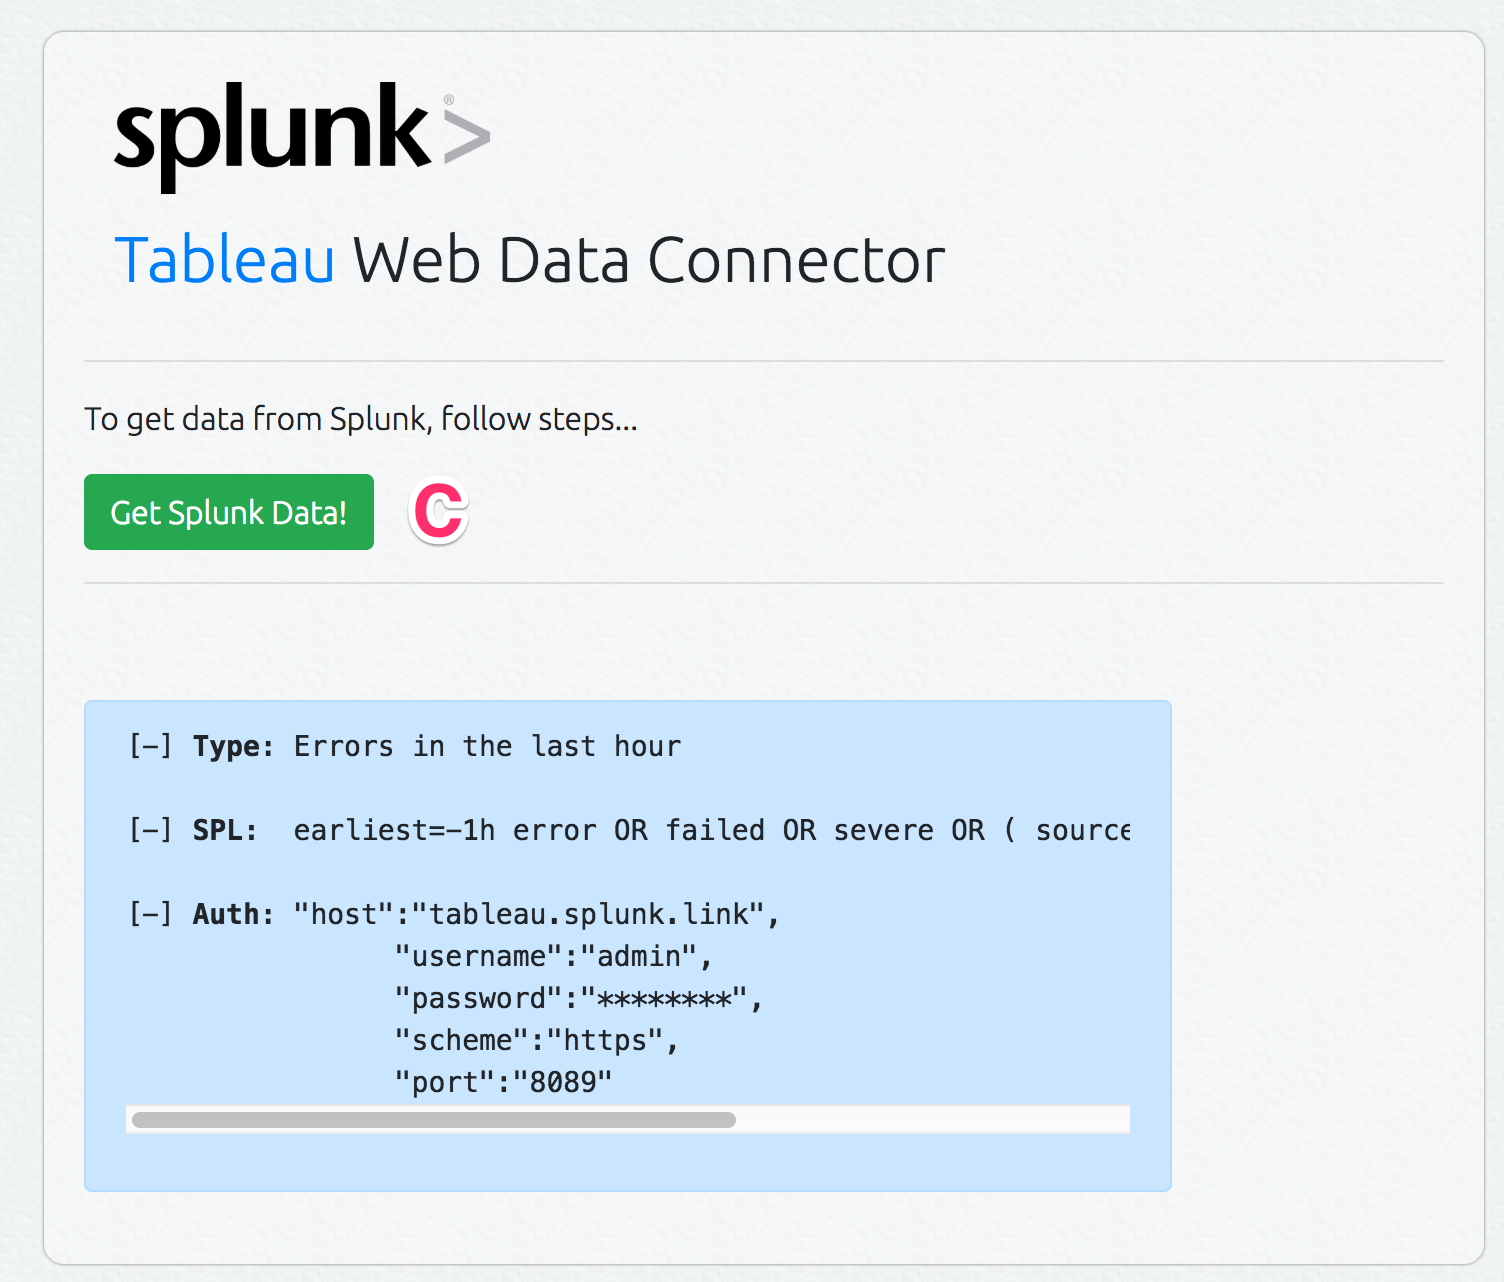
d. Go back to the previous Simulator Window, please wait until data appears in the Table section at the bottom of the page.
e. Press "Fetch Data"
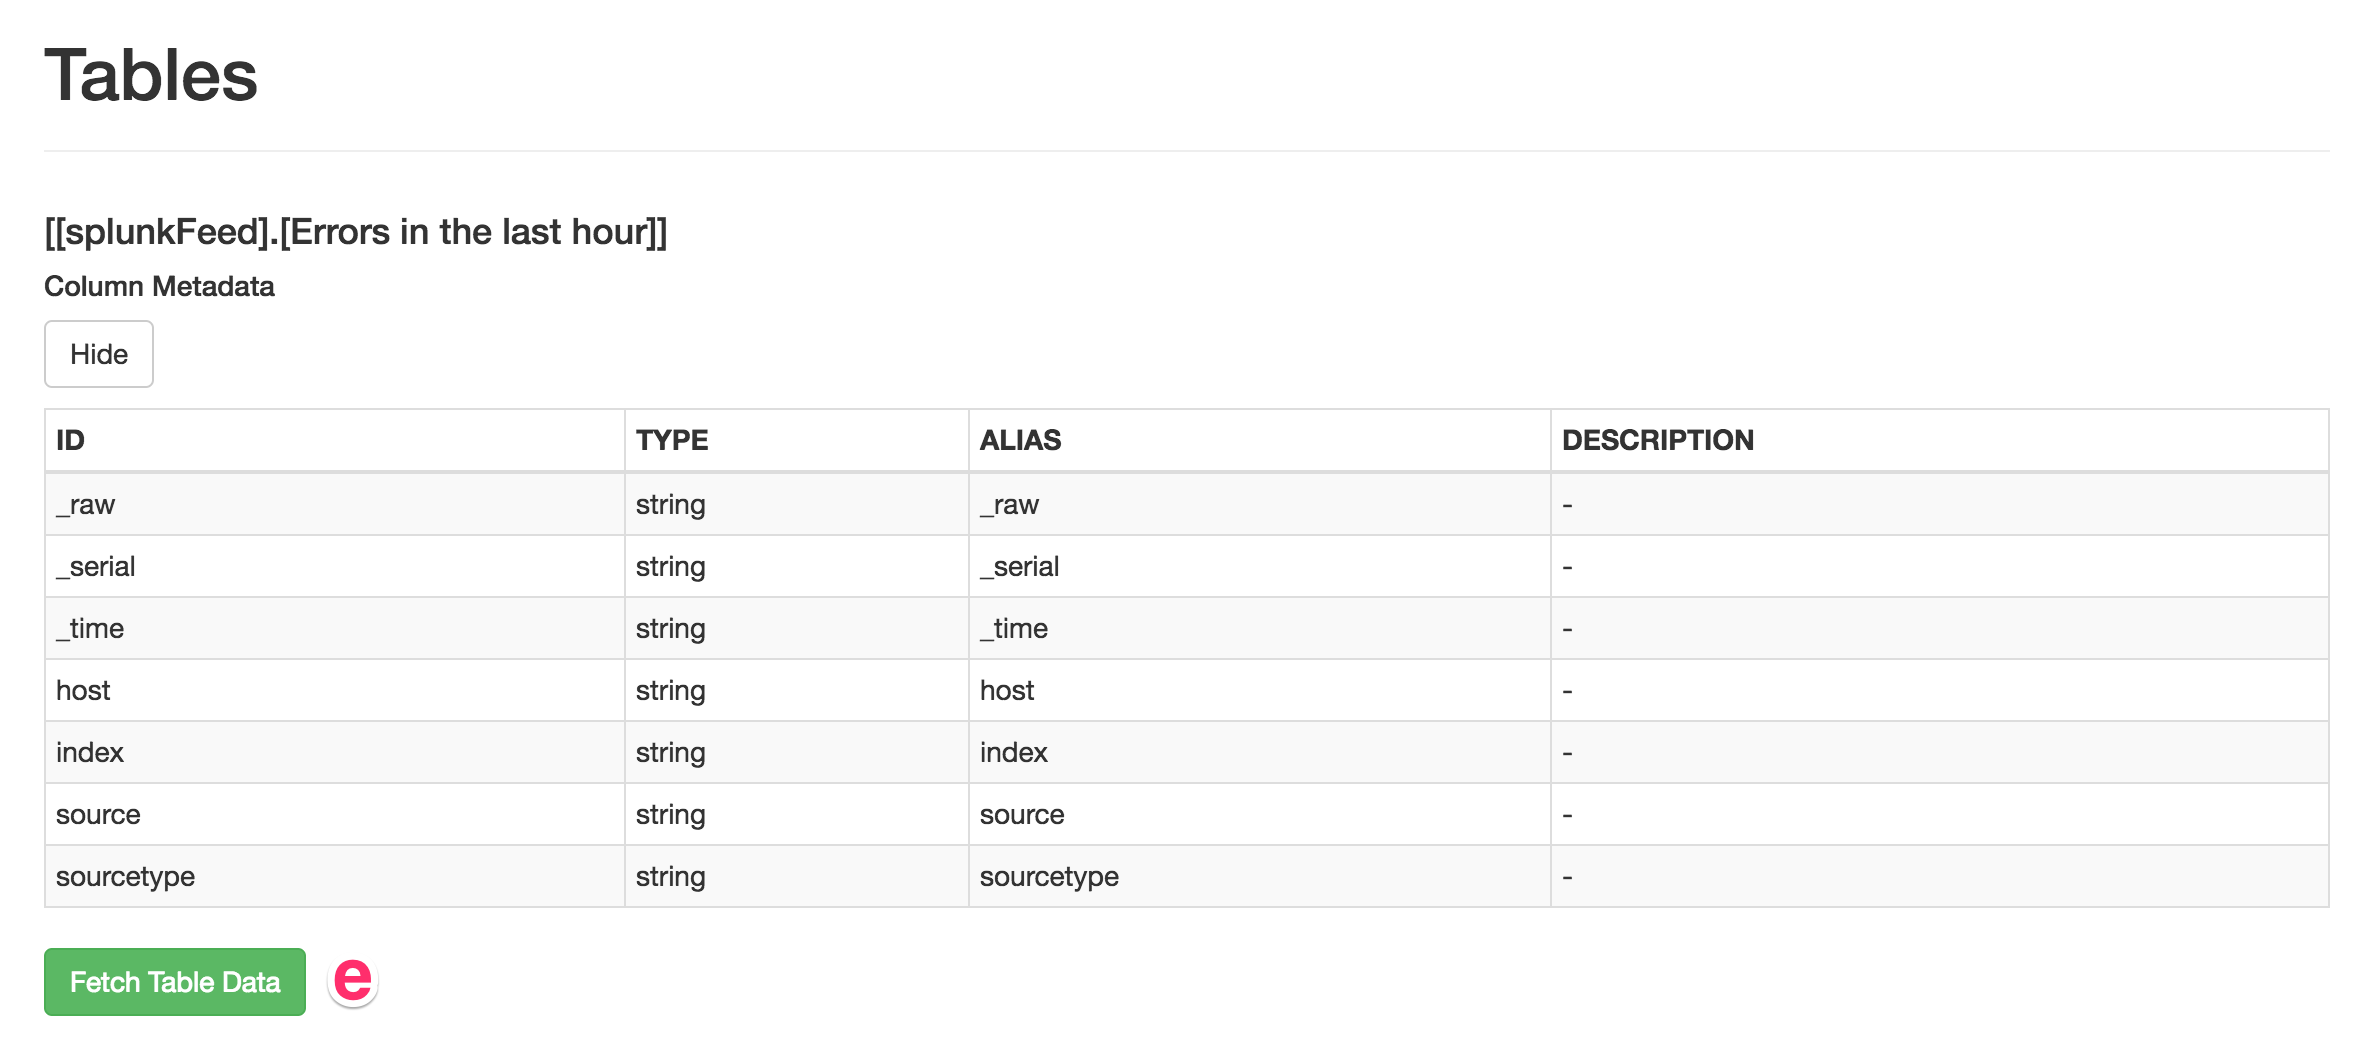
f. If Table Data appears - Congrats! The Splunk Tableau WDC works with the generated URL! You’re ready to use this WDC to push Splunk data to Tableau.
-
Tips and Tricks
-
If you require a timeframe for custom SPL execution, use the search time modifiers such as "daysago", "earliest" and "latest" fields to generate relevant data.
-
Not specifying the "table" command in your SPL, would yield all metadata for the SPL.
-
-
Follow the "Use a WDC in Tableau Desktop" instructions found here.
-
For Step 2, enter the URL you generated with the Splunk Tableau WDC from previous section.
-
Follow the "Use a WDC in Tableau Server" found here.
-
When adding a new data source -> Web Data Connector please use the URL you generated in the previous section.
Ensure that the query you run on the WDC, runs without errors on your Splunk instance. If the query fails on Splunk, Tableau will appear to be running a never ending query and not error out.
If you think paging is returning limited events, Increase the response events to more than 500000 events.
- Check for the documentation around
max_countat limits.conf
[restapi]
max_count=50000000
Useful to debug the WDC. Depending on your browser, enable the developer tools as reported below and select the tab "Console" to monitor WDC log in real-time. Informational messages, warnings (in yellow) and errors (in red) will be listed in this window. The screenshot reported is an example of Firefox console without errors.
- keyboard shortcut:
- Ctrl + Shift + J (Windows/Linux)
- Command + Option + J (Mac)
- menu location: Menu > More Tools > Developer Tools > Console tab
- keyboard shortcut:
- Ctrl + Shift + J (Windows/Linux)
- Command + Shift + J (Mac)
- menu location: Menu > Developer > Browser Console
- keyboard shortcut: F12
- menu location: Menu cog icon > F12 Developer Tools > Console tab
- menu location (Edge): Menu "three dots" icon > F12 Developer Tools > Console tab
- keyboard shortcut:
- Ctrl + Shift + J (Windows/Linux)
- Command + Option + J (Mac)
- menu location:
The Opera developer tools must be enabled before use.
- Menu > More tools > enable "Show developer menu"
- Menu > Developer > Developer Tools
- keyboard shortcut: Command + Option + C
- menu location:
The Safari developer tools must be enabled before use.
- Safari > Preferences > Advanced > enable "Show Develop menu in menu bar"
- Develop > Show Error Console
In Powershell (Win) or Terminal (Apple/Unix), browse to your Tableau installation directory and launch tableau with option -DDebugWDC. Make sure there are no errors when launching the WDC.
Example: PS C:\Program Files\Tableau\Tableau 2018.2\bin> .\tableau.exe -DDebugWDC
| Image | Indication |
|---|---|
 |
The Certificate is NOT valid. |
 |
The Certificate is valid. |
Please note above screenshots have been taken using Chrome, graphics might differ from browser to browser.
If WDC has been deployed to Tableau Server, make sure you have added it to the safe list. From Powershell (Win):
-
To verify WDCs into the safe list, execute:
PS C:\Program Files\Tableau\Tableau Server\10.5\bin> .\tabadmin whitelist_webdataconnector -l -
To add Splunk WDC into the safe list, execute:
PS C:\Program Files\Tableau\Tableau Server\10.5\bin> .\tabadmin whitelist_webdataconnector -a <https://sh.example.com:8089>, replacing the URL with yours -
To restart Tableau Server after modifying the safe list, execute:
PS C:\Program Files\Tableau\Tableau Server\10.5\bin> .\tabadmin restart
Edit $SPLUNK_HOME/etc/system/local/server.conf configuration file as shown below (more details), then restart Splunk.
[httpServer]
crossOriginSharingPolicy = <your_site_address>
Before proceeding, please:
-
Make sure you have root/sudo access to the server running your Splunk instance,
-
Verify your company security policy for issuing valid SSL Certificates.
-
DNS Mapping of your Splunk Instance
The Splunk Instance (search head) the WDC interacts with needs public DNS resolution. If your domain is not registered you’ll need to employ a service like Cloudflare DNS.
Using Cloudflare is straight forward. Just ensure to assign Sub-Domain A value to the IP address of your publicly exposed Splunk search head.
-
Issue Valid SSL Certificate For Splunk Management Port
In compliance with your company security policy, you might have to request the certificate through an external third party Certificate Authority (e.g. Symantec, GoDaddy, Comodo, etc). In association with the created domain and after payment and validation, they will provide a couple of PEM files needed to complete this configuration (skip to next step).
Otherwise, with the domain from previous step, use LetsEncrypt to issue new PEM files associated with that domain. Following commands can be executed from any Apple or Linux based machine.
-
Apple Computers in Terminal
$ brew install certbot$ certbot certonly --manual --preferred-challenges dns --config-dir=. --work-dir=. --logs-dir=.Note: Enter Splunk Search Head DNS (domain.tld) when asked by certbot.
-
On Linux on Bash Shell
$ sudo yum install letsencrypt$ sudo letsencrypt certonly --standalone -d *<replace with splunk DNS hostname>*
-
-
Combine SSL Cert chain and PKey
The previous step created fullchain.pem and privkey.pem. Combine these two files into a single file:
-
On Apple Computer Terminal or Linux Bash Shell
$ cat fullchain.pem privkey.pem > consolidated.pem -
Move the
consolidated.pemto$SPLUNK_HOME/etc/auth/on the Splunk Search Head.
-
-
Enable Management Port to use SSL with a Valid Certificate
-
Open
$SPLUNK_HOME/etc/system/local/server.conf -
Update the sslConfig stanza to be this:
[sslConfig] serverCert = $SPLUNK_HOME/etc/auth/consolidated.pemNote: Default value for enableSplunkdSSL is
true -
Restart Splunk
-
If you are in a situation where Tableau parses boolean, date, float, int values differently and/or if you observe unreliable results than what you see in Splunk. ⤵︎
💡 Use
evalto change the field type from boolean to string. For example:eval newfield="'".oldfield."'"
💡 List of functions supported by Tableau.
💡 In Tableau, Publish the datasource directly, you may use relevant function in workbook to convert a string into other data type, doing this will not break the scheduled refresh.
What if Splunk Search is too long and not working? Tableau's Internet Explorer like WDC Window Supports maximum ~2K characters in as Connector Url length. ⤵︎
💡 Wrap your bulky search via macro and refer to example of macro. This shall help shorten the length of Url well within 2K.
Note: Some external images and excerpts come from:
-
Tableau: Per wdc_library_versions, Connectors will only be compatible with Tableau 10.0 and later.
-
Splunk: Version 7.x and later.
- Erica Pescio
- Mayur Pipaliya
- Karthika Krishnan
- Joe Welsh
- Steven Hanna
-
Want to contribute? Great! Feel free to create a PR.
-
Found a 🐛 bug? Open an issue with some emojis. Issues without emojis are not valid.
