This is a tutorial about how to render on a map road line surfaces with an irregular-looking pattern using a software stack with Mapnik and CartoCSS.
Why would you want to do this? A possible use case for this is rendering the road surface. You could render paved roads with a full color, while rendering unpaved roads with the irregular-looking pattern:

This document presents various different technical approaches and discusses the advantages and disadvantages of each of them.
We start with an example style. We use the same setup as the “openstreetmap-carto” style. Especially we use the same database layout, and therefor we copy openstreetmap-carto.lua and openstreetmap.carto.style from there. Now we start with a simple project.mml that queries some roads from the OSM database:
center:
  - 0
  - 0
  - 4

# Various parts to be included later on
_parts:
  # Extents are used for tilemill, and don't actually make it to the generated XML
  osm2pgsql: &osm2pgsql
    type: "postgis"
    dbname: "gis"
    key_field: ""
    geometry_field: "way"
    extent: "-20037508,-20037508,20037508,20037508"

Stylesheet:
  - roads.mss

Layer:
  - id: roads-fill
    geometry: linestring
    Datasource:
      <<: *osm2pgsql
      table: |-
        (SELECT
            way,
            feature,
            layernotnull,
            z_order
          FROM (
            SELECT
                way,
                'highway_' || highway AS feature,
                COALESCE(layer,0) AS layernotnull,
                z_order
              FROM planet_osm_line
            ) AS features
          ORDER BY
            layernotnull,
            z_order
) AS roads_fill-
The query
'highway_' || highway AS featurecreates a columnfeature. Roads withhighway=primaryfor example getfeature=highway_primary. -
In OSM, the vertical order of bridges and tunnels can be described with the
layerkey: If two bridges are crossing, the higher one gets the higherlayervalue. We calculatelayernotnullwithCOALESCE(layer,0) AS layernotnull: If an element has a validlayervalue, it is used. Otherwise,0is used as default value. -
z_orderis an integer value that is calculated during database import (seeopenstreetmap-carto.luafor details) for all roads: More important road types get higher thez_ordervalues.highway=primaryhasz_order=360.highway=secondaryhasz_order=350. -
We order first by layernotnull, and than by z_order. So for a normal crossroad between a primary and a secondary road (both with
layer=0), the primary road is rendered above the secondary road because it’s the primary road is the more important one. But a secondary road on a bridge withlayer=2is rendered above a primary road withlayer=0on the ground.
This is the corresponding roads.mss:
Map {
  background-color: white;
}

#roads-fill {

  ::fill {

    [feature = 'highway_primary'] {
        line-color: #fcd6a4;
        line-width: 10;
        [zoom >= 18] { line-width: 15; }
        [zoom >= 19] { line-width: 20; }
    }

    [feature = 'highway_secondary'] {
        line-color: #f7fabf;
        line-width: 5;
        [zoom >= 18] { line-width: 10; }
        [zoom >= 19] { line-width: 15; }
    }

  }

}
On higher zoom levels, the roads are drawn thicker than on lower zoom levels. And within each zoom level, the primary roads are drawn thicker than the secondary roads.
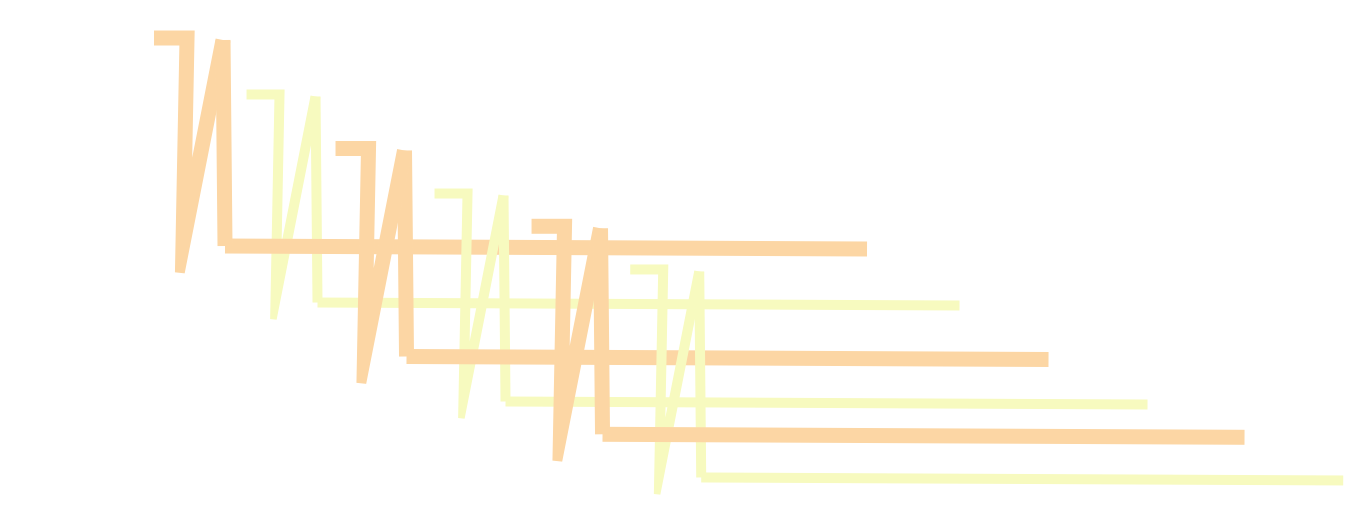
We use example data. From top left to bottom right we have:
- primary road, paved
- secondary road, paved
- primary road, unpaved, layer 1
- secondary road, unpaved, layer 1
- primary road, unpaved, layer 2
- secondary road, unpaved, layer 2
At some of the corners, the road line is split, at other it is continuous.
The code is available at code01 and it renders like this:
In this rendering, wherever a road is split into two OSM ways, the rendering is different and ugly compared to OSM nodes in the middle of a single OSM way. Round forms give us a better rendering:
Map {
  background-color: white;
}

#roads-fill {

  ::fill {

    [feature = 'highway_primary'] {
        line-color: #fcd6a4;
        line-width: 10;
        [zoom >= 18] { line-width: 15; }
        [zoom >= 19] { line-width: 20; }
        line-cap: round;
        line-join: round;
    }

    [feature = 'highway_secondary'] {
        line-color: #f7fabf;
        line-width: 5;
        [zoom >= 18] { line-width: 10; }
        [zoom >= 19] { line-width: 15; }
        line-cap: round;
        line-join: round;
    }

  }

}
The code is available at code02 and it renders like this:

Now we try to render unpaved roads differently from paved roads: We want to render them with an irregular-looking pattern, reminding the user about the uneven surface of these roads. Therefor, we have to query the surface key from the OSM database. We will also order the data by surface, so that a paved secondary road is rendered above an unpaved secondary road, but still below an unpaved primary road (though this will occur rather seldom in the OSM database):
center:
  - 0
  - 0
  - 4

# Various parts to be included later on
_parts:
  # Extents are used for tilemill, and don't actually make it to the generated XML
  osm2pgsql: &osm2pgsql
    type: "postgis"
    dbname: "gis"
    key_field: ""
    geometry_field: "way"
    extent: "-20037508,-20037508,20037508,20037508"

Stylesheet:
  - roads.mss

Layer:
  - id: roads-fill
    geometry: linestring
    Datasource:
      <<: *osm2pgsql
      table: |-
        (SELECT
            way,
            feature,
            int_surface,
            layernotnull,
            z_order
          FROM (
            SELECT
                way,
                'highway_' || highway AS feature,
                surface AS int_surface,
                COALESCE(layer,0) AS layernotnull,
                z_order
              FROM planet_osm_line
            ) AS features
          ORDER BY
            layernotnull,
            z_order,
            CASE WHEN int_surface IN ('unpaved') THEN 0 ELSE 2 END
        ) AS roads_fill
The code is available at code03.
Now we have to write MSS code that actually renders a pattern. The natural choice would be Mapnik’s line-pattern feature. Mapnik renders this pattern following the geometry of the OSM way, blending it at angles within the OSM way. We create a SVG pattern file with the correct height for each existing combination of road type and width:
Map {
  background-color: white;
}

#roads-fill {

  ::fill {

    [feature = 'highway_primary'] {
        line-color: #fcd6a4;
        line-width: 10;
        [int_surface = 'unpaved'] { line-pattern-file: url("symbols/unpaved/unpaved_primary-fill_10.svg"); }
        [zoom >= 18] {
          line-width: 15;
          [int_surface = 'unpaved'] { line-pattern-file: url("symbols/unpaved/unpaved_primary-fill_15.svg"); }
        }
        [zoom >= 19] {
          line-width: 20;
          [int_surface = 'unpaved'] { line-pattern-file: url("symbols/unpaved/unpaved_primary-fill_20.svg"); }
        }
        line-cap: round;
        line-join: round;
    }

    [feature = 'highway_secondary'] {
        line-color: #f7fabf;
        line-width: 5;
        [int_surface = 'unpaved'] { line-pattern-file: url("symbols/unpaved/unpaved_secondary-fill_5.svg"); }
        [zoom >= 18] {
          line-width: 10;
          [int_surface = 'unpaved'] { line-pattern-file: url("symbols/unpaved/unpaved_secondary-fill_10.svg"); }
        }
        [zoom >= 19] {
          line-width: 15;
          [int_surface = 'unpaved'] { line-pattern-file: url("symbols/unpaved/unpaved_secondary-fill_15.svg"); }
        }
        line-cap: round;
        line-join: round;
    }

  }

}
Obviously we need an own pattern file for each combination between color and width. Mapnik renders the pattern as it is. Options like line-pattern-cap and line-pattern-join are not available.
The code is available at code04 and it renders like this:

Advantages:
- MSS code is easy to understand.
- SQL code is trivial.
Disadvantages:
- MSS code is verbose.
- We need many pattern files (one for each combination of road color and width – could be generated automatically by a script?).
- Changes to the road width require adapting the pattern files.
- Rendering artifacts on joints of OSM ways and crossing OSM ways and within OSM ways if the angle is extreme.
- Does not look good for very thin road lines
An alternative to line-pattern exists: We can print various irregular dash-arrays to get a random-looking pattern.
Map {
  background-color: white;
}

#roads-fill {

  ::fill {

    [feature = 'highway_primary'] {
        line-color: #fcd6a4;
        line-width: 10;
        [int_surface = 'unpaved'] {
          line-color: #ffe1af;
          b/line-dasharray: 0.9,3,1,2,1,1,1,2.1,;
          b/line-offset: 3;
          b/line-width: 0.4;
          b/line-color: #573d12;
          c/line-dasharray: 1,3,1,2.2,0.9,1,1,3,1,2.2;
          c/line-offset: 1;
          c/line-width: 0.4;
          c/line-color: #573d12;
          d/line-dasharray: 1,3,1.1,2.4,1,1.3,;
          d/line-offset: -1;
          d/line-width: 0.4;
          d/line-color: #573d12;
          e/line-dasharray: 1,3.1,1,2.4,;
          e/line-offset: -3;
          e/line-width: 0.4;
          e/line-color: #573d12;
        }
        [zoom >= 18] {
          line-width: 15;
          [int_surface = 'unpaved'] {
            line-color: #ffe1af;
            b/line-dasharray: 0.9,3,1,2,1,1,1,2.1,;
            b/line-offset: 6;
            b/line-width: 0.4;
            b/line-color: #573d12;
            c/line-dasharray: 1,3,1,2.2,0.9,1,1,3,1,2.2;
            c/line-offset: 4;
            c/line-width: 0.4;
            c/line-color: #573d12;
            d/line-dasharray: 1,3,1.1,2.4,1,1.3,;
            d/line-offset: 2;
            d/line-width: 0.4;
            d/line-color: #573d12;
            e/line-dasharray: 1,3.1,1,2.1.4,;
            e/line-offset: 0;
            e/line-width: 0.4;
            e/line-color: #573d12;
            f/line-dasharray: 0.9,3,1,2,1,1,1,2.5,;
            f/line-offset: -2;
            f/line-width: 0.4;
            f/line-color: #573d12;
            g/line-dasharray: 1,3,1,2.2,0.9,1,1,3,1,2.6;
            g/line-offset: -4;
            g/line-width: 0.4;
            g/line-color: #573d12;
            h/line-dasharray: 1,3,1.1,2.4,1,1.7,;
            h/line-offset: -6;
            h/line-width: 0.4;
            h/line-color: #573d12;
          }
        }
        [zoom >= 19] {
          line-width: 20;
          [int_surface = 'unpaved'] {
            line-color: #ffe1af;
            b/line-dasharray: 0.9,3,1,2,1,1,1,2.1,;
            b/line-offset: 8;
            b/line-width: 0.4;
            b/line-color: #573d12;
            c/line-dasharray: 1,3,1,2.2,0.9,1,1,3,1,2.2;
            c/line-offset: 6;
            c/line-width: 0.4;
            c/line-color: #573d12;
            d/line-dasharray: 1,3,1.1,2.4,1,1.3,;
            d/line-offset: 4;
            d/line-width: 0.4;
            d/line-color: #573d12;
            e/line-dasharray: 1,3.1,1,2.1.4,;
            e/line-offset: 2;
            e/line-width: 0.4;
            e/line-color: #573d12;
            f/line-dasharray: 0.9,3,1,2,1,1,1,2.5,;
            f/line-offset: 0;
            f/line-width: 0.4;
            f/line-color: #573d12;
            g/line-dasharray: 1,3,1,2.2,0.9,1,1,3,1,2.6;
            g/line-offset: -2;
            g/line-width: 0.4;
            g/line-color: #573d12;
            h/line-dasharray: 1,3,1.1,2.4,1,1.7,;
            h/line-offset: -4;
            h/line-width: 0.4;
            h/line-color: #573d12;
            i/line-dasharray: 1,3.1,1,2.1.8,;
            i/line-offset: -6;
            i/line-width: 0.4;
            i/line-color: #573d12;
            j/line-dasharray: 0.9,3,1,2,1,1,1,2.9,;
            j/line-offset: -8;
            j/line-width: 0.4;
            j/line-color: #573d12;
          }
        }
        line-cap: round;
        line-join: round;
    }

    [feature = 'highway_secondary'] {
        line-color: #f7fabf;
        line-width: 5;
          [int_surface = 'unpaved'] {
            line-color: #ffffc7;
            b/line-dasharray: 0.9,3,1,2,1,1,1,2.1,;
            b/line-offset: 2;
            b/line-width: 0.4;
            b/line-color: #565a28;
            c/line-dasharray: 1,3,1,2.2,0.9,1,1,3,1,2.2;
            c/line-offset: 0;
            c/line-width: 0.4;
            c/line-color: #565a28;
            d/line-dasharray: 1,3,1.1,2.4,1,1.3,;
            d/line-offset: -2;
            d/line-width: 0.4;
            d/line-color: #565a28;
          }
        [zoom >= 18] {
          line-width: 10;
          [int_surface = 'unpaved'] {
            line-color: #ffffc7;
            b/line-dasharray: 0.9,3,1,2,1,1,1,2.1,;
            b/line-offset: 3;
            b/line-width: 0.4;
            b/line-color: #565a28;
            c/line-dasharray: 1,3,1,2.2,0.9,1,1,3,1,2.2;
            c/line-offset: 1;
            c/line-width: 0.4;
            c/line-color: #565a28;
            d/line-dasharray: 1,3,1.1,2.4,1,1.3,;
            d/line-offset: -1;
            d/line-width: 0.4;
            d/line-color: #565a28;
            e/line-dasharray: 1,3.1,1,2.4,;
            e/line-offset: -3;
            e/line-width: 0.4;
            e/line-color: #565a28;
          }
        }
        [zoom >= 19] {
          line-width: 15;
          [int_surface = 'unpaved'] {
            line-color: #ffffc7;
            b/line-dasharray: 0.9,3,1,2,1,1,1,2.1,;
            b/line-offset: 6;
            b/line-width: 0.4;
            b/line-color: #565a28;
            c/line-dasharray: 1,3,1,2.2,0.9,1,1,3,1,2.2;
            c/line-offset: 4;
            c/line-width: 0.4;
            c/line-color: #565a28;
            d/line-dasharray: 1,3,1.1,2.4,1,1.3,;
            d/line-offset: 2;
            d/line-width: 0.4;
            d/line-color: #565a28;
            e/line-dasharray: 1,3.1,1,2.1.4,;
            e/line-offset: 0;
            e/line-width: 0.4;
            e/line-color: #565a28;
            f/line-dasharray: 0.9,3,1,2,1,1,1,2.5,;
            f/line-offset: -2;
            f/line-width: 0.4;
            f/line-color: #565a28;
            g/line-dasharray: 1,3,1,2.2,0.9,1,1,3,1,2.6;
            g/line-offset: -4;
            g/line-width: 0.4;
            g/line-color: #565a28;
            h/line-dasharray: 1,3,1.1,2.4,1,1.7,;
            h/line-offset: -6;
            h/line-width: 0.4;
            h/line-color: #565a28;
          }
        }
        line-cap: round;
        line-join: round;
    }

  }

}
This code is based on Mapnik’s ability to render various lines for a single geometry – here starting with b/, c/ and so on. For these lines, we use a dasharray that looks irregular. Furthermore, each of these dasharrays has a different length to make sure that we do not get a regular-looking pattern on long straight line geometries. The larger our normal road line is, the more dasharray lines we need.
The code is available at code05 and it renders like this:

Advantages:
- SQL code is trivial.
- Looks good also for very thin road lines
Disadvantages:
- MSS code is redundant and extremely verbose.
- Changes to the road width require adapting the code for the dash-arrays.
- Rendering artifacts on joints of OSM ways and crossing OSM ways and within OSM ways if the angle is extreme.
To get a rendering without any artifacts, we would need something like a polygon-pattern. This pattern would not be blended following the line geometry, but it would be aligned globally like normal polygon-pattern, just only visible where the line geometry of the road is, considering also line-cap and line-join for the road. This would even guarantee smooth rendering without any artifacts for example for a primary unpaved and a secondary unpaved road crossing (if we use the same pattern for these road types and just change the color). It would also play very well together with area:highway rendering of polygon geometries: both could use the same pattern file.
Mapnik has no build-in support for direct polygon-pattern rendering for line geometries until version 3.0.22. But we can achieve the same rendering nevertheless. It’s just a little bit tricky.
By default, Mapnik draws newer elements above everything that is yet rendered. But this behavior can be customized with the comp-op parameter.
Map {
  background-color: white;
}

#roads-fill {

  ::fill {

    [feature = 'highway_primary'] {
        line-color: #fcd6a4;
        line-width: 10;
        [int_surface = 'unpaved'] { line-comp-op: dst-out; }
        [zoom >= 18] {
          line-width: 15;
        }
        [zoom >= 19] {
          line-width: 20;
        }
        line-cap: round;
        line-join: round;
    }

    [feature = 'highway_secondary'] {
        line-color: #f7fabf;
        line-width: 5;
        [int_surface = 'unpaved'] { line-comp-op: dst-out; }
        [zoom >= 18] {
          line-width: 10;
        }
        [zoom >= 19] {
          line-width: 15;
        }
        line-cap: round;
        line-join: round;
    }

  }

}
Applying line-comp-op: dst-out; tells Mapnik to not actually draw the line, but instead cut a hole in the yet existing rendering canvas.
The code is available at code06 and it renders like this:

Now we have to render the polygon pattern behind the existing rendering canvas, so that it will be visible only where we had cut a hole in the rendering canvas previously.
Map {
  background-color: white;
}

#roads-fill {

  ::fill {

    [feature = 'highway_primary'] {
        line-color: #fcd6a4;
        line-width: 10;
        [int_surface = 'unpaved'] { line-comp-op: dst-out; }
        [zoom >= 18] {
          line-width: 15;
        }
        [zoom >= 19] {
          line-width: 20;
        }
        line-cap: round;
        line-join: round;
    }

    [feature = 'highway_secondary'] {
        line-color: #f7fabf;
        line-width: 5;
        [int_surface = 'unpaved'] { line-comp-op: dst-out; }
        [zoom >= 18] {
          line-width: 10;
        }
        [zoom >= 19] {
          line-width: 15;
        }
        line-cap: round;
        line-join: round;
    }

  }

  ::primary-fill-pattern {
    [feature = 'globalboundingbox'] {
      polygon-pattern-comp-op: dst-over;
      polygon-pattern-file: url('symbols/unpaved/unpaved_primary-fill.svg');
      polygon-pattern-alignment: global;
    }
  }

}
The line polygon-pattern-comp-op: dst-over; will make render the polygon-pattern behind the canvas instead of above. Our MSS code contains two so-called “attachments”: fill and primary-fill-pattern. Attachments are rendered by order: Attachments that occur earlier in the code are rendered earlier; attachments that occur later in the code are rendered later. The attachment order has priority over the order done by ORDER BY in the SQL query! Therefor, out pattern will be rendered later than the road lines.
We want that the polygon pattern is rendered everywhere, on the whole planet – always behind the canvas. Unfortunately, Mapnik cannot simply render a polygon pattern on the whole planet; it needs an actual geometry. So we need to create a sort of “fake” polygon that covers the whole planet. This can be done in the SQL query:
center:
  - 0
  - 0
  - 4

# Various parts to be included later on
_parts:
  # Extents are used for tilemill, and don't actually make it to the generated XML
  osm2pgsql: &osm2pgsql
    type: "postgis"
    dbname: "gis"
    key_field: ""
    geometry_field: "way"
    extent: "-20037508,-20037508,20037508,20037508"

Stylesheet:
  - roads.mss

Layer:
  - id: roads-fill
    geometry: linestring
    Datasource:
      <<: *osm2pgsql
      table: |-
        (SELECT
            way,
            feature,
            int_surface,
            layernotnull,
            z_order
          FROM (
            SELECT
                way,
                'highway_' || highway AS feature,
                surface AS int_surface,
                COALESCE(layer,0) AS layernotnull,
                z_order
              FROM planet_osm_line
            UNION ALL
            (SELECT
                ST_MakeEnvelope(-20037508.342789244, -20037508.342789244, 20037508.342789244, 20037508.342789244, 900913) AS way,
                'globalboundingbox' AS feature,
                NULL AS layernotnull,
                NULL AS int_surface,
                NULL AS z_order
            )
            ) AS features
          ORDER BY
            layernotnull,
            z_order,
            CASE WHEN int_surface IN ('unpaved') THEN 0 ELSE 2 END
        ) AS roads_fill
This create one polygon that covers the whole canvas that we render in our style.
The code is available at code07 and it renders like this:

But currently we render only the pattern for the primary roads, so unpaved secondary roads get the same color as unpaved primary roads. To change this, we have to reorganize our MSS code.
Map {
  background-color: white;
}

#roads-fill {

  ::secondary-fill {

    [feature = 'highway_secondary'] {
        line-color: #f7fabf;
        line-width: 5;
        [int_surface = 'unpaved'] { line-comp-op: dst-out; }
        [zoom >= 18] {
          line-width: 10;
        }
        [zoom >= 19] {
          line-width: 15;
        }
        line-cap: round;
        line-join: round;
    }

  }

  ::secondary-fill-pattern {
    [feature = 'globalboundingbox'] {
      polygon-pattern-comp-op: dst-over;
      polygon-pattern-file: url('symbols/unpaved/unpaved_secondary-fill.svg');
      polygon-pattern-alignment: global;
    }
  }

  ::primary-fill {

    [feature = 'highway_primary'] {
        line-color: #fcd6a4;
        line-width: 10;
        [int_surface = 'unpaved'] { line-comp-op: dst-out; }
        [zoom >= 18] {
          line-width: 15;
        }
        [zoom >= 19] {
          line-width: 20;
        }
        line-cap: round;
        line-join: round;
    }

  }

  ::primary-fill-pattern {
    [feature = 'globalboundingbox'] {
      polygon-pattern-comp-op: dst-over;
      polygon-pattern-file: url('symbols/unpaved/unpaved_primary-fill.svg');
      polygon-pattern-alignment: global;
    }
  }

}
We want to render more important roads above less important roads. Therefor we have to split our MSS code into more attachments, and order them by road type, starting with the less important one. After each road type, we insert the code for the corresponding pattern.
The code is available at code08 and it renders like this:

Remark: You do not need necessarily an own attachment for each z_order value. Imagine you have various road types like residential and service, that you render all in the same color. Only one attachment for the code for of all these roads with the same color (for example unimportant-roads-fill) and another attachment for the corresponding pattern (for example unimportant-roads-fill-pattern) is enough. And within the road attachment, the order from the SQL query applies.
But this code does not consider the layer key anymore. That’s because of the rendering order. The general rendering order in Mapnik is like this:
- The layers in the yaml file
- group-by parameter (if any) of a layer in the yaml file
- the attachments in the MSS code (for MSS rules that are not within an attachment, a default attachment is created)
- the data order in the SQL query
So the attachment order has priority over the data order. If we still want to have support for layer, than we need another solution. A comfortable way to achieve the correct layer rendering again is using the group-by parameter to group roads by OSM layer:
center:
  - 0
  - 0
  - 4

# Various parts to be included later on
_parts:
  # Extents are used for tilemill, and don't actually make it to the generated XML
  osm2pgsql: &osm2pgsql
    type: "postgis"
    dbname: "gis"
    key_field: ""
    geometry_field: "way"
    extent: "-20037508,-20037508,20037508,20037508"

Stylesheet:
  - roads.mss

Layer:
  - id: roads-fill
    geometry: linestring
    Datasource:
      <<: *osm2pgsql
      table: |-
        (SELECT
            way,
            feature,
            int_surface,
            layernotnull,
            z_order
          FROM (
            SELECT
                way,
                'highway_' || highway AS feature,
                surface AS int_surface,
                COALESCE(layer,0) AS layernotnull,
                z_order
              FROM planet_osm_line
            UNION ALL
            (SELECT
                ST_MakeEnvelope(-20037508.342789244, -20037508.342789244, 20037508.342789244, 20037508.342789244, 900913) AS way,
                'globalboundingbox' AS feature,
                NULL AS int_surface,
                0 AS layernotnull,
                NULL AS z_order
            )
            ) AS features
          ORDER BY
            layernotnull,
            z_order,
            CASE WHEN int_surface IN ('unpaved') THEN 0 ELSE 2 END
        ) AS roads_fill
    properties:
      group-by: layernotnull
Note that although we use group-by: layernotnull now, we still keep layernotnull also in the ORDER BY SQL statement. This is a requirement to make sure that group-by works as expected.
The code is available at code09 and it renders like this:

But this SQL query generates the fake polygon for the pattern rendering only once, for the OSM layer 0. It is missing for all other layers. So we need it for each OSM layer that we render (at least if there are unpaved roads at this OSM layer):
center:
  - 0
  - 0
  - 4

# Various parts to be included later on
_parts:
  # Extents are used for tilemill, and don't actually make it to the generated XML
  osm2pgsql: &osm2pgsql
    type: "postgis"
    dbname: "gis"
    key_field: ""
    geometry_field: "way"
    extent: "-20037508,-20037508,20037508,20037508"

Stylesheet:
  - roads.mss

Layer:
  - id: roads-fill
    geometry: linestring
    Datasource:
      <<: *osm2pgsql
      table: |-
        (SELECT
            way,
            feature,
            int_surface,
            layernotnull,
            z_order
          FROM (
            SELECT
                way,
                'highway_' || highway AS feature,
                surface AS int_surface,
                COALESCE(layer,0) AS layernotnull,
                z_order
              FROM planet_osm_line
            UNION ALL
            (SELECT
                ST_MakeEnvelope(-20037508.342789244, -20037508.342789244, 20037508.342789244, 20037508.342789244, 900913) AS way,
                'globalboundingbox' AS feature,
                NULL AS int_surface,
                layernotnull,
                NULL AS z_order
              FROM
                (SELECT DISTINCT ON (COALESCE(layer,0))
                    COALESCE(layer,0) AS layernotnull
                  FROM planet_osm_line
                  WHERE highway IS NOT NULL AND surface IN ('unpaved')
                ) AS layers_list
            )
            ) AS features
          ORDER BY
            layernotnull,
            z_order,
            CASE WHEN int_surface IN ('unpaved') THEN 0 ELSE 2 END
        ) AS roads_fill
    properties:
      group-by: layernotnull
This query creates exactly one fake polygon for each OSM layer that occurs on OSM ways that have a highway tag and are also unpaved.
The code is available at code10 and it renders like this:
Doing the rendering this way can be slow for various reasons. In order of importance (starting with the most important one):
- Complex queries can lead to Full Table Scans.
SELECT DISTINCTis apparently not playing well with Mapnik’s automatic bbox additon. So to avoid full table scans we have to add bbox explicitly in our SQL queries and sub-queries. - For each attachment in the MSS code the SQL query is run again. So if we have 40 attachments, our SQL query will be 40 times slower, which can be a serious performance issue. Mapnik does not cache SQL results between attachments to avoid possible memory issues, but memory problems are not likely so it is reasonable to enable SQL result caching explicitly by
cache-features: true. (Note thatcache-features: onshould also work becausecache-featuresis a boolean value in Mapnik andonis assumed to be an alias fortrue, but I encountered problems usingonand it is the only boolean option in mapnik-reference that usesoninstead oftrue, so I would recommend to usecache-features: true. - The comp-op operation is slow. Rendering with dst-out is just as fast as rendering with default composition. But for dst-over every pixel of rendered image needs to be composited,, which is substantially slower. We render our fake polygons with
dst-over. In the previous code, the query creates exactly one fake polygon for each OSM layer that occurs on OSM ways that have ahighwaytag and are also unpaved. We could make theWHEREclause more restrictive, selecting at thehighwaytag only primary and secondary roads, which are the only ones we are currently rendering in this example style. This would reduce the number of fake polygons actually rendered, which should speed up the rendering a little bit.
center:
  - 0
  - 0
  - 4

# Various parts to be included later on
_parts:
  # Extents are used for tilemill, and don't actually make it to the generated XML
  osm2pgsql: &osm2pgsql
    type: "postgis"
    dbname: "gis"
    key_field: ""
    geometry_field: "way"
    extent: "-20037508,-20037508,20037508,20037508"

Stylesheet:
  - roads.mss

Layer:
  - id: roads-fill
    geometry: linestring
    Datasource:
      <<: *osm2pgsql
      table: |-
        (SELECT
            way,
            feature,
            int_surface,
            layernotnull,
            z_order
          FROM (
            SELECT
                way,
                'highway_' || highway AS feature,
                surface AS int_surface,
                COALESCE(layer,0) AS layernotnull,
                z_order
              FROM planet_osm_line
              WHERE way && !bbox!
            UNION ALL
            (SELECT
                ST_MakeEnvelope(-20037508.342789244, -20037508.342789244, 20037508.342789244, 20037508.342789244, 900913) AS way,
                'globalboundingbox' AS feature,
                NULL AS int_surface,
                layernotnull,
                NULL AS z_order
              FROM
                (SELECT DISTINCT ON (COALESCE(layer,0))
                    COALESCE(layer,0) AS layernotnull
                  FROM planet_osm_line
                  WHERE (highway IN ('primary', 'secondary')) AND surface IN ('unpaved') AND way && !bbox!
                ) AS layers_list
            )
            ) AS features
          ORDER BY
            layernotnull,
            z_order,
            CASE WHEN int_surface IN ('unpaved') THEN 0 ELSE 2 END
        ) AS roads_fill
    properties:
      group-by: layernotnull
      cache-features: true
The code is available at code11. The rendering has not changed.
Further possible improvements: Maybe the CartoCSS code line-comp-op: dst-out;, which applies individually to each drawn element, could be replaced by something like comp-op: dst-out; which applies to the entire layer. However, this would need even more separate attachments and layers, and the performance gain might be minimal given that dst-out is not performance relevant. Our real problem isl dst-over, and there we have yet only one drawn element per layer, so probably not much room for improvements. However, this would have to be tested…
Advantages:
- No rendering artifacts on joints of OSM ways and crossing OSM ways and within OSM ways if the angle is extreme. Renders perfectly also together with road areas (
area:highway=*) - Changes to the road width do not require any further changes to the pattern files.
- Just one pattern file per color is enough
Disadvantages:
- The SQL query for the fake polygon is not really nice.
- Does not look good for very thin road lines
- The rendering with
dst-outis not intuitive to understand. There is a complex interdependence between- the attachment order in the MSS file
- the
ORDERstatements in the SQL queries - the SQL query for the fake polygon
- and especially the
z_ordervalue (originally calculated in the Lua transform)
- The SQL query must be designed very carefully to perform well. There are really a lot of performance pitfalls.
The pattern rendering with dst-out is the only one of the solutions presented so far that offers rendering without clutter or artifacts. But given its complexity, it would be far better to have native Mapnik support for this use case. The guys from Mapnik are really great. So just after asking, they have implemented native Mapnik support for this really fast, and back-ported it to the 3.0.x branch and released it with Mapnik 3.0.22 (and updated mapnik-reference and NPM packages and so on). Now, the existing line-pattern symbolizer is extended. Its new option line-pattern-type=repeat gives us native support, together with various other new options to control the line width and line caps and the pattern alignment for this new rendering mode:
- line-pattern-type
- line-pattern-alignment
- line-pattern-width
- line-pattern-cap
- line-pattern-join
- line-pattern-miterlimit
- line-pattern-dasharray
Here is the CartoCSS code:
Map {
  background-color: white;
}

#roads-fill {

  ::fill {

    [feature = 'highway_primary'] {
        line-color: #fcd6a4;
        line-width: 10;
        [int_surface = 'unpaved'] {
          line-pattern-type: repeat;
          line-pattern-file: url('symbols/unpaved/unpaved_primary-fill.svg');
          line-pattern-alignment: global;
          line-pattern-width: 10;
          line-pattern-cap: round;
          line-pattern-join: round;
        }
        [zoom >= 18] {
          line-width: 15;
          [int_surface = 'unpaved'] { line-pattern-width: 15; }
        }
        [zoom >= 19] {
          line-width: 20;
          [int_surface = 'unpaved'] { line-pattern-width: 20; }
        }
        line-cap: round;
        line-join: round;
    }

    [feature = 'highway_secondary'] {
        line-color: #f7fabf;
        line-width: 5;
        [int_surface = 'unpaved'] {
          line-pattern-type: repeat;
          line-pattern-file: url('symbols/unpaved/unpaved_secondary-fill.svg');
          line-pattern-alignment: global;
          line-pattern-width: 5;
          line-pattern-cap: round;
          line-pattern-join: round;
        }
        [zoom >= 18] {
          line-width: 10;
          [int_surface = 'unpaved'] { line-pattern-width: 10; }
        }
        [zoom >= 19] {
          line-width: 15;
          [int_surface = 'unpaved'] { line-pattern-width: 15; }
        }
        line-cap: round;
        line-join: round;
    }

  }

}
And we can use the original project.mml file with the simply SQL query:
center:
  - 0
  - 0
  - 4

# Various parts to be included later on
_parts:
  # Extents are used for tilemill, and don't actually make it to the generated XML
  osm2pgsql: &osm2pgsql
    type: "postgis"
    dbname: "gis"
    key_field: ""
    geometry_field: "way"
    extent: "-20037508,-20037508,20037508,20037508"

Stylesheet:
  - roads.mss

Layer:
  - id: roads-fill
    geometry: linestring
    Datasource:
      <<: *osm2pgsql
      table: |-
        (SELECT
            way,
            feature,
            int_surface,
            layernotnull,
            z_order
          FROM (
            SELECT
                way,
                'highway_' || highway AS feature,
                surface AS int_surface,
                COALESCE(layer,0) AS layernotnull,
                z_order
              FROM planet_osm_line
            ) AS features
          ORDER BY
            layernotnull,
            z_order,
            CASE WHEN int_surface IN ('unpaved') THEN 0 ELSE 2 END
        ) AS roads_fill
The code is available at code12 and it renders the same as the full-features dst-out code does.
Advantages:
- No rendering artifacts on joints of OSM ways and crossing OSM ways and within OSM ways if the angle is extreme. Renders perfectly also together with road areas (
area:highway=*) - Changes to the road width do not require any further changes to the pattern files.
- Just one pattern file per color is enough
- SQL query is trivial.
- MSS code is compact and easy to understand.
- No complex dependencies.
- No performance pitfalls.
Disadvantages:
- Does not look good for very thin road lines