#Securely stream data from ESP8266 MCUs to Azure IoT Hub over Secure MQTT
** NOTE: MQTT publishing works, subscriptions currently does not working... ** ** See Issue **
###Purpose
This solution securely streams sensor data directly to Azure IoT Hub over a secure MQTT connection from ESP8266 MCUs.
###Device Platform
The ESP8266 is a great commodity priced Arduino compatible MCU with integrated WiFi.
This project is implemented and tested on the following ESP8266 based development boards:-
###Firmware
Arduino core for ESP8266 WiFi chip V2.0 firmware adds (TLS 1.0 and 1.1) support, making this a viable platform for secure IoT data streaming. See Security Discussion for more information.
###Azure IoT Hub and Azure Event Hub
IoT Hub is designed to "Connect, monitor, and control millions of IoT assets", Azure Event Hubs is designed for internet scale data ingestion.
Stream Analytics, Power Bi and preconfigured IoT Hub solutions such as Remote monitoring provide ways to visualise and unlock the value of your data in Azure.
For more background information read this "Stream Analytics & Power BI: A real-time analytics dashboard for streaming data" article.
###Acknowledgments
Thanks to Štěpán Bechynský "Proof of Concept – NodeMCU, Arduino and Azure Event Hub" project I've migrated my "Arduino NodeMCU ESP8266 MQTT" project and added IoT Hub support to stream data directly to Azure IoT Hub or Azure Event Hubs over HTTPS.
#Setup and Deployment Summary
- Setup your Azure IoT Hub. There is a free 8000 message a day subscription to get started.
- Register your device with Azure IoT Hub.
- Flash Azure and Network configuration information to EEPROM
- Update the main AzureClient.ino sketch
- Deploy the solution to your ESP8266 based device.
- View data with Device Explorer
- Optionally: Visualise your data in real time with Azure Stream Analytics and Power BI.
#Setting Up Azure IoT Hub
Follow lab Setting Up Azure IoT to provision an Azure IoT Hub and an IoT Hub device.
#Azure Configuration
Right mouse click the device you setup in Device Explorer to obtain device id, key and connection string information.
The function initCloudConfig() called from the setup() function in AzureClient.ino has two signatures.
// Inline cloud and network configuration information

initCloudConfig("IoT hub device connection string", "Case Sensitive WiFi SSID", "WiFi password", "Geo location of the device").

Example:

initCloudConfig("HostName=YourIoTHub.azure-devices.net;DeviceId=YourDeviceId;SharedAccessKey=YourDeviceKey", "SSID", "Password", "Sydney");

or

//To read cloud and network configuration from EEPROM. This is useful if deploying multiple devices

initCloudConfig();
##Optional EEPROM Configuration
You can burn cloud and network configuration information to the device EEPROM. To configure the EEPROM open the SetEEPROMConfiguration.ino found in the SetEEPROMConfiguration folder and update the following variables:-
- Wi-Fi SSID and password pairs, put in priority order.
- Wifi - Is the number of WiFi ssid and password pairs
- Azure IoT Hub or Event Bus Host name eg "MakerDen.azure-devices.net", Device ID, and Key. For IoT Hub get this information from the Device Explorer, for Event Hub, get from Azure Management Portal.
- Geo location of the device
Upload this sketch to the device to write configuration settings to EEPROM.
Be sure to call function initCloudConfig() with no parameters to ensure Azure and Network parameters are read from EEPROM.
Next upload the AzureClient sketch which will read this configuration information from the EEPROM.
#Device Configuration
You need to configure the initDeviceConfig() function in the AzureClient.ino file.
void initDeviceConfig() {  // Example device configuration
    device.boardType = Other;            // BoardType enumeration: NodeMCU, WeMos, SparkfunThing, Other (defaults to Other). This determines pin number of the onboard LED for wifi and publish status. Other means no LED status
    device.deepSleepSeconds = 0;         // if greater than zero with call ESP8266 deep sleep (default is 0 disabled). GPIO16 needs to be tied to RST to wake from deepSleep. Causes a reset, execution restarts from beginning of sketch
    cloud.cloudMode = IoTHub;            // CloudMode enumeration: IoTHub and EventHub (default is IoTHub)
    cloud.publishRateInSeconds = 90;     // limits publishing rate to specified seconds (default is 90 seconds)
    cloud.sasExpiryDate = 1737504000;    // Expires Wed, 22 Jan 2025 00:00:00 GMT (defaults to Expires Wed, 22 Jan 2025 00:00:00 GMT)
}
Then upload the sketch to your device.
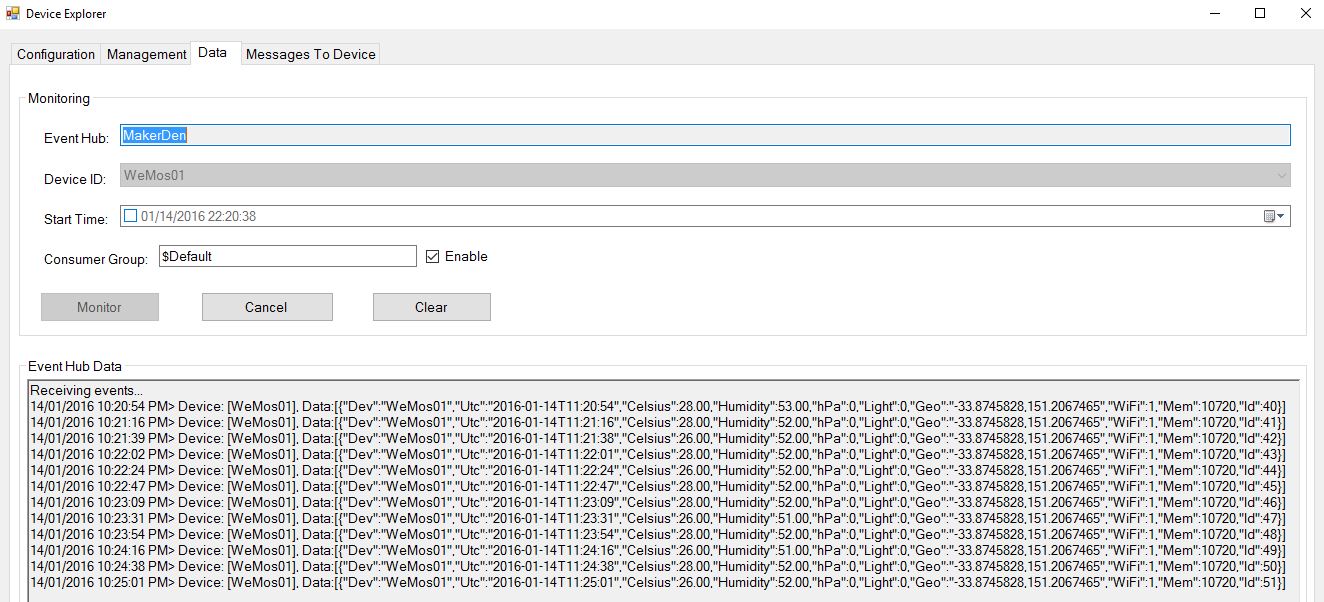
#Viewing Data
From Device Explorer, head to the Data tab, select your device, enable consumer group then click Monitor.
#Visualising Data
##Azure Stream Analytics
Azure Stream Analytics enables you to gain real-time insights in to your device, sensor, infrastructure, and application data.
See the Visualizing IoT Data lab. Replace the query in that lab with the following and be sure to change the time zone to your local time zone offset. Australia (AEDST) is currently +11 hours.
SELECT
    DateAdd(minute,-5,System.TimeStamp) AS WinStartTime,
    System.TimeStamp AS WinEndTime,
    DateAdd(Hour, 11, System.TIMESTAMP) AS AUTimezone,
    Dev AS [DeviceId],
    AVG(Celsius) AS [Celsius],
    AVG(hPa) AS [hPa],
    AVG(Humidity) AS [Humidity]
INTO [OutputPBI]
FROM [Input]  TIMESTAMP BY UTC
GROUP BY Dev, TumblingWindow (mi, 10)
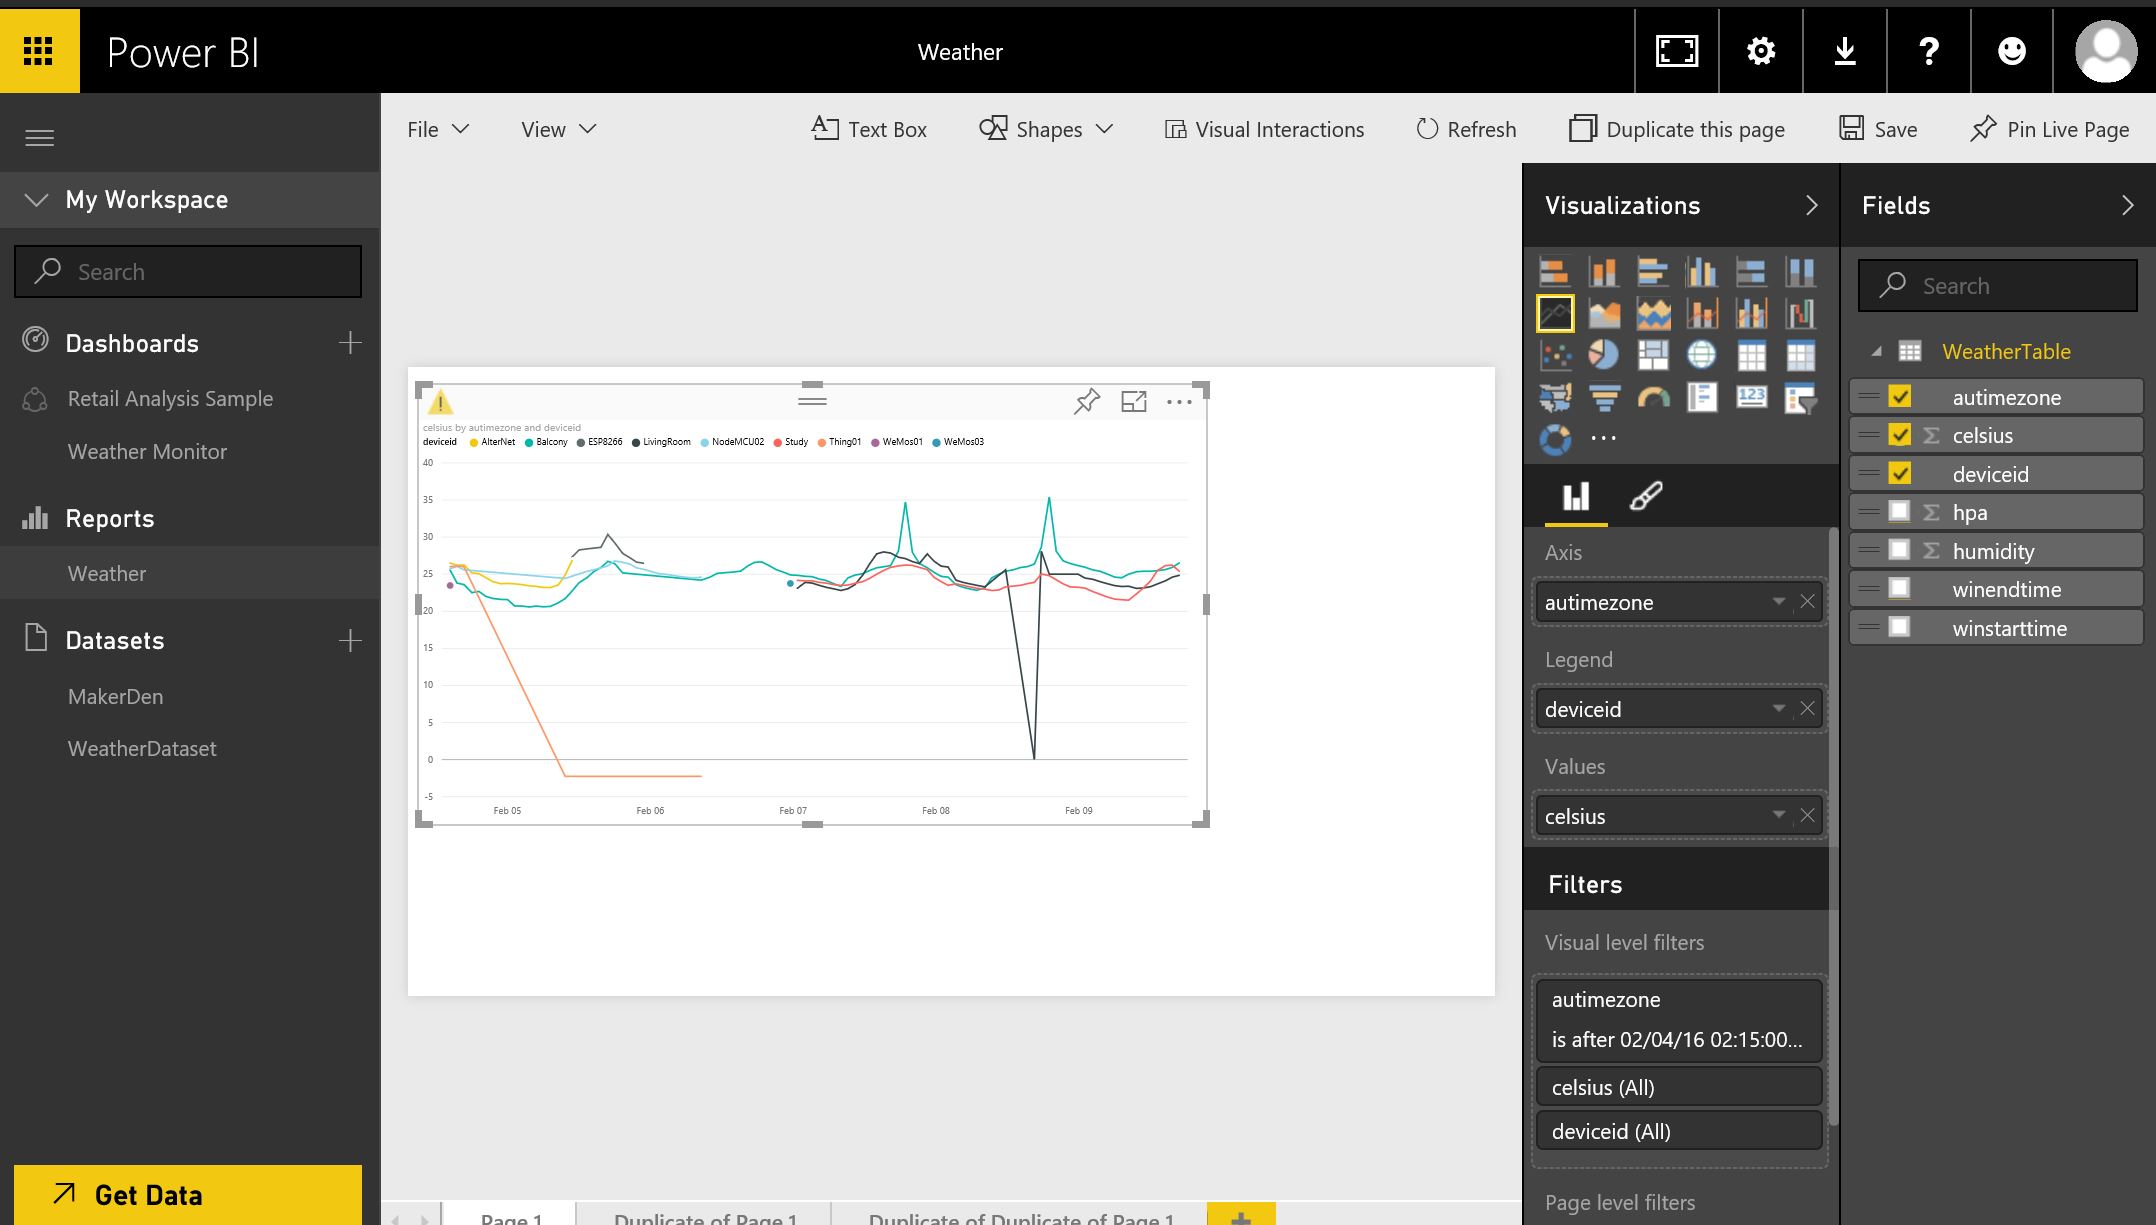
##Power BI
Microsoft Power BI makes it easy to visualise, organize and better understand your data.
Follow the notes in the See the Visualizing IoT Data lab and modify the real time report as per this image.
###Power BI Designer Setup
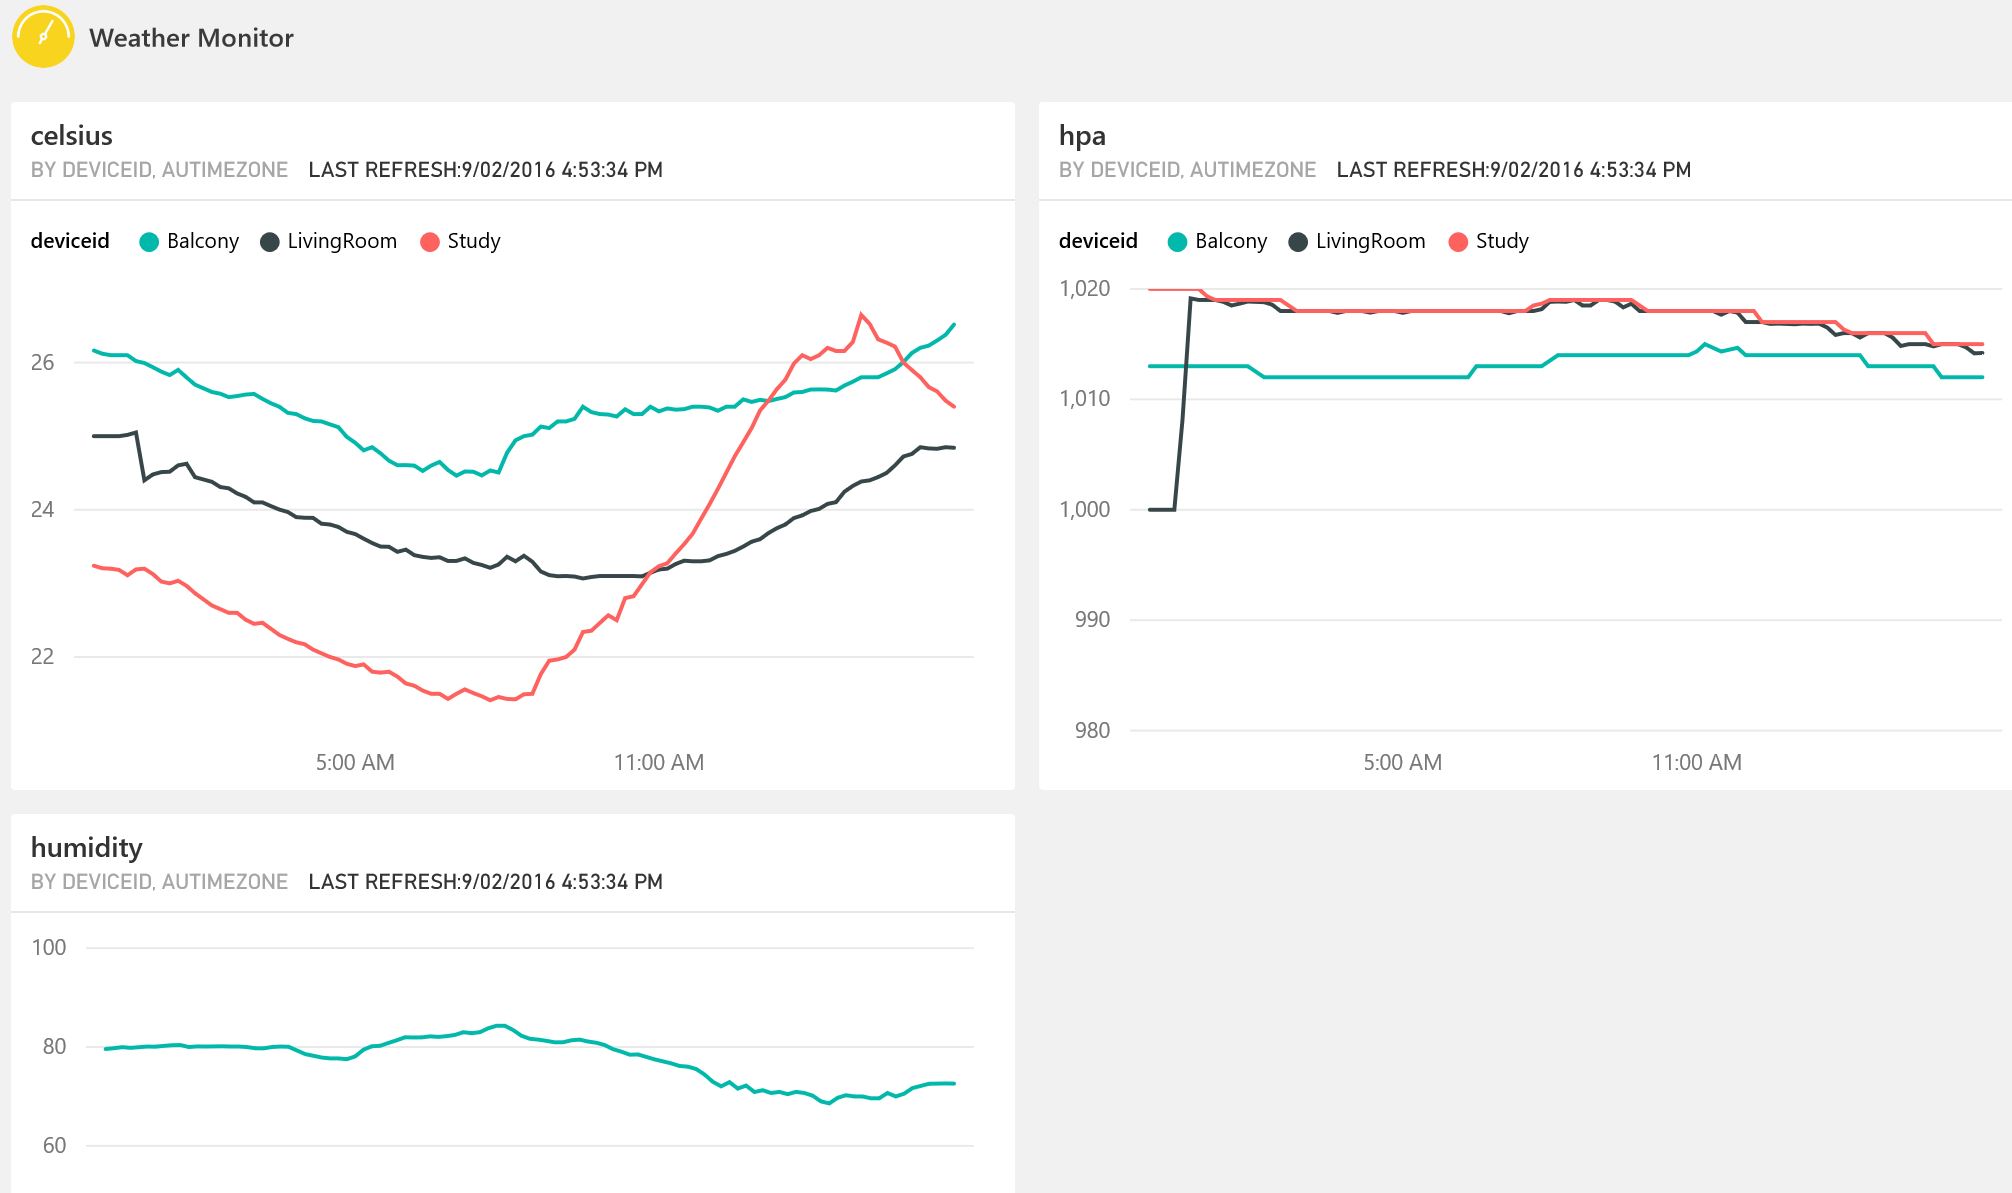
###Power BI Report Viewer
View on the web or with the Power BI apps available on iOS, Android and Windows.
#Data Schema
The AzureClient sketch streams data in the following JSON format, of course you can change this:)
{"Dev":"DeviceId","Geo":"2011","Celsius":27,"hPa":1016,"Humidity":50,"Light":99,"Utc":"2015-12-06T23:07:04","Id":103}
#ESP8266 Based Development Boards
There are a number of ESP8266 based development boards available so be sure to check out this great article "Comparison of ESP8266 NodeMCU development boards".
##NodeMCU V2 with BMP180 Sensor
- NodeMCU v2
- BMP180 Barometric Pressure Sensor
- 1 x 400 Tie Point Interlocking Solderless Breadboard
- Wires
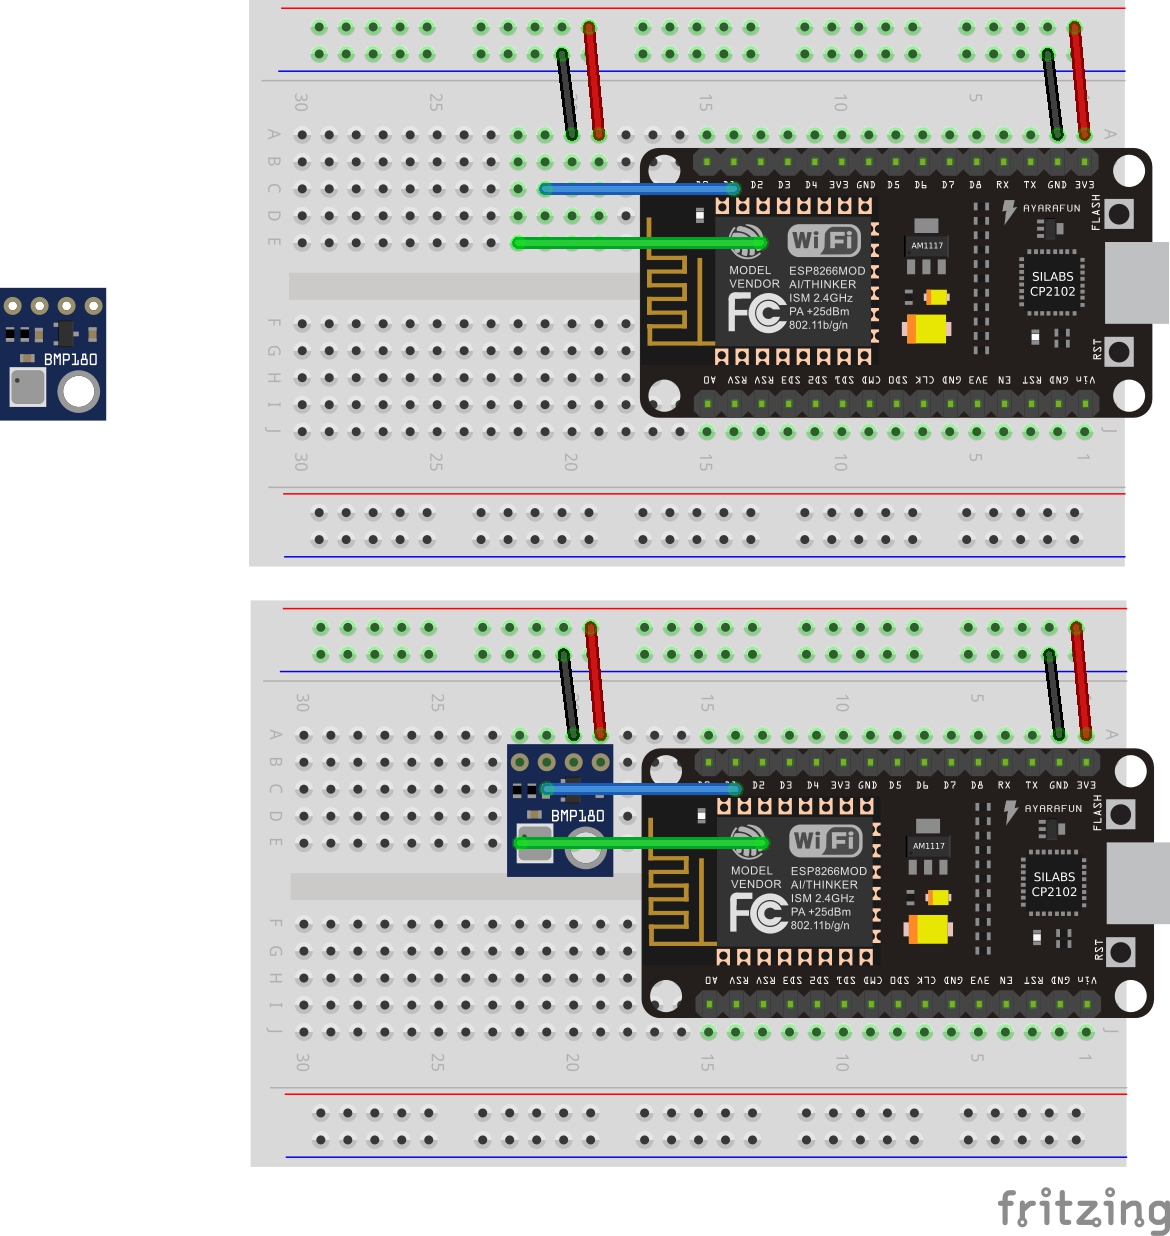
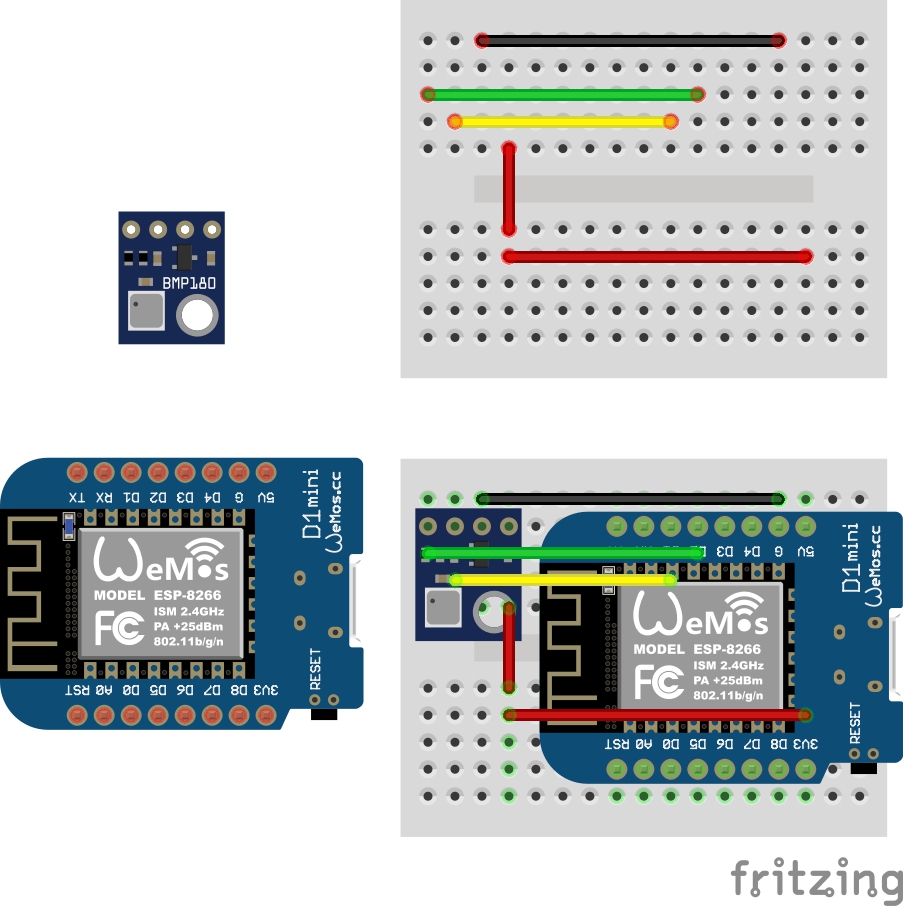
##WeMos D1 Mini MCU
###WeMos D1 Mini with BMP180 Sensor
- WeMos D1 Mini
- BMP180 Barometric Pressure Sensor
- 1 x Mini Breadboard
- Wires
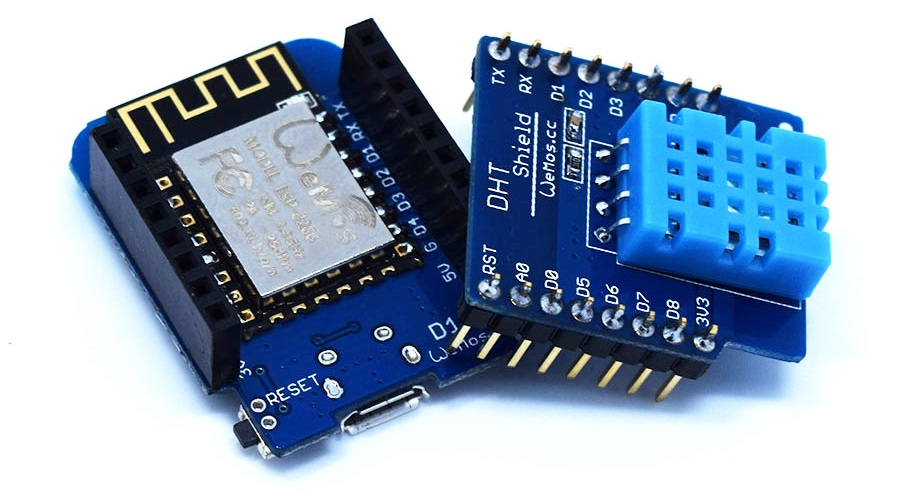
###WeMos D1 Mini with DHT Shield Sensor
No wiring required, just solder the supplied header pins for the WeMos and the DHT Sensor shield.
- WeMos D1 Mini
- DHT Shield or the DHT Pro Shield.
#Software Requirements
##Drivers
- NodeMCU - On Windows, Mac and Linux you will need to install the latest CP210x USB to UART Bridge VCP Drivers.
- WeMos - On Windows and Mac install the latest Ch340G drivers. No drivers required for Linux.
- ESP8266 Thing Development Board Hookup Guide
##Arduino IDE
- Arduino IDE 1.6.5 As at Dec, 2015, Arduino 1.6.6 has several issues, so to stick with 1.6.5
- As at Dec 2015, ESP8266 Board Manager 2.0.0 or better required for HTTPS/TLS Secure Client support.
##Visual Studio
There an fantastic plugin for Visual Studio that adds Arduino support from Visual Micro. IntelliSence, auto complete, debugging, it doesn't get much better:)
##Arduino Boards Manager ESP8266 Support
Starting with 1.6.4, Arduino allows installation of third-party platform packages using Boards Manager.
- Install Arduino 1.6.5 from the Arduino website.
- Start Arduino and open Preferences window.
- Enter http://arduino.esp8266.com/stable/package_esp8266com_index.json into Additional Board Manager URLs field. You can add multiple URLs, separating them with commas.
- Open Boards Manager from Tools > Board menu and install esp8266 platform (and don't forget to select your ESP8266 board from Tools > Board menu after installation).
- Select NodeMCU or WeMos D1 Mini Board: Tools -> Board -> NodeMCU 1.0 (ESP-12E module) or WeMos D1 Mini
- Set Port and Upload Speed: Tools. Note, you may need to try different port speeds to successfully flash the device. Faster is better as each time you upload the code to your device you are re-flashing the complete ROM not just your code.
#ESP8266 Arduino Core Documentation
Be sure to read the ESP8266 Arduino Core Documentation - there are some minor gotchas.